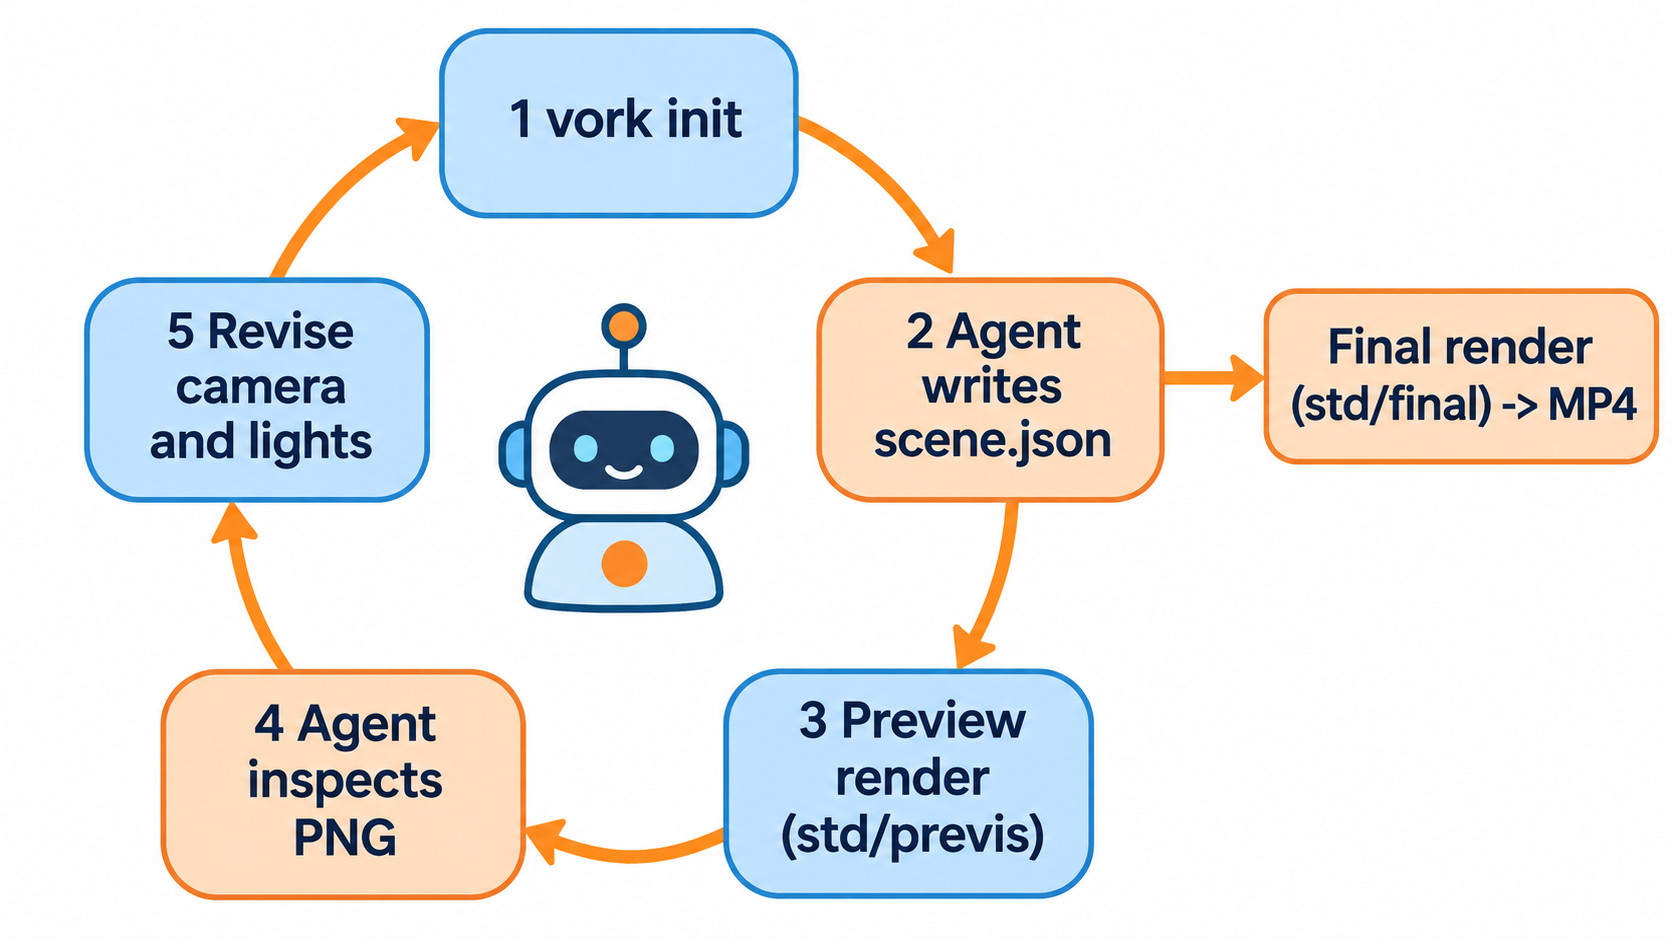
You can make 3D animations with an AI agent for free by pairing the coding agent you already use (Claude Code, Codex or Cursor) with vork, a headless 3D and VFX engine that costs nothing during its research preview. The agent writes the scene as JSON or code, renders a preview, looks at the image, fixes the camera and lights, then renders a final MP4. You don’t open an editor.
This guide walks through the loop with vork 0.3.0 (released November 9, 2026): install, vork init, a preview, a refine pass, an animated clip and a final render. It also covers what “free” means here and the hardware you need.
What is vork?
vork is a 3D and VFX engine built for AI agents, released by Voyager in November 2026. The agent writes the whole scene as code, including its own shaders, materials, cameras and physics, and vork renders it on the GPU. It’s written in Rust and Slang, runs on Vulkan and Metal, and its core API fits in about 2,500 tokens.
That last number matters: the agent can hold the whole engine in context and still have room for your shot. When a shot needs something unusual, the scene carries its own GPU programs for materials, camera rays or light. The vork repository shows a million-bird flock, a black hole and neon VFX composited onto real footage.
Here’s how the loop compares to a classic tool:
| Blender-style workflow | vork with an agent | |
|---|---|---|
| Who drives it | You, through a GUI | Your coding agent, through a CLI |
| Scene format | Binary .blend file | scene.json, scene.ts or scene.py |
| Iteration | Click, tweak, re-render | Agent edits code, renders, inspects the PNG |
| Output | Stills, video | PNG, EXR, MP4 from the same scene |
Unlike agents that drive Blender through MCP, vork has no editor underneath. The scene file is the source of truth.
Is vork really free?
Yes, with caveats you should know before you build a pipeline on it (license checked November 9, 2026):
- Free during the research preview. The vork Preview License says vork “is free to use during the research preview, including for commercial work.”
- Source-available, not open source. You can’t sell, relicense or redistribute a modified version, and you can’t run it as a hosted rendering service for other people. Rendering for your own team and delivering media to a client is allowed.
- This version only. The license covers the version you download. Later versions “may come under different terms, including paid terms,” but you keep your rights to the version you already have.
- Your output is yours. Voyager claims no rights in the scenes, code or media you create.
So the engine is a $0 route today. Your coding agent is a separate cost; vork adds nothing on top of the plan you already pay for. Read the LICENSE file before you commit a client project to it.
What hardware do you need?
The license is free, but the GPU isn’t optional for rendering. Supported setups for 0.3.0:
- Mac: Apple Silicon with Metal and macOS 26. Intel Macs aren’t supported.
- Linux: x64, Ubuntu 22.04 or newer, a recent NVIDIA GPU with a hardware ray tracing Vulkan driver.
- Windows: x64 Windows 10 or 11 with the same NVIDIA requirement, plus ffmpeg for MP4.
AMD, Intel and CPU rendering aren’t supported, and datacenter cards like the A100 and H100 lack the ray tracing hardware vork needs. You can still author scenes and read vork help without a GPU.
Step 1: Install vork
On a Mac or Linux machine, the official installer verifies checksums, installs under ~/.local/lib/vork and runs vork setup:
curl -fL https://github.com/voyager-so/vork/releases/latest/download/install.sh -o /tmp/vork-install.sh
sh /tmp/vork-install.sh
export PATH="$HOME/.local/bin:$PATH"
vork --version
vork help
Inside a Node project, npm create vork@latest my-shot installs it locally (Node 22.18 or newer). The npm package named plain vork is unrelated; the real one is @voyager-so/vork.
Setup compiles GPU shaders, so the first run is slow: about 251 seconds on an NVIDIA L4 in Voyager’s own measurement. Let it finish.
Step 2: Hand the shot to your agent
Open Claude Code, Codex or Cursor in an empty folder and paste the prompt from the vork README:
Run `vork init my-shot`, read `vork help`, render a preview and inspect the image.
Refine the camera and lighting before rendering at final quality. Read the
relevant help topic when you need a feature the first page doesn't explain.
vork init writes a starter scene.json with no network or GPU needed, and never overwrites existing files. Add --language typescript or --language python to author in code.
The agent then runs the cheapest useful render:
vork render scene.json --profile std/previs --out preview.png
Step 3: Refine with preview renders
This is where the agent earns its keep. It opens preview.png, sees the subject is off-center or the shadows are flat, edits the camera translation or the light energy, and renders again. Each loop takes seconds because std/previs skips indirect lighting.
Give it a specific brief, like “a slow push-in on an orange sphere at golden hour, low camera, soft rim light,” so it has something to check each preview against. When it needs a field it hasn’t used, it asks the engine instead of guessing:
vork help lights
vork help field node.target
vork help programs --all
For realistic sky lighting, vork std sky builds a daylight setup and vork std environment turns an HDR image into an environment light plus a sun. Free HDRIs are covered below.
Step 4: Make it move
A still is a frame. An animation is tracks. vork stores keyframes in a top-level animation array, with key times in seconds. Here’s a ball that arcs across the frame over two seconds:
{"version":2,"nodes":[
  {"type":"mesh","name":"ball","geometry":{"std":"sphere","radius":0.5},
   "materials":[{"inputs":{"base_color":[0.9,0.4,0.1],"specular_roughness":0.3}}]},
  {"type":"mesh","translation":[0,-0.5,0],"geometry":{"std":"grid","size":[10,10]},
   "materials":[{"inputs":{"base_color":[0.35,0.35,0.35]}}]},
  {"type":"light","shape":"rectangle","translation":[-3,5,4],"target":[0,0,0],
   "energy":700,"size":4},
  {"type":"camera","translation":[0,2,6],"target":[0,0,0]}
],
"animation":[{"tracks":[{"path":["nodes","ball","translation"],
  "keys":[[0,[-2,0,0]],[1,[0,1.5,0]],[2,[2,0,0]]],"interpolation":"LINEAR"}]}],
"render":{"resolution":[1280,720]}}
Rules from vork help animation: paths are arrays of segments, not dotted strings; interpolation is STEP, LINEAR or CUBICSPLINE; and a camera’s target can’t be animated, so aim it at a named node and animate that node.
Render a preview clip first. Frame ranges include both ends, so 0 to 47 at 24 fps is two seconds:
vork render scene.json --profile std/previs --set fps=24 --frame-start 0 --frame-end 47 --out preview.mp4
Step 5: Render the final
Once the preview looks right, switch profiles. Quality is a flag, not part of the scene:
vork render scene.json --profile std/final --set fps=24 --frame-start 0 --frame-end 47 --out final.mp4
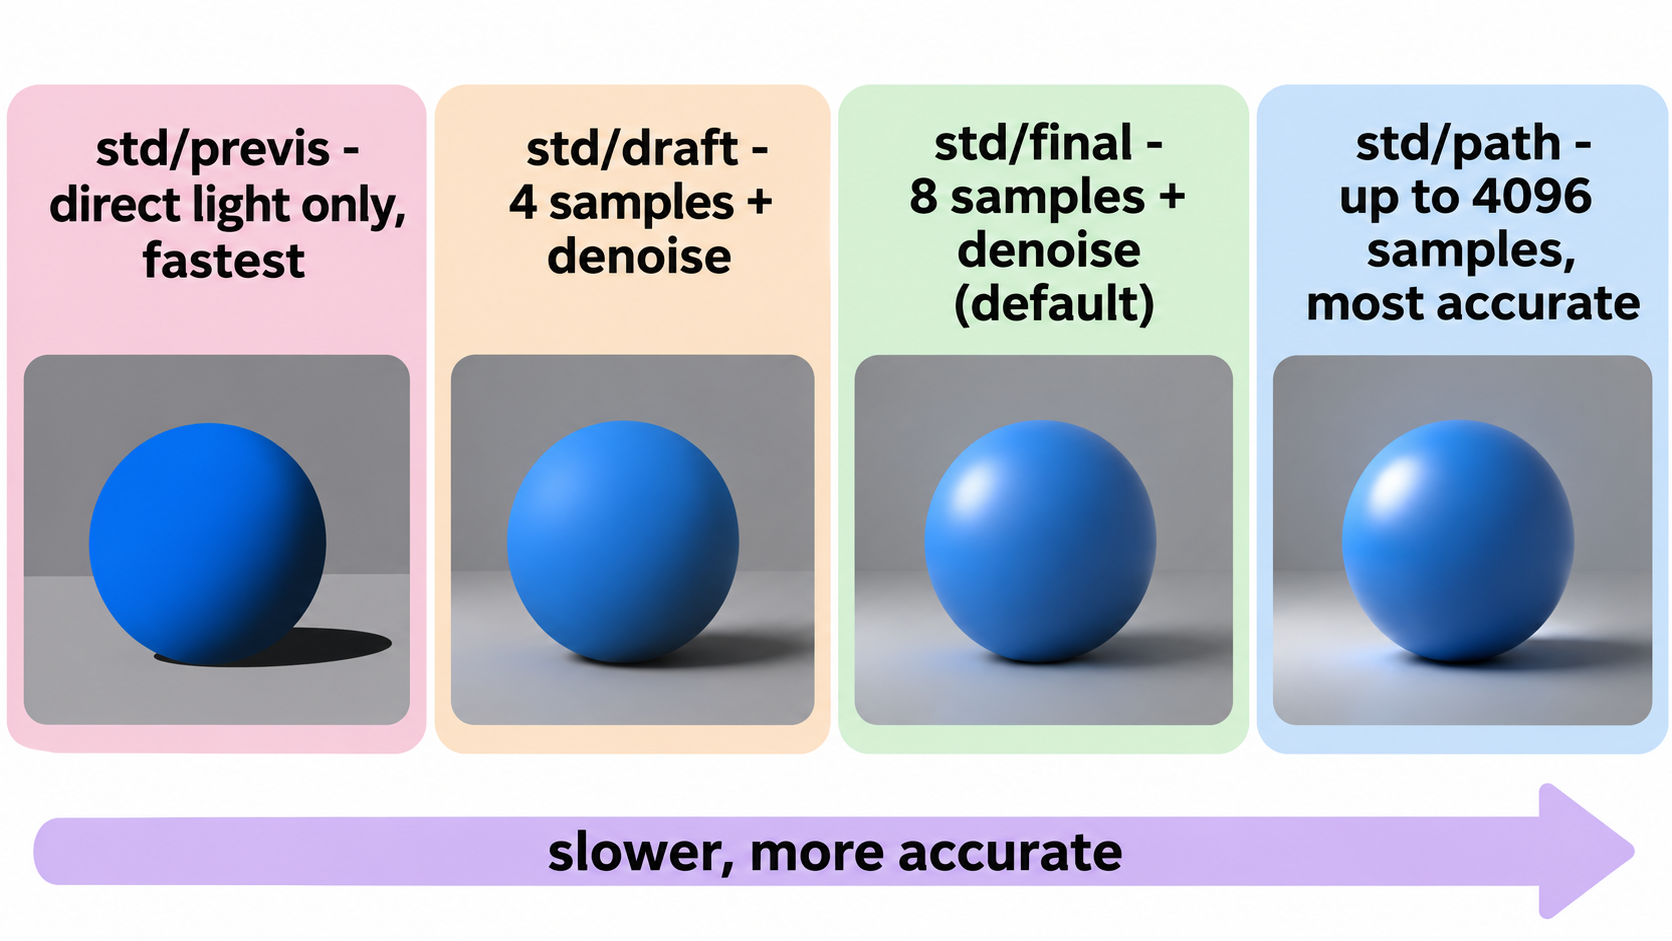
| Profile | What it does | Use it for |
|---|---|---|
std/previs |
Direct lighting only, hard shadows | Framing, blocking, fast loops |
std/draft |
4 samples, indirect light, denoised | Quick lighting checks |
std/final |
8 samples, indirect light, denoised (default) | Delivery |
std/path |
Path tracing, up to 4,096 samples | Interiors, glass, caustics |
--set samples=32 cleans up grainy detail at the cost of time.
How fast is it?
Voyager measured these on a single NVIDIA L4 and labels them timings, not equal-quality speedups.
- Million birds: 192 frames at 1080p rendered in about 97 seconds at
std/draft(4 samples, denoised). The matching Blender EEVEE figure, 13 to 18 minutes, is a projection from eight frames, not a measured movie. - Path tracing: vork was 1.99x to 5.81x slower than Cycles on two scenes (earlier build).
The benchmark method lists every boundary. Your GPU will give different numbers.
Research-preview limits to plan around
Read vork help limits before you promise a client a shot. In 0.3.0:
- No fog, haze, smoke or volumes. Voyager says fog returns in 0.4.
- Large scenes and dense transparency can fail, including on Mac.
- The first render that uses a new GPU program can compile for several minutes.
None of these stop a product turntable or a stylized explainer. They rule out a smoky cinematic for now.
Free assets for your scenes: Poly Haven’s API
Poly Haven publishes CC0 HDRIs, textures and models, and its public API lets your agent fetch them. Its terms, checked November 9, 2026, say the API is free “for any purpose, including commercial use,” needs no key, and requires a unique User-Agent or Referer naming your software.
Two calls cover most shots:
curl -A "my-shot-renderer/1.0" "https://api.polyhaven.com/assets?t=hdris&categories=sunrise-sunset"
curl -A "my-shot-renderer/1.0" "https://api.polyhaven.com/files/kloofendal_48d_partly_cloudy_puresky"
The second returns download URLs per resolution, such as a 1K .hdr, for vork std environment. Models come as glTF, which vork imports with an asset node.
Let your agent test the asset API with Apidog CLI
A render that dies at frame 200 because an asset response changed shape is an expensive way to find an API bug. Your agent already calls Poly Haven, so let it check those calls first. Apidog CLI lets it import the API, write a test and run it from the terminal.
npm install -g apidog-cli@latest
apidog auth login --with-token <YOUR_TOKEN>
npx -y skills add https://apidog.com   # pick your agent when prompted
Then give your agent one prompt:
Download https://api.polyhaven.com/api-docs/swagger.json and import it into Apidog
project <projectId>. Create a test case for GET /files/{id} with id
kloofendal_48d_partly_cloudy_puresky that asserts status 200 and that
hdri.1k.hdr.url ends in .hdr, then run it and summarize any failures.
The agent imports the spec, reads the payload schema, validates its file and runs the case:
apidog import --project <projectId> --format openapi --file ./swagger.json
apidog cli-schema get test-case-create
apidog cli-schema validate test-case-create --file case.json
apidog test-case create --project <projectId> --file case.json
apidog run --test-case <caseId> --project <projectId> -r cli,json
Put the same apidog run line before your final render, and a broken asset call fails in seconds, not halfway through a movie. Apidog’s Free plan covers up to 4 users. For agent-specific setup, see Apidog CLI in Claude Code or the installation guide.
Where vork fits next to other agent video tools
vork renders real 3D: geometry, light and physics. For motion graphics, titles and UI animation, Claude Code with Remotion builds video from React components and fits better. For an agent that edits AI-generated clips together, see OpenMontage. Many teams will pair them: Remotion for the explainer, vork for the hero 3D shot.
FAQ
Can I make 3D animations with an AI agent without paying for software? Yes. vork is free during its research preview, Poly Haven’s assets and API are free, and Apidog’s Free plan covers up to 4 users. You still need a supported GPU and your agent’s plan.
Is vork open source? No. It’s source-available. You can use and modify it for your own work, including commercial work, but you can’t redistribute a modified version or offer it as a hosted rendering service.
Which AI agents work with vork? Any agent that can run shell commands and read an image, such as Claude Code, Codex or Cursor. There’s no plugin to install.
Does vork run on an Intel Mac or an AMD GPU? No. Rendering needs Apple Silicon on macOS 26 or a recent NVIDIA GPU with hardware ray tracing.
Can vork add VFX to real video footage? Yes. The repository has examples that composite rendered 3D onto real footage with a tracked camera, occlusion mattes and proxy geometry, no generative video involved.