
Have you ever wondered how websites communicate with each other and exchange data? How do you access information from an online source and display it on your own webpage? How do you send requests and receive responses over the Internet?
If you are curious about these questions, then you are in the right place. In this blog post, I will show you how to make an HTTP GET request in Javascript, one of the most common and useful ways to interact with web APIs and how Apidog can help you.
But first, let’s understand what an HTTP GET request is and why you need it.
What is an HTTP GET Request?
HTTP stands for Hypertext Transfer Protocol, which is a set of rules that defines how messages are formatted and transmitted over the web. HTTP is the foundation of data communication for the World Wide Web.
A request is a message that you send to a server, asking for some information or action. A response is a message that the server sends back to you, containing the information or result that you requested.
A GET request is a type of HTTP request that asks the server to send you some data. For example, when you type a URL in your browser, you are sending a GET request to the server, asking for the webpage that corresponds to that URL. The server then responds with the HTML code of the webpage, which your browser renders and displays.

A GET request has two main components: a URL and a query string. A URL is the address of the resource that you want to access, such as https://example.com. A query string is a part of the URL that contains some additional information or parameters, such as ?name=John&age=25. A query string starts with a question mark (?) and consists of key-value pairs separated by ampersands (&).
A GET request looks something like this:
https://example.com?name=John&age=25
In this example, we are sending a GET request to https://example.com, with two parameters: name and age. The server will use these parameters to process our request and send us the appropriate response.

Why Do You Need an HTTP GET Request?
An HTTP GET request is useful when you want to retrieve some data from a web server, without changing anything on the server. For example, you may want to get the latest news articles, weather reports, stock prices, or user profiles from an online source.
However, not all web servers are open and accessible to anyone. Some web servers require authentication, authorization, or payment to access their data. These web servers are called web APIs.
A web API is an application programming interface that allows you to interact with a web server programmatically, using predefined methods and parameters. A web API acts as a bridge between your application and the web server, allowing you to exchange data in a structured and standardized way.
For example, if you want to get the current temperature in Paris from a weather web API, you may need to send a GET request like this:
https://api.weather.com?city=Paris&key=123456
In this example, we are sending a GET request to https://api.weather.com, with two parameters: city and key. The city parameter specifies the location that we want to get the weather information for, and the key parameter is a unique identifier that proves that we are authorized to use the web API. The web API will then respond with the current temperature in Paris, in a format that we can easily parse and use in our application.
There are many web APIs available on the internet, covering various domains and topics. Some web APIs are free and open, while others are paid and restricted. Some web APIs are simple and easy to use, while others are complex and advanced. Some web APIs are well-documented and reliable, while others are poorly-documented and unreliable.
How do you find and choose the best web API for your needs? How do you learn how to use a web API and what parameters to send? How do you handle errors and exceptions when using a web API? How do you optimize the performance and security of your web API requests?
These are some of the questions that you may encounter when working with web APIs. Fortunately, there is a tool that can help you with all of these challenges and more. That tool is called Apidog.
How to make HTTP GET requests in Javascript
Making HTTP GET requests in JavaScript is a common way to interact with servers or APIs and retrieve data. There are several methods you can use to make HTTP GET requests in JavaScript, such as:
How To Send a GET Request in JavaScript Using XMLHttpRequest
The XMLHttpRequest object is a native JavaScript feature employed to communicate with servers and load content in web pages without refreshing the browser. When you wish to fetch data from a server, you utilize the GET request. To successfully send a GET request using XMLHttpRequest in JavaScript, it is important to ensure that the following steps are carried out correctly:
- First, create a new XMLHttpRequest object:
const xhr = new XMLHttpRequest();
- Then, specify the URL of the API endpoint you want to make a GET request to:
const url = 'https://api.example.com/data';
- Next, use the
open()method to initialize the request:
xhr.open('GET', url);
- Then, use the
onreadystatechangeproperty to define a callback function that will be called when the request state changes:
xhr.onreadystatechange = function() {
  if (xhr.readyState === XMLHttpRequest.DONE && xhr.status === 200) {
    console.log(xhr.responseText);
  }
};
- Finally, use the
send()method to send the request:
xhr.send();
In this example, we’re making a GET request to the API endpoint specified by the url variable. We’re using the onreadystatechange property to define a callback function that will be called when the request state changes. When the request is complete and the status code is 200, we’re logging the response text to the console.
How to Make a GET Request with the Fetch API
The Fetch API is a contemporary JavaScript interface that operates on promises, enabling the sending of HTTP requests from browsers and Node.js (as of version 18) to servers. It can handle the same tasks as the XMLHttpRequest object, but in a more JavaScript-friendly manner due to its use of promises. Additionally, it can be utilized by other technologies like Service Workers.
Let's explore how to make an HTTP GET request using the Fetch API.
- First, create a new JavaScript file and add the following code to import the Fetch API:
import fetch from 'node-fetch';
- Next, specify the URL of the API endpoint you want to make a GET request to:
const url = 'https://api.example.com/data';
- Then, use the Fetch API to make the GET request:
fetch(url)
  .then(response => response.json())
  .then(data => console.log(data))
  .catch(error => console.error('Error:', error));
- Finally, run the JavaScript file to see the results of the GET request.
The Fetch API provides a simple and intuitive way to make HTTP GET requests in JavaScript. By following these steps, you can easily make GET requests to any API endpoint.
Here’s an example of how to make an HTTP GET request using the Fetch API to retrieve data from the OpenWeatherMap API:
const apiKey = 'YOUR_API_KEY';
const city = 'Seattle';
const url = `https://api.openweathermap.org/data/2.5/weather?q=${city}&appid=${apiKey}`;

fetch(url)
  .then(response => response.json())
  .then(data => console.log(data))
  .catch(error => console.error('Error:', error));
In this example, we’re making a GET request to the OpenWeatherMap API to retrieve weather data for Seattle. We’re passing in our API key and the name of the city we want to retrieve data for as query parameters in the URL.
By following these steps, you can easily make HTTP GET requests using the Fetch API in JavaScript.

Making an HTTP GET Request with Axios
Axios is an HTTP client library. This library is based on promises that simplify sending asynchronous HTTP requests to REST endpoints. We will send a GET request to the JSONPlaceholder Posts API endpoint.
Axios, unlike the Fetch API, is not built-in. This means you need to install Axios into your JavaScript project.
Here are the step-by-step instructions:
- First, install Axios using npm or yarn:
npm install axios
or
yarn add axios
- Next, import Axios into your JavaScript file:
import axios from 'axios';
- Then, specify the URL of the API endpoint you want to make a GET request to:
const url = 'https://api.example.com/data';
- Finally, use Axios to make the GET request:
axios.get(url)
  .then(response => console.log(response.data))
  .catch(error => console.error('Error:', error));
In this example, we’re making a GET request to the API endpoint specified by the url variable. We’re using the then method to handle the response and the catch method to handle any errors that may occur.
Here’s another example of how to make an HTTP GET request using Axios to retrieve data from the OpenWeatherMap API:
const apiKey = 'YOUR_API_KEY';
const city = 'Seattle';
const url = `https://api.openweathermap.org/data/2.5/weather?q=${city}&appid=${apiKey}`;

axios.get(url)
  .then(response => console.log(response.data))
  .catch(error => console.error('Error:', error));
In this example, we’re making a GET request to the OpenWeatherMap API to retrieve weather data for Seattle. We’re passing in our API key and the name of the city we want to retrieve data for as query parameters in the URL.
By following these steps, you can easily make HTTP GET requests using the Axios library in JavaScript.
How to send a GET request using jQuery?
Making HTTP requests in jQuery is relatively straightforward and similar to the Fetch API and Axios. To make a GET request, you will first install jQuery or make use of its CDN in your project:
<script src="https://code.jquery.com/jquery-3.6.0.min.js"></script>
Next, specify the URL of the API endpoint you want to make a GET request to:
const url = 'https://api.example.com/data';
Then, use the $.get() method to make the GET request:
$.get(url, function(data) {
  console.log(data);
});
Finally, run your JavaScript file to see the results of the GET request.
In this example, we’re making a GET request to the API endpoint specified by the url variable. We’re using the $.get() method to make the request and the function(data) callback to handle the response.
Here’s another example of how to make an HTTP GET request using jQuery to retrieve data from the OpenWeatherMap API:
const apiKey = 'YOUR_API_KEY';
const city = 'Seattle';
const url = `https://api.openweathermap.org/data/2.5/weather?q=${city}&appid=${apiKey}`;

$.get(url, function(data) {
  console.log(data);
});
In this example, we’re making a GET request to the OpenWeatherMap API to retrieve weather data for Seattle. We’re passing in our API key and the name of the city we want to retrieve data for as query parameters in the URL.

Handling Errors in Javascript HTTP GET Requests
When making an HTTP GET request, it is important to handle errors that may occur. Here are some best practices for handling errors in REST API:
- HTTP Status Codes: When a client makes a request to an HTTP server, the server must notify the client if the request was successfully handled or not. HTTP accomplishes this with five categories of status codes: 100-level (Informational), 200-level (Success), 300-level (Redirection), 400-level (Client error), and 500-level (Server error). Based on the response code, a client can surmise the result of a particular request.
- Handling Errors: The first step in handling errors is to provide a client with a proper status code. Additionally, we may need to provide more information in the response body. The simplest way we handle errors is to respond with an appropriate status code. Here are some common response codes: 400 Bad Request, 401 Unauthorized, 403 Forbidden, 404 Not Found, 412 Precondition Failed, 500 Internal Server Error, and 503 Service Unavailable. While basic, these codes allow a client to understand the broad nature of the error that occurred. We know that if we receive a 403 error, for example, we lack permissions to access the resource we requested. In many cases, though, we need to provide supplemental details in our responses .
- Error Handling for Failed HTTP Responses and Network Errors: The fetch() function will automatically throw an error for network errors but not for HTTP errors such as 4xx or 5xx responses. For HTTP errors, we can check the response.ok property to see if the request failed and reject the promise ourselves by calling return Promise.reject(error).
- Handle request errors: When an error occurs, you can obtain details of what failed to inform your user. In some cases, you might also automatically retry the request. An app should give the user useful feedback when data access fails. A raw error object is not particularly useful as feedback.
What is Apidog and Why You Should Use It?
Apidog is a web-based platform that allows you to discover, test, and integrate web APIs with ease. Apidog is designed to make your life easier when working with web APIs, by providing you with the following features and benefits:
- Discover: Apidog helps you find the best web APIs for your needs, by providing you with a curated and searchable list of thousands of web APIs, covering various categories and topics.
- Test: Apidog helps you test and debug web APIs, by providing you with a user-friendly and interactive interface that allows you to send requests and receive responses in real-time. You can easily customize the parameters, headers, and body of your requests, and see the status, headers, and body of the responses. You can also see the response time, size, and format of each request and response, and compare them with different web APIs. You can also save, share, and export your requests and responses, and use them in your own applications.
- Integrate: Apidog helps you integrate web APIs with your applications, by providing you with the code snippets and documentation of each web API. You can choose from different programming languages and frameworks, such as...
If you are interested in using Apidog, you can download it for free and start using it right away.
But enough talking, let’s see Apidog in action. In the next section, I will show you how to use Apidog to make an HTTP GET request in Javascript, using a simple and fun web API.
How to generate an HTTP GET Request in Javascript with Apidog
Apidog can help you to generate javascript code, all you need to do is to:
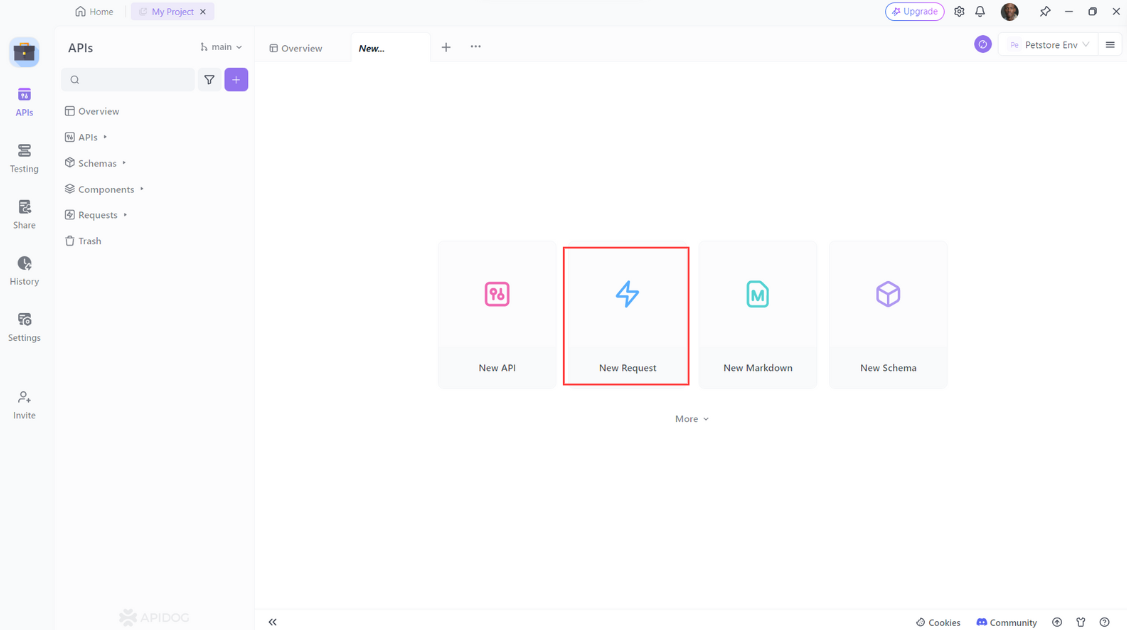
Step 1: Open Apidog and click on the "New Request" button to create a new request.
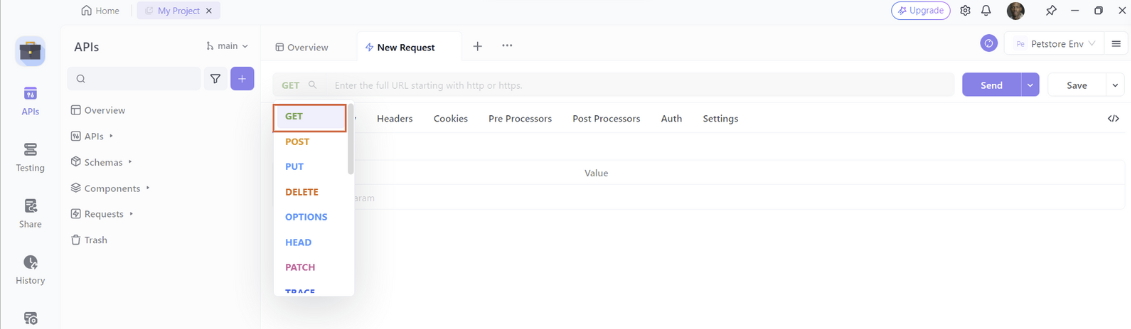
Step 2: Select Get request
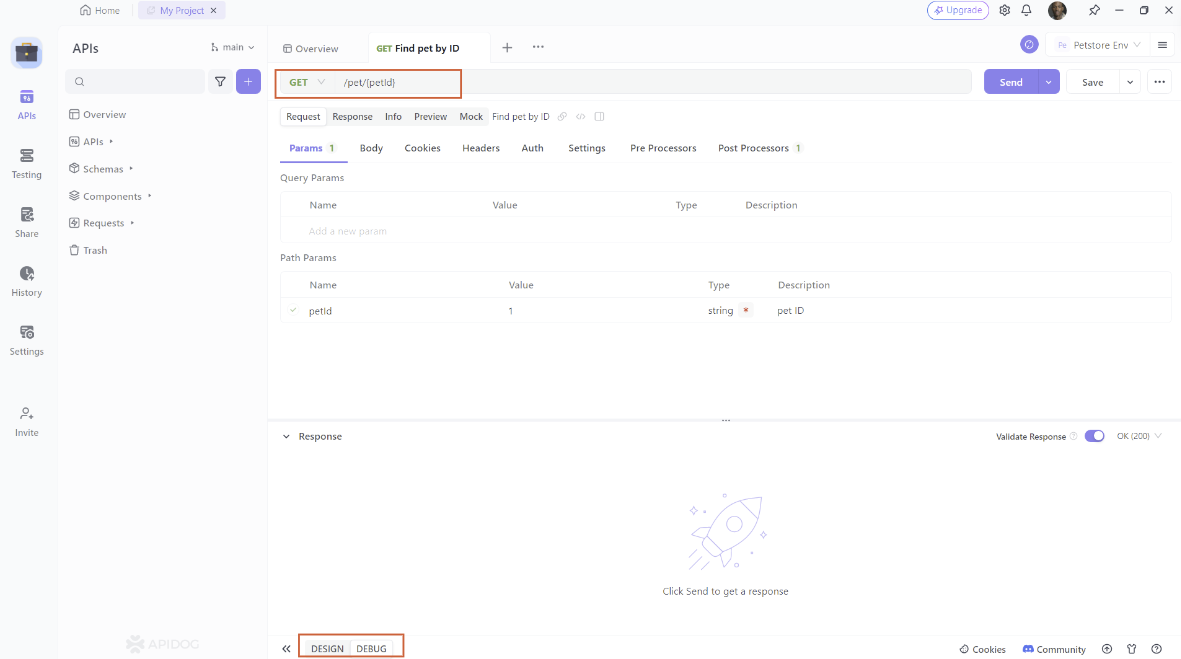
Step 3: Enter the URL of the API endpoint that you want and switch to the Design interface.
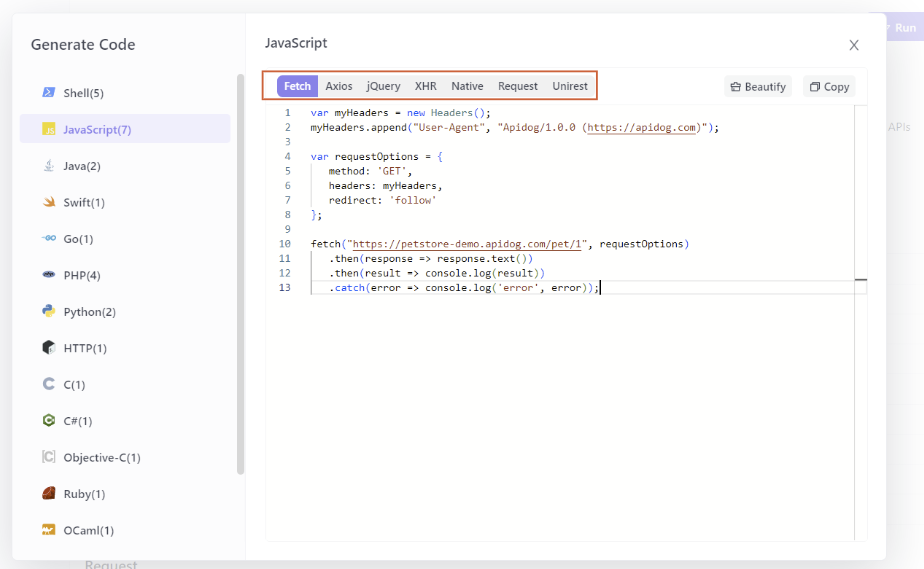
Step 4: Click Generate Client Code.
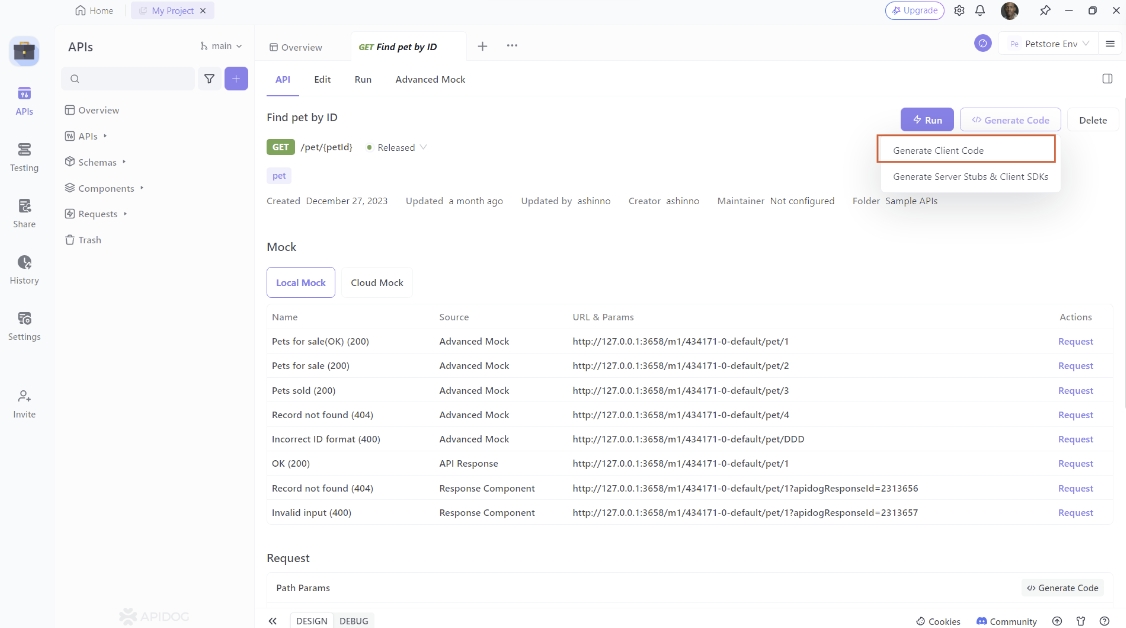
Step 4: Select the Javascript code you want to generate, it can be Fetch, Axios, Jquery, XHR and more. Just copy and paste it to your project
How to Test Javascript HTTP GET Request Using Apidog?
To Test HTTP Get reauest using Apidog, you need to follow these simple steps:
- Open Apidog and click on the "New Request" button to create a new request.
- Select "POST" as the method of the request.
3. Enter the URL of the API endpoint
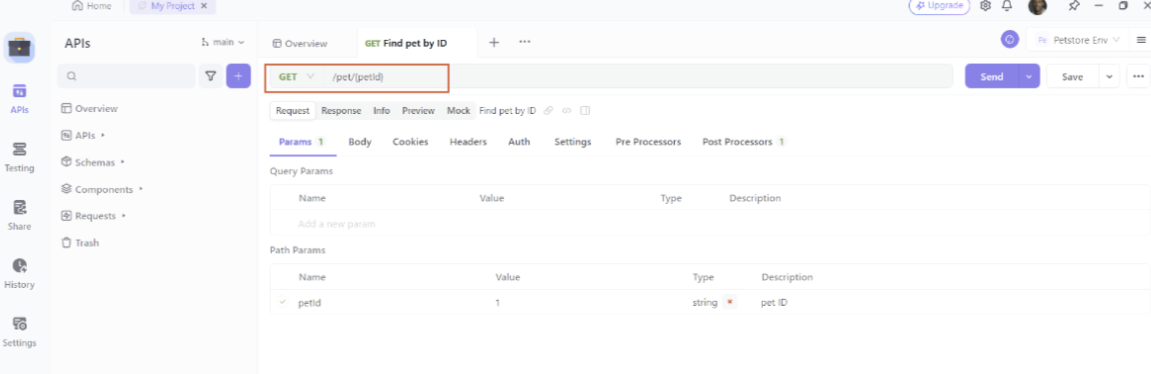
Then click on the “Send” button to send the request to the API.
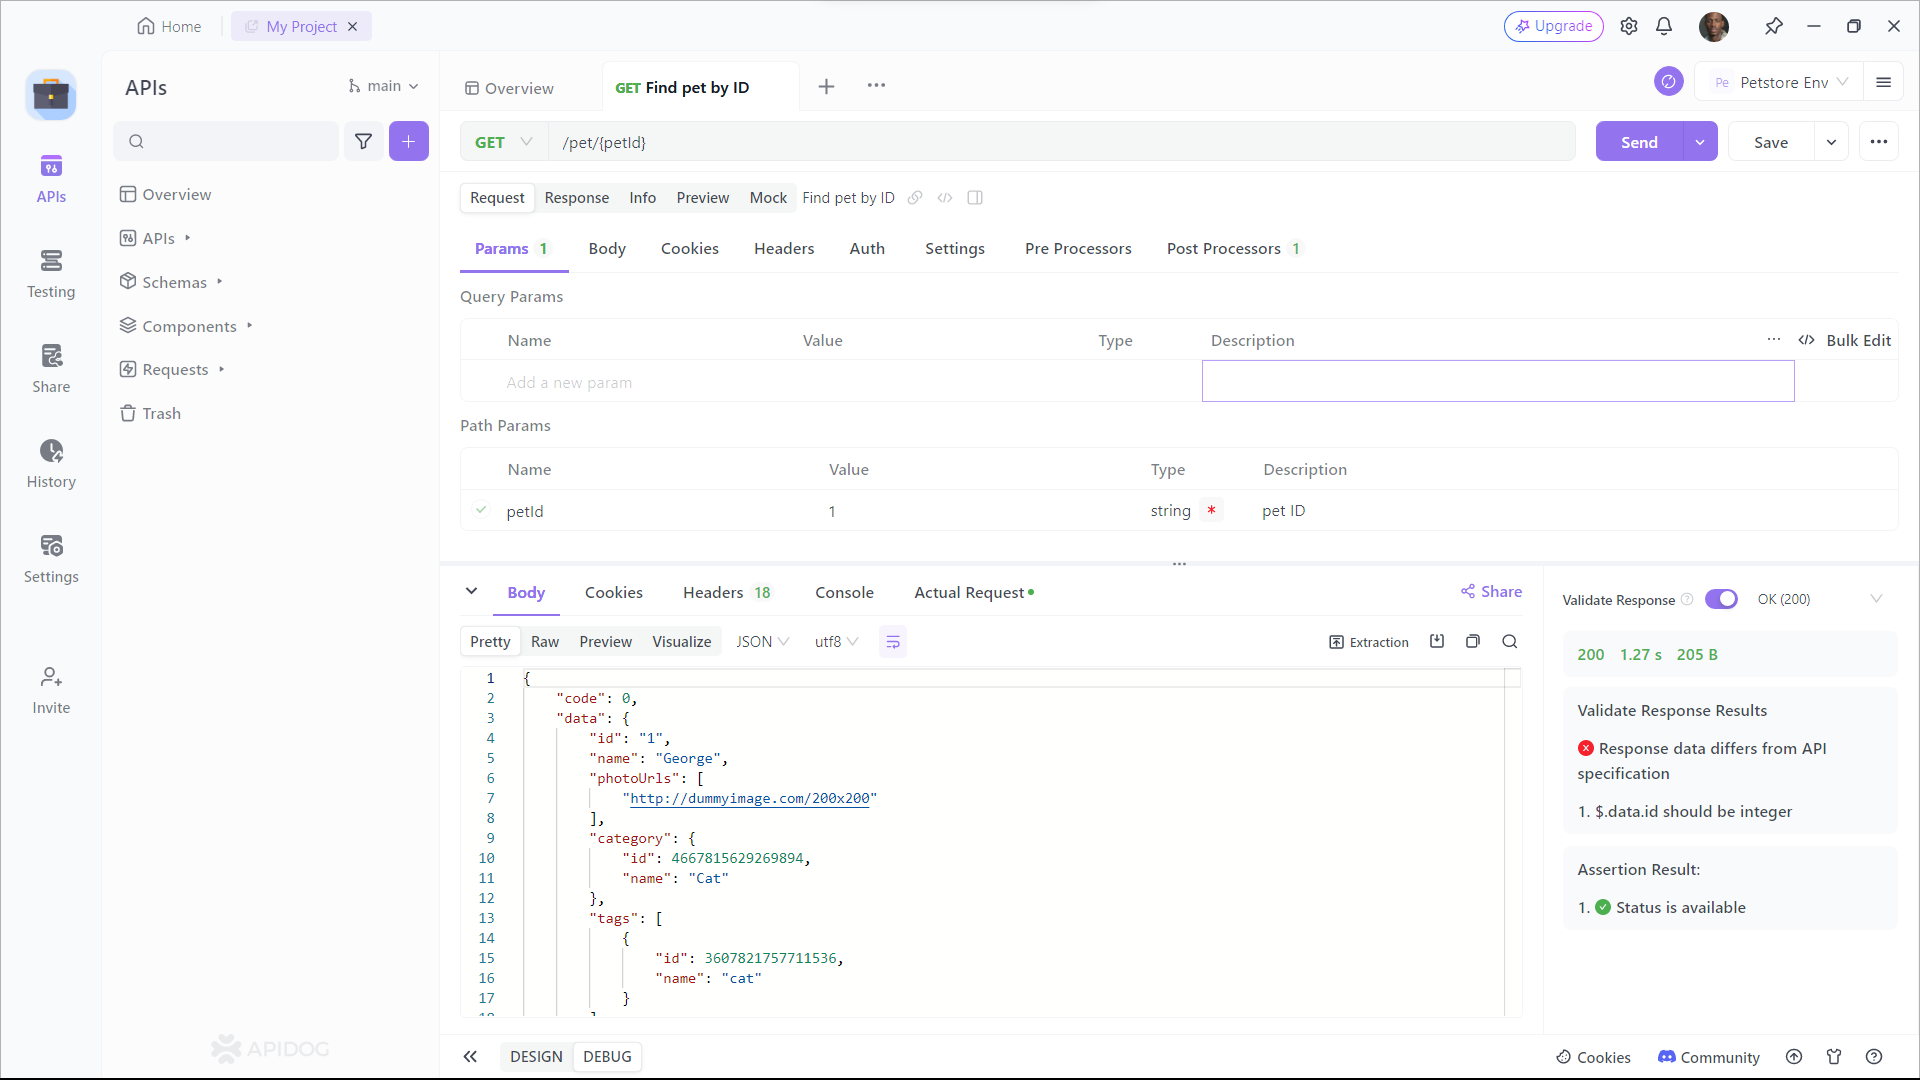
As you can see, Apidog shows you the URL, parameters, headers, and body of the request, and the status, headers, and body of the response. You can also see the response time, size, and format of the request and response, and compare them with different web APIs.
Best Practices for Javascript HTTP GET Requests
Sending well-crafted HTTP GET requests is crucial for efficient and secure communication with web servers. Optimizing them for security, performance, and scalability is crucial for a robust and efficient system. Here are some best practices to follow:
Security
- URL encoding: Avoid including special characters directly in the URL. Encode them with URL encoding to prevent potential code injection vulnerabilities.
- HTTPS: Always use HTTPS for secure communication. It encrypts the request and response, protecting sensitive data from eavesdropping.
- Parameter validation: Validate all parameters received in the GET request on the server-side. This helps prevent manipulation and potential attacks.
- Rate limiting: Implement rate limiting to prevent DDoS attacks and excessive server load.
- Avoid sensitive data: Don't pass sensitive data through GET parameters. Use POST requests for secure transmission of such information.
Performance
- Caching: Leverage browser caching for static resources like images and scripts. This reduces server load and improves page load times.
- Minimize parameters: Keep the number of query string parameters to a minimum. Excessive parameters can decrease performance.
- Gzip compression: Enable Gzip compression on the server-side to reduce the size of responses and improve transfer times.
- Use CDN: Consider using a Content Delivery Network (CDN) to geographically distribute your content and improve response times for users in different locations.
Scalability
- Pagination: Use pagination for displaying large datasets. This avoids sending and processing the entire dataset at once, reducing server load and improving responsiveness.
- Resource filtering: Allow filtering results based on user-defined criteria to reduce the volume of data retrieved and server workload.
- Asynchronous requests: Utilize asynchronous requests for fetching non-critical resources. This frees up the main thread for other tasks and improves user experience.
- API design: Design your API efficiently for GET requests. Use clear and consistent naming conventions for resources and parameters.
- Statelessness: HTTP is a stateless protocol. Ensure that GET requests remain stateless. Any request should return the same result, regardless of prior requests.
Additional tips:
- Optimize server responses: Avoid unnecessary data processing and formatting in the server response.
- Monitor and analyze your API: Monitor API usage and performance metrics to identify bottlenecks and areas for improvement.
- Use secure libraries and frameworks: Utilize well-established and secure libraries and frameworks for building and sending HTTP requests.
By adhering to these recommended methods, you can guarantee that your HTTP GET requests are both secure and optimized, promoting a resilient and effective web application or API. Keep in mind that these are general principles and the particular needs and limitations of your project may necessitate alternative strategies. Always thoroughly test your implementation to ensure it meets your requirements.
Conclusion
In this blog post, we have learned how to make an HTTP GET request in Javascript. We have also seen how Apidog helps us test and debug web APIs, by providing us with a user-friendly and interactive interface that allows us to send requests and receive responses in real-time. We have also seen how Apidog helps us integrate web APIs with our applications, by providing us with the code snippets and documentation of each web API.
We hope that you have learned something new and useful. If you want to learn more about web APIs, Apidog, or Javascript.