Apidog CLI
This article introduces you how to download and use the Apidog CLI.
Apidog CLI is mainly designed to run Apidog test cases in the command line. It is used for automation testing.
Command Options
Install CLI
The Apidog CLI relies on Node.js version number >= v16. Please install Node.js before using it.
sudo npm install -g apidog-cli
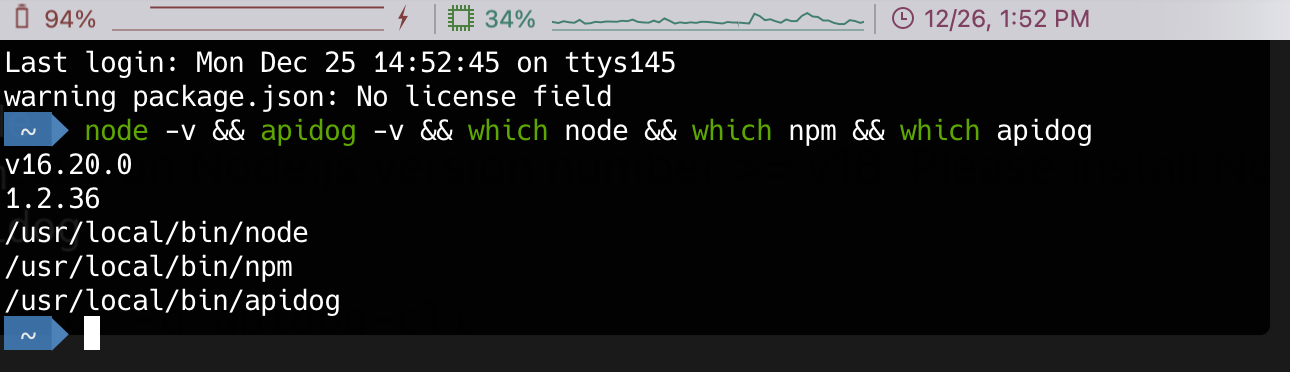
Here are some commands to verify if Apidog CLI is installed successfully.
node -v && apidog -v && which node && which npm && which apidog
If installed successfully, it will directly print the version number and installation path after executing commands above.
Command-line Options
Command Parameters
apidog [options]
-h, --help
View help information.
-v, --version
Show Apidog version.
apidog run <file-source> [options]
file-source needs to be the path for test cases files exported from Apidog.
More Options
  -r, --reporters [reporters]           Specify test report file extension, support cli, html, json, junit (default: ["cli"])
  --out-dir <outDir>                    Test report final export dir, by default is apidog-reports folder in the current dir(default: "./apidog-reports")
  --out-file <outFile>                  Test report name, ignore file extension name, by default is apidog-report-{timestamp}-0(default: "apidog-report-2022-10-25-15-03-50-160-0")
  -n, --iteration-count <n>             Define the number of iterations to run
  -d, --iteration-data <path>           Define the data which use for iterations (either JSON or CSV)
  --env-var <key=value>                 Specifies environment variables, in a key=value format. Multiple CLI environment variables can be added, for example: --env-var "user=123" --env-var "password=123"
  --global-var <key=value>              Specifies global variables, in a key=value format. Multiple CLI global variables can be added, for example: --global-var "user=123" --global-var "password=123"
  --external-program-path <path>        Specify the file path of external program, by default is current dir
  --database-connection <path>          Specify the file path of database configuration, it is required when CLI run with URL
  --ignore-redirects                    Prevent Apidog from automatically following 3XX redirect response
  --silent                              Prevent Apidog CLI from showing output
  --color <value>                       Enable/Disable colored output (auto|on|off) (default: "auto")
  --delay-request [n]                   Specify the extent of delay between requests (milliseconds) (default: 0)
  --timeout-request [n]                 Specify a timeout for requests (milliseconds) (default: 0)
  --timeout-script [n]                  Specify a timeout for pre/post requests (milliseconds) (default: 0)
  -k, --insecure                        Disables SSL validations
  --ssl-client-cert-list <path>         Specify the path to a client certificates configurations (JSON)
  --ssl-client-cert <path>              Specify the path to a client certificate (PEM)
  --ssl-client-key <path>               Specify the path to a client certificate private key
  --ssl-client-passphrase <passphrase>  Specify the client certificate passphrase (for protected key)
  --ssl-extra-ca-certs <path>           Specify additionally trusted CA certificates (PEM)
  --upload-report                       Upload the overview of this test report to the cloud, and you can view this test report in the app
  -b, --bigint                          Compatible bigint (default: false)
  --verbose                             Show detailed information of each request
  -h, --help                            display help for command
SSL
Client Certificate
Apidog CLI supports passing in client certificates.
Using Single SSL Client Certificate
--ssl-client-certSpecify the path of the public SSL client certificate.--ssl-client-keySpecify the path of the private SSL client certificate (optional).--ssl-client-passphraseSpecify SSL client passphrase (optional).
Using SSL Client Certificates Configuration File (supports multiple certificates)
--ssl-client-cert-listSpecify the path of the JSON file of the SSL client certificate list. For example:ssl-client-cert-list.json
ssl-client-cert-list.json

[
    {
        "name": "domain1",
        "matches": ["https://test.domain1.com/*", "https://www.domain1/*"],
        "key": {"src": "/CI/client.domain1.key"},
        "cert": {"src": "/CI/client.domain1.crt"},
        "passphrase": "changeme"
    },
    {
        "name": "domain2",
        "matches": ["https://domain2.com/*"],
        "key": {"src": "/CI/client.domain2.key"},
        "cert": {"src": "/CI/client.domain2.crt"},
        "passphrase": "changeme"
    }
]
This option supports setting different SSL client certificates based on URL or hostname. It takes precedence over the --ssl-client-cert, --ssl-client-key, and --ssl-client-passphrase options. These options will be used as fallback options if there is no match for the URL in the list.
Version Upgrade
CLI Use the command below to upgrade the Apidog version.
$ npm install apidog-cli@latest -g
Use the CLI
The Apidog Command Line Interface (CLI) is used in three primary contexts:
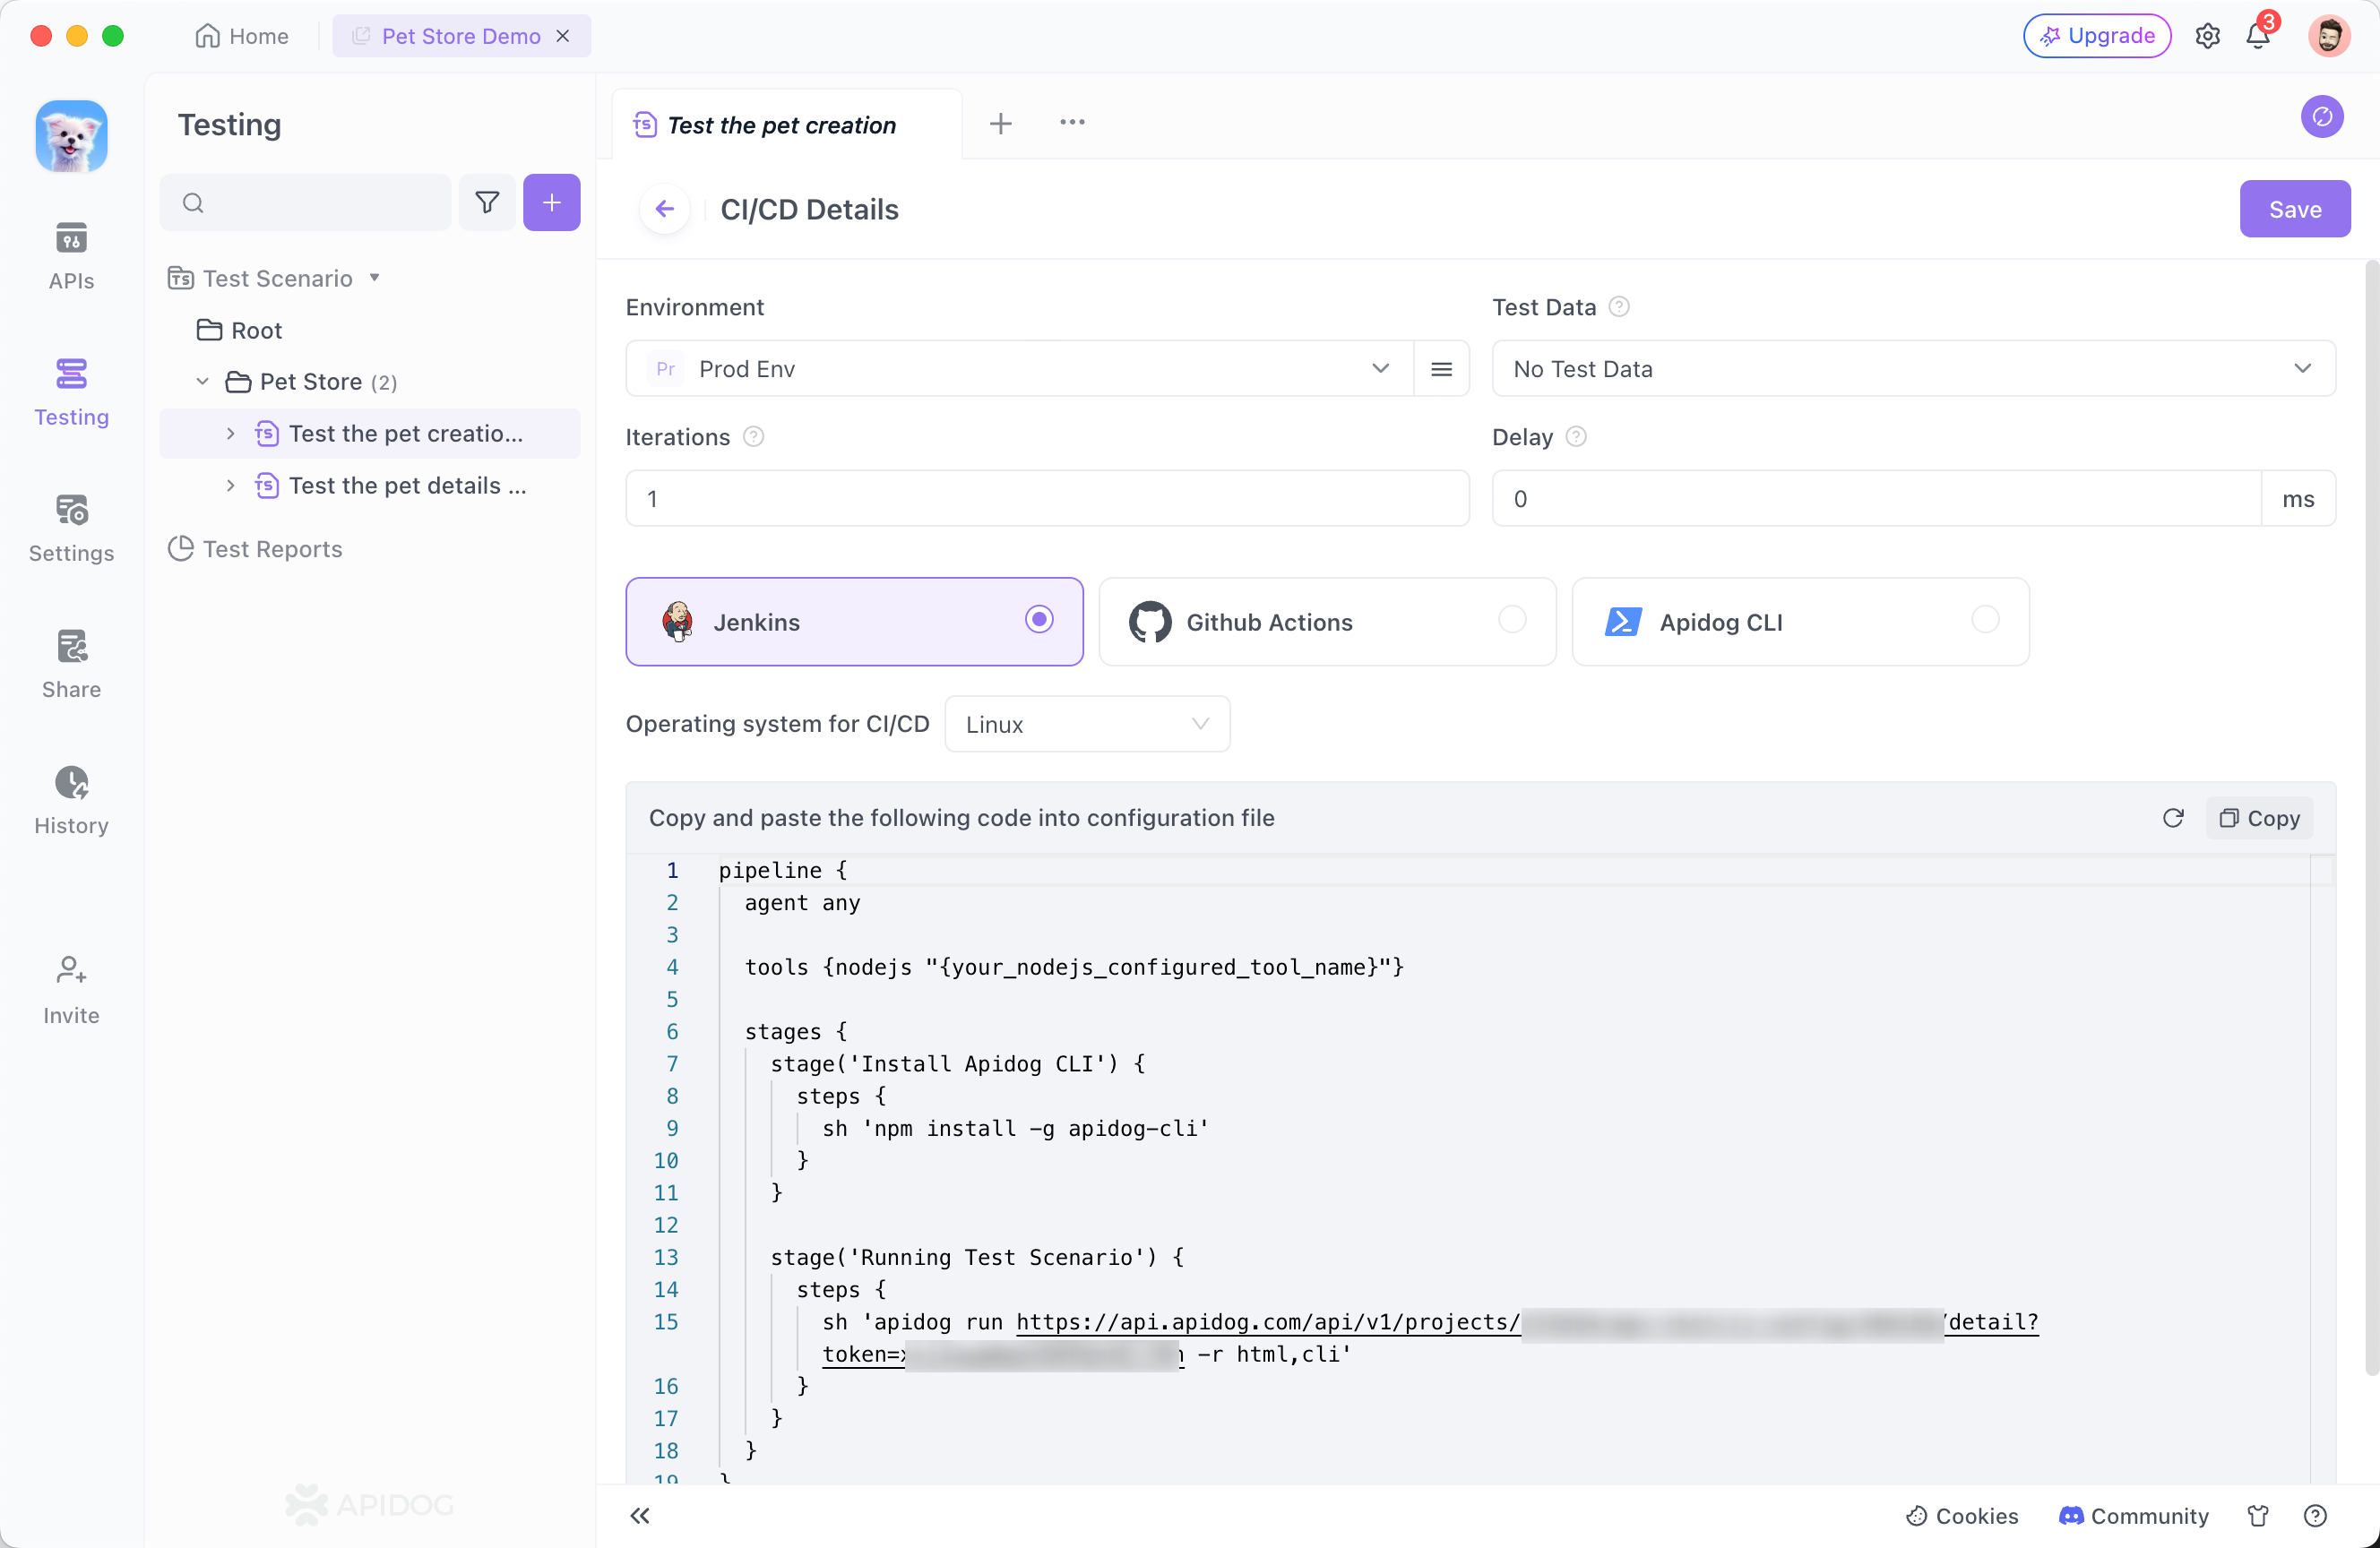
1. Execution within CI/CD Platforms
Apidog automates the generation of configuration scripts for Jenkins and Github Actions. Upon saving the continuous integration settings, embedded code for the "CI / CD Tools" Tab page is created, enabling integration directly into the configuration files of the continuous integration system to seamlessly join the existing research and development workflows.
2. Real-time Execution Based on Online Data
A sequence of executable command lines becomes available on the page immediately after saving the continuous integration setup.
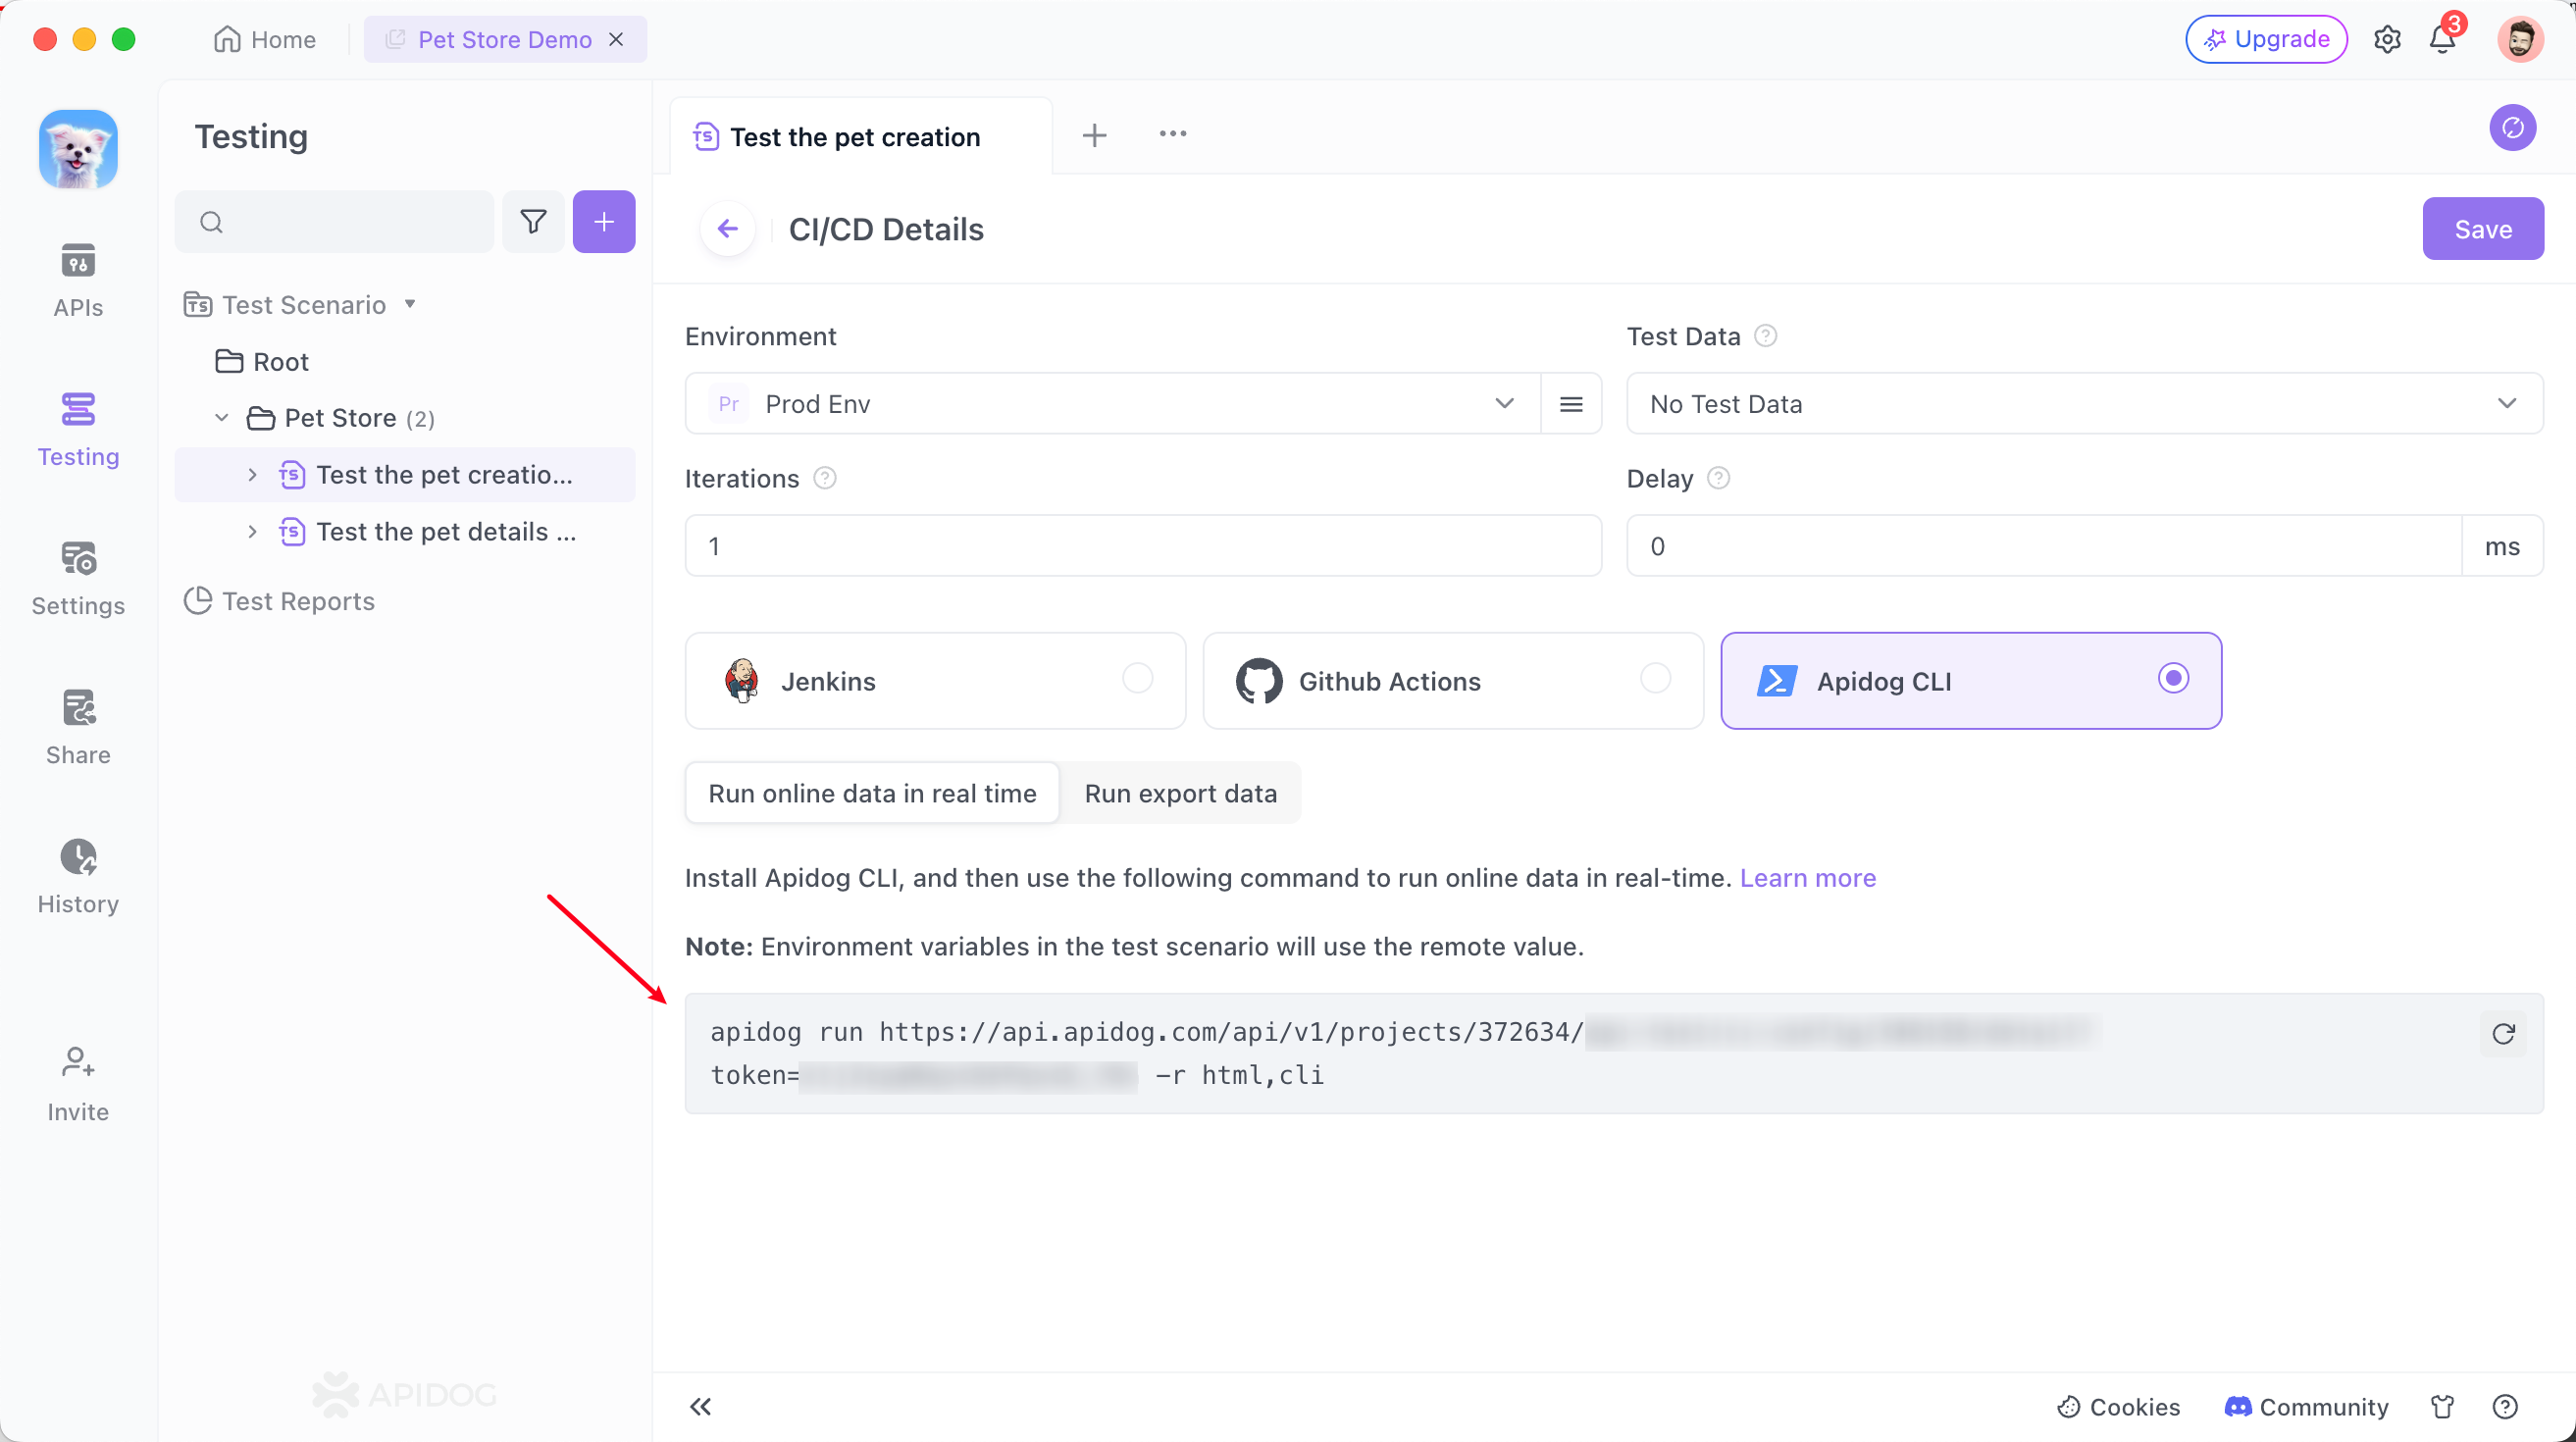
For example, the command line is as follows:
apidog run https://api.apidog.com/api/v1/projects/372634/api-test/ci-config/346158/detail?token=******** -r html,cli
The exported files utilize the predefined remote variable values if environment variables are incorporated into the testing procedures.
Database Integration
When testers incorporate database-related scripts or commands within the pre/post execution actions of the API during test steps, as illustrated below:
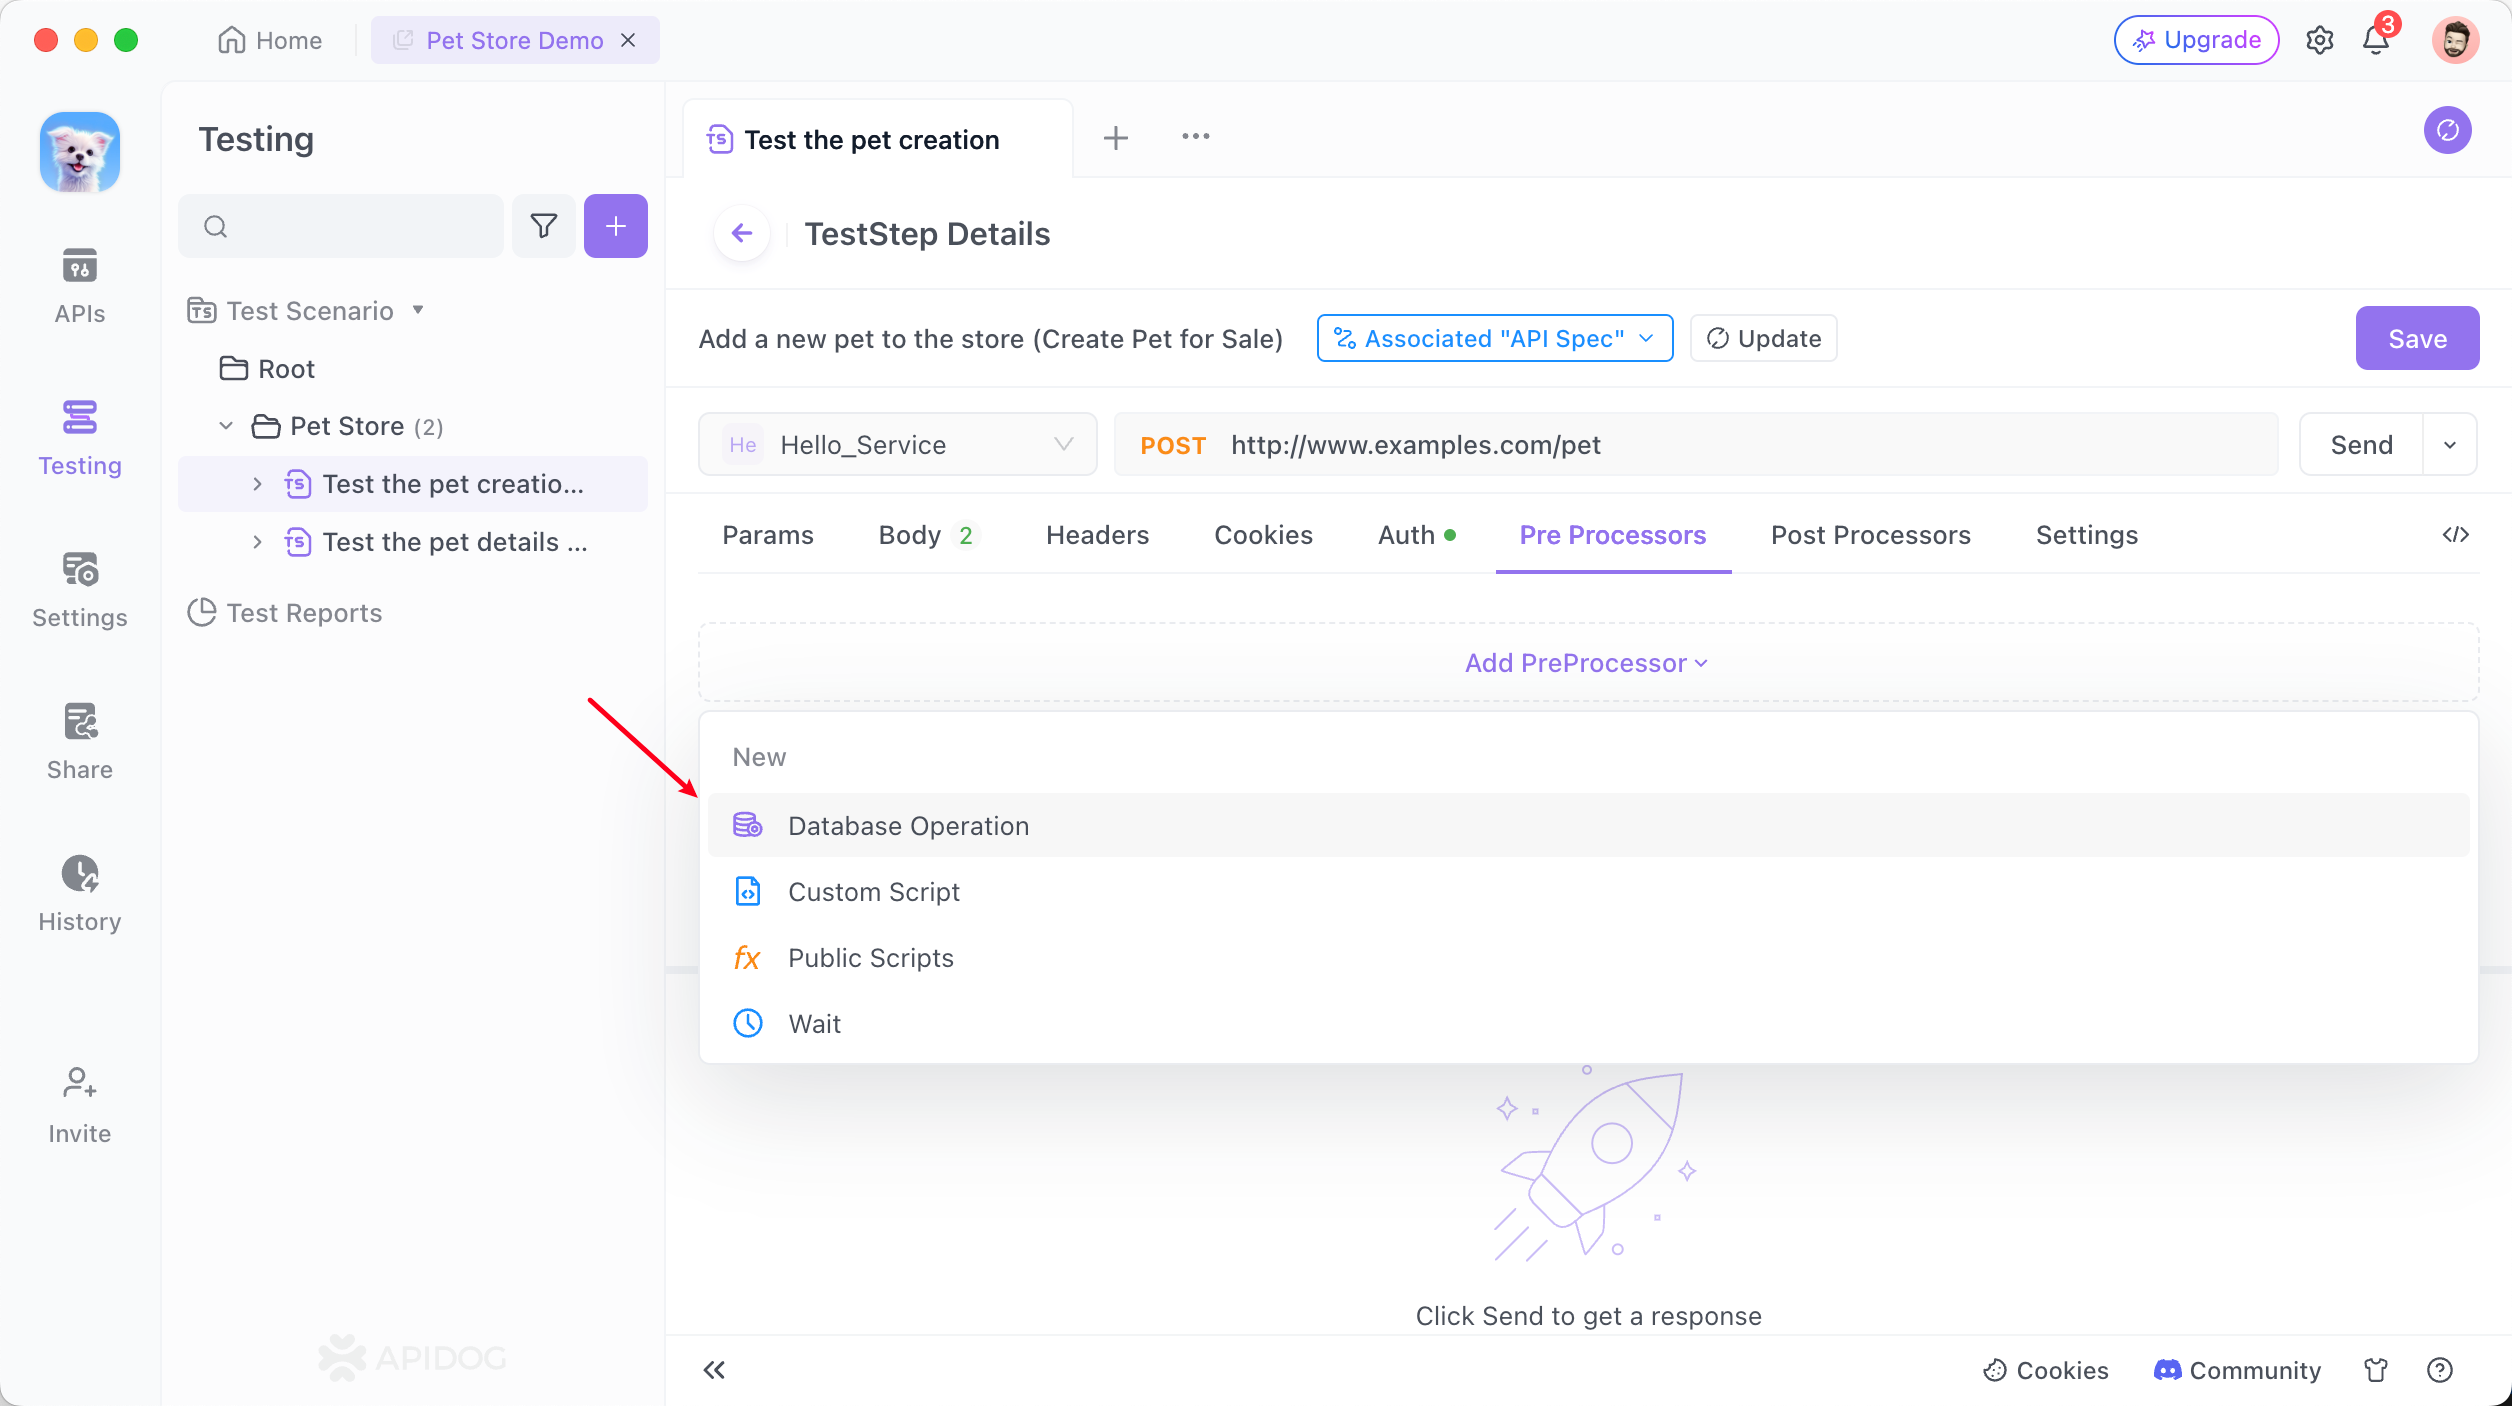
Instructions and details regarding database connectivity automatically populate among continuous integration commands. Performing the CLI command in the directory where the database connection configuration file is located initiates the automatic test sequence.

After download the configuration file, navigate to the directory in the terminal, then execute the command provided by the Apidog client. This triggers the CLI process once run locally.

3. Local Test File Execution
To run a particular test scenario using the Apidog CLI locally, the Json file associated with that scenario must be exported first. The file is then executed using the Apidog CLI tool.
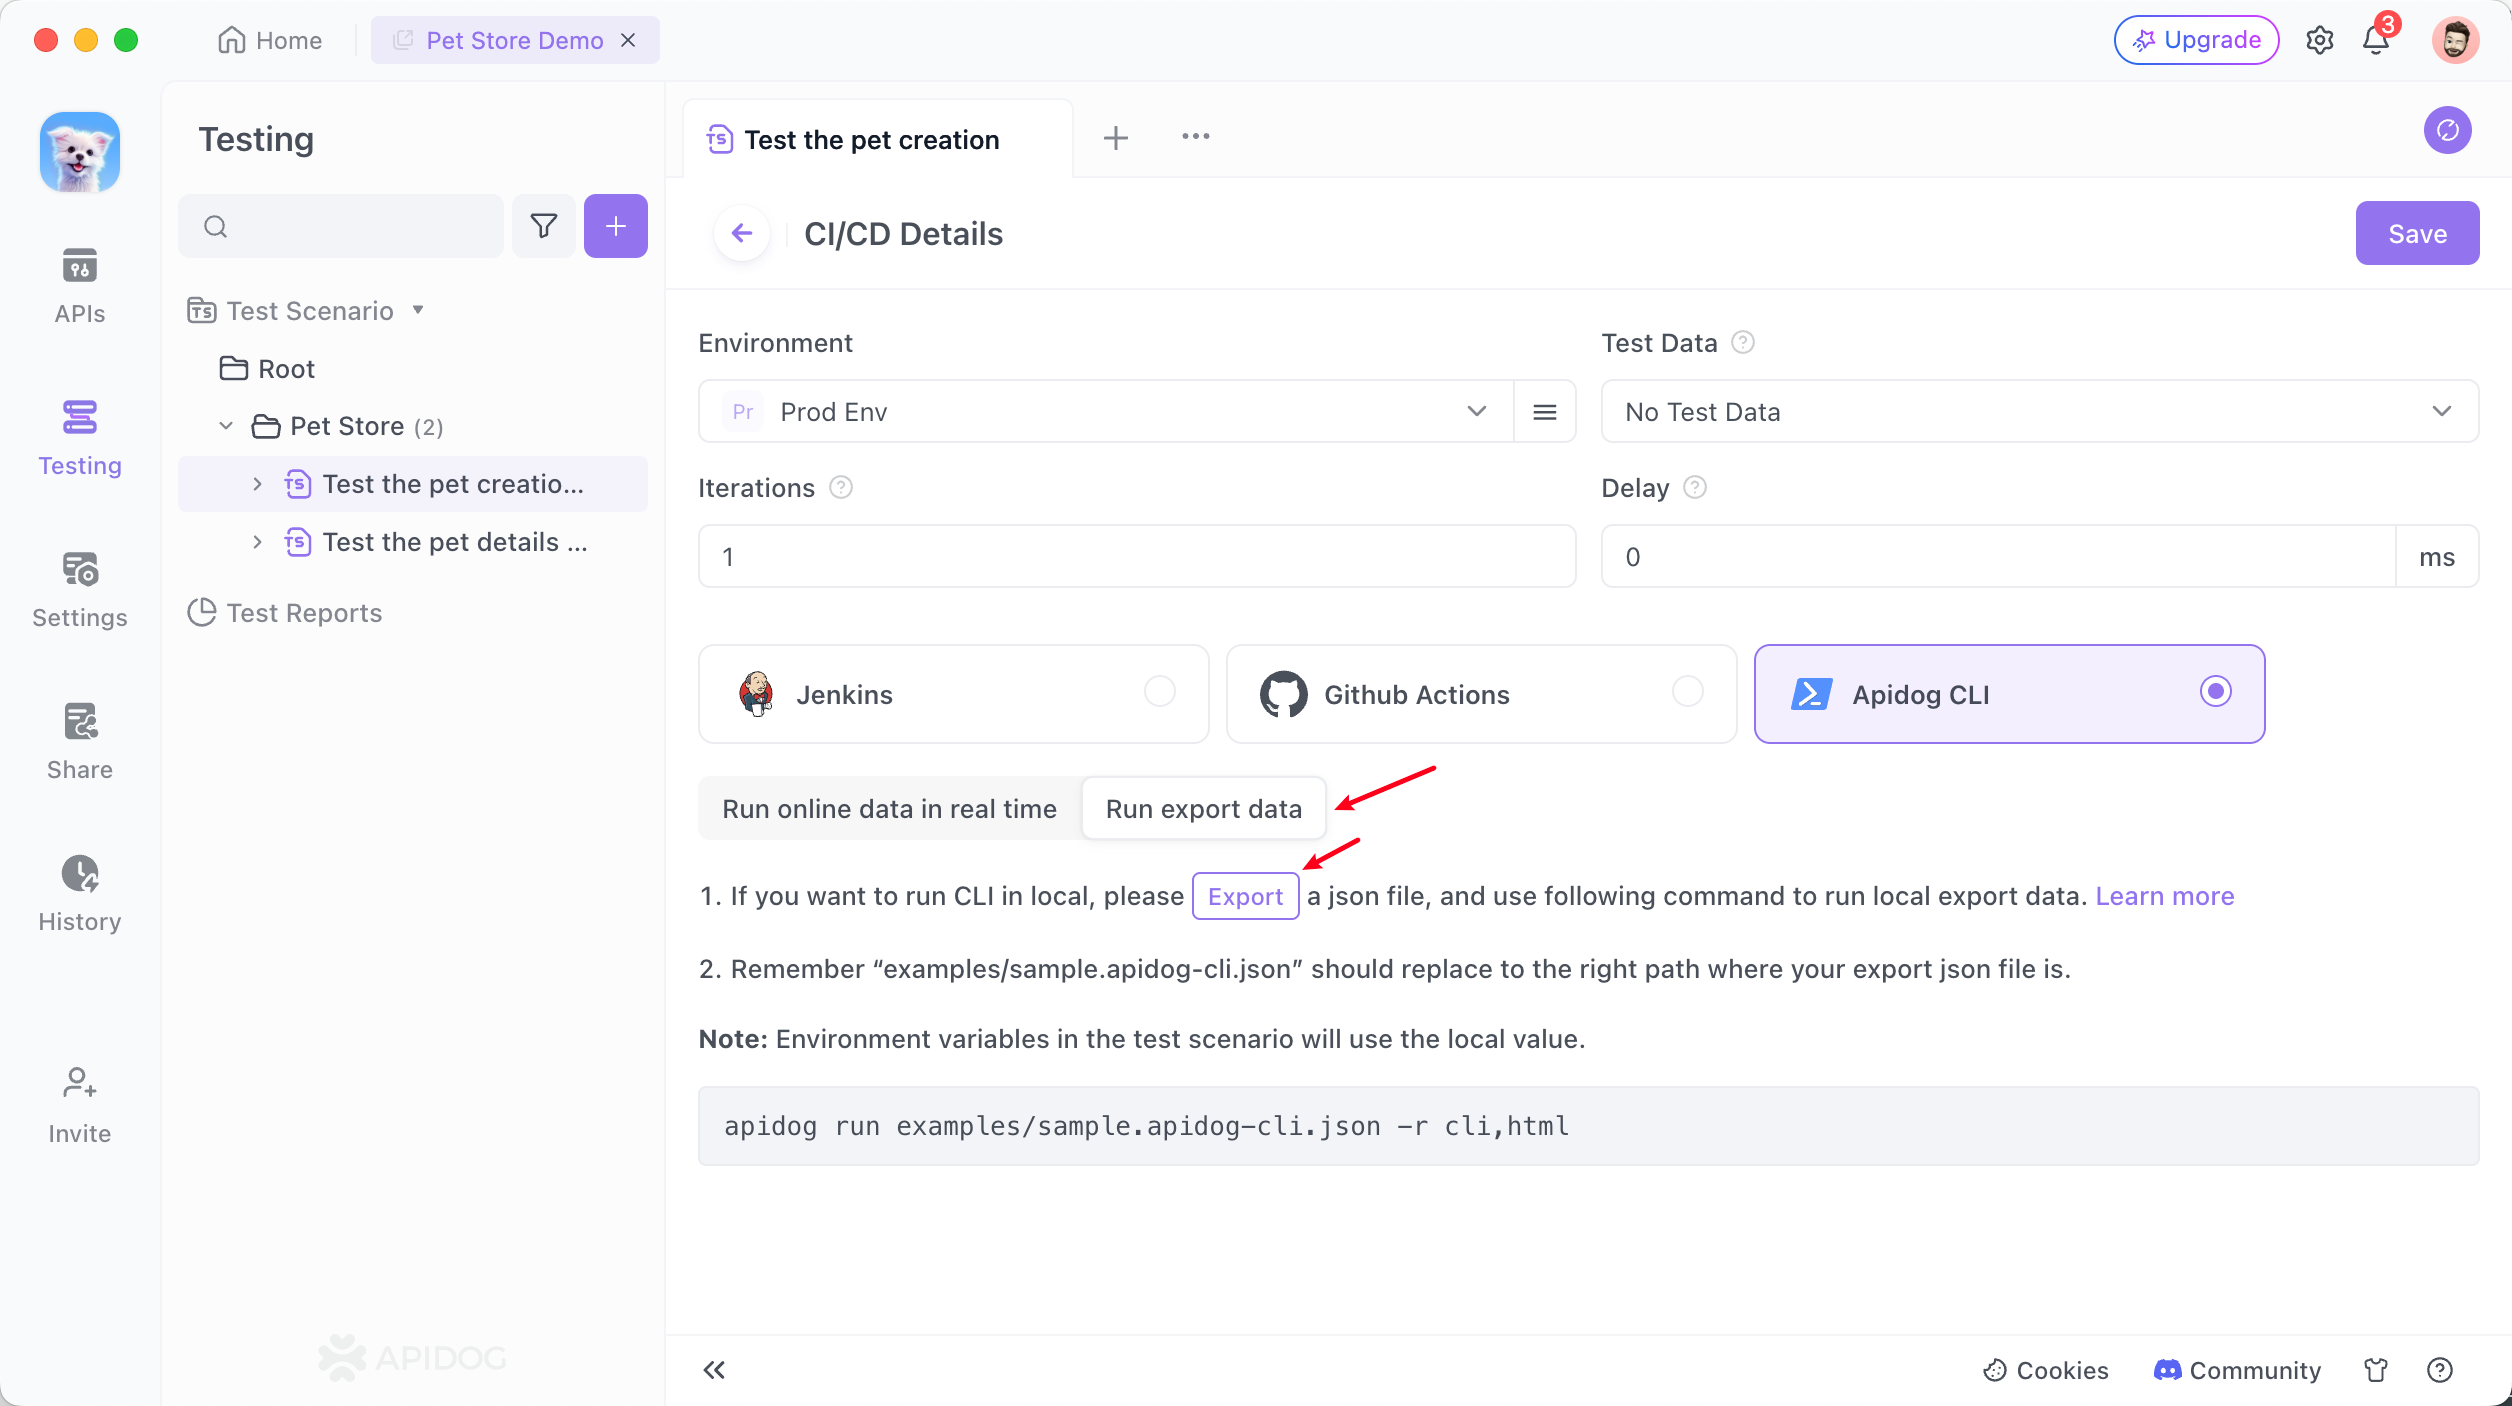
Substitute examples/sample.apidog-cli.json in the following command with the path to your stored file and execute it in the terminal.
apidog run examples/sample.apidog-cli.json -r cli,html
During the export process, if environment variables are employed in the test steps, the file incorporates the locally predetermined values of these variables.
FAQs
1. How to Fix the Error when Using CLI?
- Invalid character in header content["Authorization"]
Getting Invalid character in header content error after running Apidog CLI command in terminal:
To make sure there are no abnormalities when running automated tests in Apidog client/web, please check whether remote values are set in environment.
2. How to Pass File Parameters Using CLI?
First, go back to the request parameters in the "APIs" → "Edit" → "Bulk Edit". Change the path of the uploaded file to a variable by batch editing.


After saving as an API use case, import API Cases in Testing.
Finally, when running in the corresponding application (such as jenkins), modify the actual value of this path variable.
3. How to Upload Local CLI Test Reports to The Cloud?
Add the --upload-report parameter at the end of the CLI command line, for example:
apidog run https://api.apidog.com/api/v1/projects/2689726/api-test/ci-config/364654/detail\?token\=******* -r html,cli --upload-report
View it in the "Team Report" section under "Test Reports". The tester field of the test reports uploaded by CLI will be left blank.

4. How to Reference External Scripts/Programs in The CLI?
You can specify the path of an external script or program to be referenced at the end of the Apidog CLI command. For example, in the following command line, specify that the CLI references a program located at ./scripts path. If layer levels are not specified, the default is the current CLI execution directory.
--external-program-path ./scripts
1. Local path
To avoid management chaos of local scripts, it is recommended to organize all script files systematically under a specific directory and specify the corresponding local path in the CLI.
2. Cloud code repository
You can also host the script files in a cloud-based code repository, then set up a CI/CD workflow to pull the external scripts locally. Finally, specify the actual path of the external script in the CLI.