
Some teams can’t send their traffic to the cloud. Maybe you’re behind a corporate firewall that blocks outbound calls to third-party services. Maybe a compliance rule says request and response data has to stay on machines you control. Maybe the whole environment is air-gapped and nothing leaves the intranet at all. In any of those cases, a hosted mock URL on someone else’s infrastructure is a non-starter, even when the mock data itself is fake.
Apidog handles this with a self-hosted runner. Instead of your requests going out to Apidog’s cloud mock, you deploy a small program on a server you own, and that program returns the mock responses from inside your own network. The design lives in your Apidog project like always; only the serving moves onto your hardware. This guide walks through what the runner is, when to pick it over cloud mock, how to set it up from the docs, and one distinction that trips people up: the runner is not the CLI. If you want the broader picture of why teams run mocks on their own boxes, the guide on self-hosted API mock servers covers the general case, and the OpenAPI Initiative explains the spec these mocks are generated from. Want to follow along? Download Apidog first.
What the self-hosted runner is
The Apidog Self-hosted Runner is an automated program you host on a standalone server. It’s officially called the General Runner, and it does three jobs: it runs scheduled automated tests, it imports API documents, and it returns mock responses. That third job is the one this article is about.
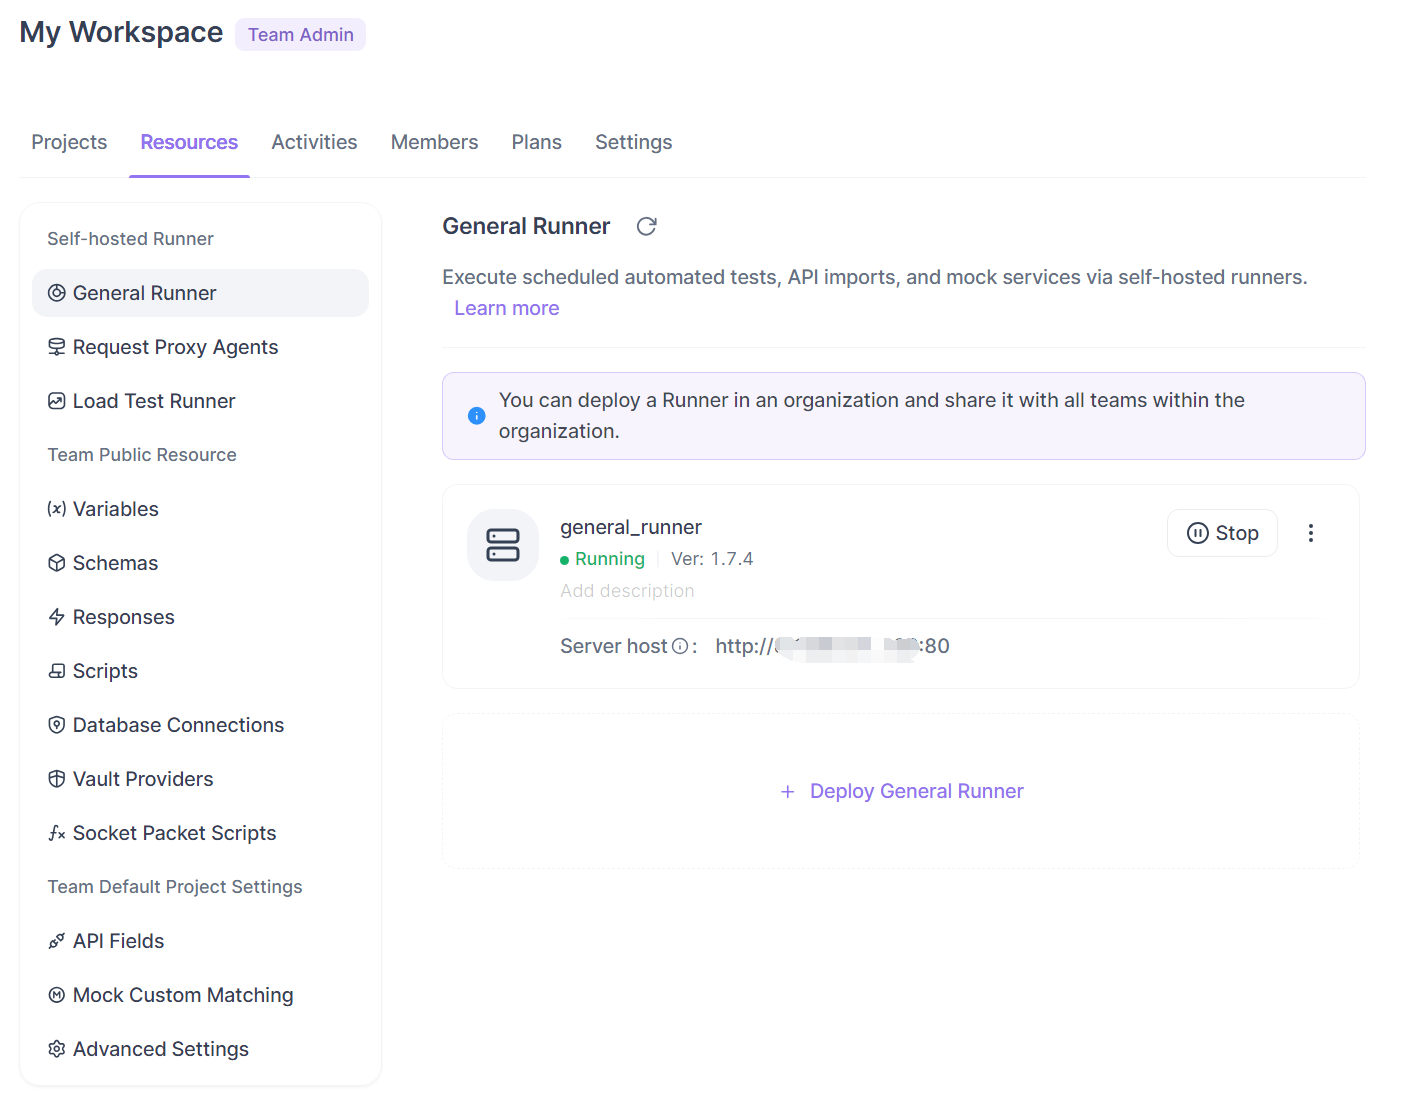
Here’s the key idea. Once you deploy a General Runner and set its Server Host, a new environment called Runner Mock appears automatically in your project. Any request you send through that environment gets its mock response from your self-hosted runner instead of from Apidog’s cloud mock. Same mock design, same generated data, different machine doing the serving. Your traffic never leaves your network.
This is the self-hosted alternative to cloud mock. If your team can reach the internet and has no rule against it, Apidog cloud mock is simpler because there’s nothing to deploy. Reach for the runner when one of these is true:
- Outbound traffic to external hosts is blocked or heavily audited.
- A compliance policy requires request data to stay on internal infrastructure.
- The environment is air-gapped and can’t reach a cloud endpoint at all.
- You want mock latency measured on your own LAN, not across the public internet.
If none of those apply, the extra Docker host is overhead you don’t need. Be honest with yourself about which camp you’re in before you provision a server.
One note on plans and permissions. The Apidog docs don’t state an explicit free-versus-paid gate for the General Runner or for self-hosted mock, and they list no pricing figures for it, so this guide won’t invent any. What the setup does require is team or project admin permission, because deploying a runner happens inside Team Resources, and only admins can open those settings. If you can’t see the Resources panel, that’s the reason.
What you need before you start
The runner ships as a Docker container, so the server that hosts it needs Docker installed. The docs call for a minimum version of 20.10.0, and recommend 20.10.13 or newer. Check what you have:
docker --version
You also need somewhere to run it: a Linux, macOS, or Windows machine that both your team’s Apidog clients and the Apidog service can reach. On an intranet that usually means an internal server with a stable IP or hostname. That’s the whole prerequisite list: Docker, a host, and admin rights on the team. Everything else you configure inside Apidog itself.
Deploy the General Runner
The deployment command is generated for you from inside Apidog, and it carries a token, so you don’t hand-write it. Here’s the flow.
Generate the command
Open Apidog Home, select your team, then click Resources in the right sidebar and choose Deploy General Runner. A popup appears where you set a few things:
- Server OS: Linux, macOS, or Windows, so the generated command matches your host.
- Docker Image: pick General, Slim, or Custom. General ships with Node.js 18, Java 21, Python 3, and PHP 8 pre-installed. Slim ships Node.js 18 only, for a smaller image. Custom lets you supply your own Dockerfile when you need extra runtimes for test scripts.
- Exposed Port: set with the
-pparameter, for example-p 80:4524, which maps host port 80 to the runner’s internal port. - Mounted Data Directory: set with the
-vparameter, so runner data persists on the host across restarts.
When you’re done, copy the generated command. This matters: the command is shown only once, for data-security reasons, because it embeds your token. If you lose it, you generate a new one rather than recovering the old. Capture it immediately.
Run it on the server
Paste the command into your server’s terminal. Installation starts on its own and pulls the image. A finished command looks roughly like this (yours will differ, and will include the real token):
docker run -d \
  --name apidog-runner \
  -p 80:4524 \
  -v /opt/apidog-runner/data:/app/data \
  apidog/runner:latest \
  --token <YOUR_GENERATED_TOKEN>
Confirm the container is up:
docker ps
You should see the runner container listed with its port mapping. A Docker client like Docker Desktop shows the same thing if you’d rather look at a UI.
Confirm it registered
Back in Apidog, go to Team Resources and open General Runner. Click the refresh button. The runner should now show as deployed with a status of Started. If it doesn’t appear at first, the refresh button is your fix; give it a moment and click again.
Runner status has three states worth knowing:
- Started: enabled, talking to Apidog, handling tasks. This is the state you want.
- Stopped: someone stopped it manually in Apidog. It stays deployed but won’t process tasks.
- Offline: it’s lost its connection to Apidog, so it can’t process anything. Check the container and the network path.
Turn on Runner Mock
Deploying the runner gives you the agent. One more step points your mock traffic at it.
In Team Resources, open General Runner and find the Server Host field. Enter the address where your runner is reachable. On a plain HTTP setup that’s the host and the port you exposed, like http://127.0.0.1:80 for a local test or http://runner.internal.example.com:80 for a shared intranet host. Behind a TLS-terminating proxy it looks like https://runner.example.com:443. More on HTTPS in a moment.
Once Server Host is set, Apidog wires up the Runner Mock environment for your project automatically. Verify it: open the project, go to Environment Management, and confirm Runner Mock now shows in the environment list. You didn’t create it by hand; setting Server Host is what made it appear.
Send a request through the self-hosted mock
Now use it. Say you have an endpoint GET /orders/{orderId} in a project for an internal order-management API. Open that endpoint, then in the environment dropdown at the top, select Runner Mock instead of the cloud environment. Send the request.
The response comes back from your runner. Because Apidog generates mock data from your schema, a well-defined Order schema returns realistic values rather than empty placeholders:
curl http://runner.internal.example.com:80/orders/10583
{
  "orderId": 10583,
  "customerEmail": "amelia.turner@example.com",
  "status": "shipped",
  "total": 148.5,
  "currency": "USD",
  "createdAt": "2026-07-14T09:32:11Z"
}
That JSON never touched the public internet. The runner built it from your endpoint’s schema and served it from inside your network. Field-aware generation like the customerEmail value above comes from Apidog reading your schema’s types and field names, the same engine covered in the companion piece on auto-generating realistic mock data with smart mock. If you want to control exactly what a given request returns, you add a mock expectation on the endpoint, and the runner serves that expectation the same way cloud mock would. The mechanics of building good mock responses are the same whether the server is Apidog’s or yours; only the host changes. The general concepts behind API mocking apply unchanged.
HTTPS, data mounts, and other real-world details
A test run on http://127.0.0.1 is easy. A shared intranet deployment has a few sharp edges worth knowing before you roll it out to a team.
HTTPS needs a reverse proxy
The runner has no built-in HTTPS certificate support and does no automatic certificate provisioning. It won’t fetch or manage a TLS cert for you. If you need https://, terminate TLS at a reverse proxy in front of the runner, for example Nginx holding your certificate, then point Server Host at the proxy’s HTTPS URL. Without a proxy, stick to http://host:port. Don’t set Server Host to https:// and expect the runner to answer TLS directly; it can’t.
A minimal Nginx block that fronts a runner on port 4524 looks like this:
server {
    listen 443 ssl;
    server_name runner.example.com;

    ssl_certificate     /etc/ssl/certs/runner.example.com.pem;
    ssl_certificate_key /etc/ssl/private/runner.example.com.key;

    location / {
        proxy_pass http://127.0.0.1:4524;
        proxy_set_header Host $host;
    }
}
Then Server Host becomes https://runner.example.com:443. The MDN guide to HTTPS is a good refresher if TLS termination is new to your team.
File mounts are path-specific
If your mocks or tests need extra files, the runner expects them at fixed paths inside the container, so mount them there:
- External programs go in
/app/external-programs/. - Database connection config goes in
/app/database/database-connections.json. - SSL client certificates go in
/app/ssl/ssl-client-cert-list.json.
Wire these through your -v mounts so they survive restarts.
Redeploy and upgrade behavior
When a new runner version ships, you’ll see an Upgrade option, and under More Actions you can Redeploy. Both stop the running container while the new one comes up. The reassuring part: existing scheduled tasks in the Apidog client are unaffected by a redeploy or upgrade, so you’re only interrupting the live serving for the moment the container restarts, not losing configuration.
Automate the workflow with the Apidog CLI
Here’s the distinction that saves confusion: the runner is a long-lived agent that can serve mocks and run scheduled tasks, while the Apidog CLI is a one-shot test runner for CI. They’re different tools. The CLI cannot serve, start, or host a mock server. There is no apidog run mock and no apidog mock serve. The CLI’s apidog run executes test scenarios, test-scenario folders, and test suites, and its mock command group only does CRUD on mock expectations as data. Mock serving is the runner’s job, never the CLI’s.
So the two fit together like this. The CLI and AI coding agents such as Cursor, Claude Code, and Codex can create and update the endpoints and schemas in your project, which keeps your mock output accurate as the spec evolves. Once the self-hosted mock has unblocked frontend work, the same project’s test scenarios run headlessly in CI with a single command, validating the real backend against the very contract the mock described:
apidog run -t <scenario_id> -e <env_id> -r html,cli
That one command runs your scenarios against the live backend and writes an HTML plus CLI report. Install is npm install -g apidog-cli on Node.js v16 or later; the Apidog CLI installation guide covers apidog login and token setup. To make that test run happen on every push, wire it into your pipeline with the Apidog CLI CI/CD guide. The piece on mocking APIs from the CLI explains exactly why the terminal manages mock definitions but doesn’t host them.
FAQ
Do I need the self-hosted runner if my team can reach the internet?
Probably not. Cloud mock needs nothing deployed and is the simpler path. Choose the runner when outbound traffic is blocked or audited, a compliance rule keeps data on internal infrastructure, or the environment is air-gapped. If you’re comparing the hosted approach against the managed one first, the walkthrough of Apidog cloud mock is the natural companion to this guide.
Can the Apidog CLI start a self-hosted mock server?
No. The CLI runs tests with apidog run and manages mock expectations as data with its mock command group. Serving mock traffic is done by the General Runner or by cloud mock, never by the CLI. If you were hoping to type one terminal command and get a running mock on a port, that’s the runner’s job, set up through the GUI as described above.
Does the runner support HTTPS on its own?
It doesn’t ship certificates or provision them automatically. Put a reverse proxy like Nginx in front to terminate TLS, then point Server Host at the proxy’s https:// URL. Without a proxy, use http://host:port.
Why doesn’t my runner show up after I ran the command?
Open Team Resources, go to General Runner, and click the refresh button. Registration can lag a moment. If it still won’t appear, confirm the container is running with docker ps and that the host is reachable from Apidog. A status of Offline means the connection dropped; Started is what you want.
Can multiple teams share one runner for global mock serving?
A runner registers to the team where you deployed it, and its Runner Mock environment surfaces per project. If you run distributed teams that share mock environments, the patterns in the guide on sharing mock environments across global teams will help you decide how many runners to stand up and where.
Wrapping up
Self-hosted mocking with the General Runner keeps your request data on infrastructure you control while your mock design stays right where it always was, in your Apidog project. You deploy one Docker container, set Server Host, and the Runner Mock environment does the rest. Reach for it when the cloud is off-limits, and stick with cloud mock when it isn’t. Ready to run mocks on your own network? Download Apidog, deploy a runner, and serve your first Runner Mock response without a single packet leaving your intranet.