
In today's interconnected world, building robust and scalable APIs has become a necessity for enabling seamless communication between diverse software components. REST APIs have emerged as the de facto standard for facilitating web data exchange, leveraging the HTTP protocol's power.
Node.js, a JavaScript runtime built on Chrome's V8 engine, has gained traction for creating efficient, lightweight APIs. Its event-driven, non-blocking I/O model excels at handling concurrent connections, making it ideal for scalable, real-time APIs.
Frameworks like Express.js simplify development, allowing developers to build robust APIs for diverse use cases quickly. For web developers seeking to create RESTful APIs, Node.js and Express offer a powerful combination to streamline the process.
What is REST API?
A REST API is an architectural style that leverages the HTTP protocol to facilitate data exchange between client and server applications. It is based on a set of constraints and principles, including a uniform interface, stateless communication, and the use of standard HTTP methods (GET, POST, PUT, DELETE) for performing operations on resources.
Key Concepts of REST API
1. Resources
Resources are the fundamental units in REST. Each resource is identified by a URL (Uniform Resource Locator). For example, in a REST API for managing books, a book might be a resource accessible at /books/1.
2. HTTP Methods
REST APIs use standard HTTP methods to interact with resources:
- GET: Retrieve data from the server (e.g., get a list of books or a single book).
- POST: Send data to the server to create a new resource (e.g., add a new book).
- PUT: Update an existing resource with new data (e.g., update details of an existing book).
- DELETE: Remove a resource from the server (e.g., delete a book).
3. Statelessness
Each request from a client to a server must contain all the information the server needs to fulfill that request. The server does not store any state about the client session between requests. This makes REST APIs scalable and easy to maintain.
4. Representations
Resources can be represented in different formats, such as JSON (JavaScript Object Notation), XML (eXtensible Markup Language), or plain text. JSON is the most commonly used format due to its lightweight nature and ease of use.
5. Uniform Interface
REST APIs are designed to have a uniform interface that allows for consistent interaction with resources. This involves:
- Resource identification: URLs uniquely identify resources.
- Manipulation of resources through representations: Clients use representations to interact with resources (e.g., sending JSON data to create or update a resource).
- Self-descriptive messages: Each message includes enough information to describe how to process it.
- Hypermedia as the engine of application state (HATEOAS): Clients interact with resources entirely through hyperlinks provided dynamically by the server.
6. Client-Server Architecture
REST separates the client and server, allowing them to evolve independently. The client handles the user interface and user experience, while the server manages data storage, processing, and security.
7. Cacheability
Responses from a REST API can be explicitly marked as cacheable or non-cacheable. This allows clients to cache responses to improve performance and reduce the need for repeated requests.
A Real-world REST API Example
Here is an example of Rest API endpoints for a library:
1. Get a list of all books
- Endpoint:
/books - HTTP Method: GET
- Description: Retrieves a list of all books in the library.
- Request:
GET /books- Response:
[
    {
        "id": 1,
        "title": "1984",
        "author": "George Orwell",
        "published_year": 1949
    },
    {
        "id": 2,
        "title": "To Kill a Mockingbird",
        "author": "Harper Lee",
        "published_year": 1960
    }
]
2. Get details of a specific book
- Endpoint:
/books/{id} - HTTP Method: GET
- Description: Retrieves details of a specific book by its ID.
- Request:
GET /books/1- Response:
{
    "id": 1,
    "title": "1984",
    "author": "George Orwell",
    "published_year": 1949
}
3. Add a new book
- Endpoint:
/books - HTTP Method: POST
- Description: Adds a new book to the library.
- Request:
POST /books
Content-Type: application/json

{
    "title": "Brave New World",
    "author": "Aldous Huxley",
    "published_year": 1932
}- Response:
{
    "id": 3,
    "title": "Brave New World",
    "author": "Aldous Huxley",
    "published_year": 1932
}
4. Update an existing book
- Endpoint:
/books/{id} - HTTP Method: PUT
- Description: Updates the details of an existing book.
- Request:
PUT /books/1
Content-Type: application/json

{
    "title": "1984",
    "author": "George Orwell",
    "published_year": 1948
}- Response:
{
    "id": 1,
    "title": "1984",
    "author": "George Orwell",
    "published_year": 1948
}
What is Node.js?
Node.js, a server-side JavaScript runtime, and Express, a popular Node.js framework, make for a powerful combination to create RESTful APIs. In this blog post, we'll explore the process of creating a REST API using Node.js and Express, step by step, with practical examples.
Why Use Node.js and Express to Build Rest API?
Using Node.js and Express to create APIs offers several advantages that make it a popular choice among developers. Here are some of the key benefits:
1. High Performance and Scalability
Node.js is built on the V8 JavaScript engine from Google, which compiles JavaScript directly to machine code. This results in high performance and speed. Node.js is also designed with an event-driven, non-blocking I/O model, which makes it highly efficient and scalable for handling numerous simultaneous connections.
2. JavaScript Everywhere
Node.js allows developers to use JavaScript for both client-side and server-side development. This consistency reduces the learning curve and simplifies the development process, as developers can use the same language and data structures across the entire application stack.
3. Fast Development Cycle
Node.js, combined with Express, enables rapid development of applications. Express is a minimal and flexible framework that provides a robust set of features for web and mobile applications. It simplifies routing, middleware management, and view rendering, allowing developers to build APIs quickly and efficiently.
4. Extensive Ecosystem
Node.js has a rich ecosystem of libraries and modules available through npm (Node Package Manager). This vast collection of pre-built modules significantly speeds up development by allowing developers to reuse existing code for common tasks.
5. JSON and RESTful APIs
Node.js and Express are well-suited for building JSON-based RESTful APIs. JavaScript’s native support for JSON simplifies data exchange between the server and the client. Express's lightweight nature makes it ideal for creating RESTful endpoints efficiently.
6. Real-Time Capabilities
Node.js excels in building real-time applications, such as chat applications or live-update features. Its non-blocking architecture allows for handling real-time data streaming and interactions seamlessly.
7. Community Support
Node.js has a large and active community. This vibrant community contributes to a wealth of open-source libraries, tools, and frameworks, ensuring that developers have access to the latest best practices, solutions to common problems, and ongoing improvements.
8. Microservices Architecture
Node.js is particularly well-suited for microservices architecture. Its lightweight nature allows developers to create small, independent services that can be deployed and scaled individually. This modularity leads to better maintainability and scalability of applications.
9. Cross-Platform Development
Node.js is cross-platform, meaning it can run on various operating systems, including Windows, macOS, and Linux. This flexibility is beneficial for developing applications that need to operate in different environments.
10. Ease of Learning and Use
For developers familiar with JavaScript, learning Node.js and Express is relatively straightforward. The simplicity and minimalism of Express make it easy to get started with building APIs without a steep learning curve.
Prerequisites
Before we dive into building our REST API, make sure you have the following tools and knowledge:
- Node.js and npm: Install Node.js, which includes npm (Node Package Manager), from the official website.
- Text Editor or IDE: Choose your preferred code editor. Some popular choices are Visual Studio Code, Sublime Text, or WebStorm.
- Basic JavaScript Knowledge: Understanding of JavaScript is crucial for Node.js development.
Step-by-step Guide to Make a REST API Using Node.js
Step 1: Initialize Your Project
Let's start by creating a new directory for your project and initializing it with npm.
mkdir my-rest-api
cd my-rest-api
npm init -y
This will create a package.json file with default settings for your project.
Step 2: Install Dependencies
We need a couple of packages to get our REST API up and running:
- Express: The web application framework for Node.js.
- Body-parser: A middleware for parsing incoming request bodies.
- Nodemon (Optional): A tool that helps in automatically restarting the server during development.
Install these packages using npm:
const express = require('express');
const bodyParser = require('body-parser');
const app = express();

app.use(bodyParser.json());

const port = process.env.PORT || 3000;
app.listen(port, () => {
  console.log(`Server is running on port ${port}`);
});
Step 3: Create an Express App
Now, let's create an Express application and set up a basic server.
javascriptCopy codeconst express = require('express');const bodyParser = require('body-parser');const app = express();use(bodyParser.json());const port = process.env.PORT || 3000;listen(port, () => {console.log(`Server is running on port ${port}`);
Here, we've created a basic Express app, added the body-parser middleware to parse JSON data, and started a server on port 3000.
Step 4: Define Routes
In a REST API, routes define the endpoints for different HTTP methods (GET, POST, PUT, DELETE). Let's create a simple example with a GET request.
app.get('/api/hello', (req, res) => {
  res.json({ message: 'Hello, World!' });
});
This code defines a route for /api/hello that responds with a JSON message when accessed via a GET request.
Step 5: Run Your API
You can run your API using Node.js, but during development, it's handy to use Nodemon, which will automatically restart your server on code changes.
npm start
Now, if you access http://localhost:3000/api/hello, you should see the "Hello, World!" message.
Step 6: Add More Routes
To make a useful API, you'll need to define more routes and implement CRUD (Create, Read, Update, Delete) operations for your resources. Here's an example of a simple "To-Do List" API。
let todos = [];

app.get('/api/todos', (req, res) => {
  res.json(todos);
});

app.post('/api/todos', (req, res) => {
  const newTodo = req.body;
  todos.push(newTodo);
  res.status(201).json(newTodo);
});

// Implement PUT and DELETE as an exercise
In this example, we've added routes to list and create to-do items. You can extend this by implementing PUT and DELETE for updating and deleting tasks.
Step 7: Testing Your API
Testing your API is crucial to ensure it works as expected. Tools like Apidog or Insomnia can help you send requests and verify the responses.
Step 8: Deploy Your API
When you're ready to share your API with the world, you can deploy it on platforms like Heroku, AWS, or Azure.
An alternative way to Create a REST API with Apidog
Apidog simplifies REST API development, streamlining testing, documentation, security, and performance. This article demonstrates how to use Apidog and its key features.
Step 1: Download and Install Apidog
First, you need to create an account on Apidog. This can be done by going to the Apidog website and clicking the "Sign up" button. After registration, you will be redirected to the Apidog homepage.
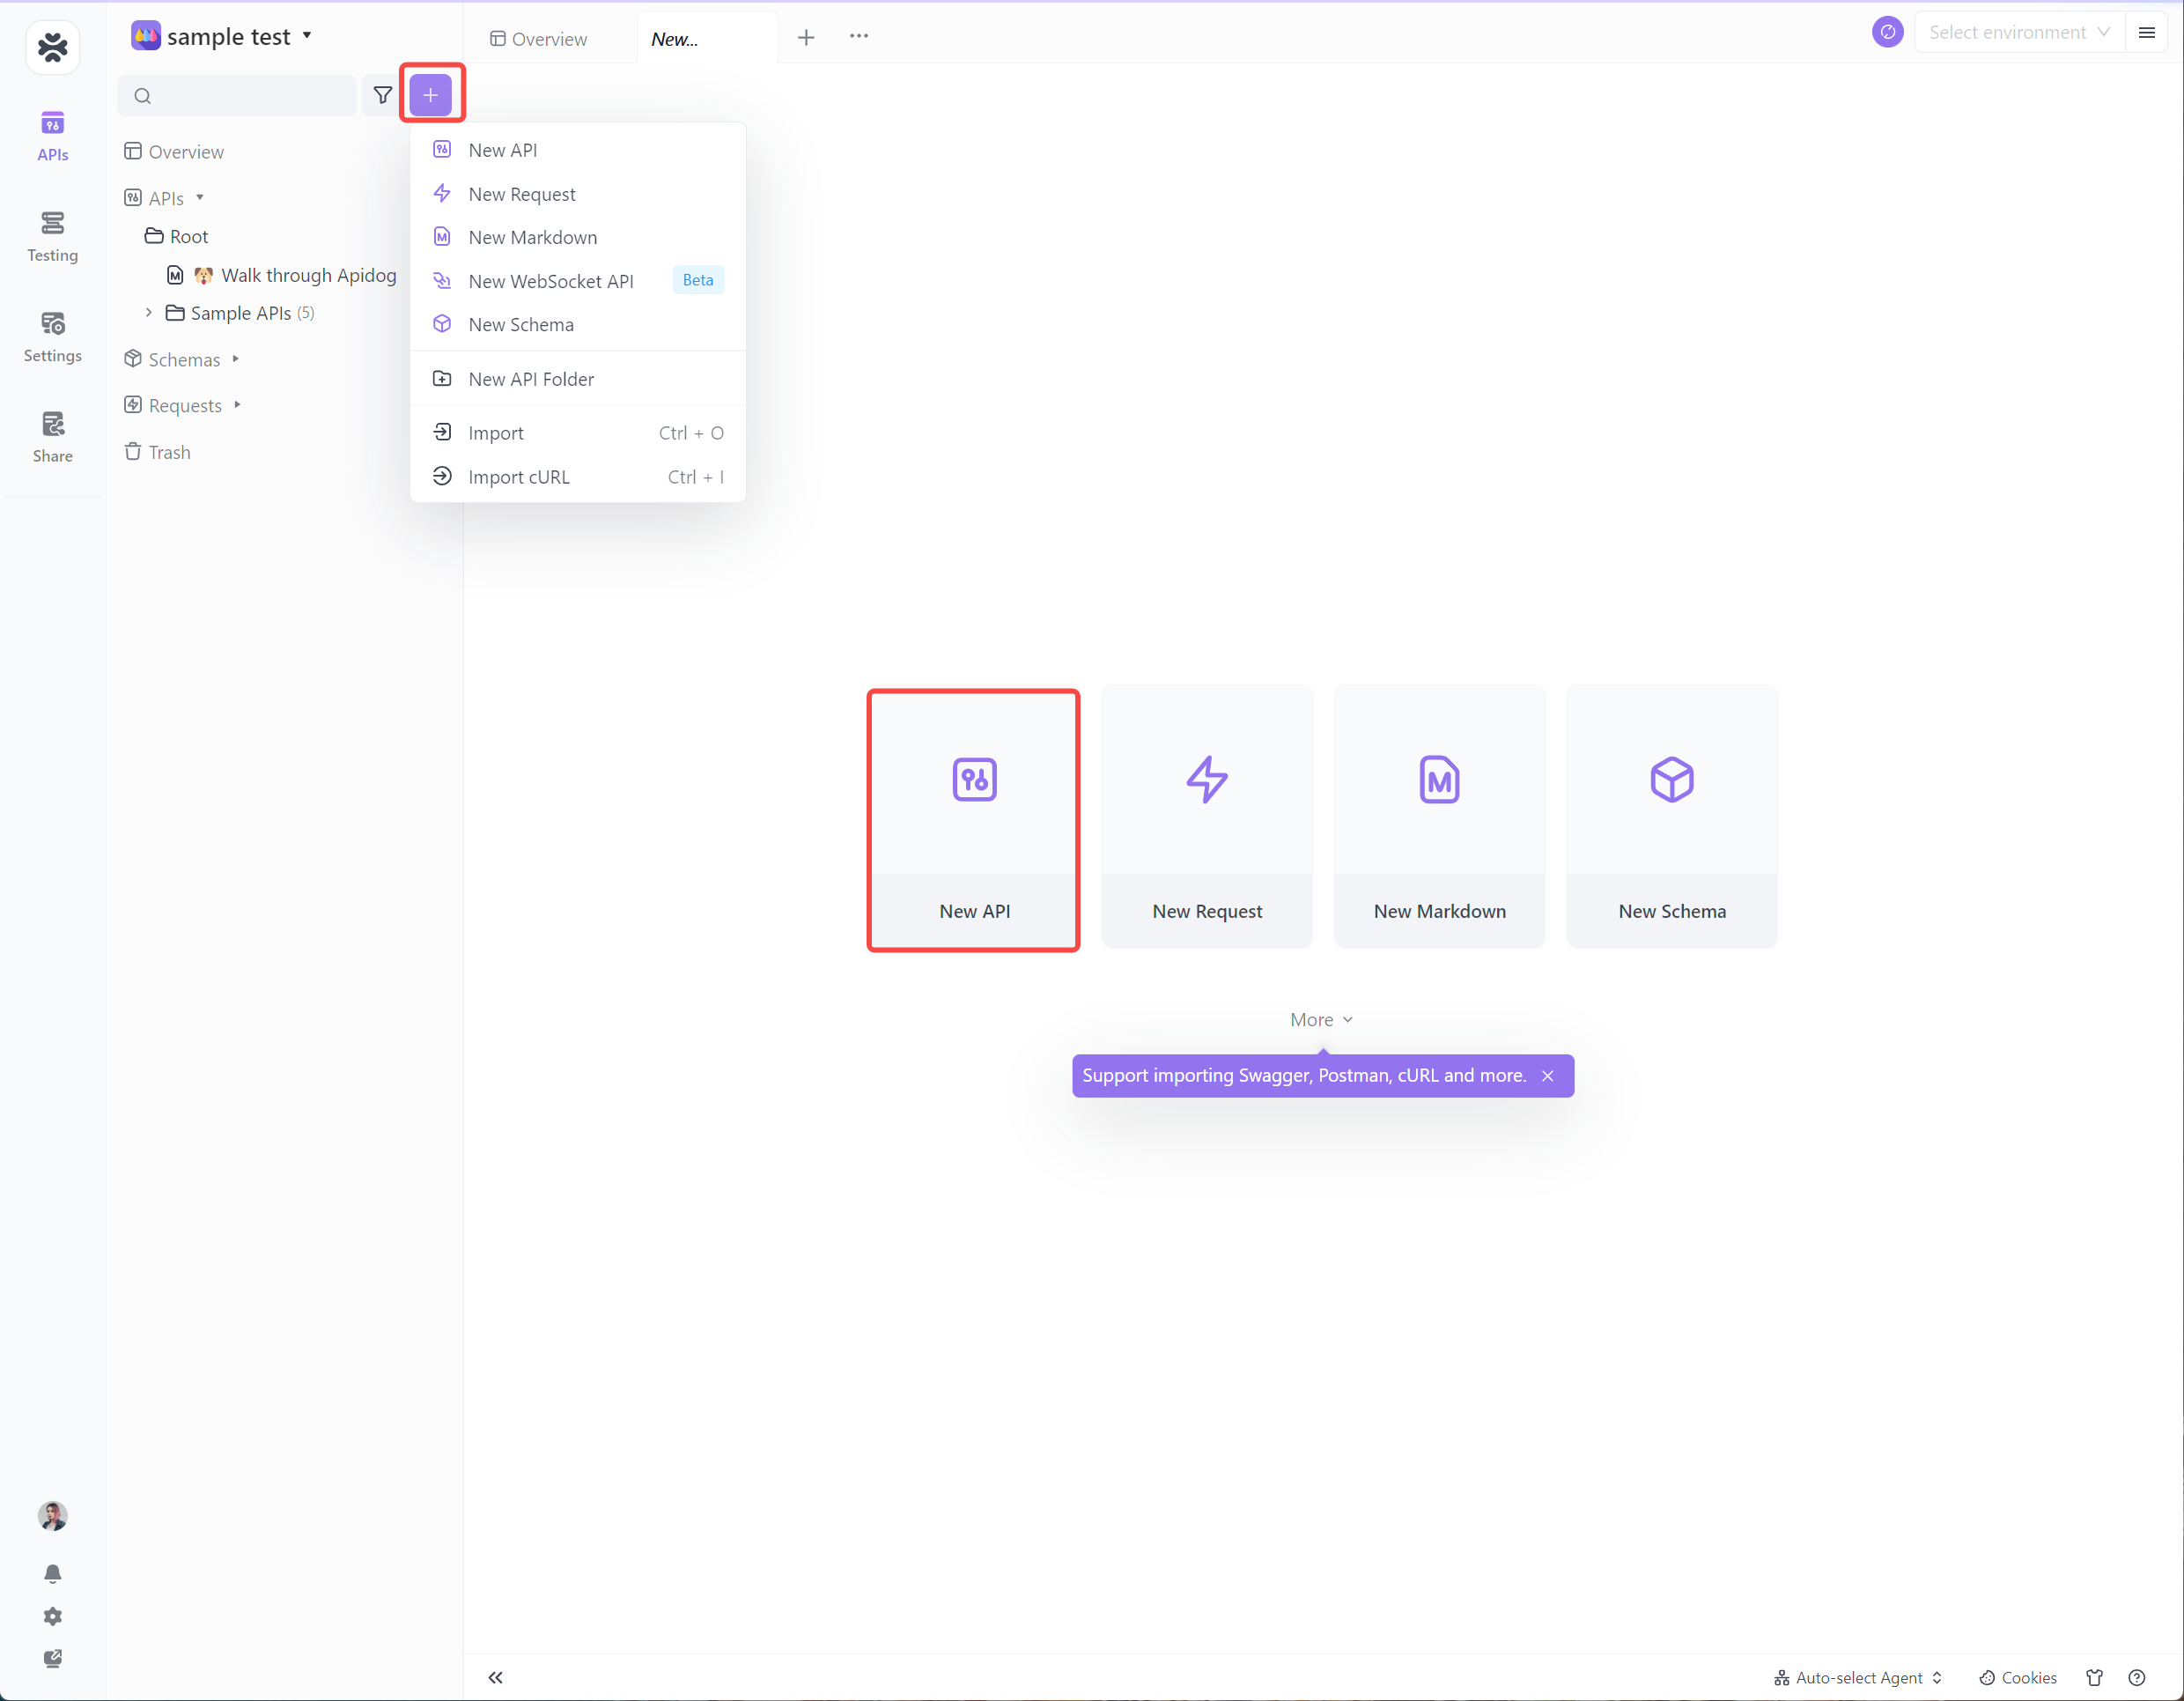
Step 2: Create an API
Within the project, you can create a new API. The documentation is the blueprint of the REST API, describing its resources, operations, and parameters. To create a new API, click the "+" button on the project page.
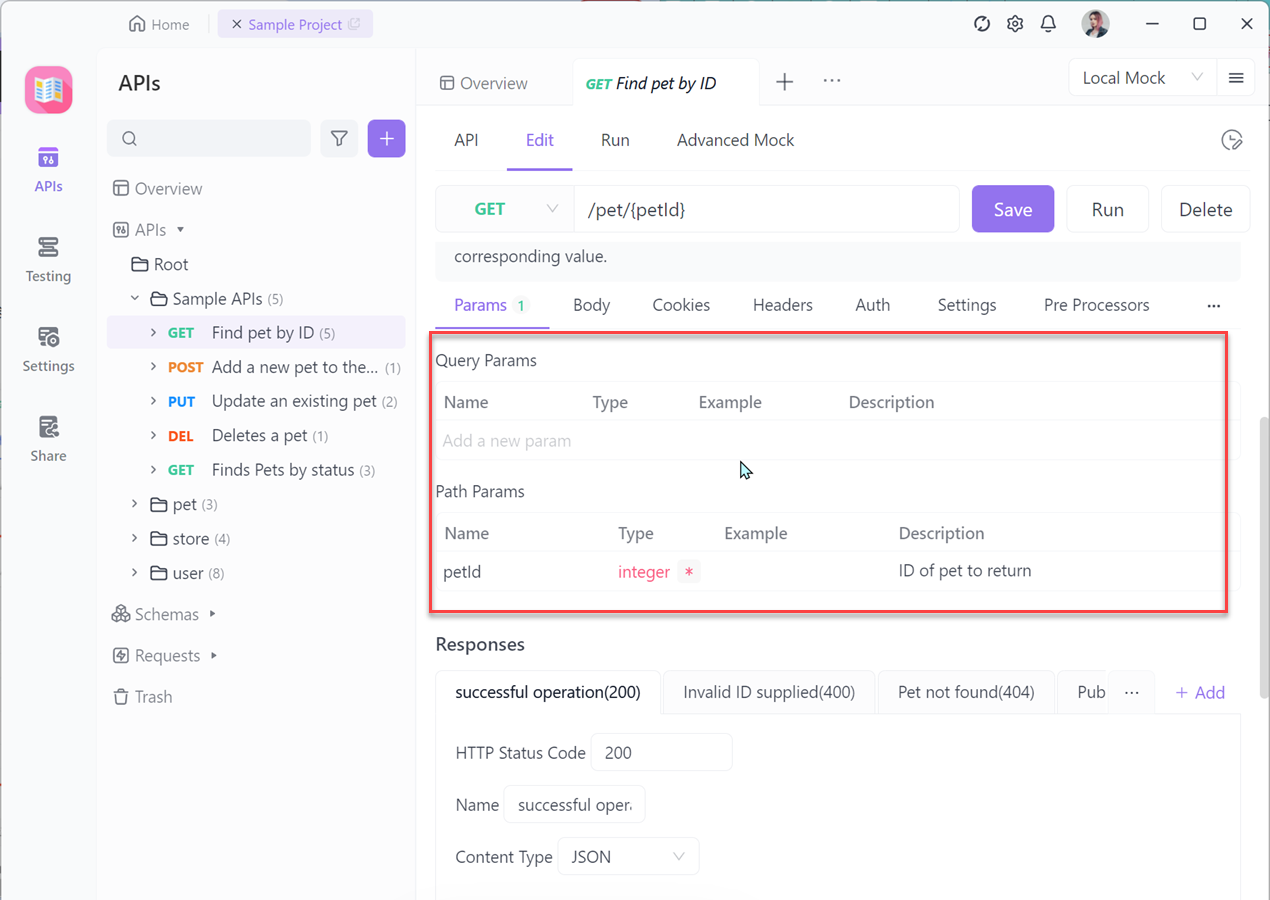
Step 3: Set the Parameters of REST APIs
Fill in the HTTP methods, request/response models, query parameters, headers, etc.
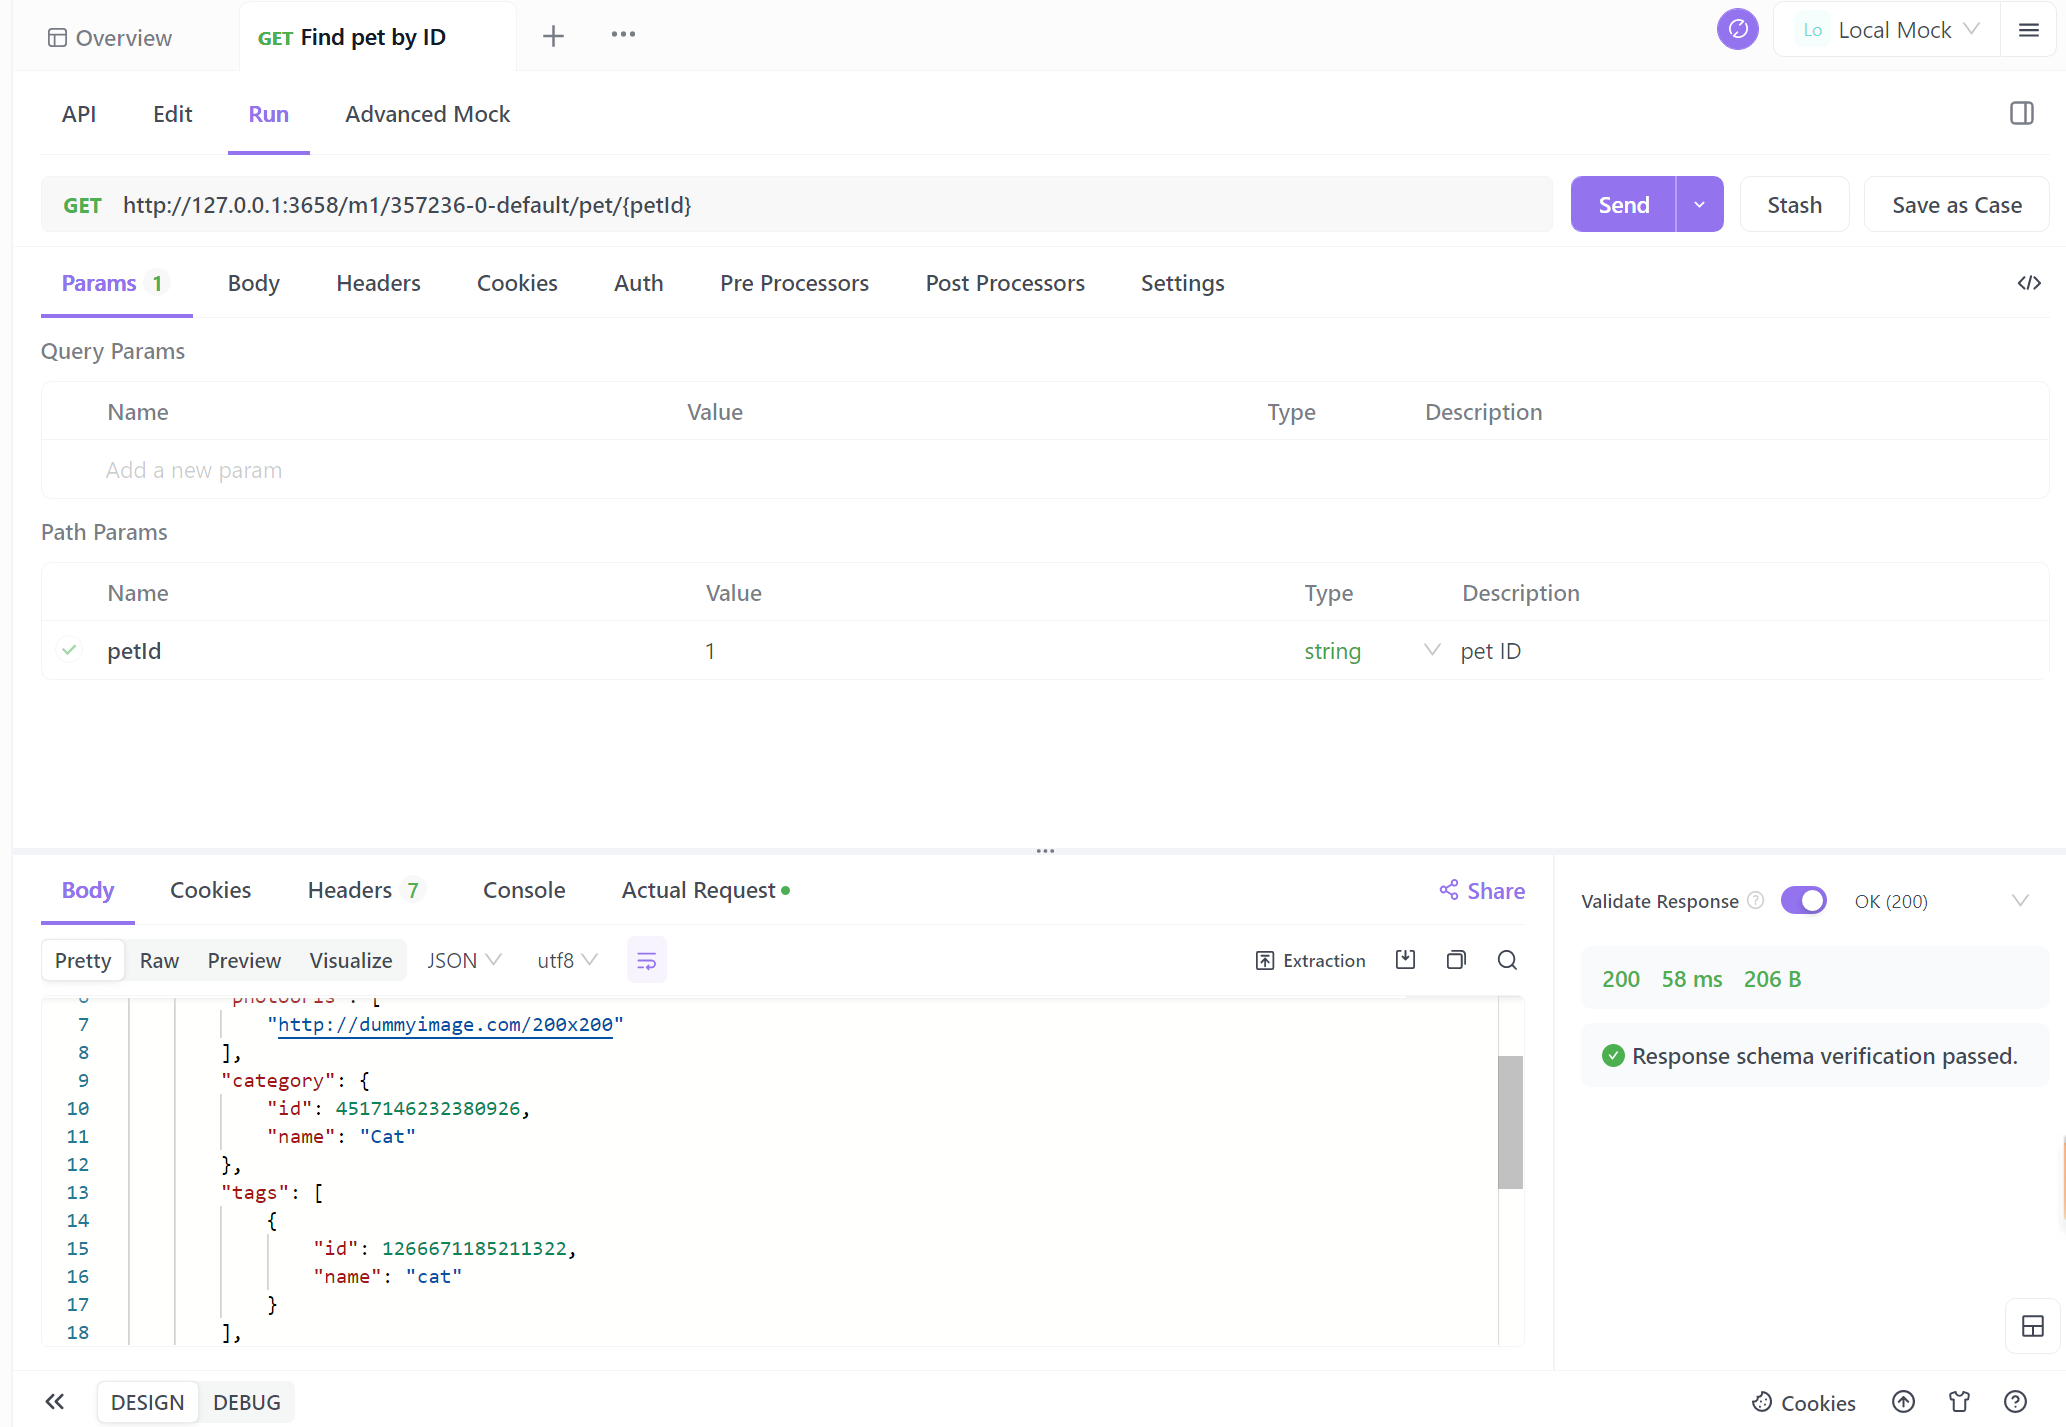
Step 4: Testing REST API
After all APIs have been developed, you can click the "Send" button to test your APIs.
Conclusion
Creating a REST API with Node.js and Express is a powerful skill for any web developer. In this blog post, we covered the essential steps from project setup to defining routes, and even touched on testing and deployment. Remember, practice is key, so don't hesitate to build your own APIs, experiment with different functionalities, and explore more advanced features as you become more proficient with Node.js and Express.
With this foundation, you'll be well on your way to developing robust and scalable web applications with RESTful APIs. Happy coding!
Frequently Asked Questions about Node.js REST API
1. What is the best framework for Node.js REST API?
While Feathers, Nest, LoopBack, and Moleculer are excellent frameworks, here are a few reasons why Express is the best option:
Feature-Rich: Express offers features like Model-View-Controller (MVC) architecture, robust routing capabilities, and built-in middleware, enabling you to create dynamic, scalable applications.
Strong Community Support: It has a large community that can help you work faster and more efficiently.
User-Friendly: Express is easy to set up, learn, and use, making it an ideal choice for beginners.
2. Should l use Go or node for REST API?
Choosing between Go (Golang) and Node.js for building a REST API depends on several factors including performance requirements, development speed, concurrency needs, and your team's expertise.
When to Use Go:
- You need high performance and efficiency.
- Your application requires handling a large number of concurrent operations.
- You prefer a statically typed language for compile-time error checking and performance optimization.
- You are building a microservices architecture where performance is critical.
When to Use Node.js:
- You need a fast development cycle and access to a large ecosystem of libraries and tools.
- Your application is I/O-heavy (e.g., real-time applications, chat applications).
- You want to use JavaScript across both the front-end and back-end.
- You have a team already experienced with JavaScript.
3. What is the best language to implement REST API?
The best language for implementing a REST API will depend on your specific project requirements, the expertise of your development team, and the existing technology stack in use.
- For Quick Prototyping: Python (Flask/Django) or Ruby (Rails).
- For High Performance: Go or C# (ASP.NET Core).
- For Existing Ecosystem and Community: JavaScript (Node.js) or PHP.
- For Enterprise-Level Applications: Java or C#.
4. Does Node.JS use REST API?
Node.js itself is a runtime environment for executing JavaScript on the server side, and it doesn't "use" REST APIs in the sense of having built-in REST functionality. However, Node.js is widely used to create REST APIs, thanks to its asynchronous, event-driven architecture and the availability of frameworks like Express.js, which make it straightforward to build and manage RESTful web services.
5. Do people still use Express?
Yes, people still use Express.js widely for developing REST APIs and web applications.
6. Does Next.js replace Express?
Next.js and Express are two different tools that serve different purposes in the web development ecosystem, and one does not necessarily replace the other.
7. Is Node.JS good for APl development?
Yes, Node.js is very well-suited for API development, especially for building RESTful APIs.
8. What is the best database for Node.JS API?
The "best" database for your Node.js API depends heavily on your specific project requirements and preferences. MongoDB is popular for its flexibility and ease of integration with Node.js, while PostgreSQL and MySQL are favored for their strong consistency and SQL capabilities. SQLite is ideal for embedded applications or simpler use cases. Assessing your application's needs and considering these factors will help you choose the most suitable database for your Node.js API.


