
How to Build CI/CD Pipeline (Step-by-Step Guide)
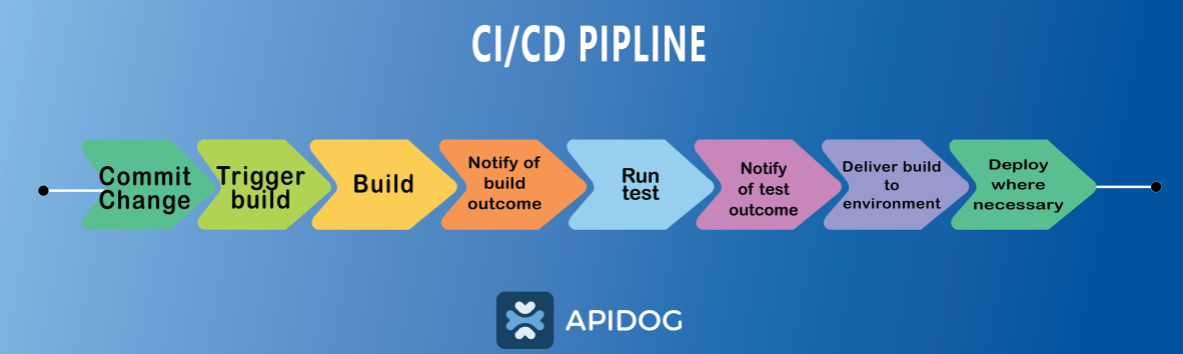
CI/CD stands for Continuous Integration and Continuous Deployment or Continuous Delivery. It is a modern approach in software engineering designed to minimize the gap between writing code and delivering it to users in a production environment.

CI/CD stands for Continuous Integration and Continuous Deployment or Continuous Delivery. It is a modern approach in software engineering designed to minimize the gap between writing code and delivering it to users in a production environment.
CI/CD introduces automation into the stages of app development that traditionally could be manual and prone to error. This acceleration boosts product release cycles while enhancing overall quality by spotting and resolving potential issues.
What is CI/CD?
CI/CD stands for Continuous Integration and Continuous Delivery/Deployment. They are key concepts in modern software development and delivery.
Continuous Integration (CI)
Continuous Integration (CI) is the practice of frequently merging code changes from different developers into a shared main branch in a version control system like Git. This is done to detect integration bugs as early as possible. A CI system will automatically build the code and run tests whenever new commits are pushed to the main branch. If any test fails, the team is alerted to fix the issue before proceeding further.
Continuous Deployment/Delivery (CD)
Continuous Delivery (CD) is the process of keeping software in a state where it can be released to production at any time. Code changes are automatically built, tested, and approved after merging into the main branch. The key difference from continuous deployment is that a human still decides when to actually deploy to production.
APIs in the CI/CD Framework
Integrating APIs with CI/CD can be a complex task. Think of APIs as bridges that allow software programs to communicate with each other. They require comprehensive lifecycle management practices to ensure seamless development, testing, and deployment.
CI/CD Features in Apidog
Apidog isn't just another tool in the developer's arsenal; it's a comprehensive solution designed to address the unique challenges of API development. With the rise of microservices and the increasing reliance on APIs, having a dedicated tool like Apidog is invaluable.
Apidog in the CI/CD Pipeline
- Seamless Integration: Apidog can be effortlessly integrated (which we will do in our next section) into existing CI/CD pipelines, ensuring that API testing and documentation are part of the continuous deployment process.
- Version Control: With Apidog's version control feature, teams can track changes, compare different versions of the API, and ensure that everyone is working with the latest, most stable version.
- Collaboration Features: Apidog promotes team collaboration by allowing discussions, comments, and suggestions right within the platform, ensuring that all stakeholders are aligned.
Apidog CLI
Apidog CLI is a command-line utility designed specifically for those who prefer terminal-based operations. While the main Apidog platform provides an interactive GUI(Graphical User Interface) for all API lifecycle management tasks, the CLI bridges the gap for developers who favor command-line functionalities, allowing them to interact with the platform without leaving the terminal.
Setting Up Apidog CLI for Continuous Integration
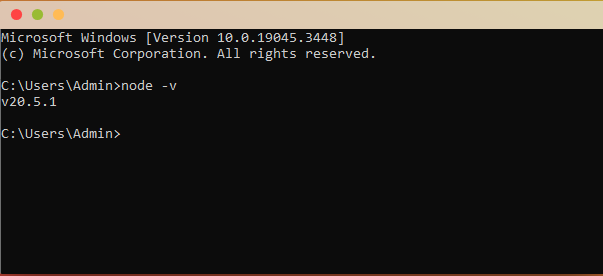
The pre-requisite for setting up the Apidog CLI is Node.js. Apidog CLI is built on Node.js, a runtime that allows you to execute JavaScript on the server side. To ensure compatibility and smooth performance, having the right version of Node.js is crucial.
How to Check and Install Node.js?
- Download & Install: If you don't have the required version (12 or higher), go to the official Node.js website and download the recommended version for your operating system. Follow the installation prompts.
- Verify Installation: Check the existing version of node.js by using the command node -v to see if you have Node.js installed.
Run the above command again to display the correct version. The output will be similar to this.
How to Install Apidog CLI?
The Apidog CLI is a gateway to all of Apidog's features from your terminal or command prompt. It's designed to be intuitive, making tasks like testing, debugging, and documentation a breeze.
- Open Terminal: If you're using Windows, ensure you have administrative rights before beginning. To open your terminal or command prompt, proceed accordingly.
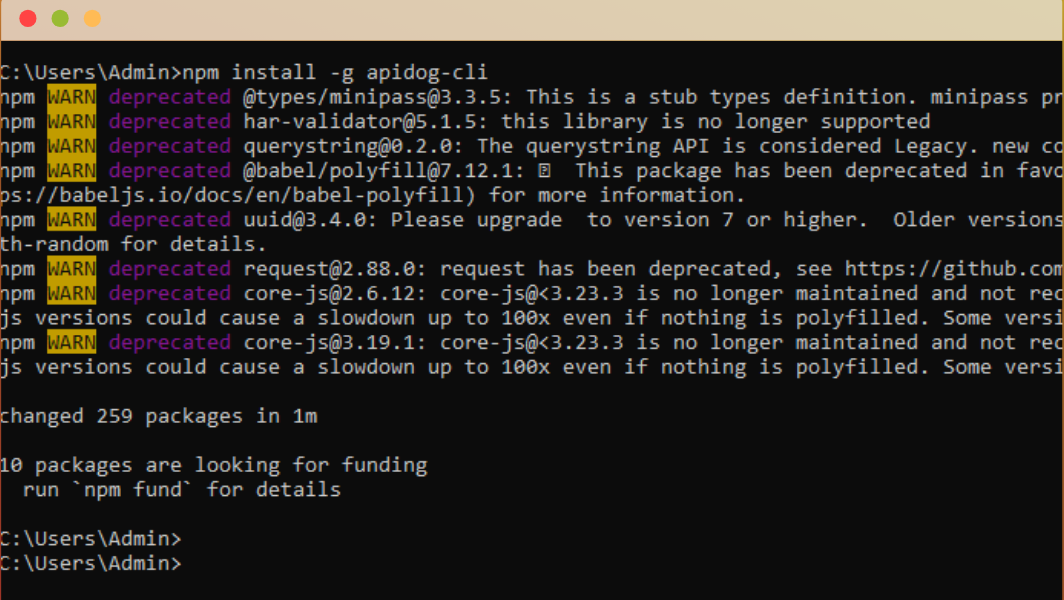
- Use npm (Node Package Manager): The Apidog CLI can be obtained using npm, included with Node.js. To fetch and install it, execute the subsequent directive:
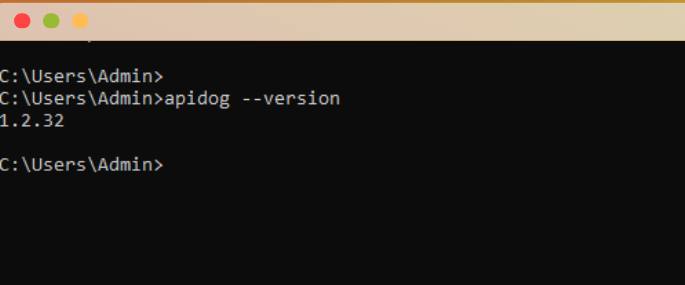
3. Post-installation Check: Checking if the installation is completed ensures good practice. It can be done using the following command.
4. Confirming successful installation: this command returns the Apidog CLI's version number.
Apidog's vast capabilities can be incorporated into your CI/CD process using Apidog CLI. With this tool, API tasks can easily be executed via the command line by developers interacting with Apidog. It means you can automate API testing, documentation generation, and other API management tasks using scripts and commands, a key component of CI/CD pipelines.
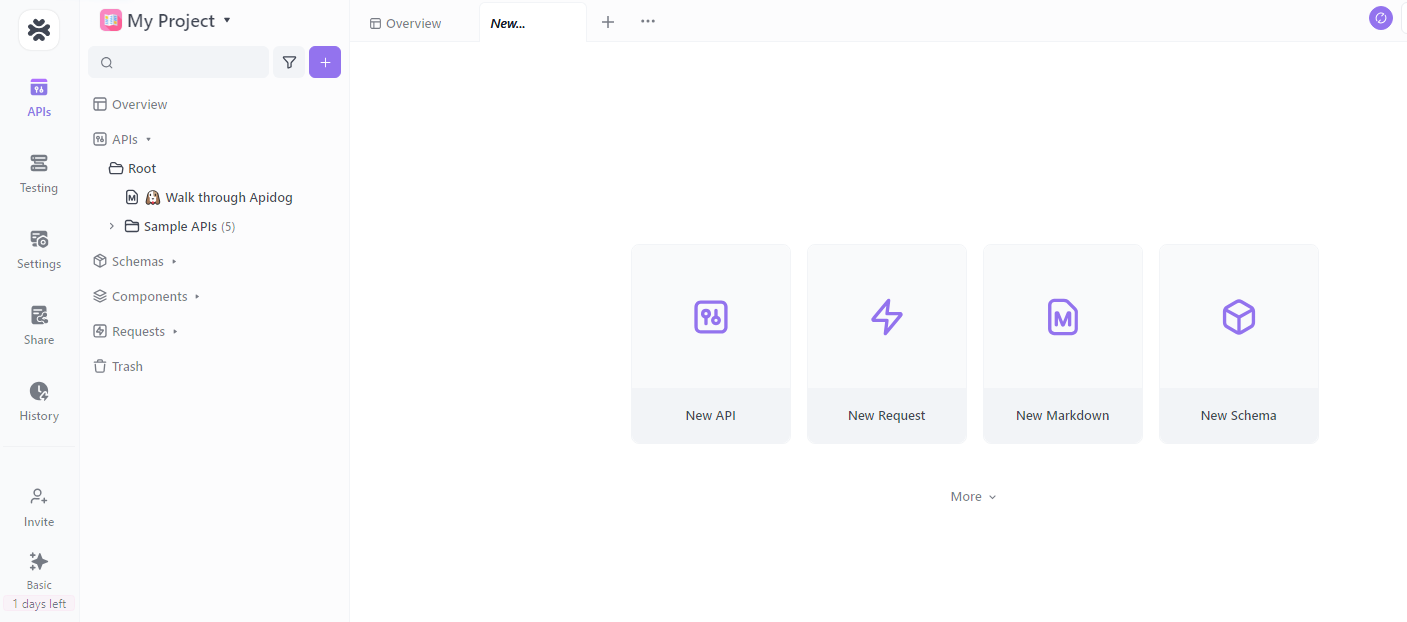
How to Set up and Run CI/CD in Apidog?
By incorporating CI into Apidog, developers can ensure that every change made to an API—whether it's a new endpoint or a modification to an existing one—is automatically tested and validated against predefined conditions. This automatic testing not only catches issues early in the development cycle but also ensures that the entire suite of APIs remains consistent and functional. In essence, CI in Apidog is a guardian, ensuring your APIs' health, stability, and reliability.
Method 1. Detailed Steps to Set Up a New CI within Apidog
To set up Continuous Integration in Apidog, one must thoroughly understand each step and proceed with great attention to detail. Let’s dive deep into each phase and provide a complete overview for developers looking to integrate CI within their Apidog setup.
Step 1. Access the Testing Environment
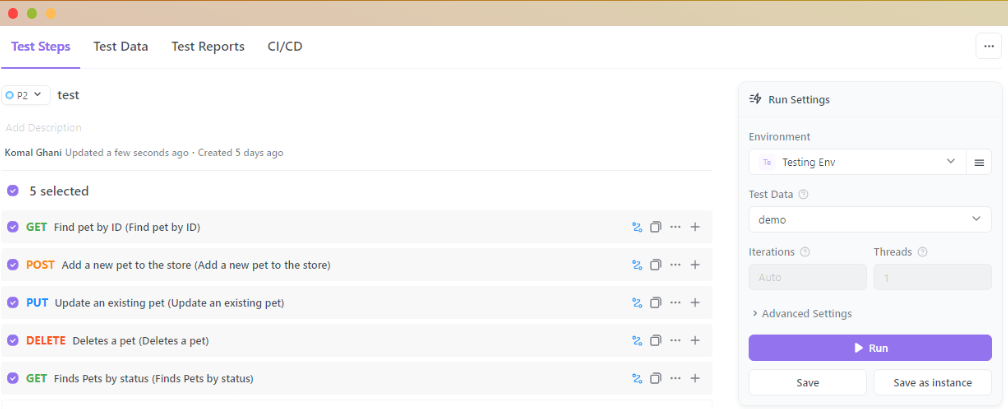
- Access the "Testing" section from the Apidog dashboard to manage test cases, suites, and configurations.
Step 2. Select Testing
- You will see a comprehensive list of your test suites and individual test cases. Choose which tests you want to include in the CI process. This selection is important for the accuracy of your CI testing.
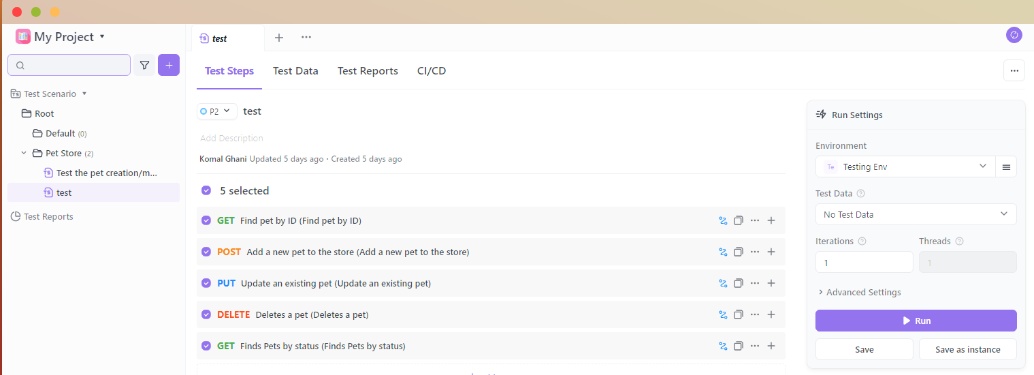
Step 3. Configure Test Settings
- To ensure seamless test execution within your CI setup, it's crucial to configure the following settings:
- Define the Runtime Environment: Specify the environment in which your tests will run. This includes defining the operating system, dependencies, and necessary tools or libraries.
- Set the Iteration Count: Determine how often your tests should be repeated during the CI process. This helps evaluate your software's stability and reliability under various conditions i.e. under different test types.
- Configure Relevant Parameters: Customize additional parameters or options that align with your testing needs. These configurations are essential for accurately simulating real-world scenarios and ensuring that your tests provide meaningful results.
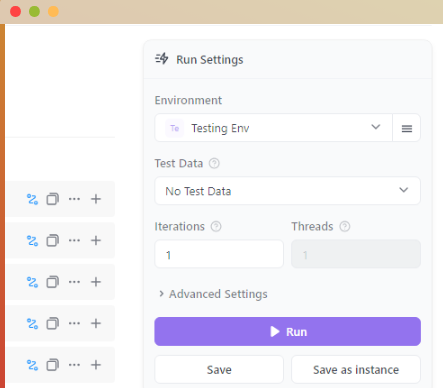
Step 4. Save Your Customized Settings
After making all the necessary selections and configurations, saving your CI setup within the testing environment is crucial. This step completes the process, and your tests are now fully integrated into your CI workflow, ready to be executed automatically.
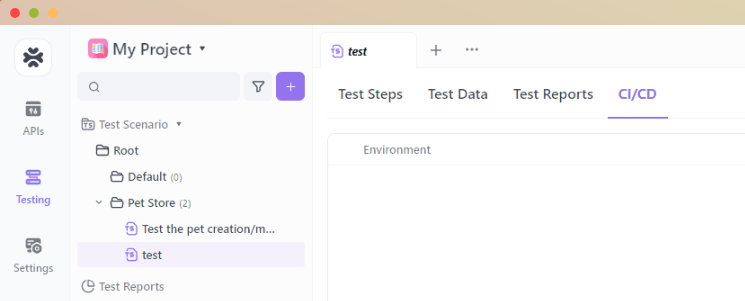
Method 2. Creating a New CI Setup using the "CI/CD" Tab
In addition to creating CI setups within your testing environment, Apidog offers a complementary method using the "CI/CD" tab. This approach provides flexibility and caters to different workflows. Here's a more detailed guide on navigating to the "CI/CD" tab and creating a new CI setup:
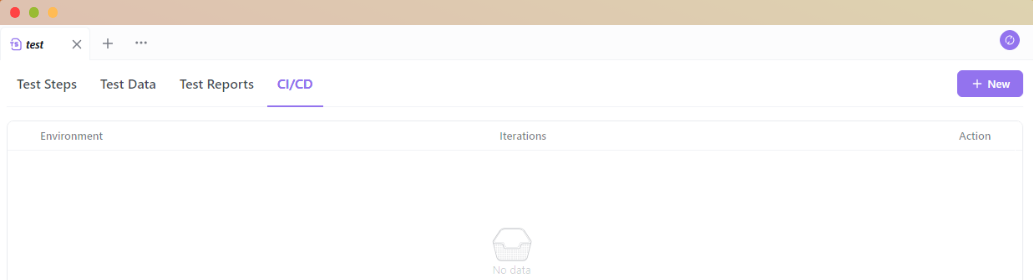
Step 1. Access the CI/CD Section:
Log into your Apidog account and locate the "CI/CD" tab in the Testing tab. This dedicated section houses all the tools and features related to Continuous Integration and Continuous Deployment.
Step 2. Initiate a New CI Setup:
Within the "CI/CD" tab, you'll typically find an option to create a new CI setup. Click on the ”+New” button to start the setup process.
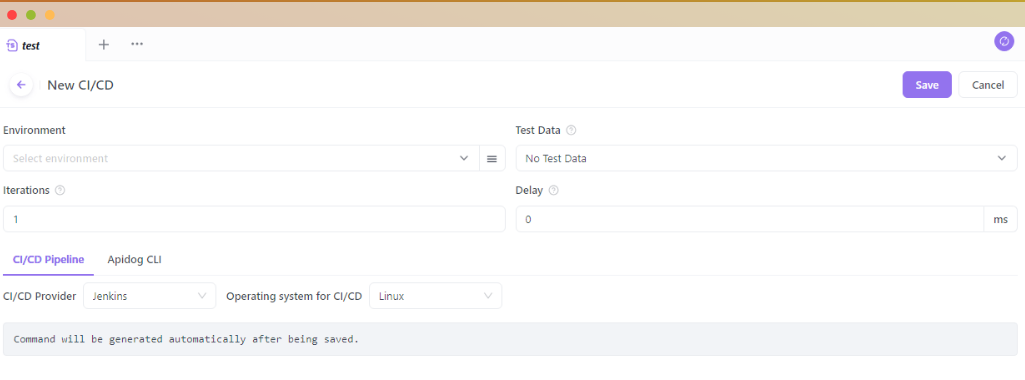
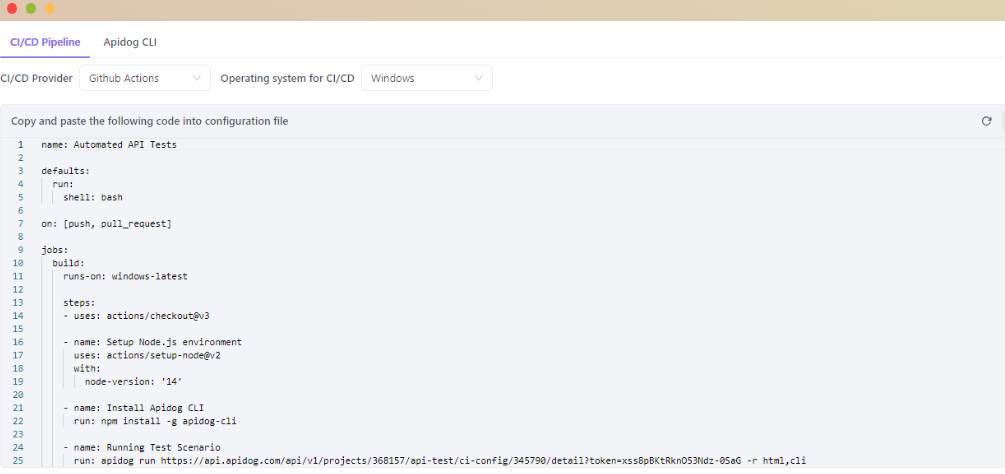
Step 3. Configuration:
Provide an environment for your new CI setup. Include Test data, complete all the configuration, and hit the save button after completing your configuration.
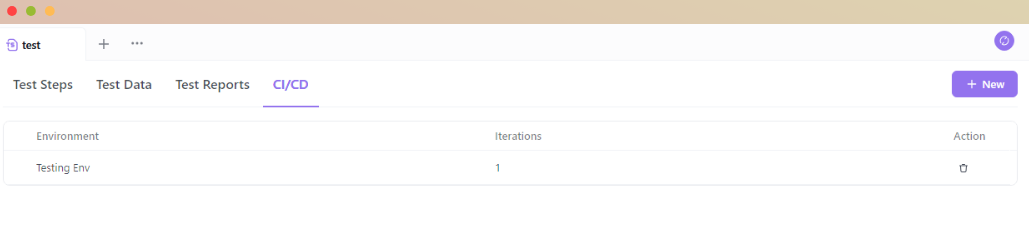
Step 4. Finalize and Save:
- Before finalizing the setup, review all the settings and configurations you've defined for your new CI setup. Once you're satisfied that everything is set up per your requirements, save the new CI setup. This step marks the completion of the process, and your tests are now ready to run within the CI/CD workflow.
Setting up CI within Apidog is a proactive step toward ensuring your APIs' integrity, functionality, and reliability. With regular and automated testing, issues are caught early, and the quality of the API deliverables is always at its best.
Running Continuous Integration Tests with Apidog
Continuous Integration (CI) tests ensure your APIs function as expected, especially after new code integrations. Apidog simplifies this process, allowing you to run online and local tests. Let's delve into the specifics of executing these tests.
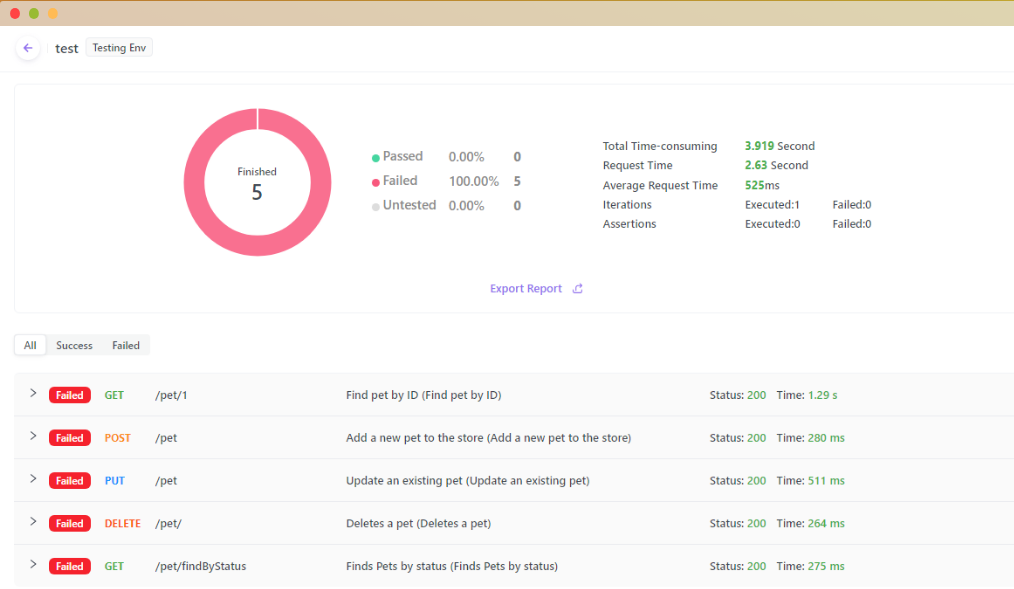
Running Tests Online in Real-time
- Access the CI Configuration: Navigate to the "CI/CD" tab in Apidog and select the CI configuration you've set up.
- Initiate Test: Look for a "Run" button. Clicking this will start the CI tests in real-time.
- Monitor Progress: Apidog provides a live progress bar or log, allowing you to monitor the test's progress. Any failures or issues will be highlighted, making it easier to pinpoint problems.
Conclusion
Continuous Integration and Continuous Deployment (CI/CD) are contemporary software development cornerstones. These methodologies, championed with tools like Apidog and Jenkins, empower teams to drive innovation swiftly, deliver software of elevated quality, and adapt promptly to shifts in the digital landscape.
