
Real-time communication has become essential for modern web applications. From live chat systems and collaborative editing tools to online gaming and financial trading platforms, users expect instant updates without page refreshes. WebSocket technology makes this possible by enabling true bidirectional communication between clients and servers.
This comprehensive guide explores what WebSocket is, how it works, its relationship with HTTP, and most importantly—how to test and debug WebSocket APIs effectively using professional tools like Apidog.
What is WebSocket?
WebSocket is a communication protocol that provides full-duplex, bidirectional communication channels over a single TCP connection. Unlike traditional HTTP requests that follow a request-response pattern, WebSocket establishes a persistent connection that allows both the server and client to send data independently at any time.
Key Characteristics of WebSocket
- Persistent Connection: Once established, a WebSocket connection remains open until explicitly closed by either the client or server. This eliminates the overhead of repeatedly establishing new connections for each data exchange.
- Bidirectional Communication: Both client and server can initiate data transmission at any time. The server can push updates to the client without waiting for a request, enabling true real-time communication.
- Low Latency: By maintaining a persistent connection and eliminating HTTP request/response overhead, WebSocket significantly reduces latency compared to traditional polling or long-polling techniques.
- Efficient Data Transfer: WebSocket uses a lightweight framing protocol that minimizes overhead. After the initial handshake, data frames contain minimal header information, making transmission highly efficient.
- Protocol Upgrade: WebSocket connections begin as standard HTTP requests and then upgrade to the WebSocket protocol through a handshake process, ensuring compatibility with existing web infrastructure.
How WebSocket Works: The Technical Foundation

Understanding WebSocket's underlying mechanism helps developers implement and debug real-time communication effectively.
The WebSocket Handshake Process
Step 1: Initial HTTP Request
The client initiates a WebSocket connection by sending a standard HTTP request with special headers:
GET /chat HTTP/1.1

Host: example.com

Upgrade: websocket

Connection: Upgrade

Sec-WebSocket-Key: dGhlIHNhbXBsZSBub25jZQ==

Sec-WebSocket-Version: 13
Key headers include:
Upgrade: websocket- Indicates the desire to upgrade to WebSocket protocolConnection: Upgrade- Signals protocol upgradeSec-WebSocket-Key- Random value for security verificationSec-WebSocket-Version- WebSocket protocol version
Step 2: Server Response
If the server supports WebSocket and accepts the connection, it responds with:
HTTP/1.1 101 Switching Protocols

Upgrade: websocket

Connection: Upgrade

Sec-WebSocket-Accept: s3pPLMBiTxaQ9kYGzzhZRbK+xOo=
The 101 Switching Protocols status code confirms successful protocol upgrade. The Sec-WebSocket-Accept header contains a hash of the client's key, verifying the handshake.
Step 3: Persistent Connection Established
After the handshake, the HTTP connection transforms into a WebSocket connection. Both parties can now send data frames independently without additional handshakes.
WebSocket Frame Structure
WebSocket communication uses frames—small data packets that include:
Frame Header:
- FIN bit: Indicates if this is the final frame in a message
- Opcode: Specifies frame type (text, binary, close, ping, pong)
- Mask bit: Indicates if payload is masked (required for client-to-server)
- Payload length: Size of the data
Payload Data:
The actual message content, which can be text (UTF-8) or binary data.
Masking:
Client-to-server frames must be masked using a random 32-bit key to prevent cache poisoning attacks. The server unmasks the data upon receipt.
Connection Lifecycle
- Active Communication: Once established, both parties can send messages at any time. The connection remains open until explicitly closed.
- Keep-Alive Mechanism: WebSocket includes ping/pong frames to verify connection health. If a party doesn't respond to a ping, the connection may be considered dead.
3. Connection Termination: Either party can initiate closure by sending a close frame. The other party responds with its own close frame, and the TCP connection terminates.
WebSocket vs HTTP: Understanding the Differences

WebSocket and HTTP are distinct protocols with different purposes, yet they're intrinsically connected.
How They Differ
1. Communication Pattern
HTTP:
- Request-response model
- Client initiates all communication
- Server responds only to requests
- Each exchange requires a new connection (without keep-alive)
WebSocket:
- Full-duplex communication
- Both parties can initiate messages
- Persistent connection
- Continuous bidirectional data flow
2. Use Cases
HTTP:
- Traditional web pages
- RESTful APIs
- File downloads
- Form submissions
- Any request-response interaction
WebSocket:
- Real-time chat applications
- Live sports scores
- Collaborative editing
- Online gaming
- Financial trading platforms
- IoT device communication
3. Overhead
HTTP:
- Each request includes full headers
- Connection establishment overhead
- Higher latency for frequent updates
WebSocket:
- Minimal frame overhead after handshake
- No repeated connection establishment
- Lower latency for real-time updates
How They Connect
1. WebSocket Depends on HTTP
WebSocket connections always begin with an HTTP handshake. The client sends an HTTP request with upgrade headers, and if the server agrees, the protocol switches to WebSocket. This design ensures:
- Compatibility with existing web infrastructure
- Ability to traverse firewalls and proxies
- Leverage of HTTP security mechanisms (TLS/SSL)
2. Complementary Roles
Modern applications often use both protocols:
- HTTP for traditional request-response operations (authentication, data retrieval)
- WebSocket for real-time updates and bidirectional communication
This hybrid approach optimizes both initial page load and ongoing real-time interaction.
Testing WebSocket APIs with Apidog: The Professional Approach
Developing WebSocket services requires robust testing tools. Apidog provides comprehensive WebSocket testing capabilities within its all-in-one API development platform.
Why Apidog for WebSocket Testing?
Unified Platform:
Test REST APIs, GraphQL, and WebSocket endpoints in a single tool, eliminating the need for multiple specialized applications.
Visual Interface:
Intuitive UI for establishing connections, sending messages, and viewing responses—no command-line complexity.
Message Format Support:
Handle text formats (JSON, XML, HTML, plain text) and binary formats (Base64, Hexadecimal) with syntax highlighting and formatting.
Real-Time Monitoring:
View connection status, sent messages, and received messages in chronological order with detailed inspection capabilities.
Team Collaboration:
Save WebSocket APIs to your project for team access, documentation, and reuse.
Advanced Features:
Configure handshake parameters (headers, cookies, query params), use variables, and integrate with your existing API workflow.
Step-by-Step: Testing WebSocket APIs with Apidog
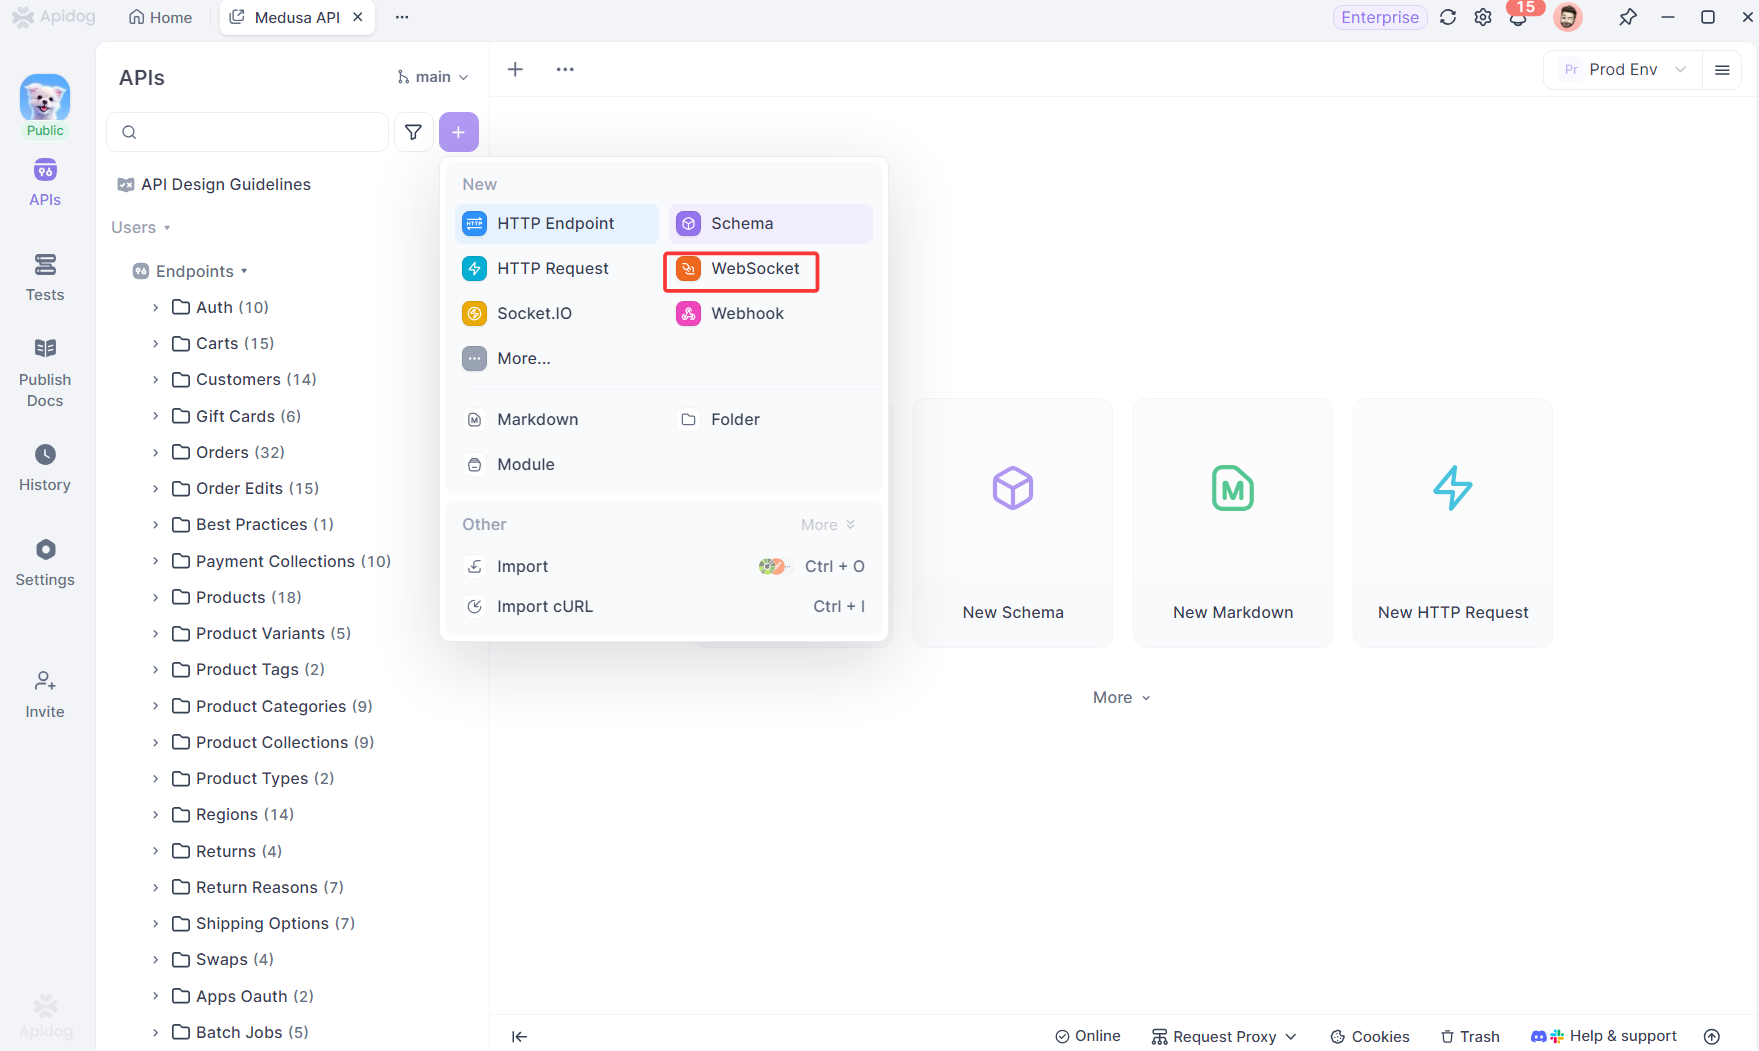
Step 1: Create a WebSocket Request
- Open your Apidog project
- Click the "+" button in the left sidebar
- Select "New WebSocket"
- Enter your WebSocket server URL (beginning with
ws://orwss://)
Step 2: Configure Handshake Parameters
Before establishing the connection, configure authentication and other parameters:
Query Parameters:
Add URL query parameters with support for string, integer, number, and array data types.
Headers:
Set custom headers for authentication tokens, API keys, or other metadata.
Cookies:
Include cookies required for session management or authentication.
These parameters are sent during the WebSocket handshake and cannot be modified after connection establishment.
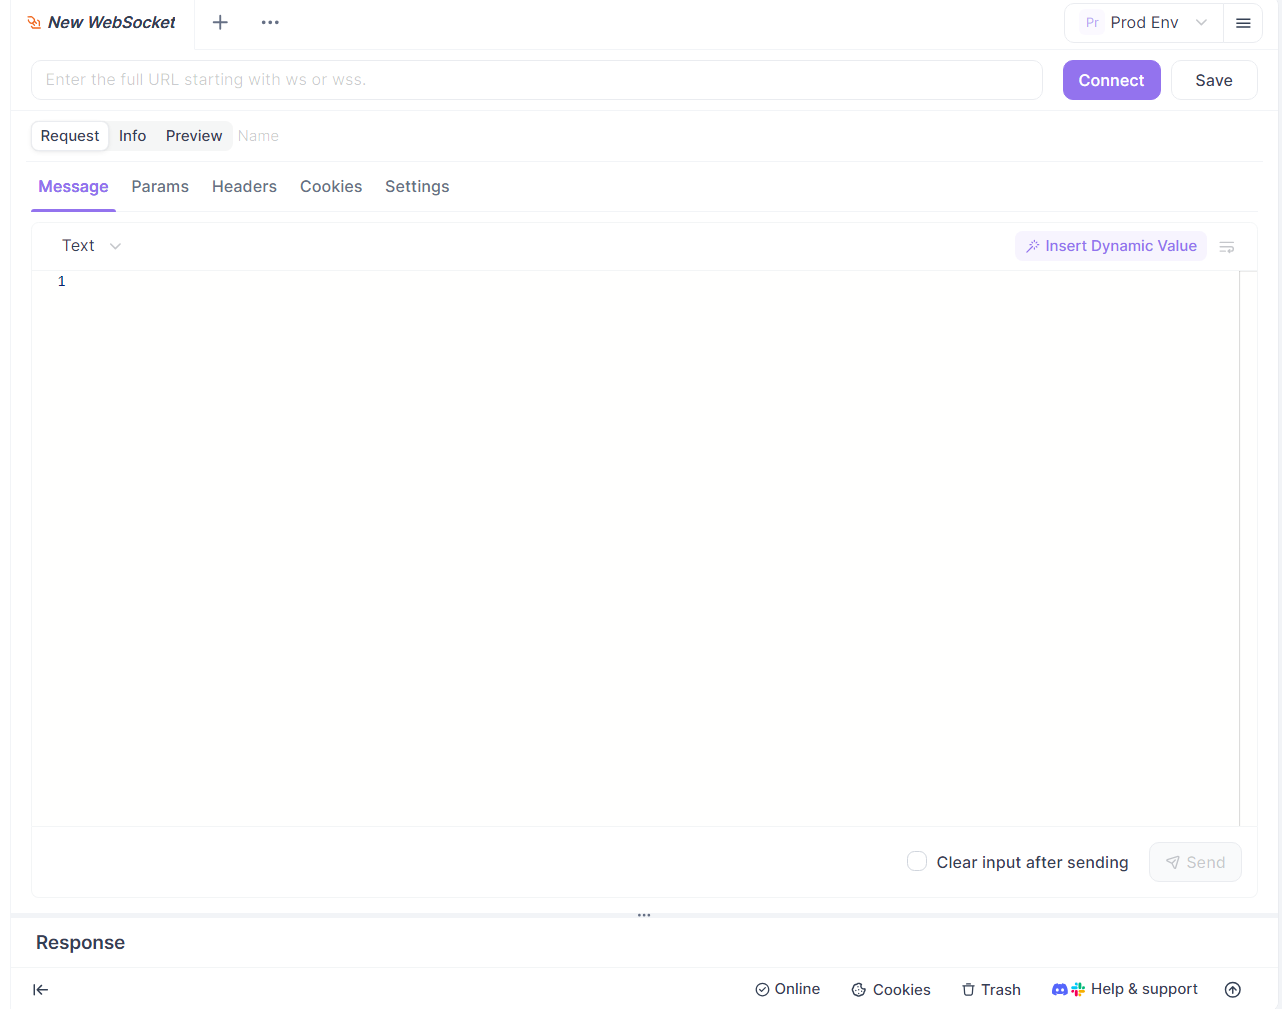
Step 3: Establish WebSocket Connection

Click the "Connect" button to initiate the WebSocket handshake. Apidog displays:
- Connection status (connecting, connected, disconnected)
- Handshake request details
- Server response
- Any connection errors
Upon successful connection, you'll see a confirmation message, and the server may send initial data.
Step 4: Compose and Send Messages
Navigate to the Message tab to compose your messages:
Text Formats:
- Plain Text
- JSON (with syntax highlighting and formatting)
- XML (with syntax highlighting and formatting)
- HTML (with syntax highlighting and formatting)
Binary Formats:
- Base64 encoded
- Hexadecimal encoded
The editor provides:
- Syntax highlighting based on selected format
- Auto-formatting for JSON, XML, and HTML
- Variable substitution support
- Message history
Click "Send" to transmit your message to the server.
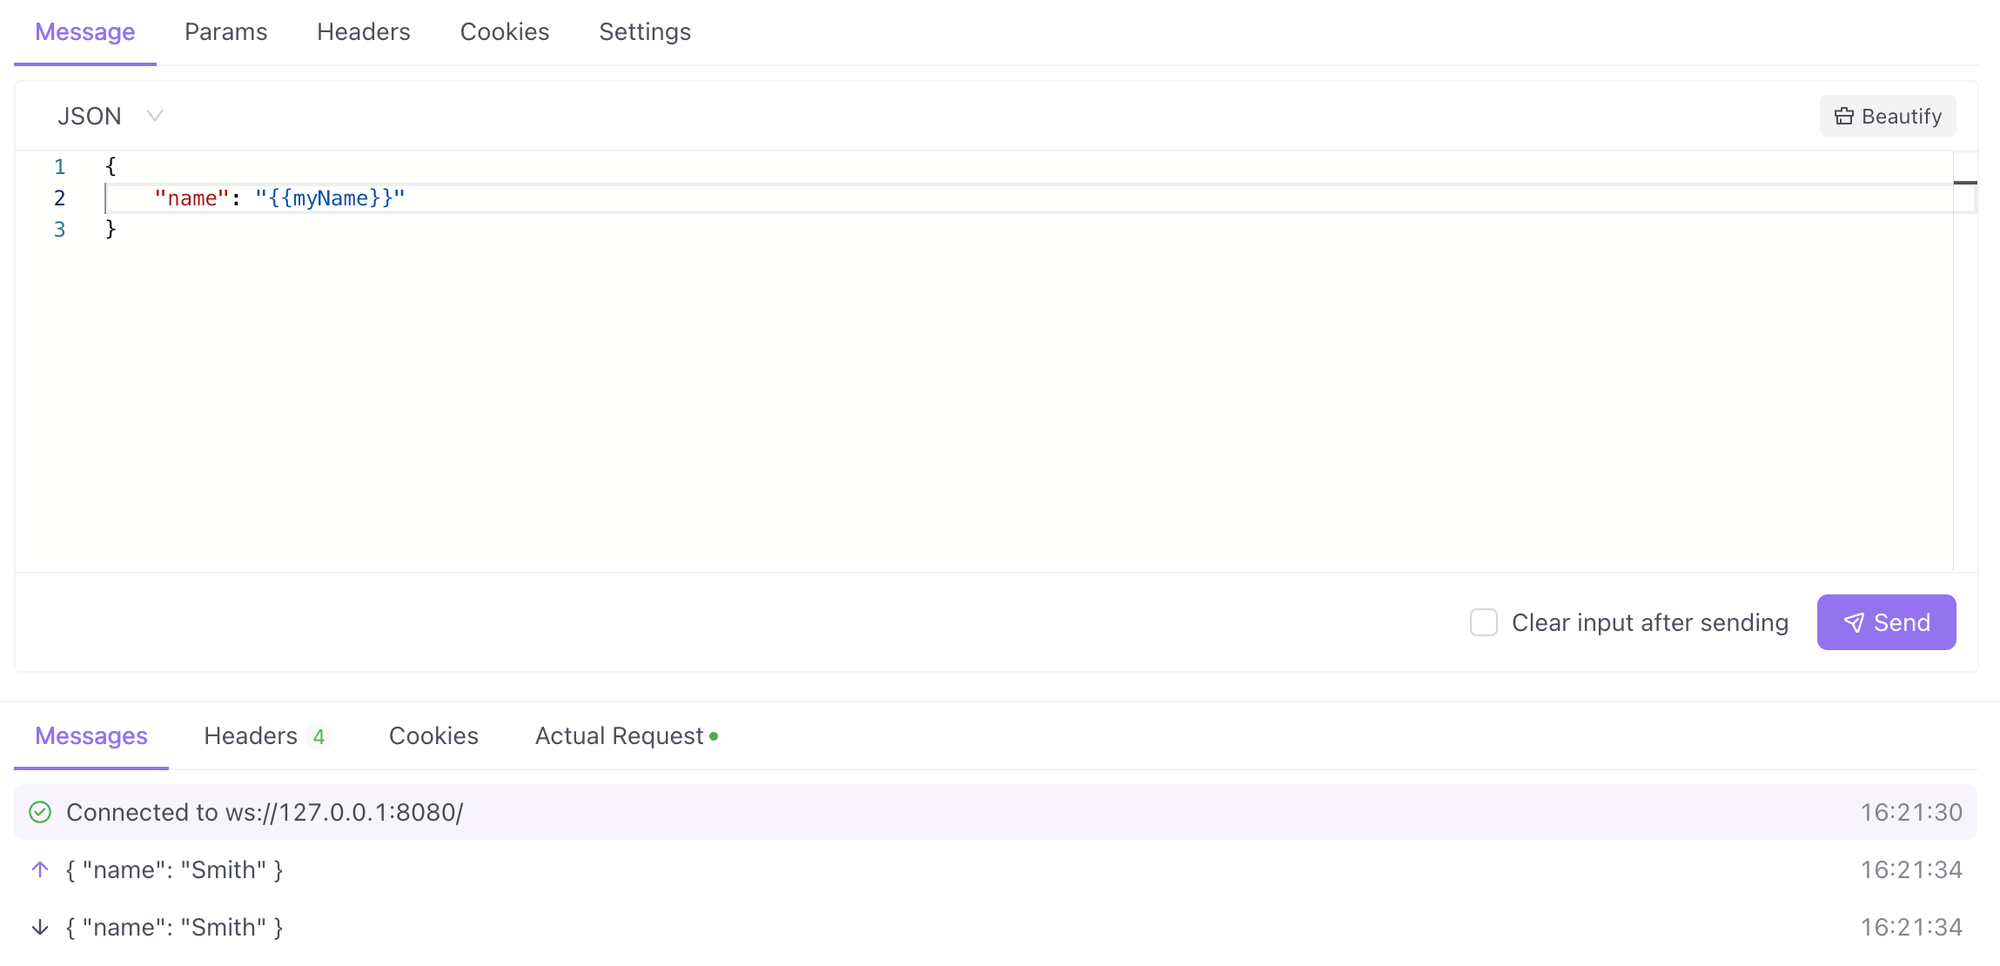
Step 5: View and Analyze Messages

The Messages section displays all communication in chronological order:
Message List:
- Connection events (connected, disconnected)
- Sent messages (from client to server)
- Received messages (from server to client)
- Timestamps for each event
Message Details:
Click any message to view detailed information:
Text Messages:
- Formatted display with syntax highlighting
- Manual format switching (JSON, XML, HTML, Text)
- Encoding options
Binary Messages:
- Hexdump view by default
- Base64 encoded view
- Raw binary data view
This comprehensive view helps debug message structure, encoding issues, and protocol implementation.
Step 6: Use Variables for Dynamic Testing

Apidog's variable system works seamlessly with WebSocket:
Environment Variables:
Switch between development, staging, and production WebSocket endpoints without modifying the URL.
Global Variables:
Store authentication tokens or common parameters accessible across all WebSocket requests.
Variable Syntax:
Use {{variable_name}} in URLs, headers, parameters, and message content.
This capability enables:
- Testing across multiple environments
- Reusing authentication credentials
- Parameterized testing scenarios
- Team collaboration with shared configurations
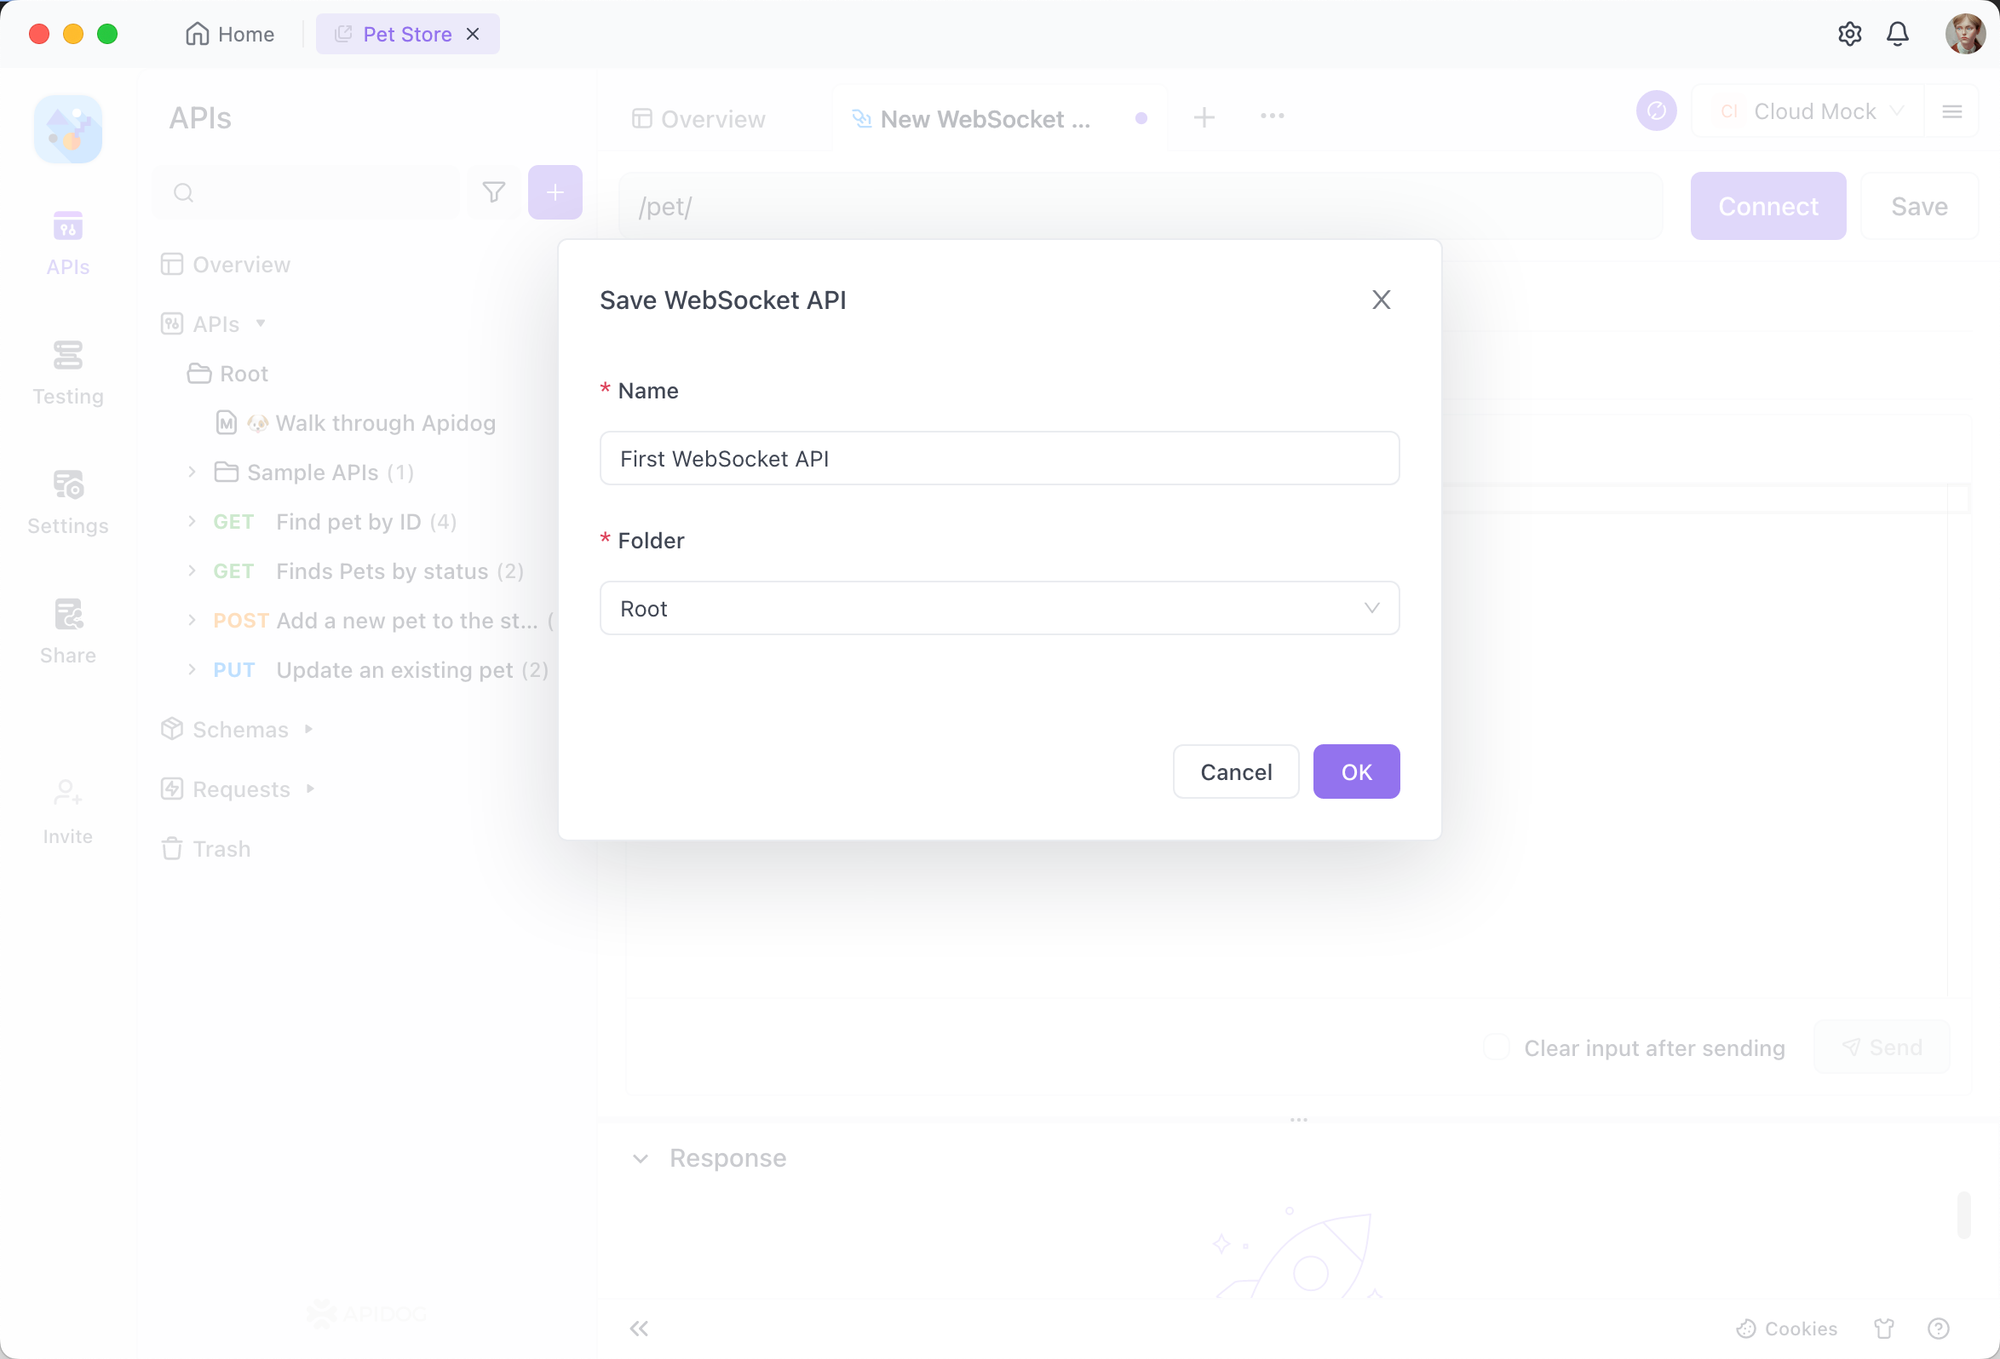
Step 7: Save and Document WebSocket API
After successful testing, save your WebSocket API:
- Click the "Save" button
- Add to your project's directory structure
- Set status, responsible person, and tags
- Write detailed documentation in Markdown format
Benefits of Saving:
- Team members can access and test the same WebSocket API
- Documentation stays synchronized with implementation
- Version control tracks changes over time
- Share documentation with external teams via browser-accessible links
Common WebSocket Use Cases
Understanding where WebSocket excels helps developers choose the right technology for their applications.
Real-Time Chat Applications
Requirements:
- Instant message delivery
- Presence indicators (online/offline status)
- Typing indicators
- Message read receipts
Why WebSocket:
Eliminates polling overhead, reduces latency, and enables true real-time communication. Users see messages instantly without page refreshes.
Live Collaboration Tools
Examples:
- Google Docs-style collaborative editing
- Shared whiteboards
- Code pair programming
- Design collaboration
Why WebSocket:
Multiple users see changes in real-time. WebSocket's bidirectional nature allows simultaneous editing with conflict resolution.
Financial Trading Platforms
Requirements:
- Real-time price updates
- Order book changes
- Trade execution notifications
- Market data streaming
Why WebSocket:
Milliseconds matter in trading. WebSocket's low latency ensures traders receive market data and execute orders with minimal delay.
Online Gaming
Requirements:
- Player position updates
- Game state synchronization
- Real-time interactions
- Low-latency communication
Why WebSocket:
Smooth gameplay requires instant communication. WebSocket enables responsive multiplayer experiences without lag.
IoT Device Communication
Requirements:
- Sensor data streaming
- Device control commands
- Status monitoring
- Alert notifications
Why WebSocket:
Persistent connections reduce power consumption compared to frequent HTTP polling. Bidirectional communication enables both monitoring and control.
Live Sports Scores and Updates
Requirements:
- Score updates
- Play-by-play commentary
- Statistics changes
- Breaking news
Why WebSocket:
Fans expect instant updates. WebSocket pushes new information immediately without requiring page refreshes or polling.
Best Practices for WebSocket Development
Connection Management:
- Implement automatic reconnection with exponential backoff
- Handle connection failures gracefully
- Monitor connection health with ping/pong
- Clean up resources on disconnection
Message Handling:
- Validate message format and content
- Implement message queuing for reliability
- Handle partial messages correctly
- Use appropriate data formats (JSON for structured data, binary for efficiency)
Security:
- Always use WSS (WebSocket Secure) in production
- Implement proper authentication and authorization
- Validate all incoming messages
- Protect against injection attacks
- Rate limit connections and messages
Performance:
- Minimize message size
- Batch updates when appropriate
- Use binary formats for large data
- Implement message compression
- Monitor connection count and resource usage
Testing:
- Test connection establishment and closure
- Verify message delivery and ordering
- Test reconnection logic
- Validate error handling
- Use tools like Apidog for comprehensive testing
Conclusion: Master WebSocket with the Right Tools
WebSocket technology enables the real-time, interactive experiences users expect from modern web applications. Understanding how WebSocket works—from the initial HTTP handshake to persistent bidirectional communication—empowers developers to build responsive, efficient applications.
However, understanding the technology is only half the battle. Effective testing and debugging are crucial for reliable WebSocket implementations. Apidog provides the comprehensive WebSocket testing capabilities you need:
- Intuitive visual interface for connection management
- Support for text and binary message formats
- Real-time message monitoring and inspection
- Advanced handshake parameter configuration
- Variable system for dynamic testing
- Team collaboration and documentation features
- Integration with your complete API workflow
Whether you're building a chat application, collaborative tool, trading platform, or IoT system, Apidog ensures your WebSocket implementation works flawlessly before deployment.


