Welcome to the future of API development! Today, we're diving into the powerful combination of Spring Boot and GraphQL. If you're a developer, you know how crucial it is to create efficient, flexible, and scalable APIs. With the rise of GraphQL, many are turning away from traditional REST APIs in favor of this more dynamic approach. And what better way to implement GraphQL than with Spring Boot, a Java-based framework that simplifies the process of building robust applications?
In this post, we'll explore how to integrate GraphQL with Spring Boot, leveraging the best tools in the industry. We'll also highlight how using tools like Apidog can enhance your development workflow. So, let’s get started!
Why GraphQL?
Before we jump into the technical details, let’s understand why GraphQL is gaining so much traction.

Flexibility and Efficiency
GraphQL allows clients to request exactly what they need and nothing more. This reduces the amount of data transferred over the network, making your applications faster and more efficient.
Strongly Typed Schema
With GraphQL, you define a schema that outlines the capabilities of your API. This schema is a contract between the client and the server, ensuring that both sides understand the structure of the data being exchanged.
Powerful Query Language
GraphQL’s query language is incredibly powerful. It allows clients to nest queries and fetch multiple resources in a single request, reducing the number of network calls and making your applications more responsive.
Community and Ecosystem
GraphQL has a vibrant community and a growing ecosystem of tools and libraries. This means you’ll have access to a wealth of resources, tutorials, and support.
Getting Started with Spring Boot and GraphQL
Now that we’ve covered the basics, let’s dive into how to set up GraphQL with Spring Boot.
Step 1: Setting Up Your Spring Boot Project
First things first, you need to create a Spring Boot project. If you’re familiar with Spring Boot, you know how easy it is to get started. If not, don’t worry, I’ve got you covered!
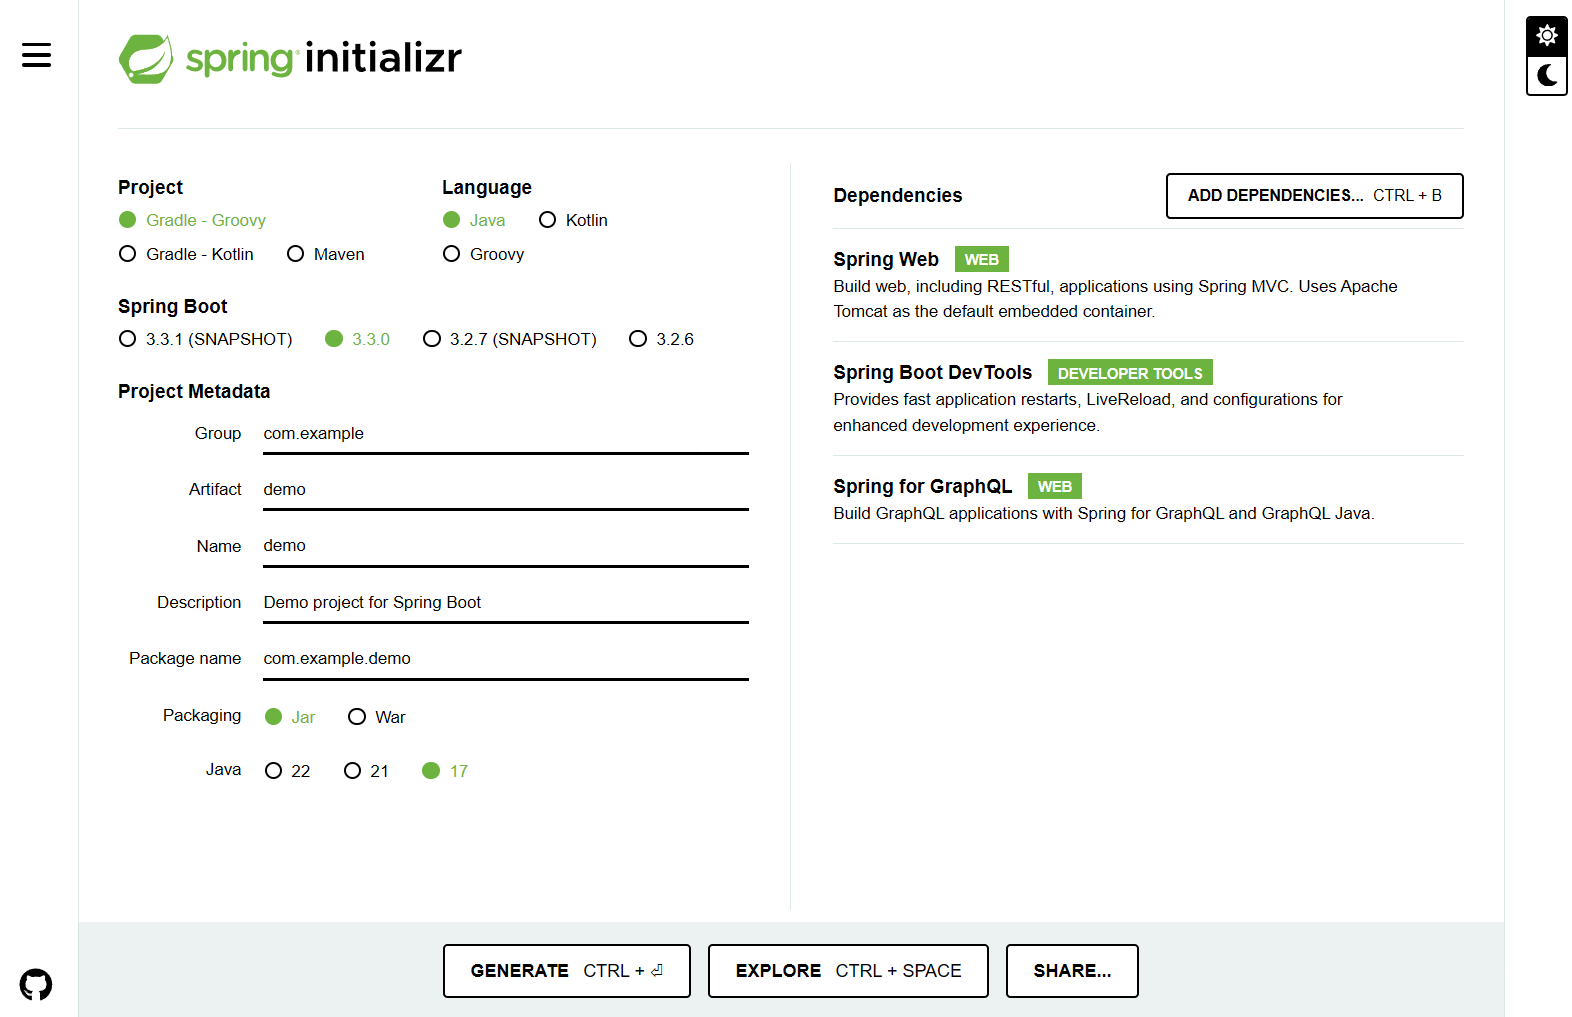
Create a New Project: Use Spring Initializr to create a new Spring Boot project. You can do this from the web interface at start.spring.io.
Select Dependencies: Choose the following dependencies:
- Spring Web
- Spring Boot DevTools
- GraphQL Spring Boot Starter
- GraphQL Spring Boot Starter Websocket (for subscriptions)
Generate the Project: Click "Generate" to download your project as a ZIP file. Extract it and open it in your favorite IDE.
Step 2: Configuring GraphQL in Spring Boot
Now that your project is set up, let’s configure GraphQL.
Add GraphQL Dependencies: If you didn’t add the GraphQL dependencies in the initial setup, add them to your pom.xml file:
<dependency>
    <groupId>com.graphql-java-kickstart</groupId>
    <artifactId>graphql-spring-boot-starter</artifactId>
    <version>11.1.0</version>
</dependency>
<dependency>
    <groupId>com.graphql-java-kickstart</groupId>
    <artifactId>graphql-spring-boot-starter-websocket</artifactId>
    <version>11.1.0</version>
</dependency>
Define Your Schema: Create a schema.graphqls file in the src/main/resources directory. This file will define your GraphQL schema. Here’s a simple example:
type Query {
    hello: String
}
Create a Resolver: In Spring Boot, you create resolvers to handle GraphQL queries. Create a HelloWorldResolver class:
package com.example.demo;

import com.coxautodev.graphql.tools.GraphQLQueryResolver;
import org.springframework.stereotype.Component;

@Component
public class HelloWorldResolver implements GraphQLQueryResolver {
    public String hello() {
        return "Hello, World!";
    }
}
Run Your Application: Start your Spring Boot application. You can now access the GraphQL Playground at http://localhost:8080/graphql.
Step 3: Testing Your GraphQL API
With your GraphQL API up and running, it’s time to test it. The GraphQL Playground is an excellent tool for this. You can send queries and see the results in real-time.
Here’s a simple query to get you started:
{
    hello
}
You should see the response:
{
  "data": {
    "hello": "Hello, World!"
  }
}
Enhancing Your Development with Apidog
While setting up GraphQL with Spring Boot is straightforward, testing and documenting your APIs can be a challenge. This is where Apidog comes into play.
What is Apidog?
Apidog is a powerful API development tool that helps you design, document, test, and mock APIs. It integrates seamlessly with GraphQL, making it an essential tool for modern API development.
Benefits of Using Apidog
Design and Documentation: Apidog provides an intuitive interface for designing and documenting your APIs. You can define your GraphQL schema, queries, and mutations in a user-friendly environment.
Testing: With Apidog, you can create and run automated tests for your GraphQL APIs. This ensures that your APIs work as expected and helps catch bugs early in the development process.
Mocking: Apidog allows you to create mock servers for your APIs. This is especially useful during development when the backend services might not be ready.
Collaboration: Apidog facilitates collaboration between team members by providing a shared workspace for API development.
Getting Started with Apidog
To get started with Apidog, follow these simple steps:
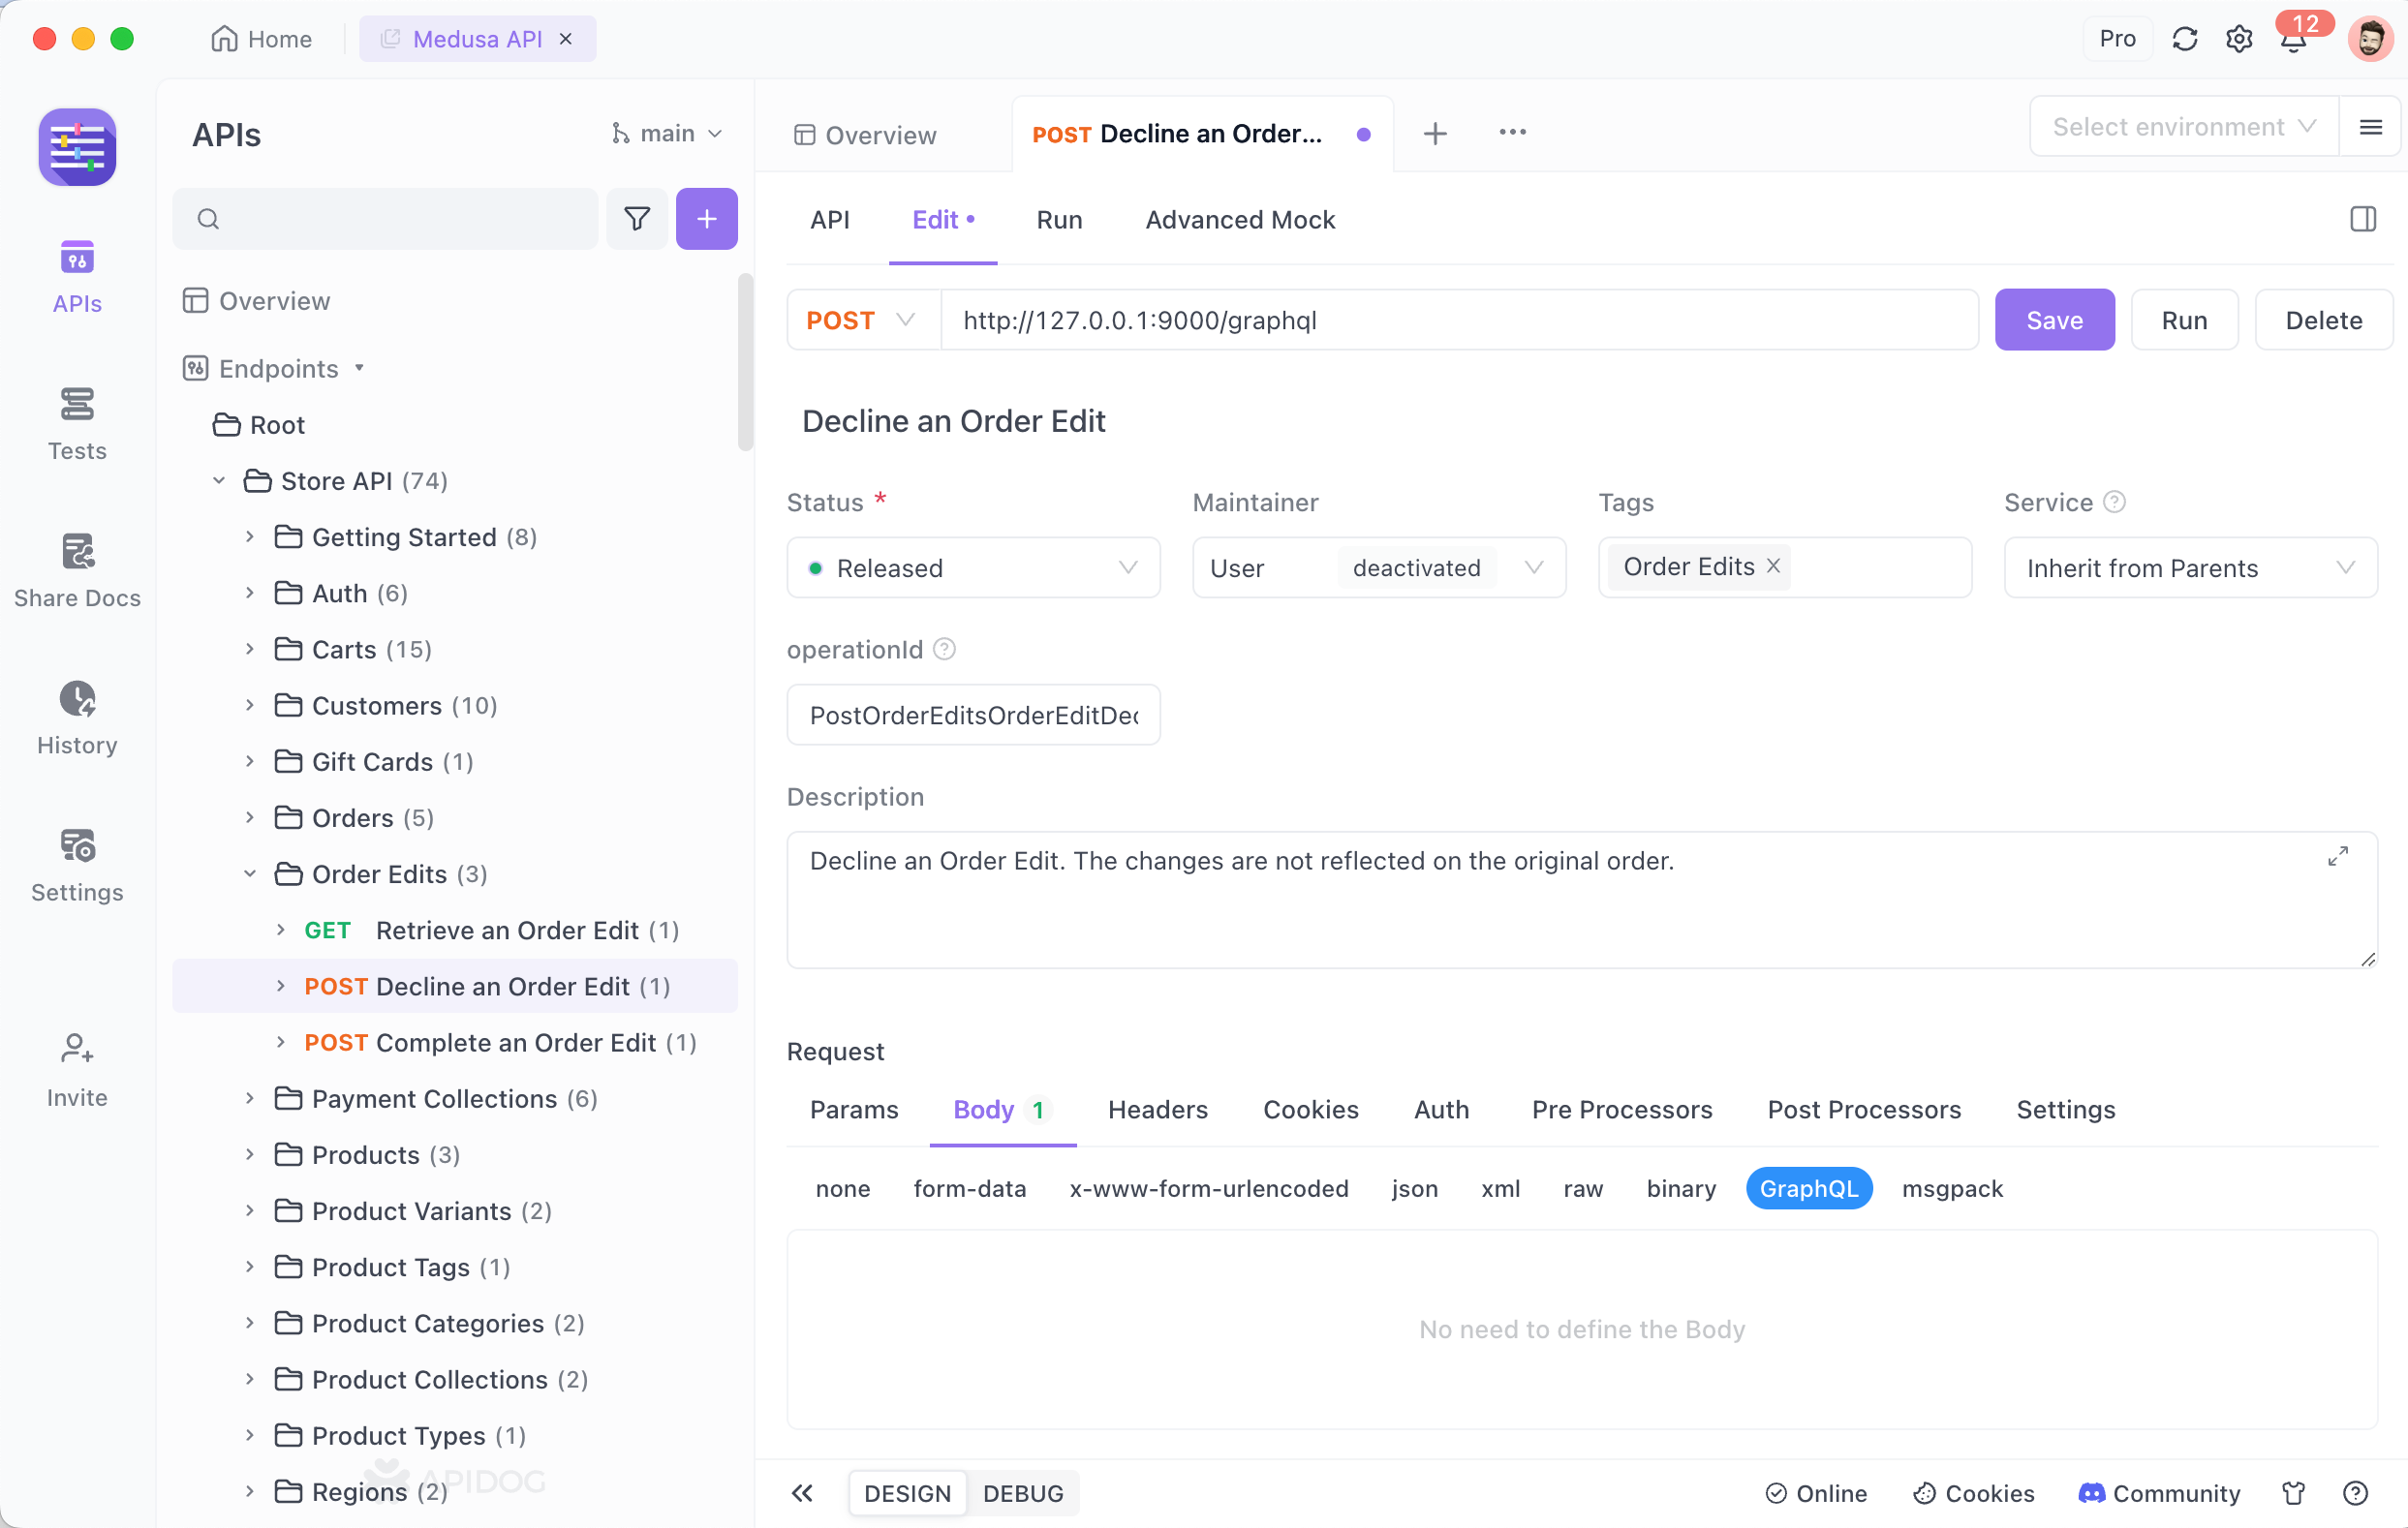
To create a new GraphQL request in a project, click on "Body" → "GraphQL" in sequence.
Enter your query in the Query box on the "Run" tab. You can also click the manual Fetch Schema button in the input box to enable the "code completion" feature for Query expressions, assisting in entering Query statements.
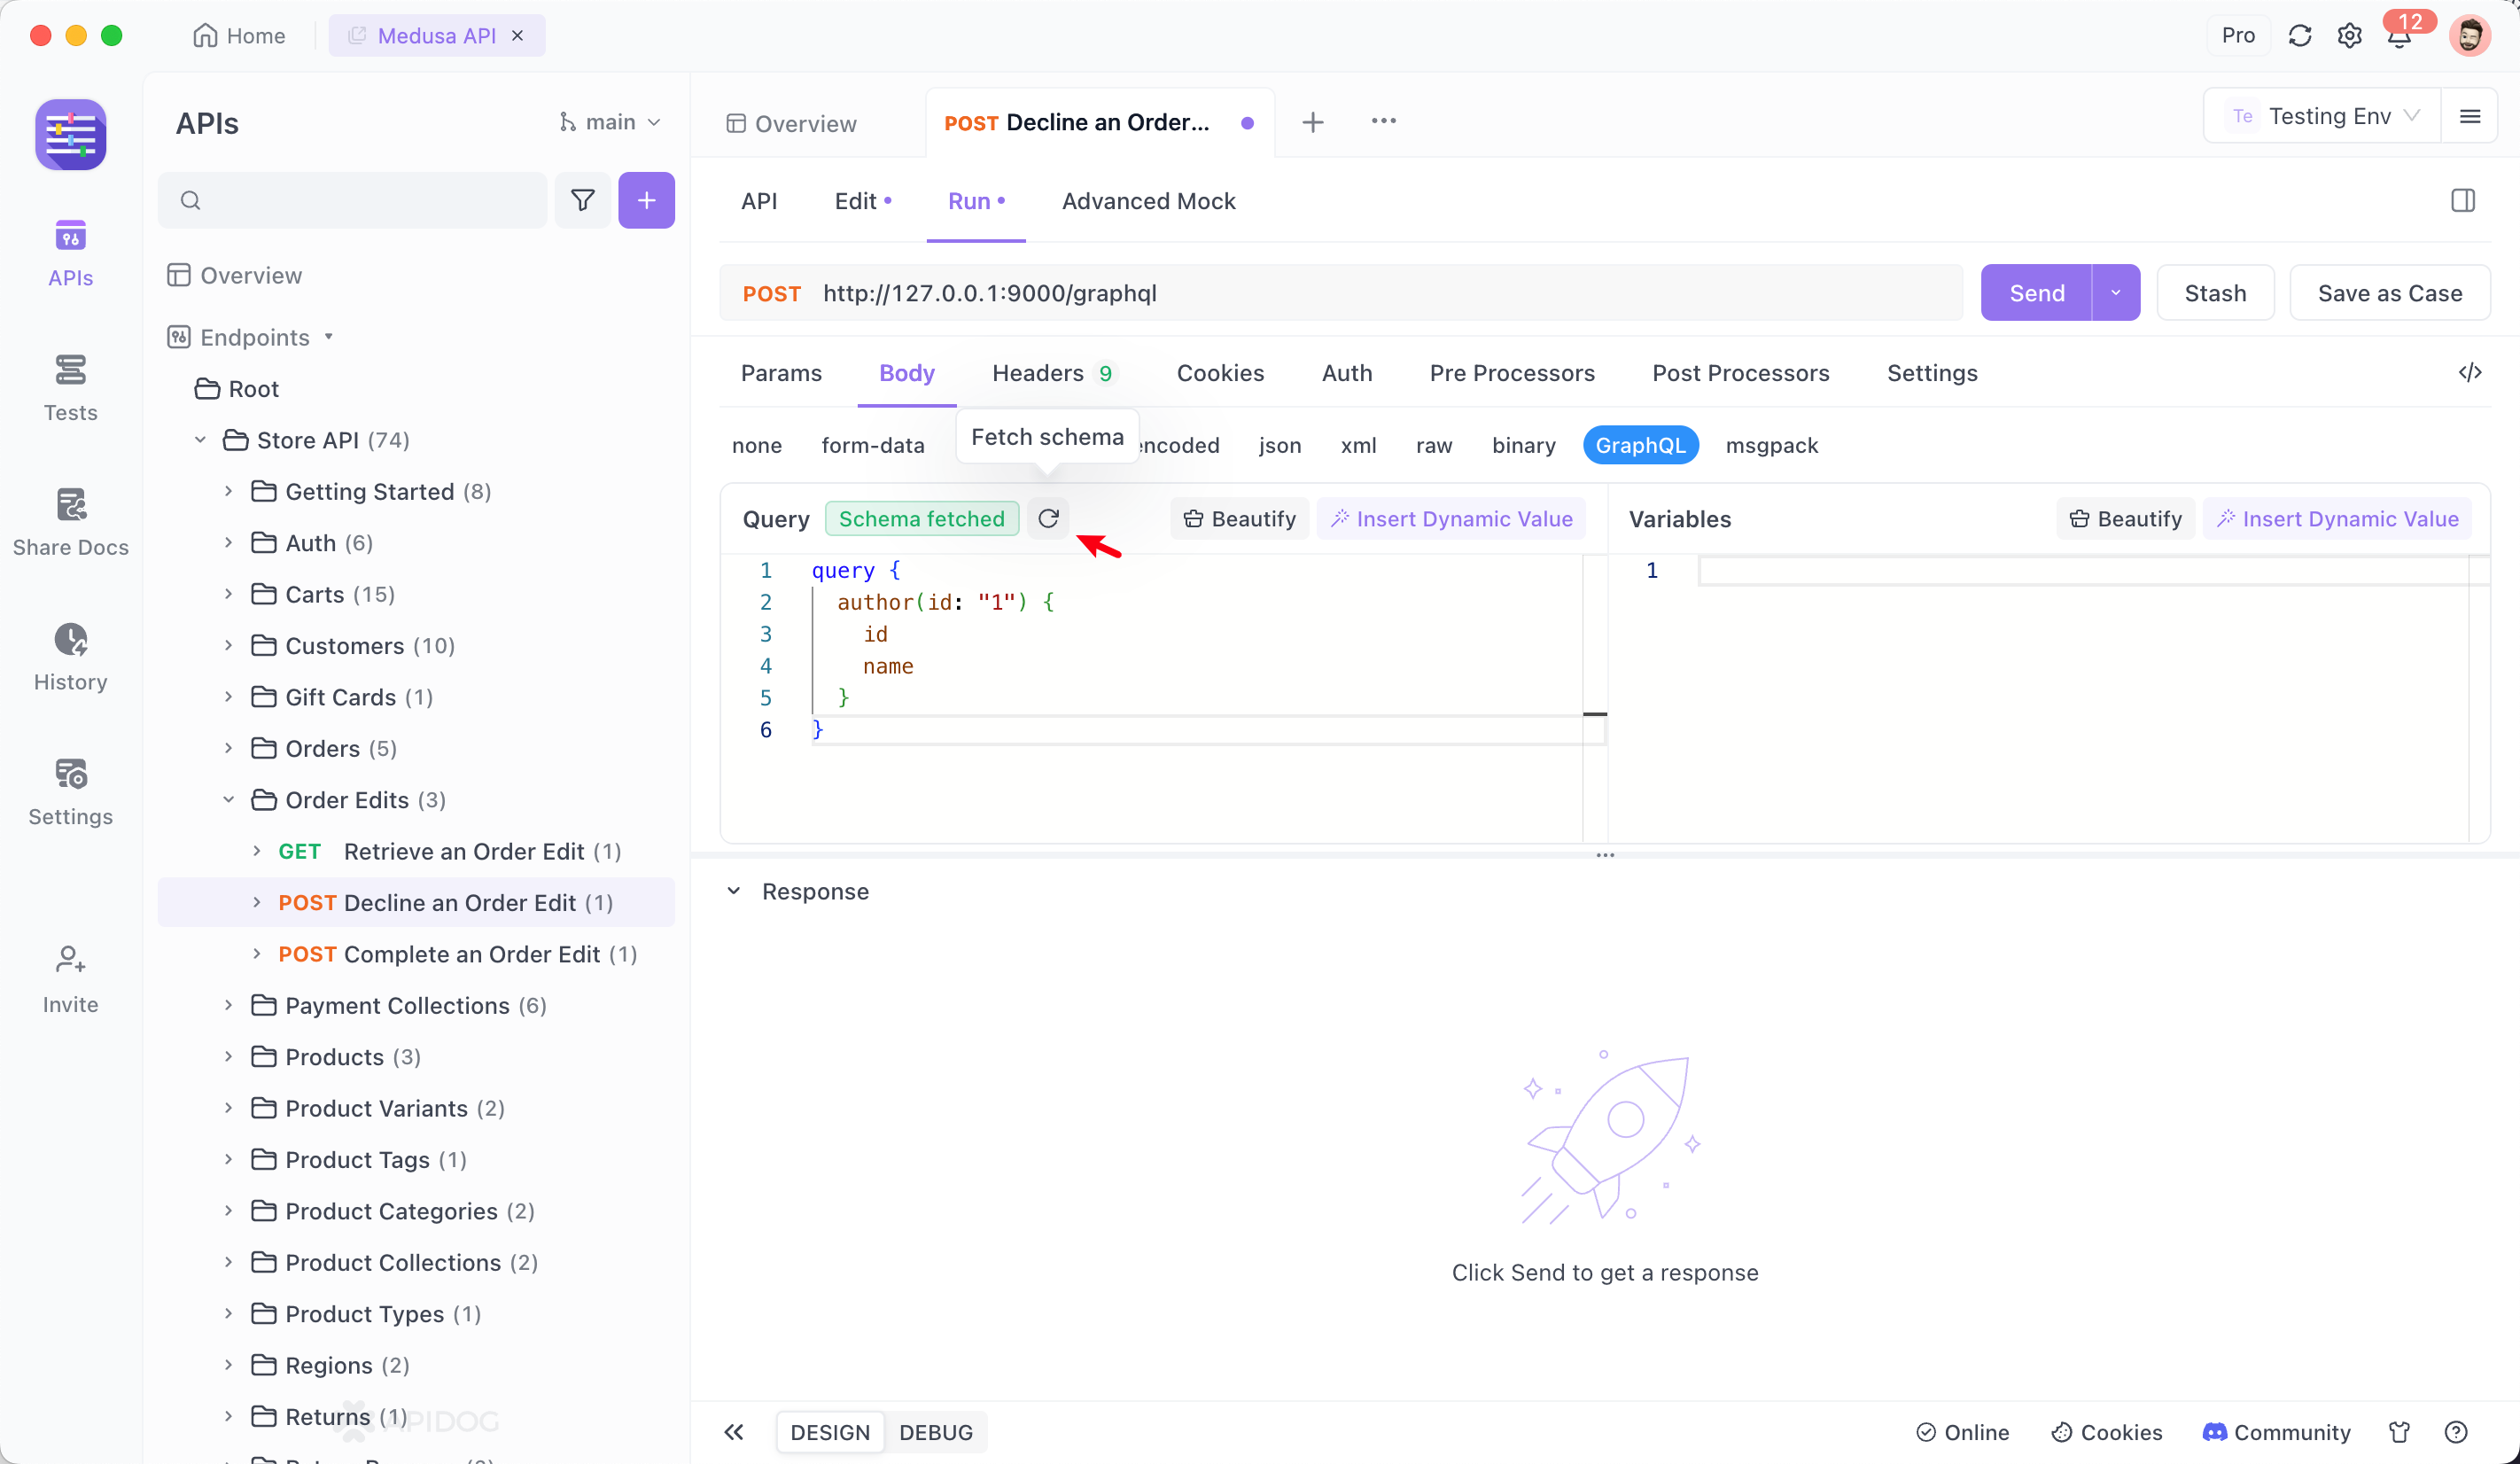
Query statements support using GraphQL variables for requesting. For specific usage, please refer to the GraphQL syntax.
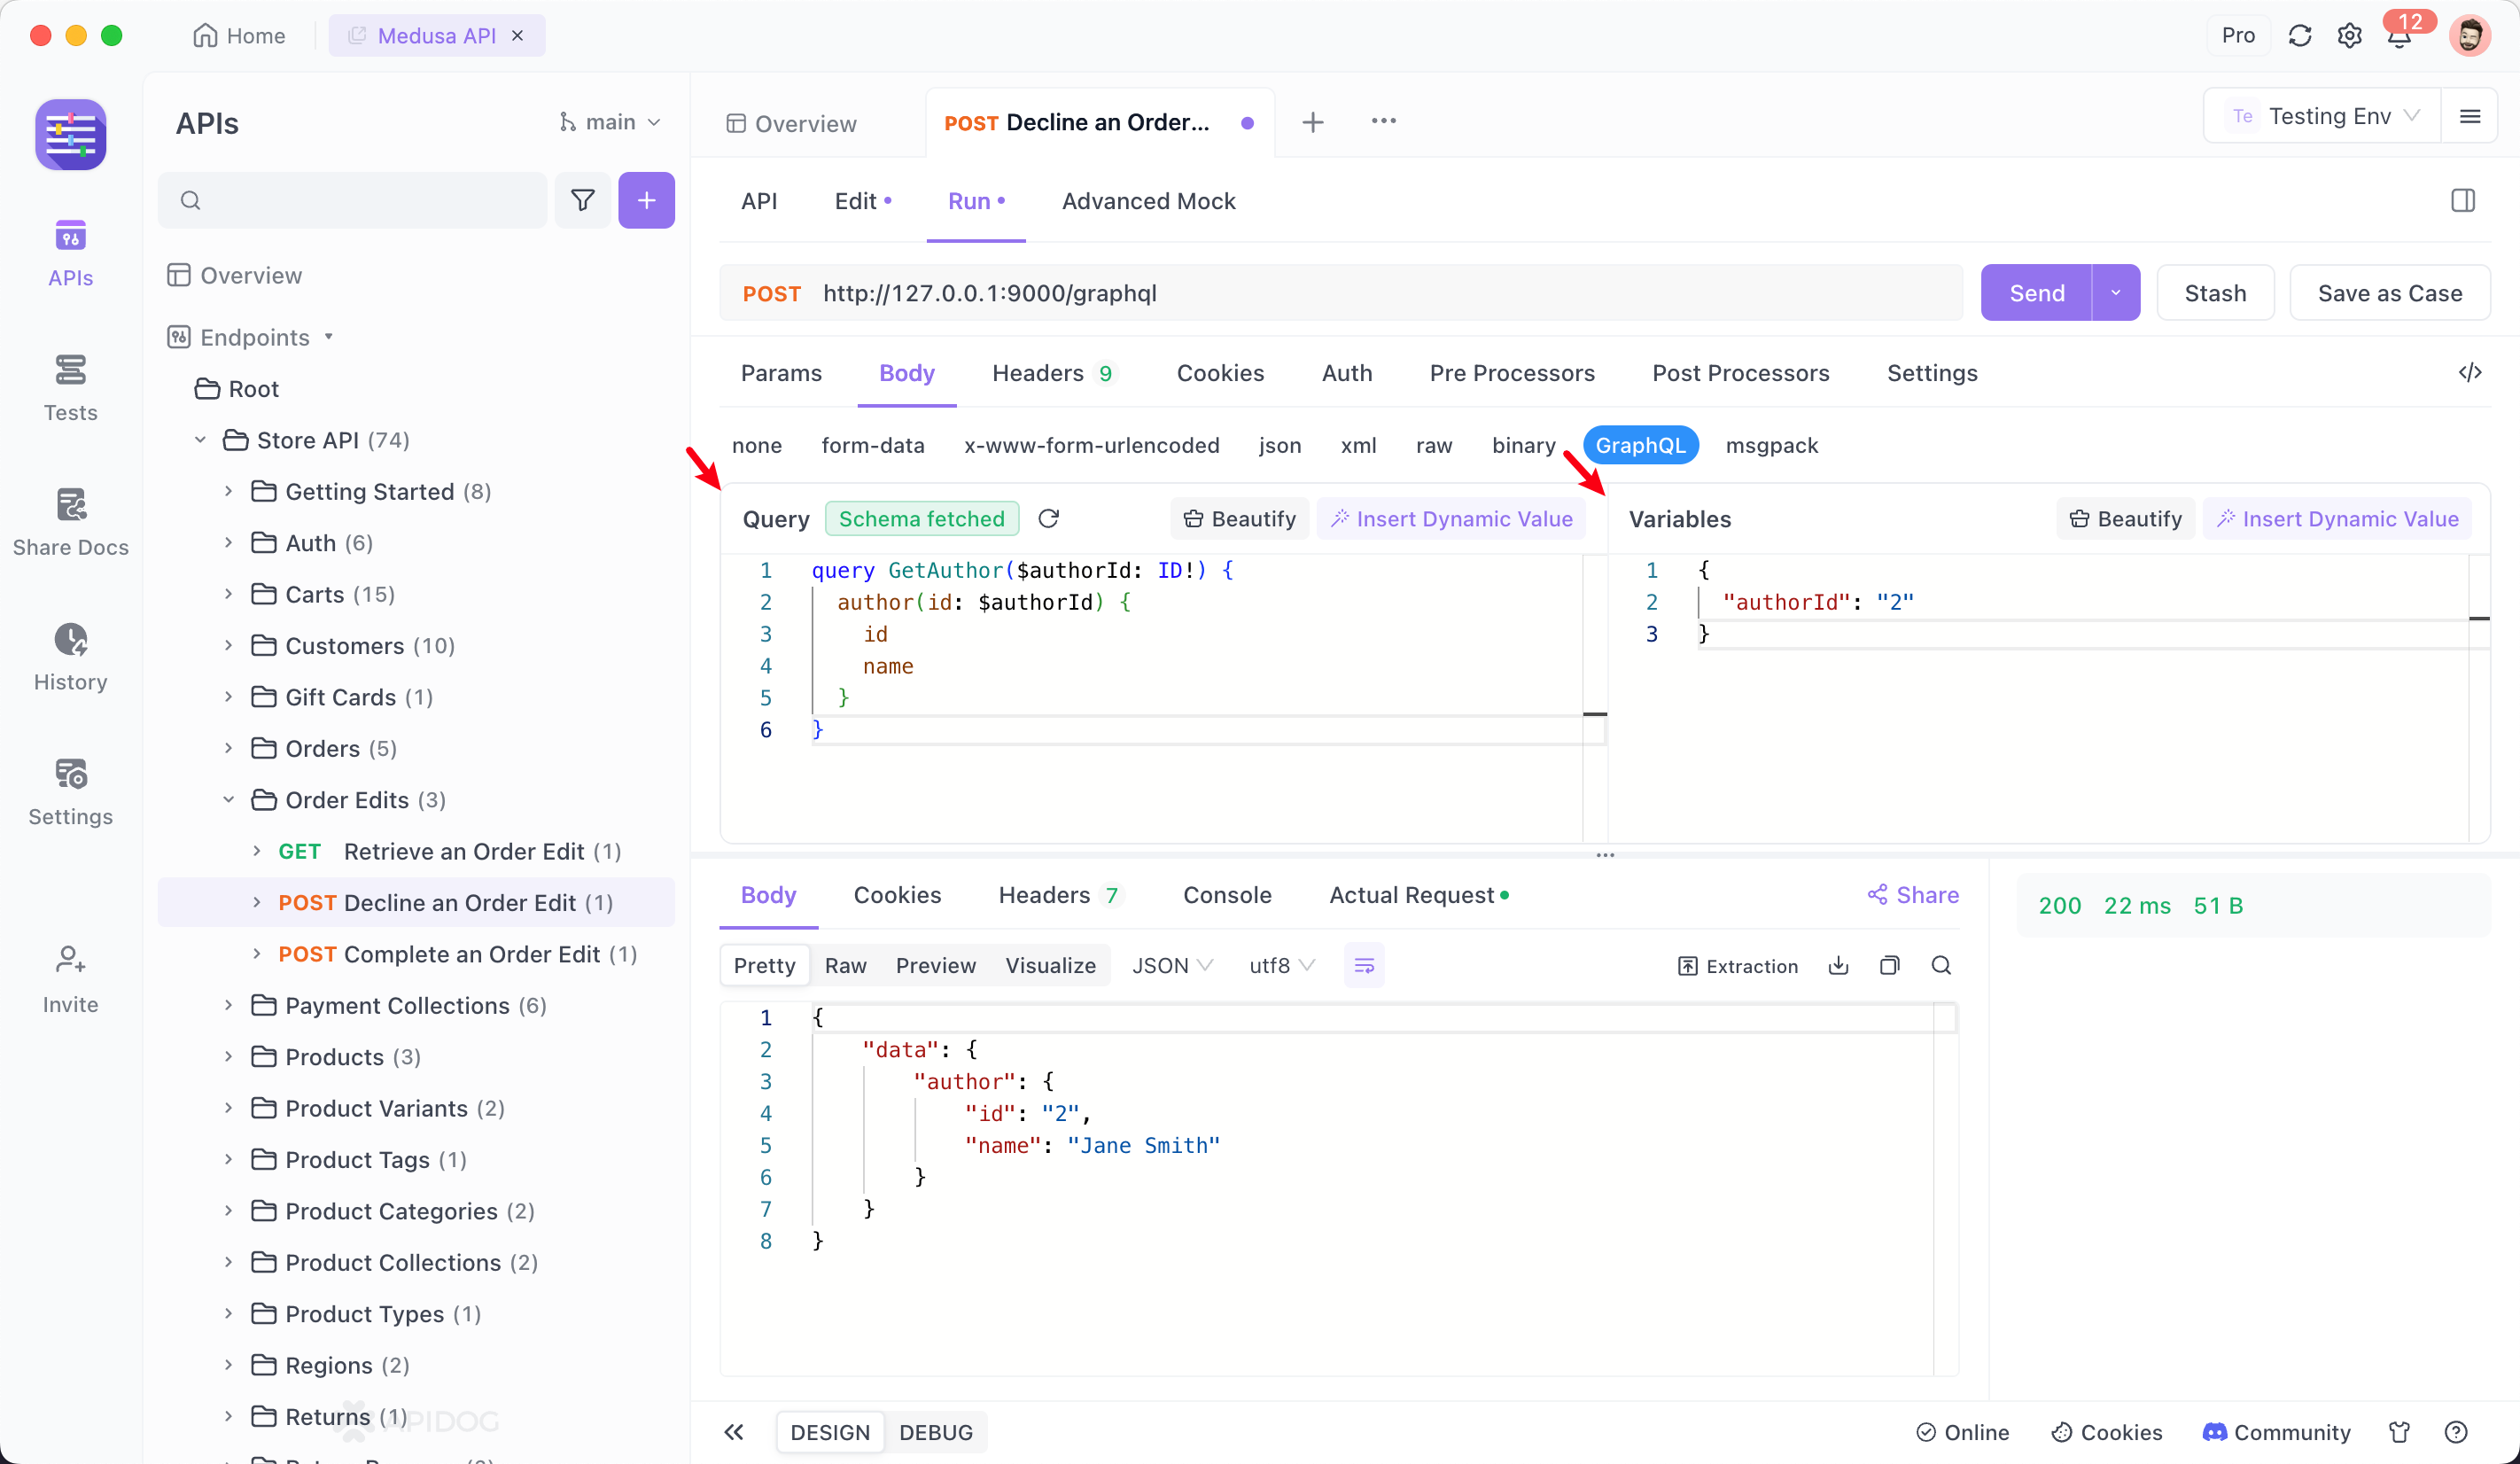
By using Apidog, you can streamline your API development process and ensure that your GraphQL APIs are robust and well-documented.
Advanced Topics in Spring Boot and GraphQL
Now that you have a basic understanding of how to set up GraphQL with Spring Boot, let’s explore some advanced topics.
Pagination and Filtering
One of the strengths of GraphQL is its ability to handle complex queries. Pagination and filtering are common requirements for modern APIs.
Pagination: To implement pagination, you can use libraries like graphql-java and graphql-java-tools. Here’s an example:
type Query {
    users(page: Int, size: Int): [User]
}
public List<User> getUsers(int page, int size) {
    Pageable pageable = PageRequest.of(page, size);
    Page<User> userPage = userRepository.findAll(pageable);
    return userPage.getContent();
}
Filtering: For filtering, you can use input types in GraphQL:
input UserFilter {
    name: String
    age: Int
}

type Query {
    users(filter: UserFilter): [User]
}
public List<User> getUsers(UserFilter filter) {
    return userRepository.findByFilter(filter);
}
Error Handling
Proper error handling is crucial for any API. In GraphQL, you can define custom error messages and use exception handlers to manage errors gracefully.
Custom Error Messages: You can define custom error messages in your resolvers:
public String hello() {
    if (someCondition) {
        throw new RuntimeException("Custom error message");
    }
    return "Hello, World!";
}
Exception Handlers: Use Spring’s exception handling mechanism to manage errors:
@ControllerAdvice
public class GraphQLExceptionHandler {

    @ExceptionHandler(RuntimeException.class)
    public GraphQLError handleRuntimeException(RuntimeException e) {
        return new GenericGraphQLError(e.getMessage());
    }
}
Subscriptions
GraphQL subscriptions allow clients to receive real-time updates. This is particularly useful for applications that require live data, such as chat applications or real-time dashboards.
Configure WebSocket: Ensure that you have added the graphql-spring-boot-starter-websocket dependency.
Define Subscriptions: Add subscriptions to your schema:
type Subscription {
    messageAdded: Message
}
Create a Publisher: Use a publisher to send updates:
@Component
public class MessagePublisher {
    private final Publisher<Message> publisher;

    public MessagePublisher(Publisher<Message> publisher) {
        this.publisher = publisher;
    }

    public void publishMessage(Message message) {
        publisher.publish(message);
    }
}
Create a Subscription Resolver: Handle subscriptions in your resolver:
@Component
public class
MessageSubscriptionResolver implements GraphQLSubscriptionResolver {
private final MessagePublisher messagePublisher;
    public MessageSubscriptionResolver(MessagePublisher messagePublisher) {
        this.messagePublisher = messagePublisher;
    }

    public Publisher<Message> messageAdded() {
        return messagePublisher.getPublisher();
    }
}
```
Conclusion
Integrating GraphQL with Spring Boot is a game-changer for API development. It offers a flexible, efficient, and powerful way to build APIs that meet the demands of modern applications. By leveraging tools like Apidog, you can further streamline your development process, ensuring that your APIs are well-documented, tested, and ready for production.
So, what are you waiting for? Dive into the world of Spring Boot and GraphQL, and see how it transforms your API development workflow. And don’t forget to download Apidog for free to enhance your development experience even further.