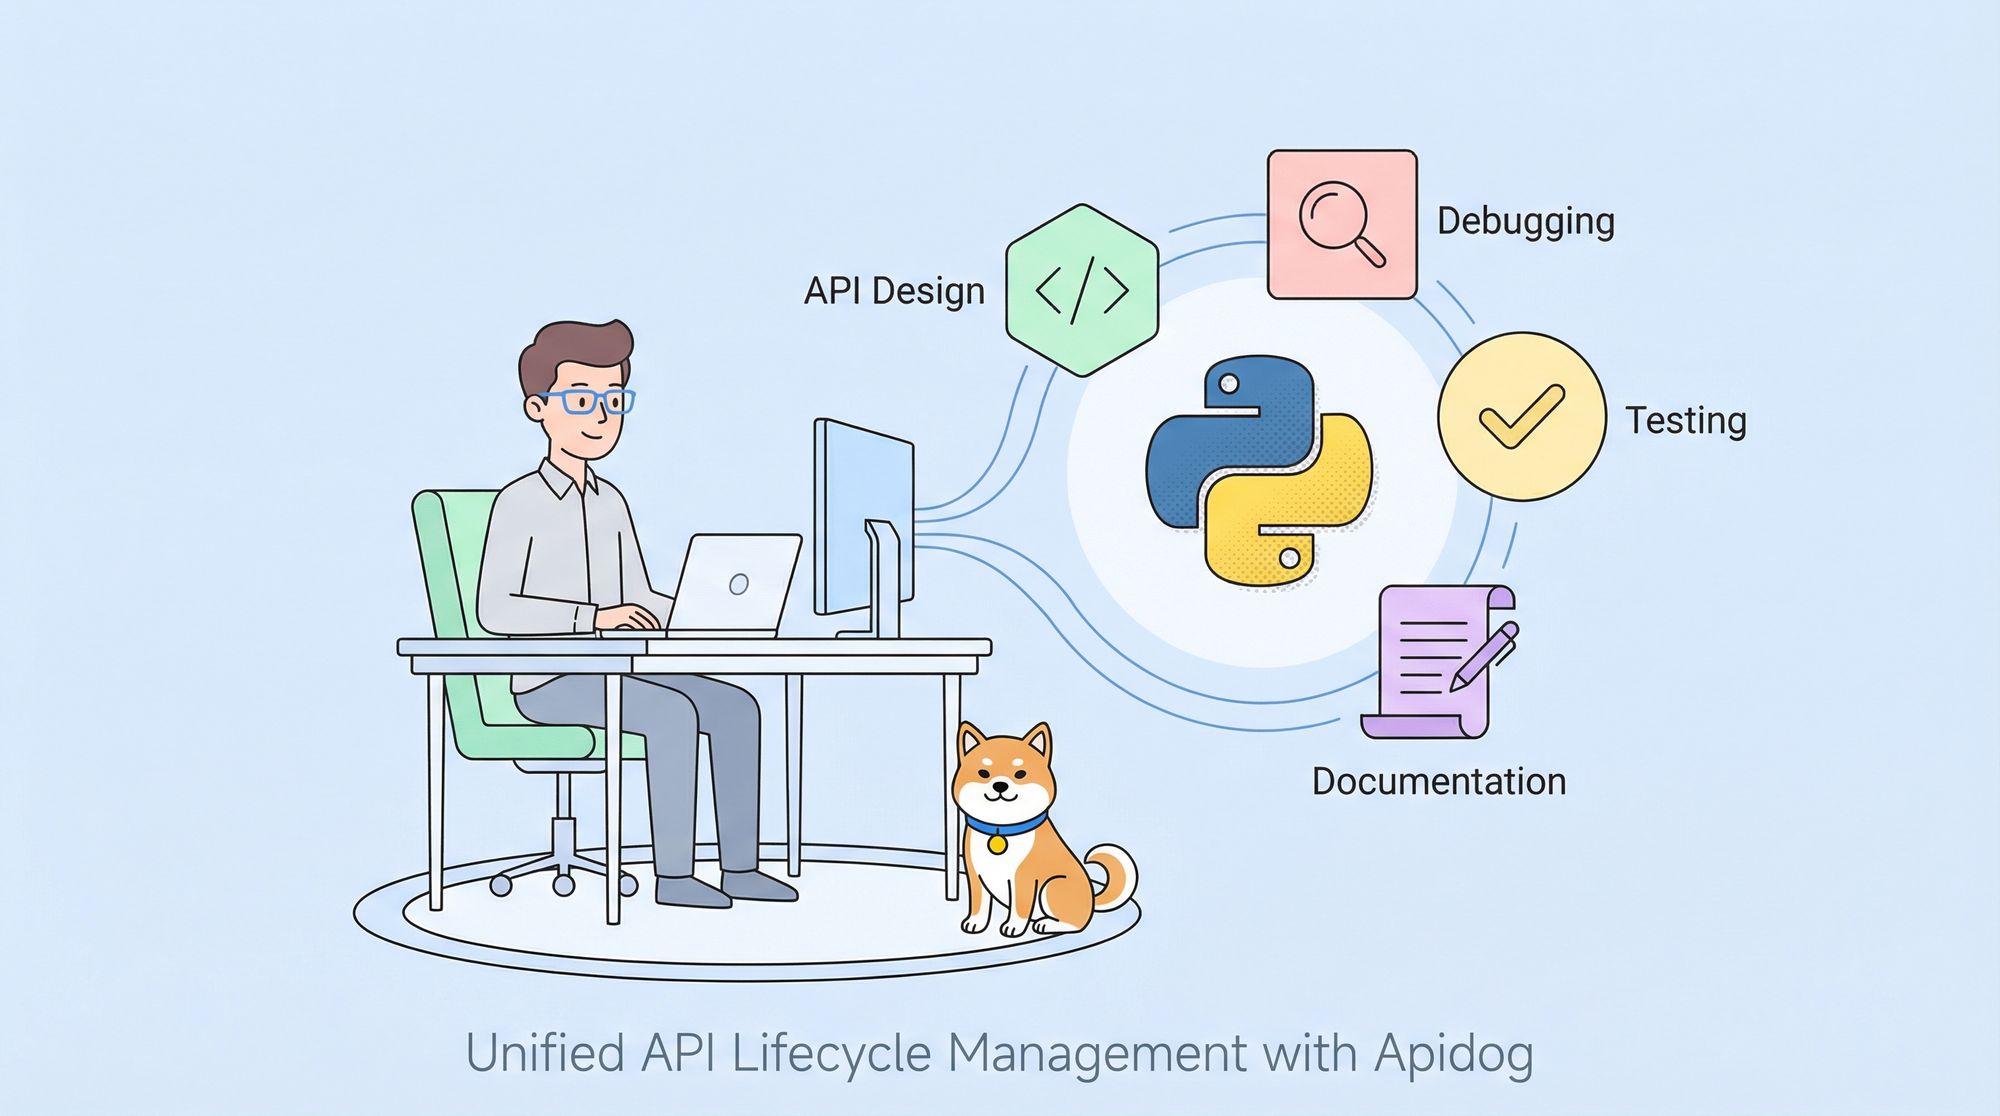
Are you tired of juggling different tools and platforms to create, debug, test, and document your Python REST APIs? Welcome to a whole new world of streamlined API development with Apidog.
This comprehensive guide explores leveraging Apidog, a complete set of tools that effortlessly connects the entire API lifecycle. With its unique features, Apidog enhances your Python REST API development, making it faster, more efficient, and a pleasure to work with. Join us as we journey into the world of Python REST APIs and discover how Apidog can transform your development experience.
Python REST API
There is no denying the immense popularity of Python in the development world. Its simplicity, versatility, and broad library support have made it a go-to language for many programmers. When Python is combined with REST API - a scalable and stateless architecture that uses HTTP requests to GET, PUT, POST, and DELETE data - it becomes a formidable tool for creating high-performing web services.
A Python REST API simplifies the process of building scalable web services. Its strength lies in Python's inherent simplicity and the REST architecture's universality. As HTTP is supported by all web clients and servers, a Python REST API ensures that your service can communicate with any device connected to the internet.
Python Call REST API - Simplified
With its extensive library support, Python simplifies calling and interacting with REST APIs. Libraries such as requests make sending HTTP requests and handling responses straightforward.
A typical Python call to a REST API using the requests library might look like this:
import requests
response = requests.get('http://api.example.com/data')

# If the request is successful, the status code will be 200
if response.status_code == 200:
    print(response.json())
In this simple example, Python sends a GET request to 'http://api.example.com/data.' The server then responds with data, which Python can handle and manipulate as needed.
Python simplifies making calls to a REST API and provides powerful tools for handling the responses. This efficiency makes Python an ideal language for interacting with web services and integrating disparate systems.
Introduction to Apidog
As developers strive to build increasingly complex and powerful web services, the need for efficient, streamlined tools becomes undeniable. This is where Apidog comes into play. Apidog is an all-in-one platform that facilitates efficient API development, particularly with a design-first approach.
The design-first approach, advocated by Apidog, involves designing the API's contract (its interface and expected behavior) before writing any code. This approach leads to more robust and reliable APIs, as it encourages clear, upfront thinking about the API's requirements.
With Apidog, developers can easily design and debug their APIs and automate much of the testing and documentation process, boosting productivity and enhancing the overall API lifecycle.
Unique Apidog Features
Apidog sets itself apart with its unique features aimed at simplifying and enhancing the API development process. Here are some of the key features that make Apidog an indispensable tool for Python REST API developers:
API Developing Toolkit:
This toolkit allows developers to design and debug APIs in a visually powerful editor. The support for JSON Schema makes describing and debugging a breeze.
Automated Testing Tool:
With Apidog's automated testing tool, you can generate tests from your API specifications, build visual assertions, validate responses, and integrate the process with your CI/CD pipelines.
Online API Documentation:
Apidog can automatically generate visually appealing and comprehensive API documentation, which can be published to a custom domain or securely shared with collaborative teams.
Smart Mock Server:
This feature enables both local and cloud mock engines to generate reasonable mock data according to field names and specifications, eliminating the need for scripting.
Multi-protocol Support:
Apidog allows developers to create, organize, share, and execute HTTP, REST, GraphQL, SOAP, or WebSocket requests without switching apps.
Apidog IDEA Plugin:
This plugin allows backend developers to generate API specifications directly from JavaDoc comments and synchronize them with Apidog without invasive annotations.
These features ease the development process and enable better collaboration, efficiency, and productivity across the API lifecycle.
Basics of Creating a REST API in Python with Flask
When it comes to creating a REST API in Python, Flask is often the framework of choice due to its simplicity and flexibility. Flask is a lightweight WSGI web application framework designed to help developers start their web services quickly and easily without requiring much setup or boilerplate code.
Let's build a simple REST API using Python and Flask. This API will have endpoints to GET and POST data.
Step 1: Install Flask
If you haven't installed Flask yet, you can do so using pip in your command prompt:
pip install flask
Step 2: Create a New Flask App
Now, we'll create a new Python file (let's call it app.py) and set up a basic Flask app:
from flask import Flask, jsonify, request

app = Flask(__name__)
Step 3: Define Routes and Logic
Next, we'll define our routes and the associated logic. In this example, we're creating a simple API for a list of tasks. We'll have one route to get all tasks and another to create a new task:
@app.route('/get-data', methods=['GET'])
def get_data():
   return jsonify(data)

@app.route('/update-data', methods=['POST'])
def update_data():
   new_data = request.json
   for key in new_data:
       data[key] = new_data[key]
   return jsonify(data)
In the above code, we've defined two endpoints. The first is a GET endpoint that returns all tasks, and the second is a POST endpoint that creates a new task.
Step 4: Run the App
Finally, we can run our Flask app:
if __name__ == "__main__":
    app.run(debug=True)
Now, our Flask app is ready to handle requests.
Python Call REST API - A Flask Example
With our Python Flask API set up, let's see how we can call the REST API endpoints. We'll use Python's requests library to send HTTP requests to our API.
# Import necessary modules
from flask import Flask, jsonify, request

# Initialize the Flask app
app = Flask(__name__)

# This is our data store, which is just a dictionary
data = {
   'name': 'John Doe',
   'age': 30
}

# Define a route for the GET request
@app.route('/get-data', methods=['GET'])
def get_data():
   # This function will run when a GET request is received
   # It returns the data dictionary as a JSON response
   return jsonify(data)

# Define a route for the POST request
@app.route('/update-data', methods=['POST'])
def update_data():
   # This function will run when a POST request is received
   # It will update the data dictionary with the data received in the request
   new_data = request.json
   for key in new_data:
       data[key] = new_data[key]
   # It returns the updated data dictionary as a JSON response
   return jsonify(data)

# This code runs the Flask app
if __name__ == "__main__":
   app.run(debug=True)
This script first defines and starts the Flask app. Then, it sends a GET request to the '/tasks' endpoint and prints the response. After that, it creates a new task and sends a POST request to the '/tasks' endpoint to add the task, then prints the response.
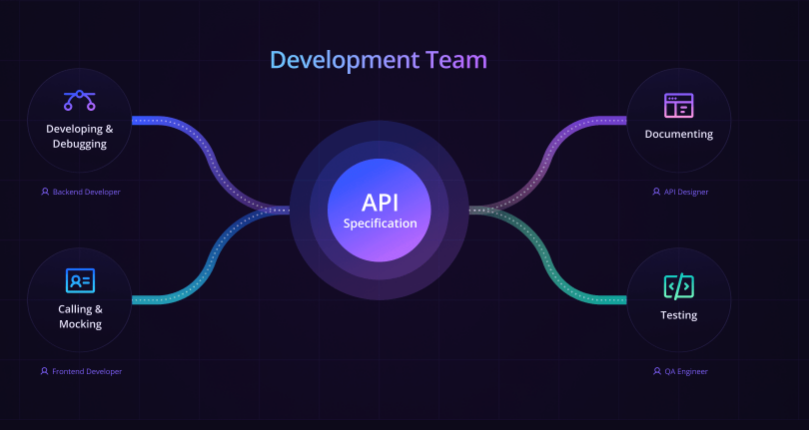
Connecting Python and REST APIs with Apidog
Python is an ideal language choice when developing and testing APIs, and Apidog smoother the process. Apidog is not just an API client but a comprehensive set of tools that connect the entire API lifecycle, from design and debugging to testing, documentation, and mocking.
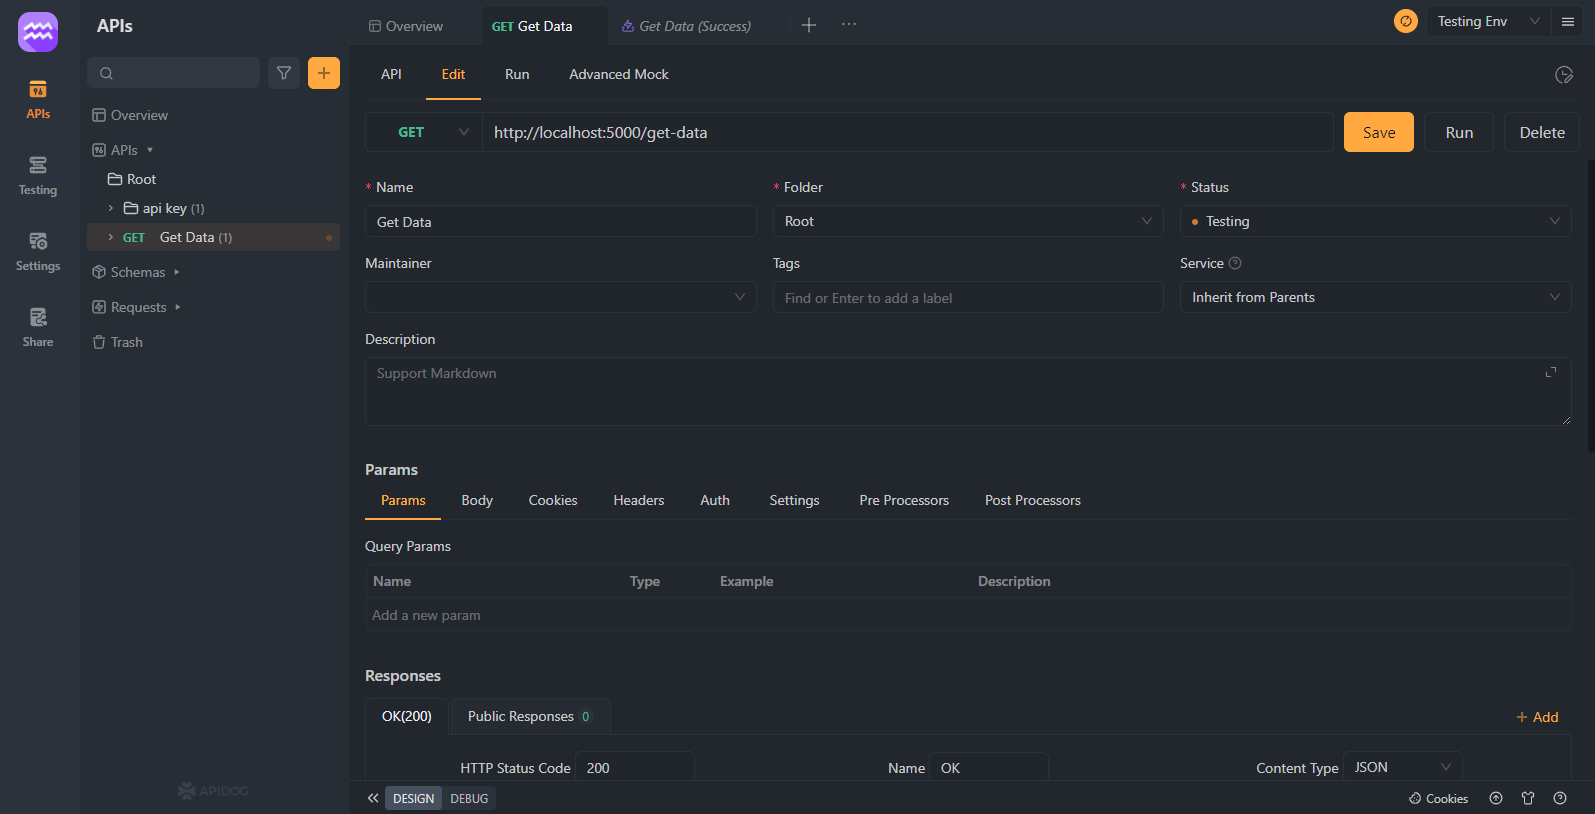
If you are developing a REST API using Python, you can use Apidog's powerful visual editor to design and debug your APIs, complete with JSON Schema support. This not only speeds up the development process but also helps in maintaining standardization across the API structure.
Setting up Apidog for Python
To integrate Apidog into your Python REST API development process, follow these steps:
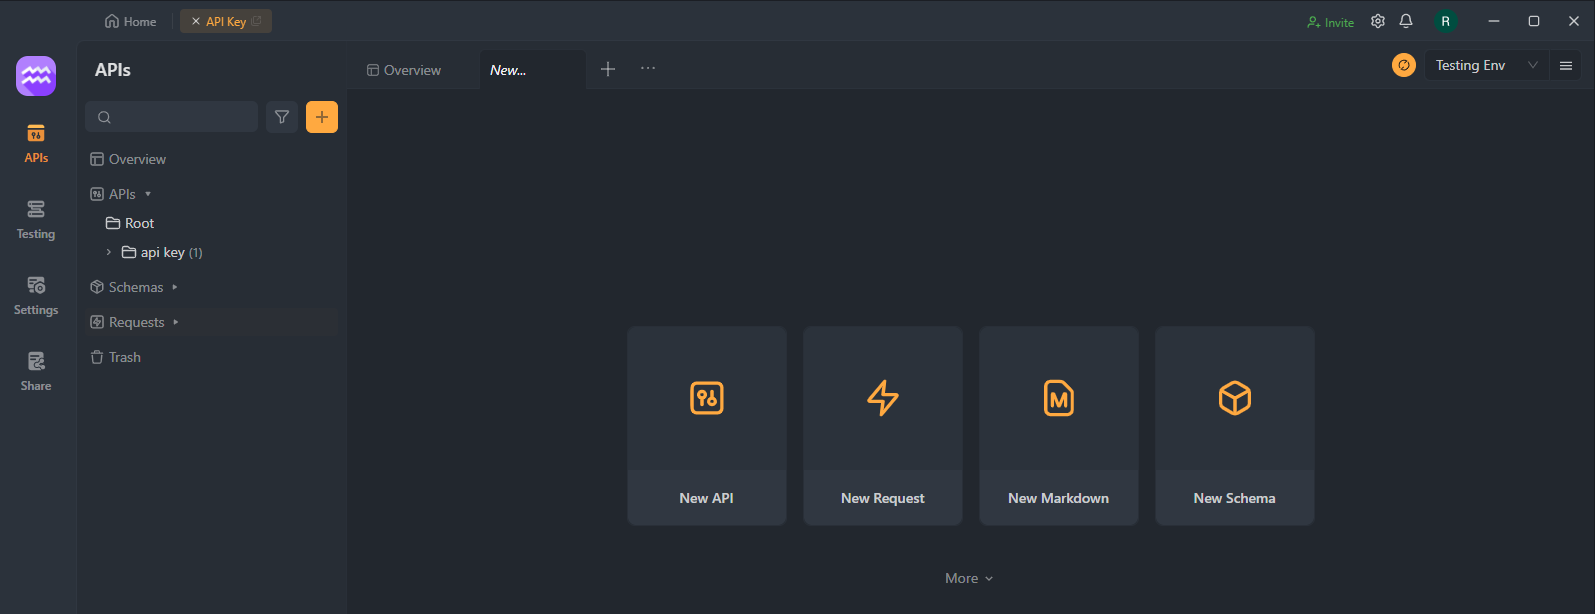
Sign up for a free Apidog account. Visit the Apidog website and sign up. You can either start a new project or import an existing one.
Create a new API request. In your Apidog workspace, create a new API request. You can specify the request type (GET, POST, etc.), the URL, headers, and other parameters.
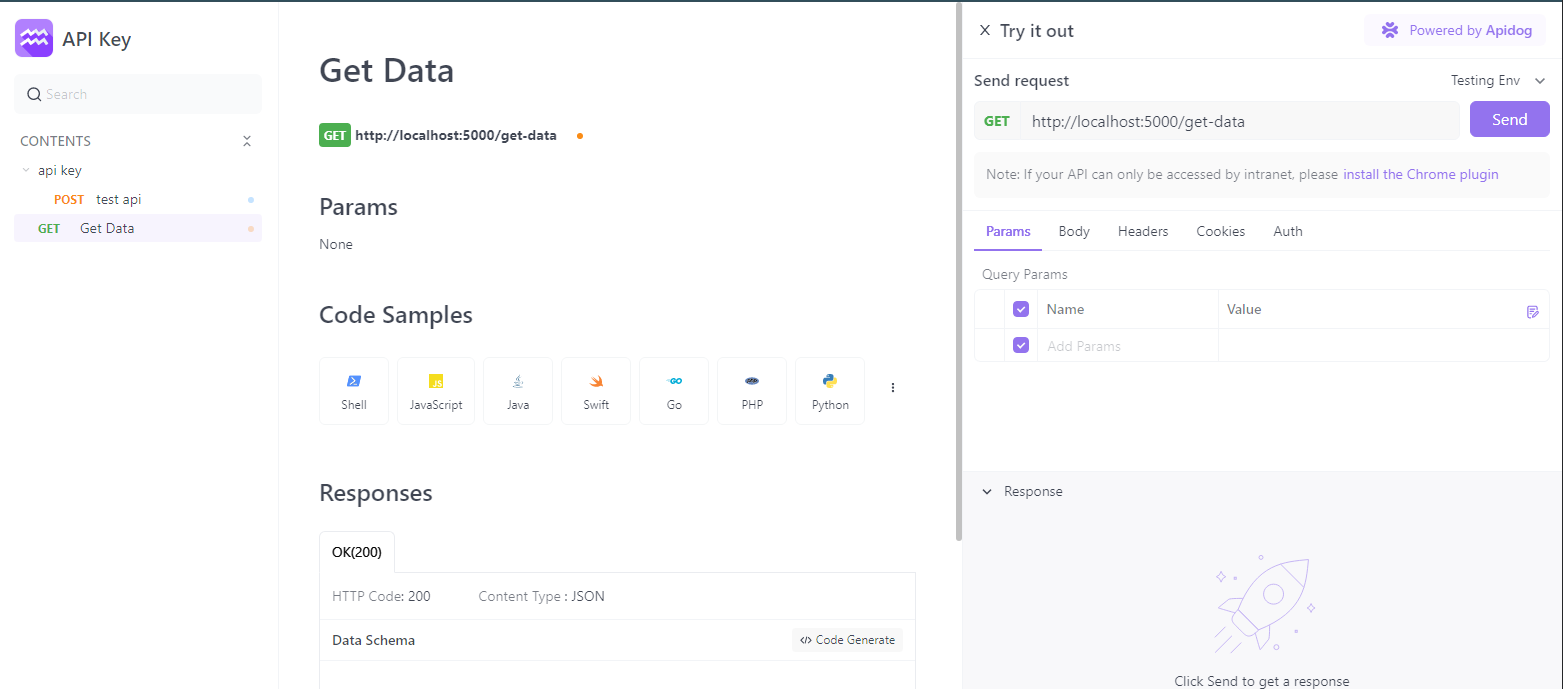
Connect to your Python REST API. Use the URL of your Flask server (for example, 'http://localhost:5000/get-data' or 'http://localhost:5000/update-data') as the request URL in Apidog.
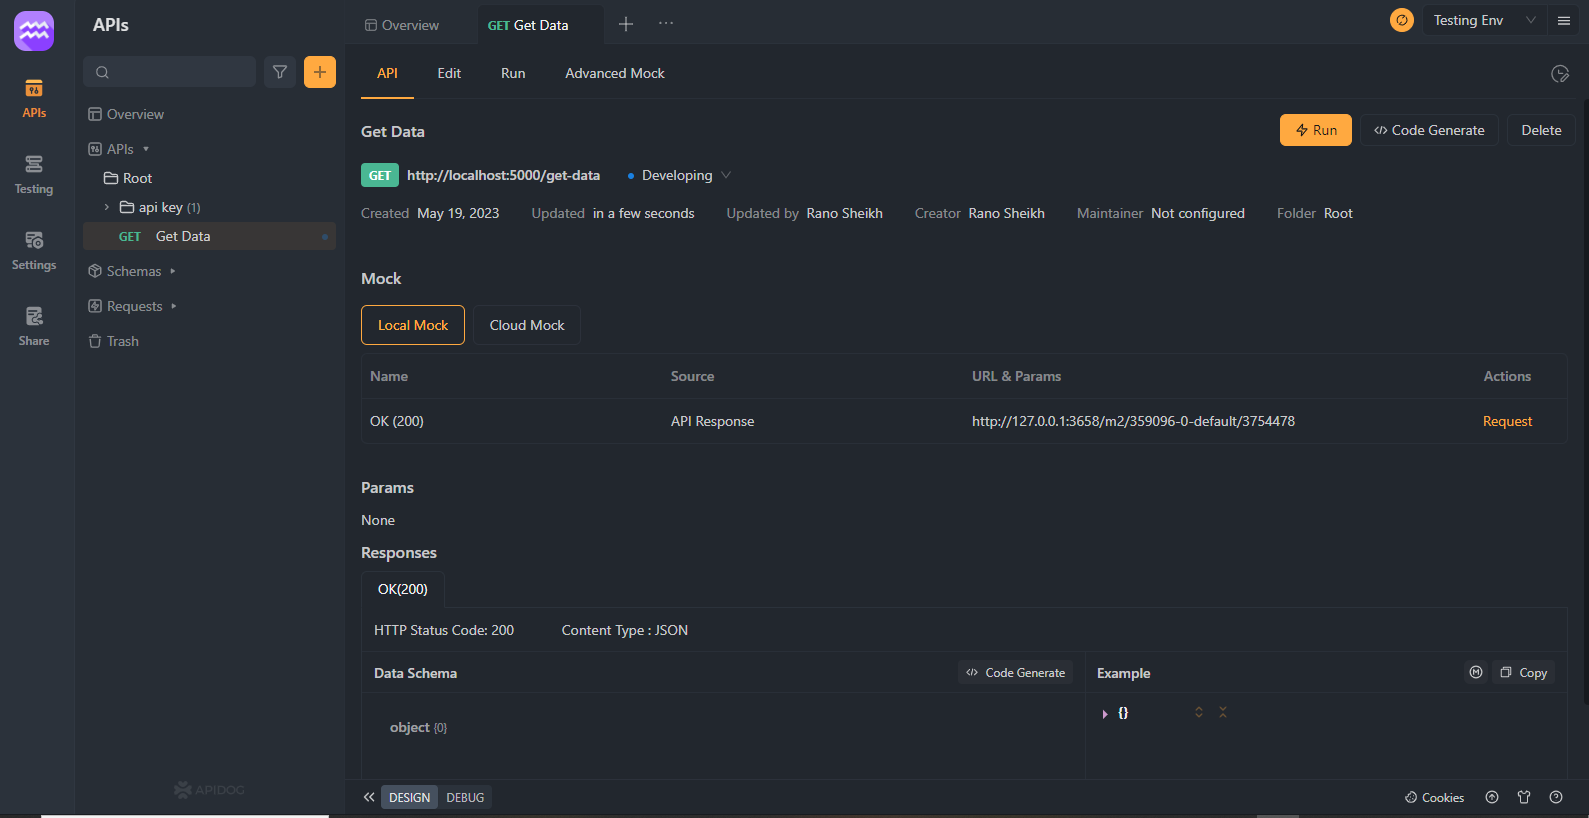
Test your API. You can now send requests to your Python REST API directly from Apidog. You can view the response in the Response section.

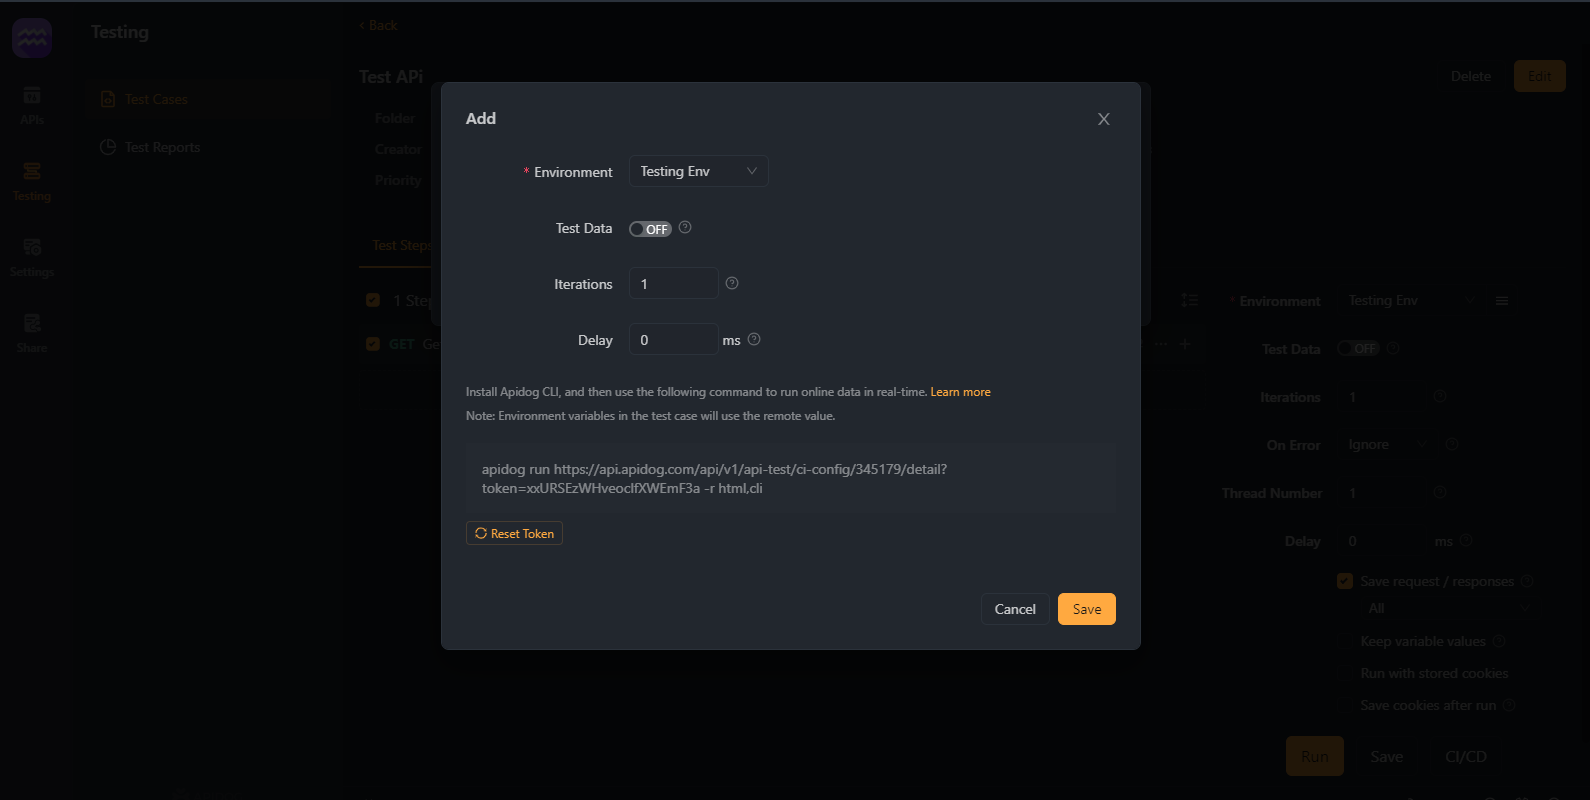
Automate Testing. Leverage Apidog's automated testing tool to validate your APIs, make visual assertions, and integrate with your CI/CD pipeline.
Following these steps, you can effectively utilize Apidog for your Python REST API development and testing. Apidog is an all-in-one workspace for API design, documentation, debugging, testing, and mocking. Using Apidog with Python significantly improves your productivity, efficiency, and the overall quality of your APIs.
Testing Your Python Flask API with Apidog
Now that you understand the power of Apidog in Python REST API development, let's see it in action. We'll demonstrate how to use Apidog to test the Python Flask API that you've developed.
Add your Flask API to Apidog: In Apidog, create a new API request and specify the URL for your Flask server, such as 'http://localhost:5000/get-data'. Define the method (GET, POST, etc.) and any necessary headers or parameters.
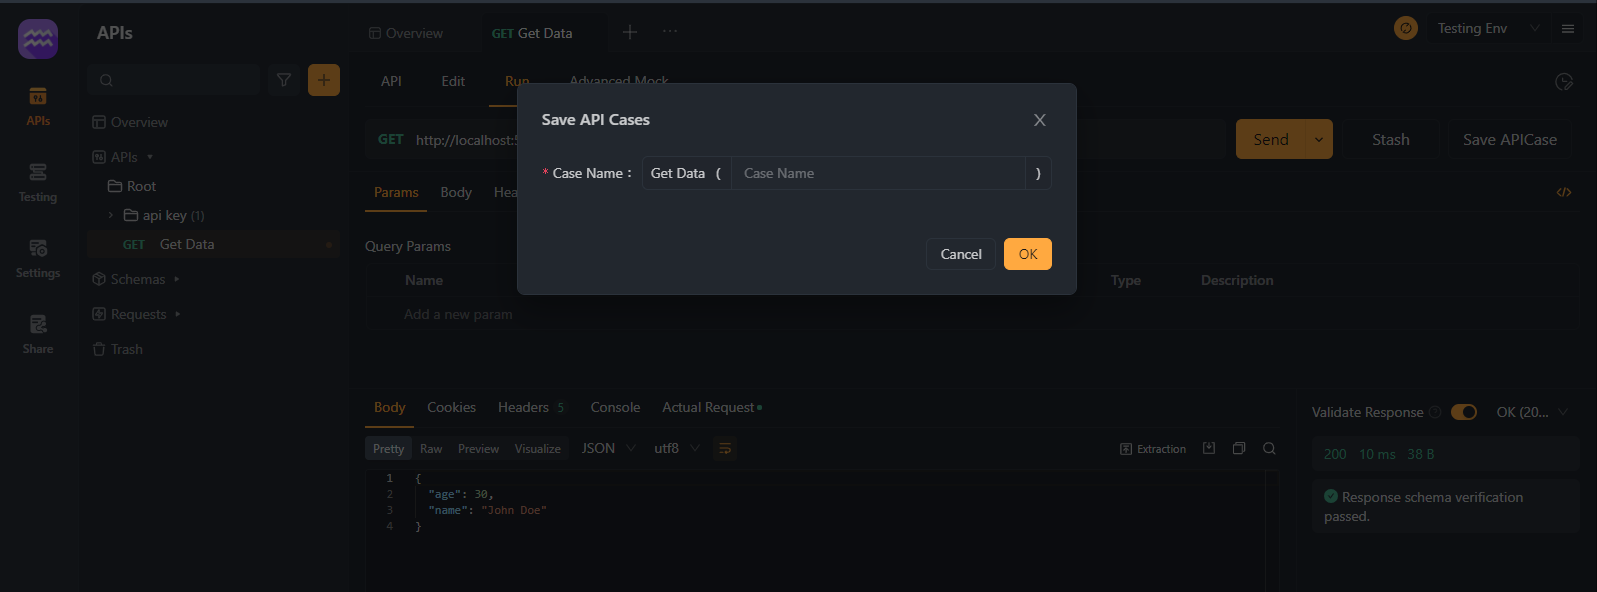
Send the request: Use the 'Send' button in Apidog to make a call to your Python REST API. You'll see the response right in the Apidog interface. This is an excellent way to ensure your API is functioning as expected. You can then Save the API Case to actually test.
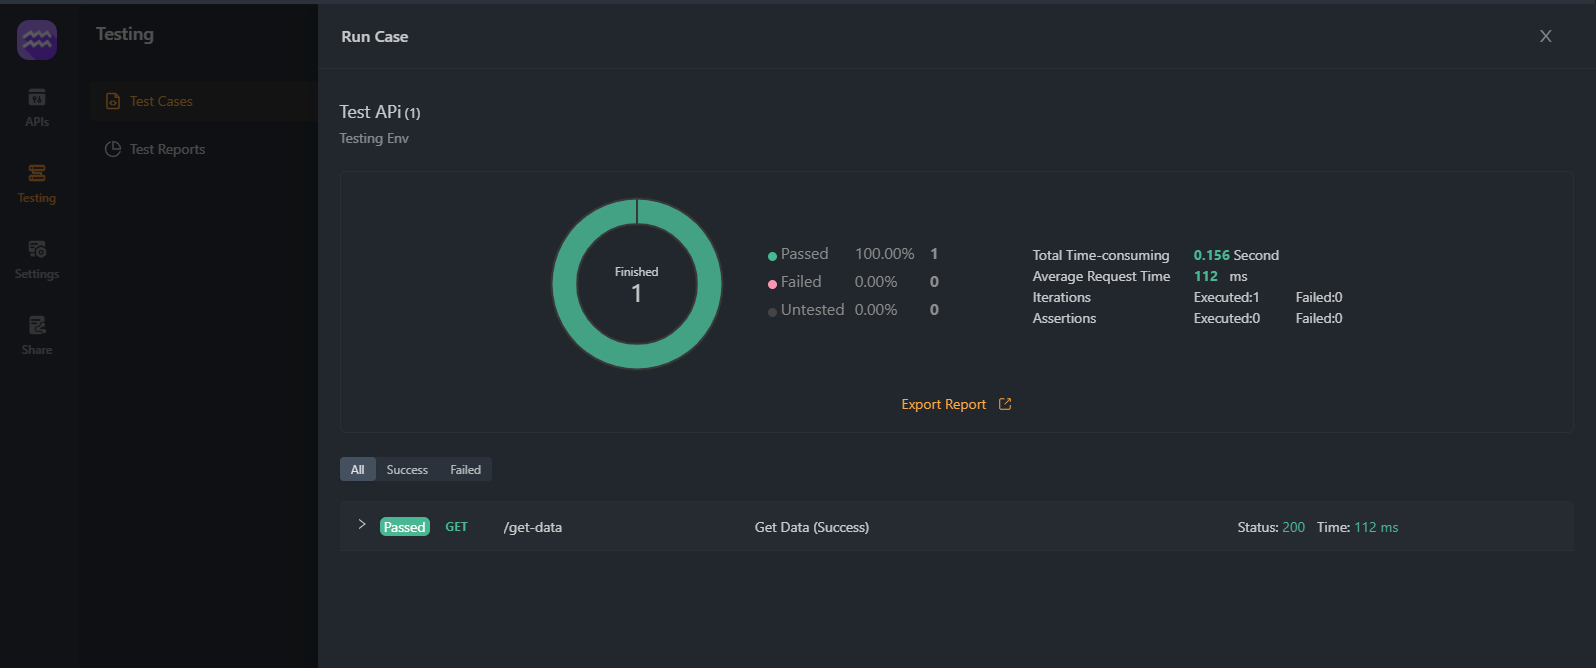
Automate testing: Use Apidog's automated testing tool to create test cases based on your API specifications. You can define assertions visually and generate test scenarios. This is a handy way to ensure that your API remains robust as it evolves.
Harnessing the power of Apidog for your Python REST API improves the quality of your API, and it also saves you valuable time, allowing you to focus more on delivering great features.
Apidog for Python - Streamlining Documentation
One of the most critical aspects of API development is documentation. Properly documented APIs are easier to maintain, debug, and use. This is where Apidog excels, offering an efficient toolset to generate and publish comprehensive API documentation.
Apidog automatically generates detailed documentation from your API definitions, which includes request parameters, responses, and endpoints. Additionally, Apidog supports 'try it out' functionality and example code, allowing other developers to interact with your API without additional setup. This thoroughly explains the API's operation and provides clear instructions.
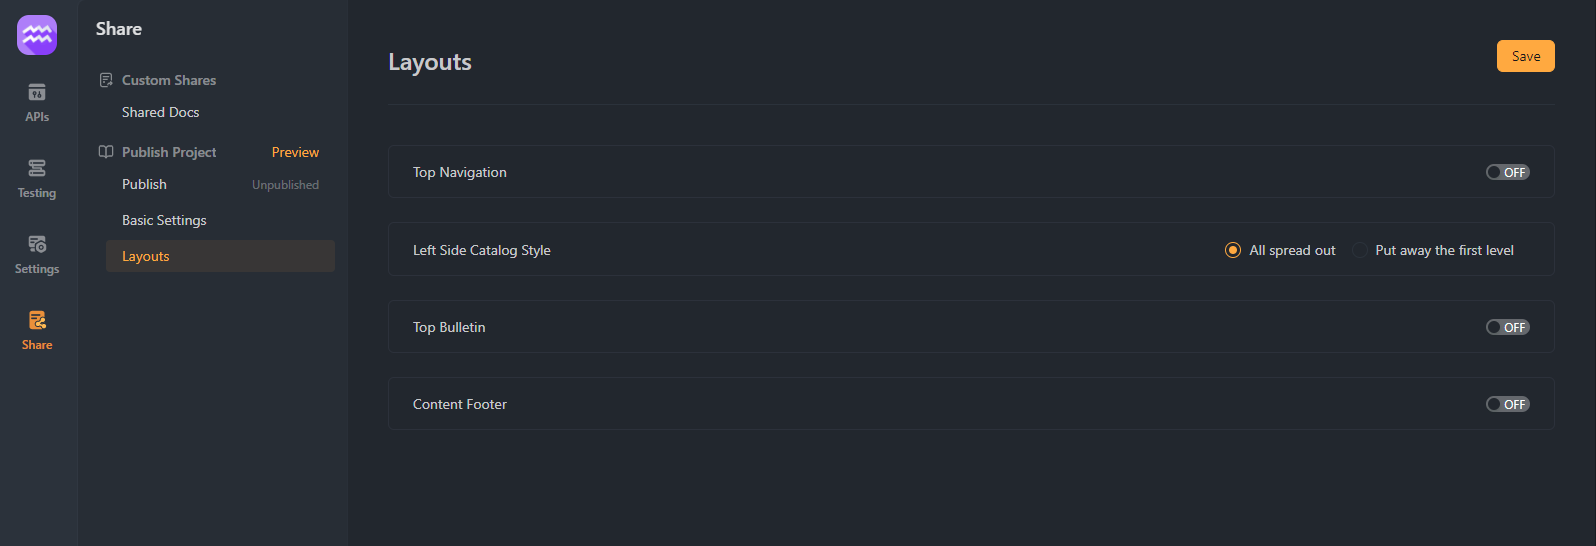
Moreover, Apidog provides customization options for your API's documentation. You can adjust the domain, headers, and layouts to fit your brand and project requirements. This, coupled with Apidog's ability to share your API docs as beautiful pages, makes Apidog an invaluable tool in your Python REST API toolkit.
A Step-by-Step Guide to Documenting Your Python REST API
To document your Python REST API using Apidog, follow these steps:
Design Your API: Create your API definitions in Apidog's visual editor, including all relevant endpoints, parameters, headers, and specifications.
Automatically Generate Documentation: As you build and test your API, Apidog automatically generates comprehensive API documentation. This includes request methods, URLs, parameters, and responses.

Customize Your Documentation: Apidog offers several customization options. You can change your documentation's domain, headers, and layouts to align with your brand and project's requirements.
Publish Your Documentation: Once satisfied with your documentation, you can publish it to a custom domain, share it with your team, or publicly publish it on Apidog's API Hub.
Remember, having good API documentation is not just a nice-to-have; it's a must-have. Properly documented APIs are easier to understand, use, maintain, and reflect well on the developer or team that created them.
If your existing workflow starts with requests you've prototyped in Apidog,translating those cURL commands to Python preserves headers, auth, and body structure without rewriting the logic from scratch.
Conclusion
Developing Python REST APIs has never been more efficient with the introduction of tools like Apidog. Whether you're an individual developer or a part of a large team, Apidog offers features that streamline collaboration and synchronize efforts. The ability to design while debugging, integrated API innovation, and compatibility with popular tools such as Postman makes Apidog a go-to tool for any Python REST API developer.
As you venture into creating more sophisticated and complex APIs, remember to leverage the full potential of Apidog to simplify your processes, save time, and deliver high-quality APIs.


