
When building web applications with Next.js, understanding how to effectively make PUT requests is essential for developers looking to manage and update data. This introductory guide will walk you through the process of creating PUT requests within the Next.js framework, providing you with the knowledge to seamlessly integrate server-side functionality into your applications. Whether you’re updating user profiles, posting articles, or modifying settings, mastering PUT requests is a crucial skill in the modern web development landscape. Let’s dive into the world of Next.js and unlock the full potential of API routes for data management.
What is a GET Request?
A PUT request is a method used in web protocols like HTTP to communicate with a server. When you make a PUT request, you’re essentially asking the server to either create or update the resource identified by the URL you’re sending the request to
What is NextJs?
Next.js is a React framework that enables developers to build server-rendered React applications with ease. It provides features like automatic code splitting, static generation, server-side rendering, and optimized loading to enhance performance and user experience. Next.js also supports CSS-in-JS, global CSS, and other styling options out of the box.
It’s designed to make the process of building web applications more efficient by handling various tasks such as routing, data fetching, and UI rendering. With Next.js, you can create dynamic web applications that are both fast and SEO-friendly.

How to Make Put Request in NextJs
Making a PUT request in Next.js is similar to handling other types of HTTP requests. You can create an API route that listens for PUT requests and then define the logic for updating data. Here’s a simple example of how to handle a PUT request in an API route:
// pages/api/update.js
export default function handler(req, res) {
  if (req.method === 'PUT') {
    // Extract your data from the request body
    const data = req.body;

    // Update your data in the database or perform other actions

    // Send a response back to the client
    res.status(200).json({ message: 'Data updated successfully' });
  } else {
    // If not a PUT request, send 405 - Method Not Allowed
    res.status(405).end(`Method ${req.method} Not Allowed`);
  }
}
In this example, when a PUT request is sent to /api/update, the server will process the data sent in the request body and return a success message. If the request method is not PUT, it will return a 405 Method Not Allowed error.
To make a PUT request from the client side, you can use the fetch API like this:
// Inside your React component or wherever you need to make the request
const updateData = async () => {
  const response = await fetch('/api/update', {
    method: 'PUT',
    headers: {
      'Content-Type': 'application/json',
    },
    body: JSON.stringify({
      // Your data here
    }),
  });

  const result = await response.json();
  console.log(result);
};

// Call this function when you want to update data
This function makes a PUT request to the /api/update endpoint with the data you want to update. It then logs the response from the server.
Remember to handle errors and loading states appropriately to ensure a good user experience. Would you like to know more about error handling or working with different types of data in your PUT requests?
How to Handle the Response Data in Nextjs?
Handling response data in Next.js typically involves using the fetch API to make requests and then processing the returned Response object. Here’s a general approach to handling response data:
- Make a
fetchrequest to your desired endpoint. - Use
.then()orawaitsyntax to wait for the promise to resolve. - Check the response status to ensure the request was successful.
- Parse the response data, usually as JSON, to use it in your application.
Here’s an example of how you might handle response data in a Next.js page or API route:
// Example in a Next.js page or API route
fetch('https://api.example.com/data')
  .then((response) => {
    if (!response.ok) {
      throw new Error('Network response was not ok');
    }
    return response.json();
  })
  .then((data) => {
    // Handle your data here
    console.log(data);
  })
  .catch((error) => {
    // Handle any errors here
    console.error('There has been a problem with your fetch operation:', error);
  });
Or using async/await:
// Example with async/await in a Next.js page or API route
async function fetchData() {
  try {
    const response = await fetch('https://api.example.com/data');
    if (!response.ok) {
      throw new Error('Network response was not ok');
    }
    const data = await response.json();
    // Handle your data here
    console.log(data);
  } catch (error) {
    // Handle any errors here
    console.error('There has been a problem with your fetch operation:', error);
  }
}

// Call fetchData where needed
Remember to handle different HTTP status codes and potential network errors to ensure a robust application.
How to Test NextJs HTTP GET Request Using Apidog?
To Test HTTP Put request using Apidog, you need to follow these simple steps:
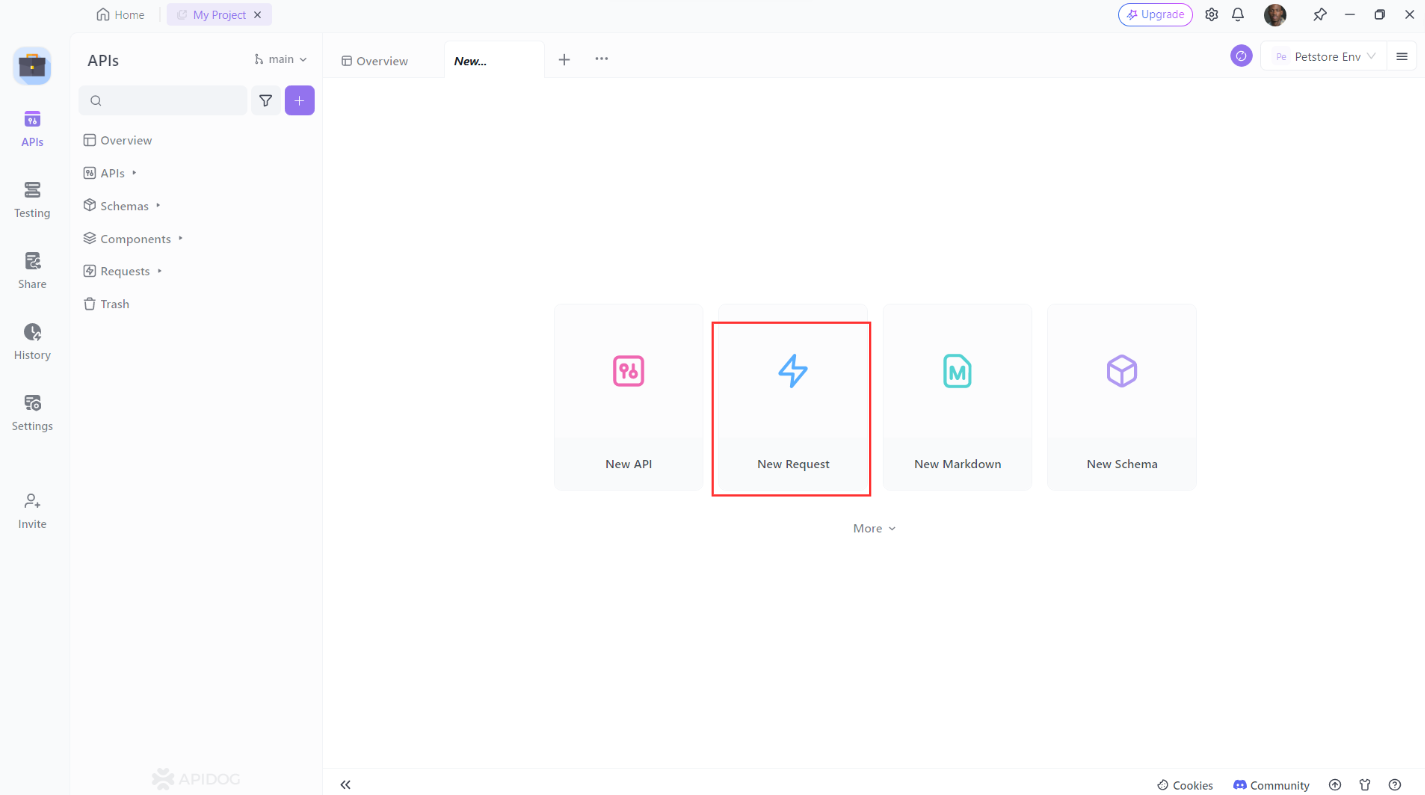
- Open Apidog and create a new request.
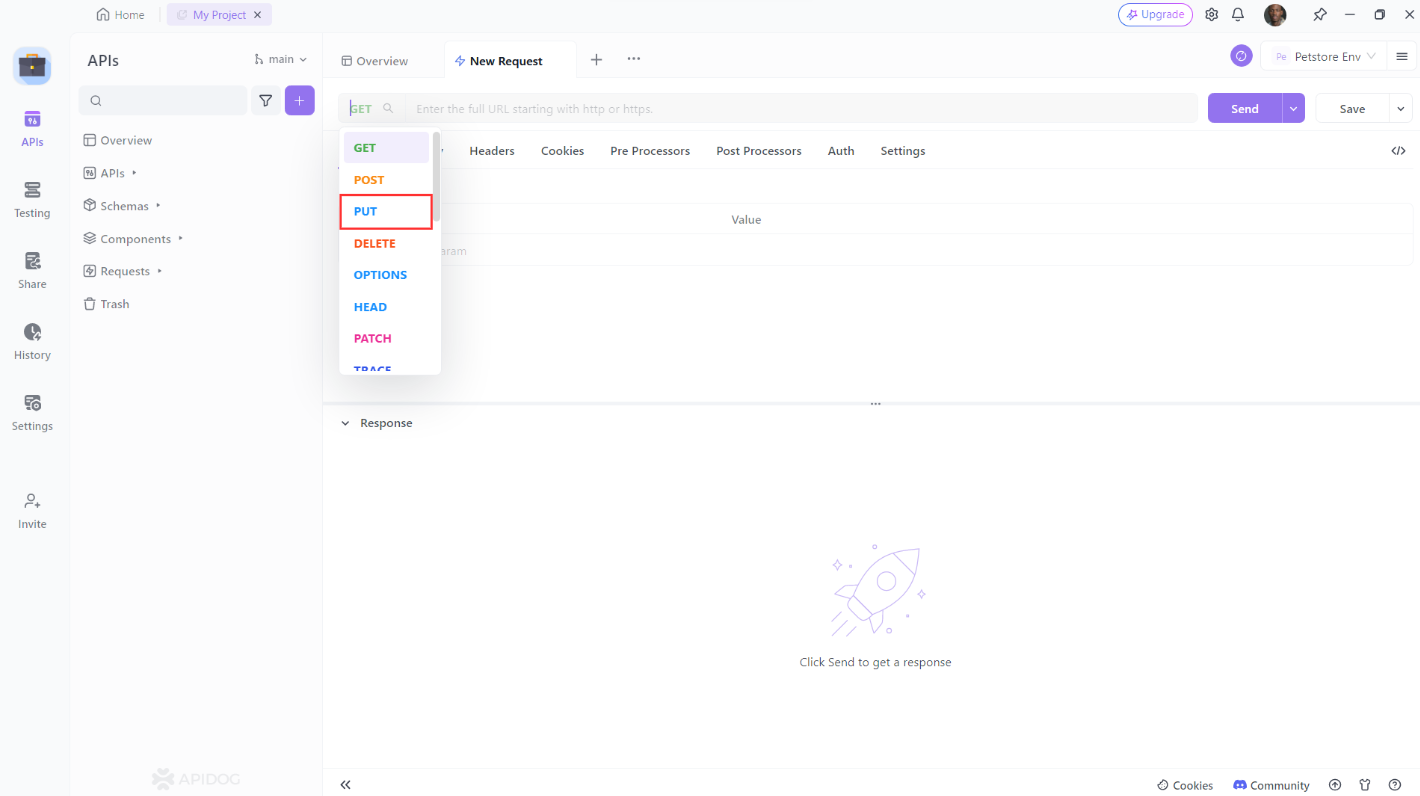
2. Set the request method to PUT.
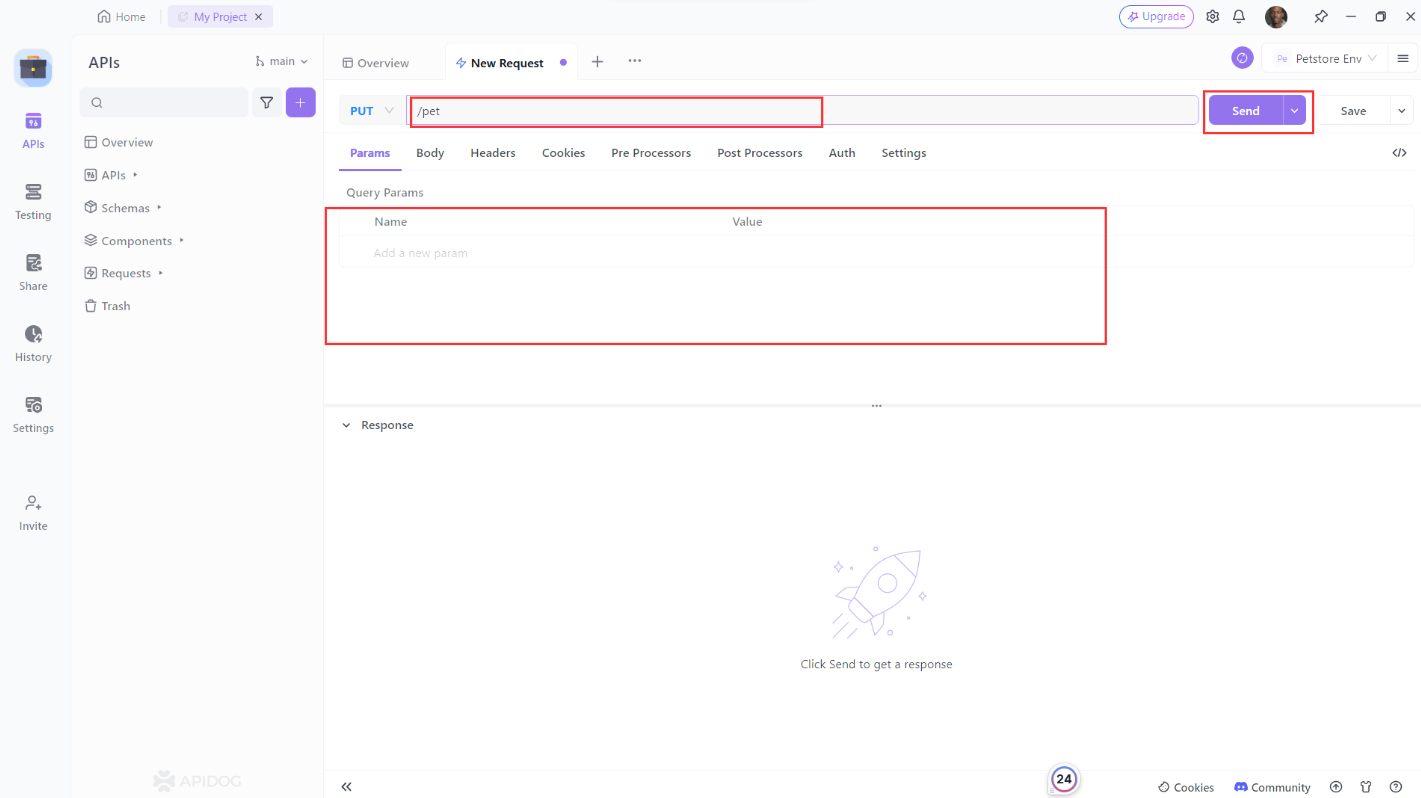
3. Enter the URL of the resource you want to update. Add any additional headers or parameters you want to include then click the “Send” button to send the request.
4. Verify that the response is what you expected.
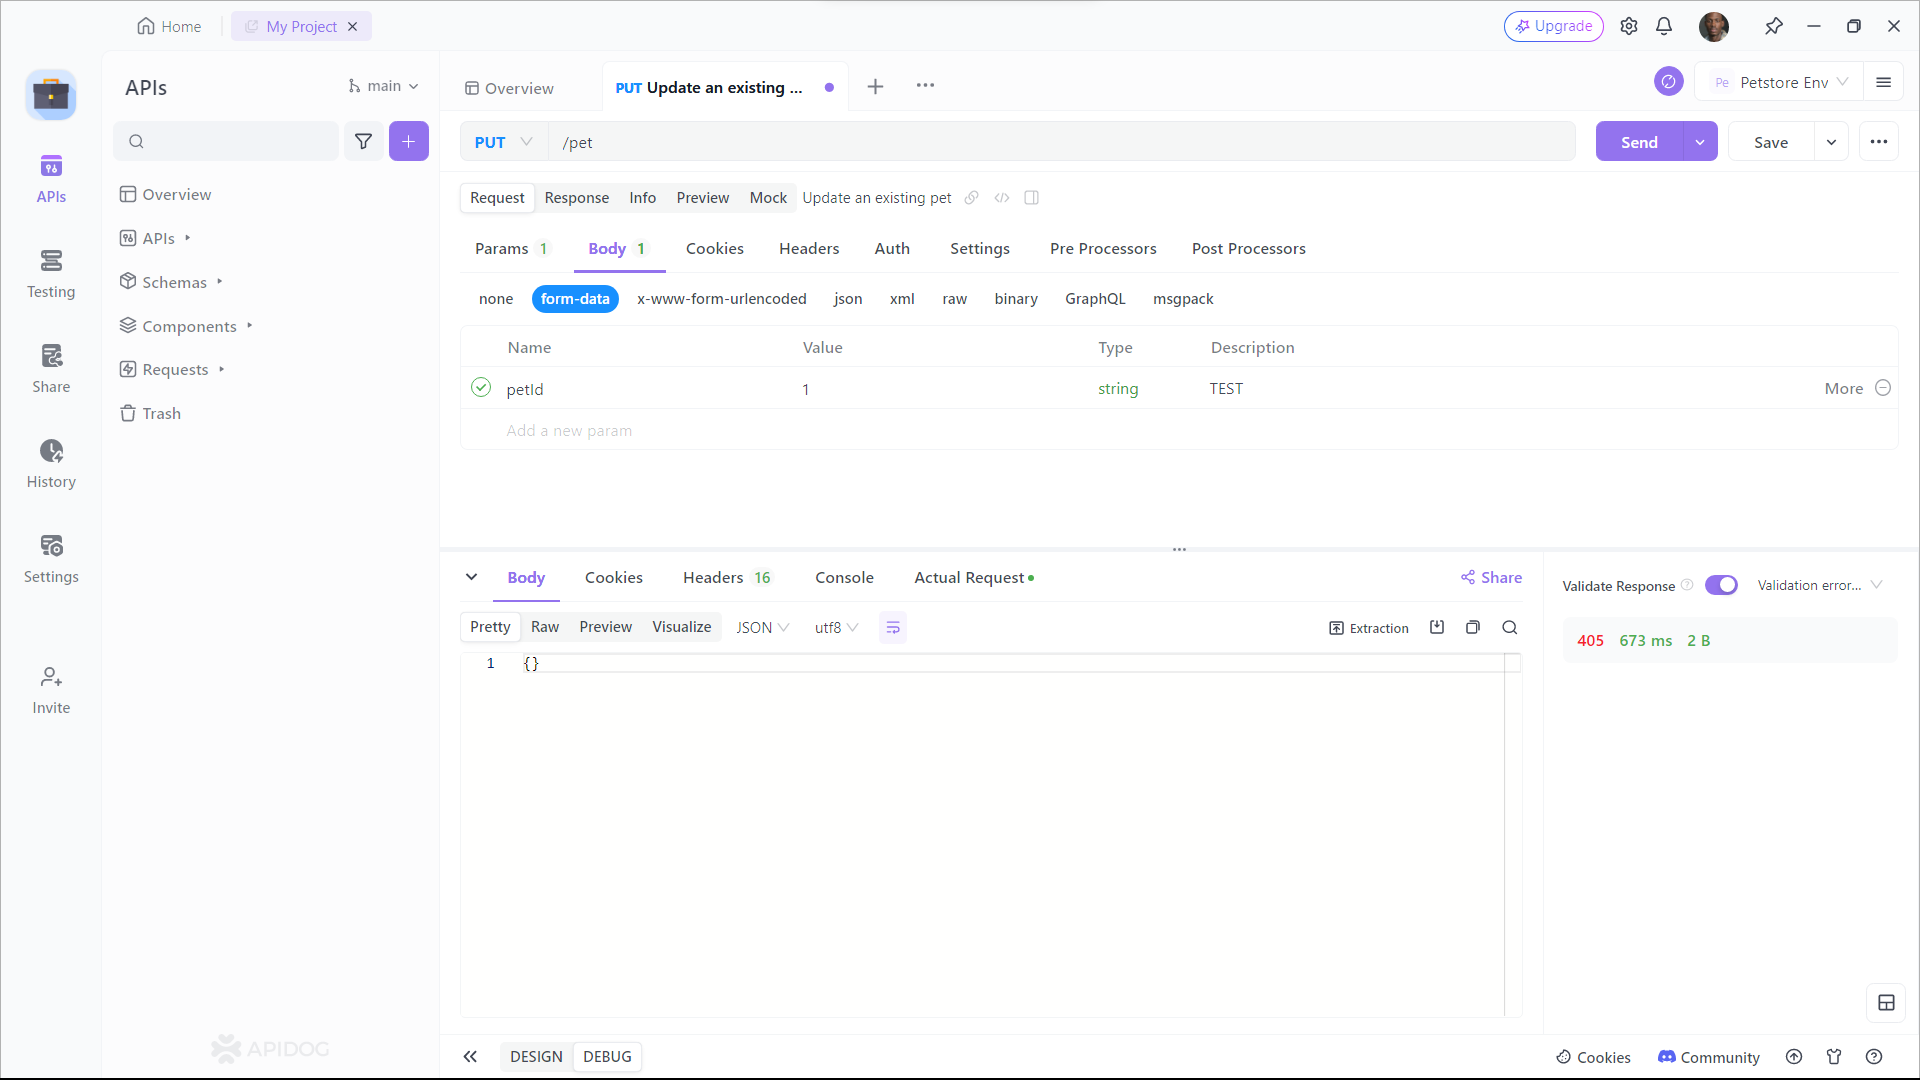
As you can see, Apidog shows you the URL, parameters, headers, and body of the request, and the status, headers, and body of the response. You can also see the response time, size, and format of the request and response, and compare them with different web APIs.
Conclusion
In summary, making a PUT request in Next.js is a process that can be handled efficiently within the framework’s API routes. By understanding the HTTP PUT method and its idempotent nature, developers can create or update resources on the server with confidence. Next.js simplifies this process by allowing API routes to be written directly alongside page components, providing a streamlined full-stack development experience


