Moonshot AI shipped Kimi K3 on July 16, 2026, and called it their most capable model to date: the world’s first open 3T-class model, with a 2.8T-parameter Mixture-of-Experts design and a 1,048,576-token context window. The interesting part for builders is not the size, it’s the API. Kimi K3 speaks the OpenAI SDK dialect, so if you already call GPT or any OpenAI-compatible endpoint, you can point the same client at kimi-k3 and start streaming responses in a few minutes. This guide walks through getting a key, the quickstart in Python, JavaScript, and cURL, streaming, tool calls, JSON mode, the configurable reasoning-effort parameter, and the context caching that makes cache-hit input roughly ten times cheaper than cache-miss. Then you’ll test and debug those calls in Apidog so you can see the raw request and the server-sent events instead of guessing.
TL;DR
- The API model ID is
kimi-k3. On OpenRouter the slug ismoonshotai/kimi-k3. - The endpoint is OpenAI-SDK compatible. Set
base_url, setapi_key, setmodel="kimi-k3", done. Confirm the exact base URL in the console at platform.kimi.ai; Kimi has historically usedhttps://api.moonshot.ai/v1. - Context window is 1M tokens. Pricing is $0.30 per million cache-hit input tokens, $3.00 per million cache-miss input tokens, and $15.00 per million output tokens.
- Streaming, tool calls, JSON mode, structured output, and a
reasoning_effortparameter (maxis available today) all work through the standard chat-completions shape. - Older or budget coding workloads may still fit the K2.7 line better; there’s a note on picking below.
- Import the request into Apidog to inspect streaming, debug tool calls, store your key as an environment variable, and A/B
kimi-k3againstkimi-k2-7-code.
Which Kimi model should you call
Before you write any code, pick the right target. Kimi K3 is the frontier model in the family: a large MoE aimed at complex coding, long-horizon agentic work, and knowledge tasks over long context. It carries the highest per-token output cost in the lineup, and Moonshot’s own launch post is candid that K3 trails Claude Fable 5 and GPT-5.6 Sol on their internal comparisons. It’s strong, not a clean frontier winner, and it’s priced accordingly.
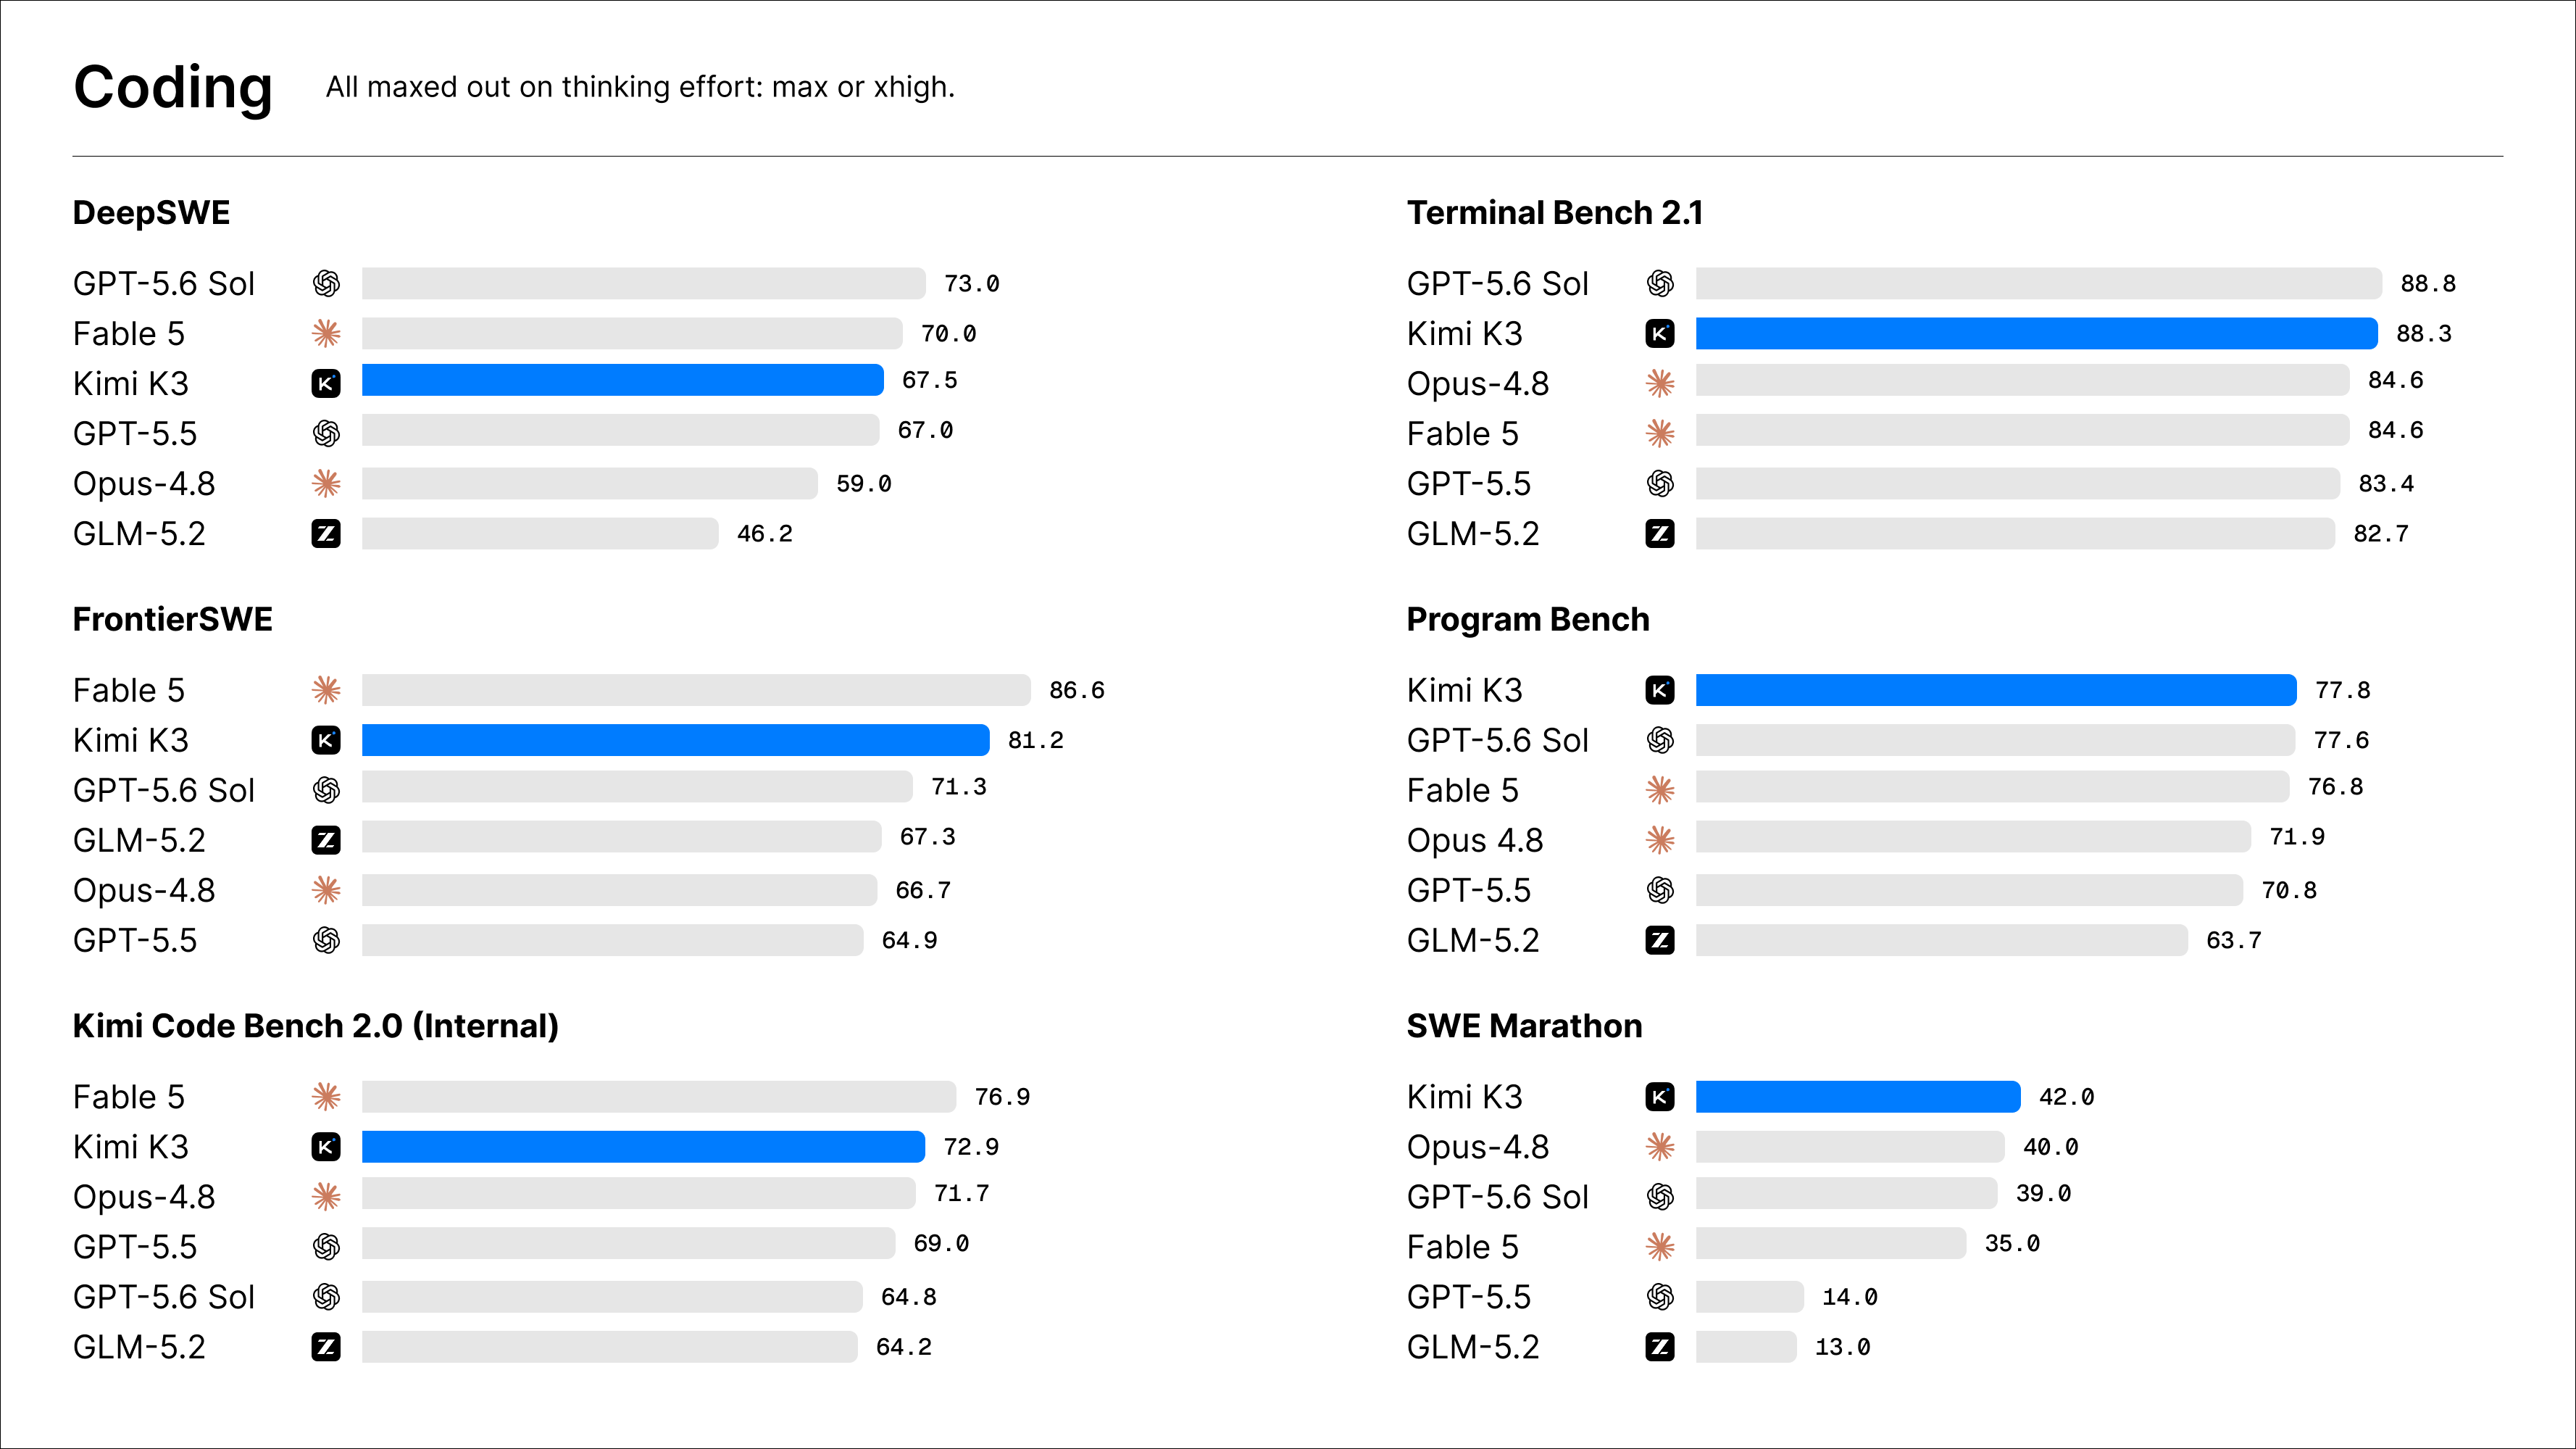
If your workload is a high-volume coding assistant, a CI test-writer, or anything where you’re paying per call at scale, the older K2.7 Code line is often the better fit on cost. Start with the Kimi K2.7 Code API guide and the what is Kimi K2.7 Code overview to see whether that tier covers your case. For a side-by-side on capability and price, the Kimi K3 vs Kimi K2.7 Code comparison lays out where each one wins. Reach for kimi-k3 when you need the extra reasoning depth, the full 1M context, or the agentic tool orchestration; drop to K2.7 when the task is routine and volume is high. If you want the full capability rundown first, the what is Kimi K3 explainer covers the architecture and where the model lands.
Get an API key on the Kimi platform
Head to platform.kimi.ai and sign in. The new console is where you create keys, watch usage, and confirm the base URL for your account.
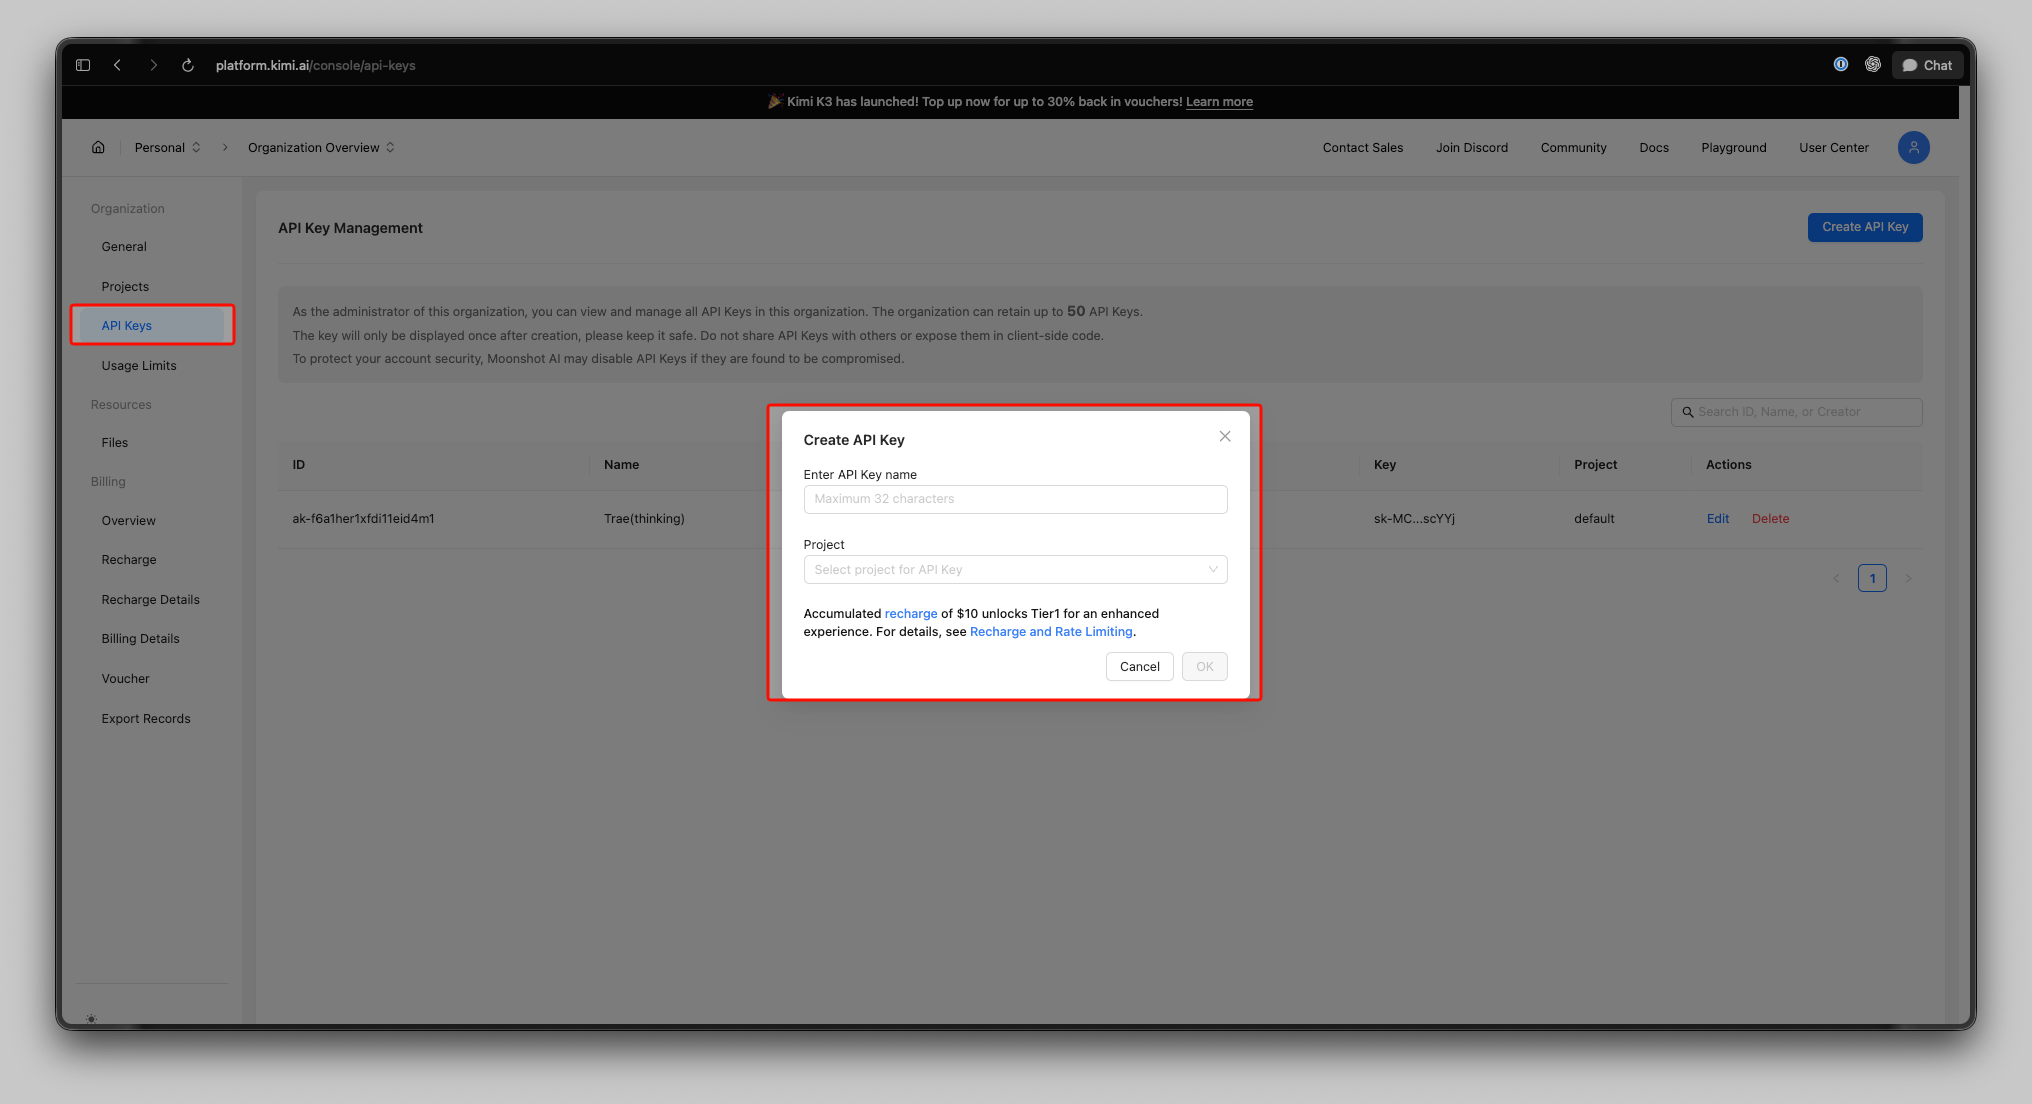
- Open the API keys section of the console and create a new key.
- Copy it once and store it somewhere safe. You won’t see the full value again.
- Add credit or confirm your billing tier so calls to
kimi-k3don’t get rejected for insufficient balance. - Note the base URL shown in the console. Kimi has historically used
https://api.moonshot.ai/v1; the console is the source of truth for your account.
Export the key as an environment variable so it never lands in your source code:
export KIMI_API_KEY="sk-your-key-here"
That single habit keeps secrets out of git history and out of screenshots. Later, when you test in Apidog, you’ll store the same value as an environment variable there too, so the key lives in exactly two places you control.
For a full breakdown of the cache-hit versus cache-miss math and how it maps to real monthly bills, see the Kimi K3 pricing guide.
Quickstart: your first kimi-k3 call
Kimi’s API follows the OpenAI chat-completions contract, so the official OpenAI SDKs work with two changes: the base_url and the model. Install the SDK you prefer, then run one of the snippets below.
Python
import os
from openai import OpenAI

client = OpenAI(
    api_key=os.environ["KIMI_API_KEY"],
    # Kimi is OpenAI-SDK compatible. Confirm the exact base URL in the
    # console at platform.kimi.ai; Kimi has historically used the value below.
    base_url="https://api.moonshot.ai/v1",
)

response = client.chat.completions.create(
    model="kimi-k3",
    messages=[
        {"role": "system", "content": "You are a precise coding assistant."},
        {"role": "user", "content": "Explain what a token bucket rate limiter does in one paragraph."},
    ],
)

print(response.choices[0].message.content)
JavaScript / TypeScript
import OpenAI from "openai";

const client = new OpenAI({
  apiKey: process.env.KIMI_API_KEY,
  // Confirm the base URL in the platform.kimi.ai console.
  baseURL: "https://api.moonshot.ai/v1",
});

const response = await client.chat.completions.create({
  model: "kimi-k3",
  messages: [
    { role: "system", content: "You are a precise coding assistant." },
    { role: "user", content: "Explain what a token bucket rate limiter does in one paragraph." },
  ],
});

console.log(response.choices[0].message.content);
cURL
curl "$KIMI_BASE_URL/chat/completions" \
  -H "Authorization: Bearer $KIMI_API_KEY" \
  -H "Content-Type: application/json" \
  -d '{
    "model": "kimi-k3",
    "messages": [
      {"role": "user", "content": "Explain what a token bucket rate limiter does in one paragraph."}
    ]
  }'
Set KIMI_BASE_URL to whatever the console shows (for example https://api.moonshot.ai/v1). If any of these return a 401, the key is wrong or unset. A 404 on the path usually means the base URL is off, not that the model is missing. The OpenAI Python SDK docs cover the client options in more detail, and every option there applies here because the wire format is the same.
Streaming responses
For chat UIs and long agent turns, you want tokens as they arrive instead of waiting for the whole completion. Set stream=True and iterate over the deltas.
stream = client.chat.completions.create(
    model="kimi-k3",
    messages=[{"role": "user", "content": "Write a 6-line poem about flaky tests."}],
    stream=True,
)

for chunk in stream:
    delta = chunk.choices[0].delta
    if delta.content:
        print(delta.content, end="", flush=True)
Under the hood this is a server-sent events (SSE) stream: each line is a data: frame carrying a small JSON chunk, and the stream ends with data: [DONE]. The SDK hides that framing from you, which is convenient until something breaks mid-stream and you need to see the raw frames. That’s one place the Apidog section below earns its keep.
The same flag works in JavaScript:
const stream = await client.chat.completions.create({
  model: "kimi-k3",
  messages: [{ role: "user", content: "Write a 6-line poem about flaky tests." }],
  stream: true,
});

for await (const chunk of stream) {
  process.stdout.write(chunk.choices[0]?.delta?.content ?? "");
}
Tool calls (function calling)
Kimi K3 supports tool calls, tool-choice constraints, and dynamic tool loading, so you can wire it into agents that read files, hit APIs, or run terminal commands. You describe your functions with JSON Schema, the model decides when to call one, and you return the result on a tool message.
tools = [
    {
        "type": "function",
        "function": {
            "name": "get_weather",
            "description": "Get the current weather for a city.",
            "parameters": {
                "type": "object",
                "properties": {
                    "city": {"type": "string", "description": "City name, e.g. Singapore"},
                },
                "required": ["city"],
            },
        },
    }
]

messages = [{"role": "user", "content": "What's the weather in Singapore right now?"}]

first = client.chat.completions.create(
    model="kimi-k3",
    messages=messages,
    tools=tools,
    tool_choice="auto",
)

tool_call = first.choices[0].message.tool_calls[0]
print(tool_call.function.name)       # get_weather
print(tool_call.function.arguments)  # {"city": "Singapore"}
The model doesn’t run your function; it hands you a name and JSON arguments. You execute the real work, then feed the output back so the model can write a final answer:
import json

# Append the assistant turn that asked for the tool, then the tool result.
messages.append(first.choices[0].message)
messages.append({
    "role": "tool",
    "tool_call_id": tool_call.id,
    "content": json.dumps({"city": "Singapore", "temp_c": 31, "sky": "humid"}),
})

final = client.chat.completions.create(model="kimi-k3", messages=messages, tools=tools)
print(final.choices[0].message.content)
Set tool_choice="required" to force a tool call, or pass a specific {"type": "function", "function": {"name": "get_weather"}} object to pin one function. Those constraints keep an agent on rails when you already know which tool should fire.
One K3-specific gotcha worth knowing early: the model was trained in preserved-thinking-history mode. If your agent harness drops the model’s earlier reasoning between turns, generation quality can get unstable. When you build a multi-turn agent loop, pass the full message history back rather than trimming the assistant’s internal turns.
JSON mode and structured output
When you need machine-readable output, ask for JSON directly instead of parsing prose. Set response_format to json_object and instruct the model to return JSON.
response = client.chat.completions.create(
    model="kimi-k3",
    messages=[
        {"role": "system", "content": "Return only valid JSON. No prose, no markdown."},
        {"role": "user", "content": "Extract name and role from: 'Ada Lovelace, mathematician'."},
    ],
    response_format={"type": "json_object"},
)

print(response.choices[0].message.content)  # {"name": "Ada Lovelace", "role": "mathematician"}
For stricter guarantees, Kimi supports structured output against a schema. If your SDK version accepts it, pass a json_schema response format so the model conforms to your shape:
response = client.chat.completions.create(
    model="kimi-k3",
    messages=[{"role": "user", "content": "Extract name and role from: 'Ada Lovelace, mathematician'."}],
    response_format={
        "type": "json_schema",
        "json_schema": {
            "name": "person",
            "schema": {
                "type": "object",
                "properties": {
                    "name": {"type": "string"},
                    "role": {"type": "string"},
                },
                "required": ["name", "role"],
            },
        },
    },
)
Confirm json_schema support for your account in the console before you ship it; when in doubt, json_object plus a validation step on your side is the safe fallback. Kimi also exposes a partial mode and internet search, which help when you want to prefill an assistant response or ground answers on fresh data.
Configurable reasoning effort
Kimi K3 exposes a reasoning_effort parameter that controls how much the model thinks before it answers. Today the available level is max, which is also the default; Moonshot has said lower and higher levels are planned. Deeper thinking costs more output tokens and adds latency, so it’s a lever you tune per task.
response = client.chat.completions.create(
    model="kimi-k3",
    messages=[{"role": "user", "content": "Plan a migration from REST to GraphQL for a 40-endpoint API."}],
    reasoning_effort="max",
)
If your OpenAI SDK version rejects the field as unknown, pass it through the escape hatch instead:
response = client.chat.completions.create(
    model="kimi-k3",
    messages=[{"role": "user", "content": "Plan a migration from REST to GraphQL."}],
    extra_body={"reasoning_effort": "max"},
)
The extra_body pattern is how you send any provider-specific field the base SDK doesn’t model yet, which is common when a compatible endpoint moves faster than the client library.
Test and debug kimi-k3 in Apidog
SDK code hides the wire format, which is fine until a tool call returns the wrong shape or a stream cuts off and you can’t tell whether the fault is yours or the endpoint’s. This is where an API client that speaks raw HTTP pays off. Apidog lets you send the exact kimi-k3 request, watch the SSE stream frame by frame, and keep your key out of the request body. If you’d rather test API calls without living in a terminal, this is a cleaner loop than curl-and-squint; the testing APIs without Postman walkthrough covers the general workflow.
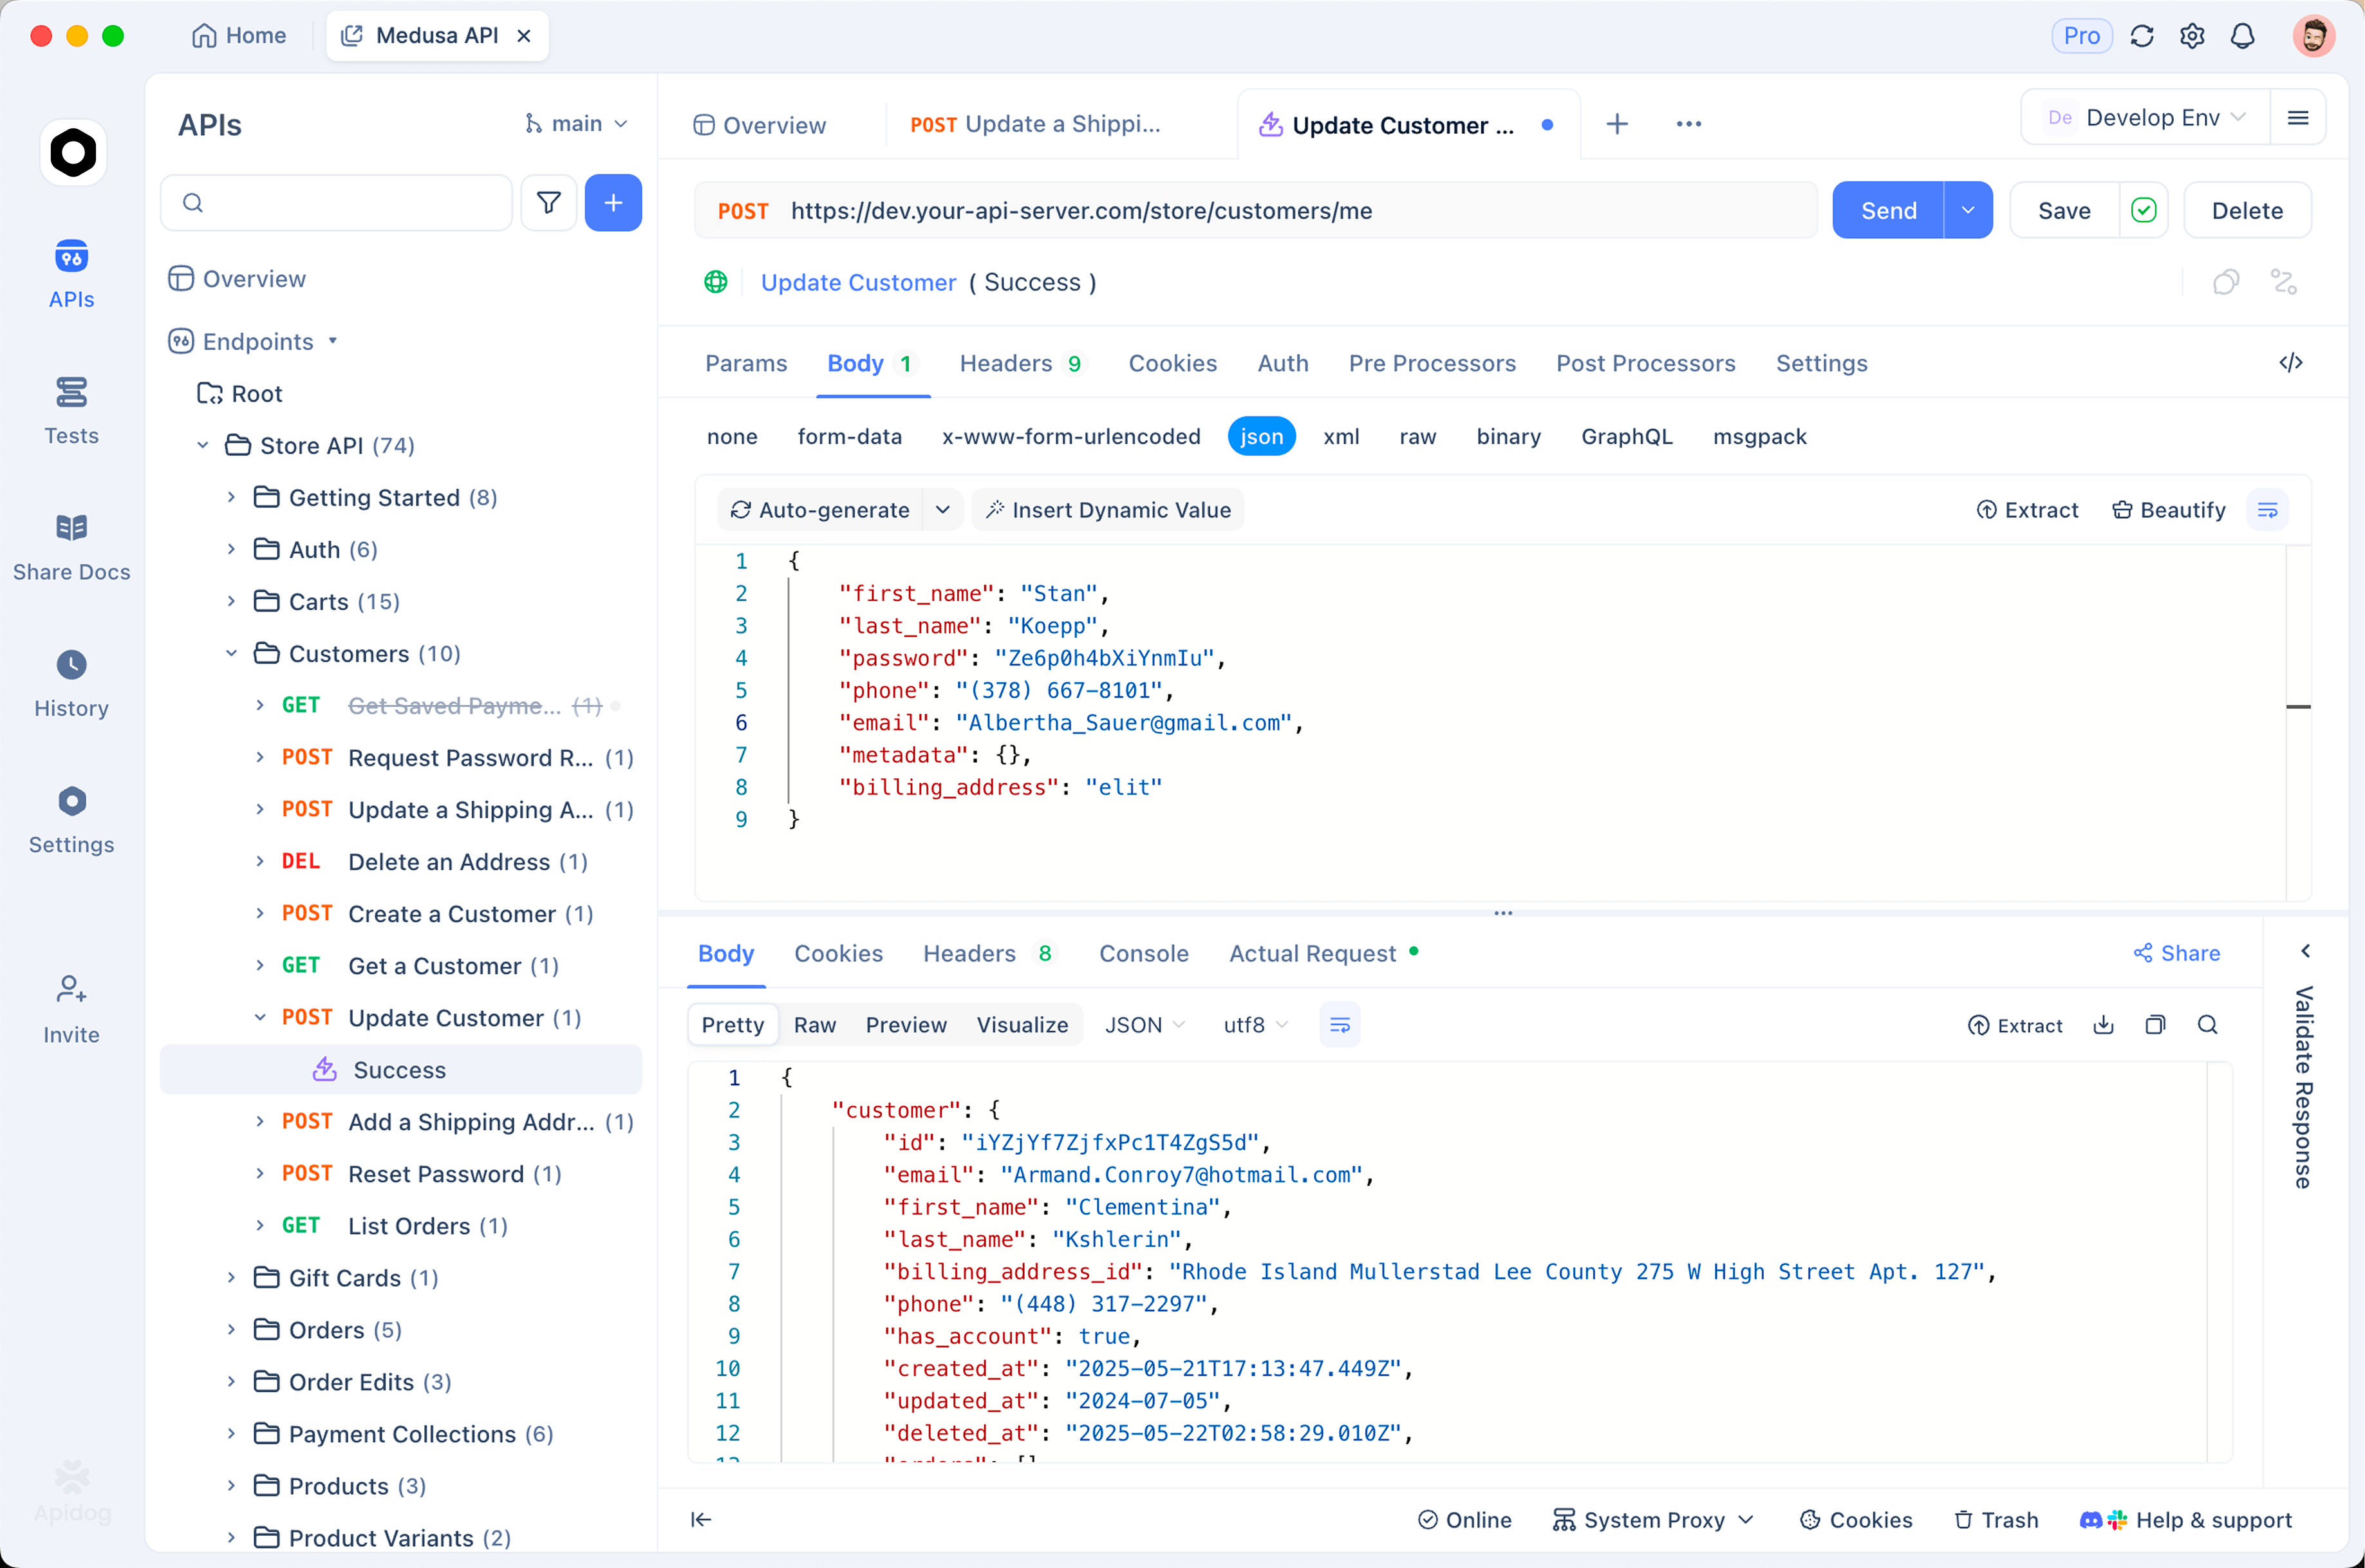
Here’s a focused loop for kimi-k3:
- Create a new HTTP request in Apidog. Set the method to POST and the URL to your base URL plus
/chat/completions. - Store your key as an environment variable. In Apidog’s environment settings, add
KIMI_API_KEY, then set theAuthorizationheader toBearer {{KIMI_API_KEY}}. Now the secret is referenced, not pasted, and you can switch between test and production keys by switching environments. - Paste a JSON body with
"model": "kimi-k3"and yourmessagesarray. Send it and read the full response, including token usage, so you can see cache-hit versus cache-miss counts on real calls. - Flip
"stream": trueand watch the server-sent events arrive as discrete frames. Seeing the rawdata:chunks makes streaming bugs obvious in a way the SDK’s tidy iterator does not. - Debug tool calls by inspecting the
tool_callsarray in the response. When arguments come back malformed, you can see whether the model produced bad JSON or your schema was ambiguous, and fix the description right there. - A/B against
kimi-k2-7-code. Duplicate the request, change only themodelfield, and compare latency, output quality, and cost on the same prompt. That’s the fastest honest way to decide whether K3’s extra reasoning is worth the price jump for your task.
Because Apidog imports OpenAI-compatible requests directly, you can paste a cURL command and get a saved, replayable request with headers and body already filled in. From there it becomes a shared test case your team can rerun whenever Kimi ships an update. If your agent talks to the model through MCP, the visual debugging with the Apidog MCP client guide shows how to trace those calls too. Download Apidog if you want to follow this loop on your own key.
Real-world use cases
A few patterns map cleanly onto what kimi-k3 is built for:
- Repository-scale coding agents. The 1M context and agentic tool orchestration let the model hold a large codebase, run tests, read logs, and iterate. Cache the codebase digest as a stable prefix and you keep the per-turn cost sane.
- Long-document knowledge work. Feed a full spec, contract, or research corpus and ask for structured extraction with
json_schema. Keep the document at the front of the prompt so repeated queries hit the cache. - Migration and refactor planning. Turn
reasoning_efforttomaxfor the planning pass, where deeper thinking pays off, then drop back to a cheaper model for the mechanical edits. - Grounded research answers. With internet search and tool calls, K3 can pull fresh data and cite it, which suits assistants that can’t rely on stale training knowledge.
In every one of these, the workflow is the same: build the request with the SDK, verify the raw behavior in Apidog, then wire it into your app once you trust the shape.
Wrapping up
Calling Kimi K3 comes down to three settings on an OpenAI-compatible client: the base URL from your console, your API key, and model="kimi-k3". From there, streaming, tool calls, JSON mode, structured output, and reasoning_effort all follow the chat-completions contract you already know. The two things worth internalizing are the caching economics, where keeping a stable prefix turns $3.00 input into $0.30 input, and the honest tradeoff that K3 buys reasoning depth at a real price, so route routine high-volume work to the K2.7 line. Build the request in code, prove it out in Apidog, and you’ll ship against kimi-k3 without surprises.
FAQ
What is the API model ID for Kimi K3? It’s kimi-k3 on Kimi’s own platform. If you call it through OpenRouter, the slug is moonshotai/kimi-k3. You can read the model’s OpenRouter listing at openrouter.ai/moonshotai/kimi-k3.
Which base URL do I use? Confirm it in the console at platform.kimi.ai, since that’s the source of truth for your account. Kimi has historically used https://api.moonshot.ai/v1. In code, keep it as a base_url variable you set from the console rather than hard-coding it.
Is Kimi K3 compatible with the OpenAI SDK? Yes. The API follows the OpenAI chat-completions format, so the official OpenAI Python and JavaScript SDKs work after you change base_url and model. Provider-specific fields go through extra_body.
How much does the Kimi K3 API cost? $0.30 per million cache-hit input tokens, $3.00 per million cache-miss input tokens, and $15.00 per million output tokens. Structuring prompts for cache reuse is the biggest lever on your bill. The Kimi K3 pricing guide works through the numbers.
What does context caching actually do? When the leading tokens of your request match a previous one, the endpoint reuses computed state instead of recomputing it, which drops input cost from $3.00 to $0.30 per million on that portion. Keep your system prompt and shared context at the front and identical across calls to maximize hits.
Can I control how hard the model thinks? Yes, through reasoning_effort. The available level today is max, which is also the default; Moonshot has said other levels are planned. Higher effort costs more output tokens and adds latency.
Should I use Kimi K3 or Kimi K2.7 Code? Use kimi-k3 when you need deep reasoning, the full 1M context, or agentic tool orchestration. For high-volume, routine coding work, the cheaper K2.7 line is often the better call. The Kimi K3 vs Kimi K2.7 Code comparison and the Kimi K2.7 Code API guide help you decide.
How do I debug a broken streaming or tool-call response? Send the raw request in Apidog with "stream": true and read the server-sent events frame by frame, or inspect the tool_calls array to see whether the model returned malformed JSON. Storing your key as an environment variable keeps it out of the request body while you test.