If you're a Java developer, you've probably faced challenges with REST APIs, like over-fetching or under-fetching data. Enter GraphQL—a powerful query language for your API that solves these issues by giving clients the power to ask for exactly what they need and nothing more.
Today, we’re diving into how you can implement GraphQL in Java to create flexible and efficient APIs. But before we jump into the nitty-gritty, let me share an exciting tool that will make your journey smoother—Apidog.
What is GraphQL?
GraphQL is an open-source data query and manipulation language for APIs, developed by Facebook in 2012 and publicly released in 2015. Unlike REST, which exposes multiple endpoints, GraphQL allows clients to query a single endpoint and specify exactly what data they need. This leads to more efficient data retrieval and reduced network usage.
Why Choose Java for GraphQL?
Java, a robust and widely-used programming language, is perfect for implementing GraphQL for several reasons:
- Strong Typing: Java’s strong type system aligns well with GraphQL’s schema-based structure.
- Community Support: Java has a vast ecosystem and community support, ensuring you can find libraries and tools to ease your GraphQL implementation.
- Performance: Java’s performance capabilities make it suitable for handling complex and large-scale GraphQL queries.

Getting Started with GraphQL in Java
Now, let’s walk through the steps to set up and use GraphQL in a Java application. We'll be using Spring Boot, a popular framework for building Java applications, along with some powerful GraphQL libraries.
Step 1: Set Up Your Spring Boot Project
First, create a new Spring Boot project. You can do this using Spring Initializr or your favorite IDE.
Here’s a simple setup using Spring Initializr:
- Navigate to start.spring.io.
- Select "Gradle Project" or "Maven Project".
- Add the necessary dependencies:
- Spring Web
- Spring Boot DevTools
- Spring Data JPA
- H2 Database (for simplicity)
Generate the project and unzip the downloaded file. Open it in your IDE.
Step 2: Add GraphQL Dependencies
Next, add the GraphQL dependencies to your project. In your build.gradle or pom.xml file, include:
// build.gradle
dependencies {
    implementation 'com.graphql-java-kickstart:graphql-spring-boot-starter:11.1.0'
    implementation 'com.graphql-java-kickstart:graphql-java-tools:11.1.0'
    implementation 'com.graphql-java-kickstart:graphiql-spring-boot-starter:11.1.0'
}
Or for Maven:
<!-- pom.xml -->
<dependencies>
    <dependency>
        <groupId>com.graphql-java-kickstart</groupId>
        <artifactId>graphql-spring-boot-starter</artifactId>
        <version>11.1.0</version>
    </dependency>
    <dependency>
        <groupId>com.graphql-java-kickstart</groupId>
        <artifactId>graphql-java-tools</artifactId>
        <version>11.1.0</version>
    </dependency>
    <dependency>
        <groupId>com.graphql-java-kickstart</groupId>
        <artifactId>graphiql-spring-boot-starter</artifactId>
        <version>11.1.0</version>
    </dependency>
</dependencies>
Step 3: Define Your GraphQL Schema
Create a folder named graphql in the src/main/resources directory. In this folder, create a file named schema.graphqls to define your GraphQL schema. Here’s a simple example:
type Query {
    getBookById(id: ID!): Book
    getAllBooks: [Book]
}

type Book {
    id: ID!
    title: String
    author: String
    publishedDate: String
}
Step 4: Create Your Java Models
Create a simple Book class in your project:
package com.example.graphql.model;

import javax.persistence.Entity;
import javax.persistence.GeneratedValue;
import javax.persistence.GenerationType;
import javax.persistence.Id;

@Entity
public class Book {
    @Id
    @GeneratedValue(strategy = GenerationType.IDENTITY)
    private Long id;
    private String title;
    private String author;
    private String publishedDate;

    // Getters and Setters
}
Step 5: Set Up Your Repositories
Create a repository interface for your Book entity:
package com.example.graphql.repository;

import com.example.graphql.model.Book;
import org.springframework.data.jpa.repository.JpaRepository;
import org.springframework.stereotype.Repository;

@Repository
public interface BookRepository extends JpaRepository<Book, Long> {
}
Step 6: Create GraphQL Resolvers
Now, create resolvers for your GraphQL queries. Resolvers are responsible for fetching the data specified in the GraphQL schema.
package com.example.graphql.resolver;

import com.coxautodev.graphql.tools.GraphQLQueryResolver;
import com.example.graphql.model.Book;
import com.example.graphql.repository.BookRepository;
import org.springframework.beans.factory.annotation.Autowired;
import org.springframework.stereotype.Component;

import java.util.List;

@Component
public class BookResolver implements GraphQLQueryResolver {

    @Autowired
    private BookRepository bookRepository;

    public Book getBookById(Long id) {
        return bookRepository.findById(id).orElse(null);
    }

    public List<Book> getAllBooks() {
        return bookRepository.findAll();
    }
}
Step 7: Test Your GraphQL API
With everything set up, it’s time to test your GraphQL API. Run your Spring Boot application and navigate to http://localhost:8080/graphiql in your browser. This will open the GraphiQL interface where you can test your queries.
Try the following query to fetch all books:
{
    getAllBooks {
        id
        title
        author
        publishedDate
    }
}
You should see a list of books returned from your database.
Advanced GraphQL Features
Now that you have a basic GraphQL API set up, let’s explore some advanced features to make your API even more powerful.
Mutations
In addition to queries, GraphQL supports mutations, which allow clients to modify data. Add the following to your schema.graphqls file:
type Mutation {
    createBook(title: String!, author: String!, publishedDate: String!): Book
    updateBook(id: ID!, title: String, author: String, publishedDate: String): Book
    deleteBook(id: ID!): Boolean
}
Then, create a resolver for these mutations:
package com.example.graphql.resolver;

import com.coxautodev.graphql.tools.GraphQLMutationResolver;
import com.example.graphql.model.Book;
import com.example.graphql.repository.BookRepository;
import org.springframework.beans.factory.annotation.Autowired;
import org.springframework.stereotype.Component;

@Component
public class BookMutationResolver implements GraphQLMutationResolver {

    @Autowired
    private BookRepository bookRepository;

    public Book createBook(String title, String author, String publishedDate) {
        Book book = new Book();
        book.setTitle(title);
        book.setAuthor(author);
        book.setPublishedDate(publishedDate);
        return bookRepository.save(book);
    }

    public Book updateBook(Long id, String title, String author, String publishedDate) {
        Book book = bookRepository.findById(id).orElse(null);
        if (book != null) {
            book.setTitle(title);
            book.setAuthor(author);
            book.setPublishedDate(publishedDate);
            return bookRepository.save(book);
        }
        return null;
    }

    public Boolean deleteBook(Long id) {
        bookRepository.deleteById(id);
        return true;
    }
}
Error Handling
Handling errors gracefully is crucial for a robust API. In GraphQL, errors are returned in a standardized format, making it easier for clients to understand what went wrong. You can customize error handling in your Spring Boot application by creating a custom exception and a handler.
package com.example.graphql.exception;

import graphql.ErrorType;
import graphql.GraphQLError;
import graphql.language.SourceLocation;

import java.util.List;

public class BookNotFoundException extends RuntimeException implements GraphQLError {

    public BookNotFoundException(String message) {
        super(message);
    }

    @Override
    public List<SourceLocation> getLocations() {
        return null;
    }

    @Override
    public ErrorType getErrorType() {
        return ErrorType.DataFetchingException;
    }
}
Then, create a handler to manage these exceptions:
package com.example.graphql.handler;

import graphql.GraphQLError;
import graphql.servlet.GraphQLErrorHandler;
import org.springframework.stereotype.Component;

import java.util.List;
import java.util.stream.Collectors;

@Component
public class CustomGraphQLErrorHandler implements GraphQLErrorHandler {

    @Override
    public List<Graph

QLError> processErrors(List<GraphQLError> errors) {
        return errors.stream().map(this::getNested).collect(Collectors.toList());
    }

    private GraphQLError getNested(GraphQLError error) {
        if (error.getExtensions() != null && error.getExtensions().containsKey("nested")) {
            return (GraphQLError) error.getExtensions().get("nested");
        }
        return error;
    }
}
Understanding the Differences: GraphQL Java vs. GraphQL Spring Boot
Before diving into the capabilities of Apidog, it's essential to understand the differences between using GraphQL Java and integrating GraphQL with Spring Boot.
GraphQL Java
GraphQL Java is a foundational library for implementing GraphQL in Java applications. It provides the core functionality to define schemas, handle queries, and process mutations. Here are some key points:
- Flexibility: GraphQL Java offers low-level flexibility, allowing you to customize how you define and resolve your GraphQL schemas and types.
- Manual Setup: Since it's a core library, using GraphQL Java requires more manual setup and boilerplate code. You'll need to handle aspects like schema parsing, query execution, and wiring manually.
- Control: It provides granular control over the GraphQL execution process, making it ideal for complex and highly customized GraphQL implementations.
GraphQL Spring Boot
GraphQL Spring Boot, on the other hand, is an opinionated framework that builds on top of GraphQL Java, integrating it seamlessly with the Spring Boot ecosystem. Here’s how it differs:
- Ease of Use: GraphQL Spring Boot simplifies the setup process by providing auto-configuration and sensible defaults. It leverages Spring Boot’s convention-over-configuration approach to reduce boilerplate code.
- Spring Integration: It integrates seamlessly with other Spring components such as Spring Data, Spring Security, and Spring Web, making it easier to build robust and secure GraphQL APIs.
- Enhanced Tooling: The framework includes additional tools like GraphiQL and Voyager for interactive query testing and schema visualization, improving the developer experience.
By choosing GraphQL Spring Boot, you can accelerate development and focus more on your business logic rather than the intricacies of GraphQL setup. However, if you require fine-grained control and are comfortable with a more hands-on approach, GraphQL Java is a powerful alternative.
Now that we’ve clarified the distinctions between these two approaches, let’s explore how Apidog can further enhance your GraphQL API development process.
Integrating Apidog with Your GraphQL Java Project
Apidog is a comprehensive API management tool that can significantly streamline your API development process. Here’s how you can integrate Apidog into your GraphQL Java project to enhance your API management capabilities.
Step 1: Download and Install Apidog
First, download Apidog and follow the installation instructions.
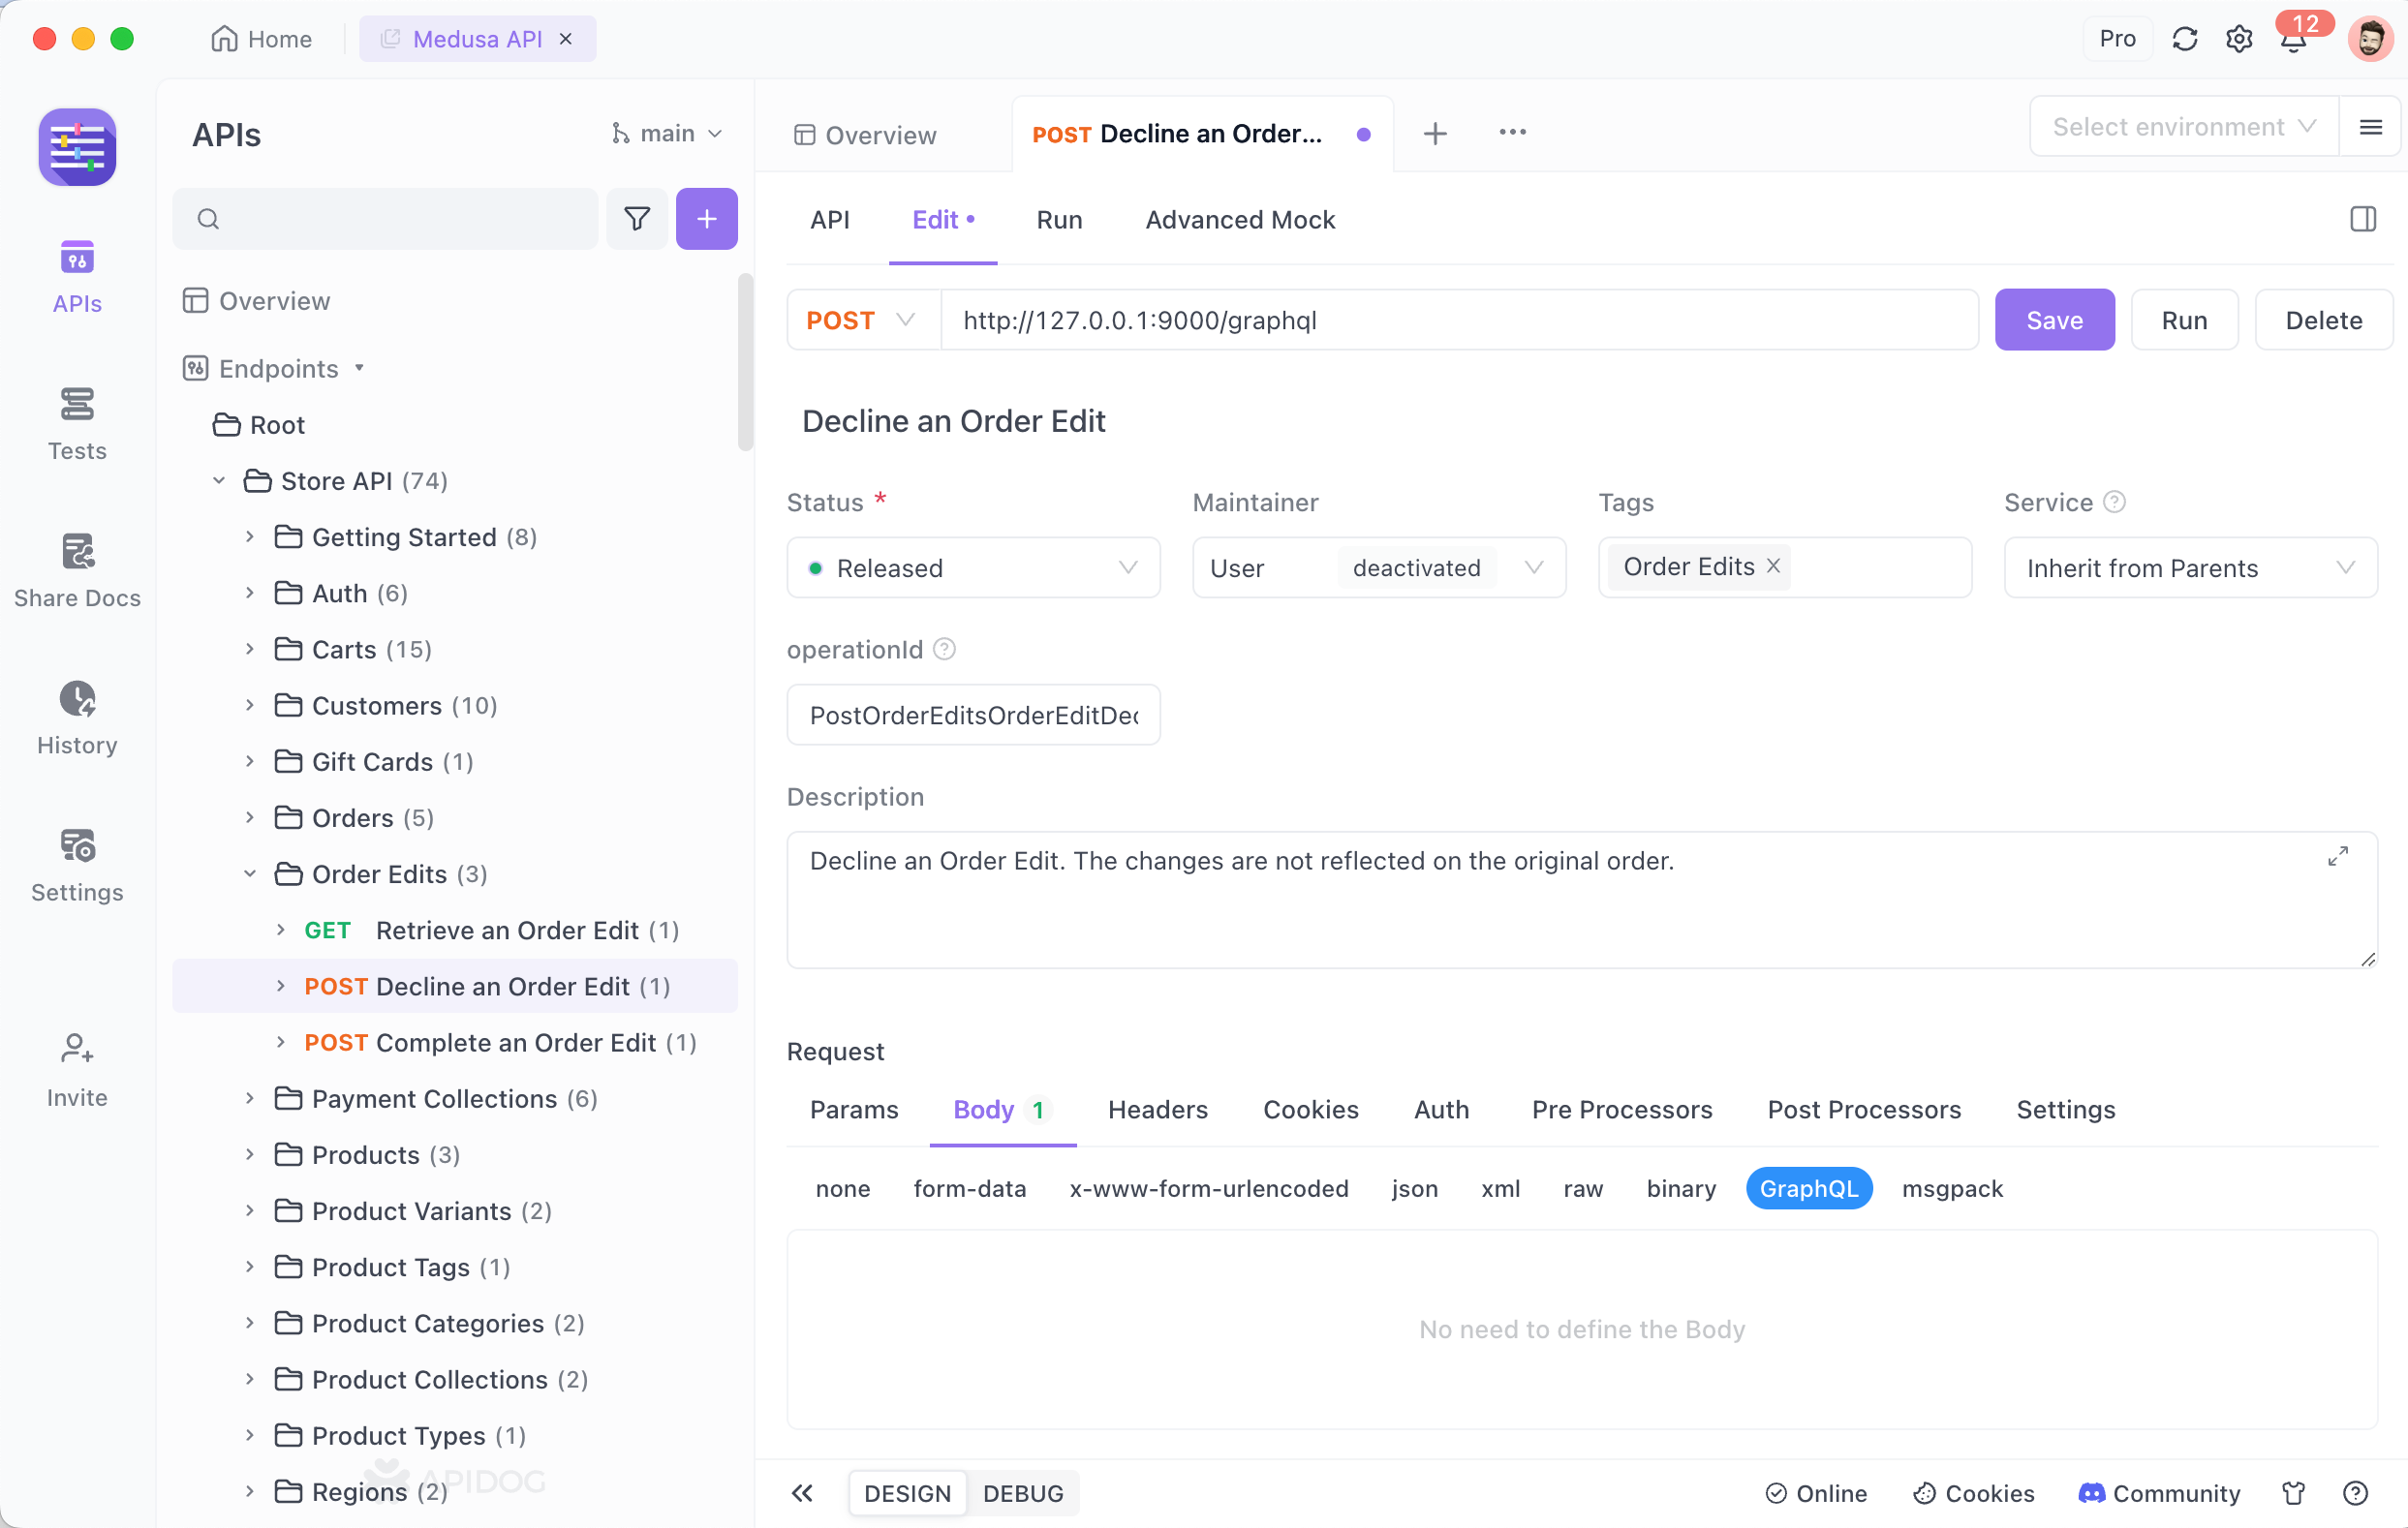
Step 2: Import Your GraphQL Schema
Once you have Apidog installed, you can import your GraphQL schema to manage and test your API more efficiently. Navigate to the import section in Apidog and upload your schema.graphqls file.
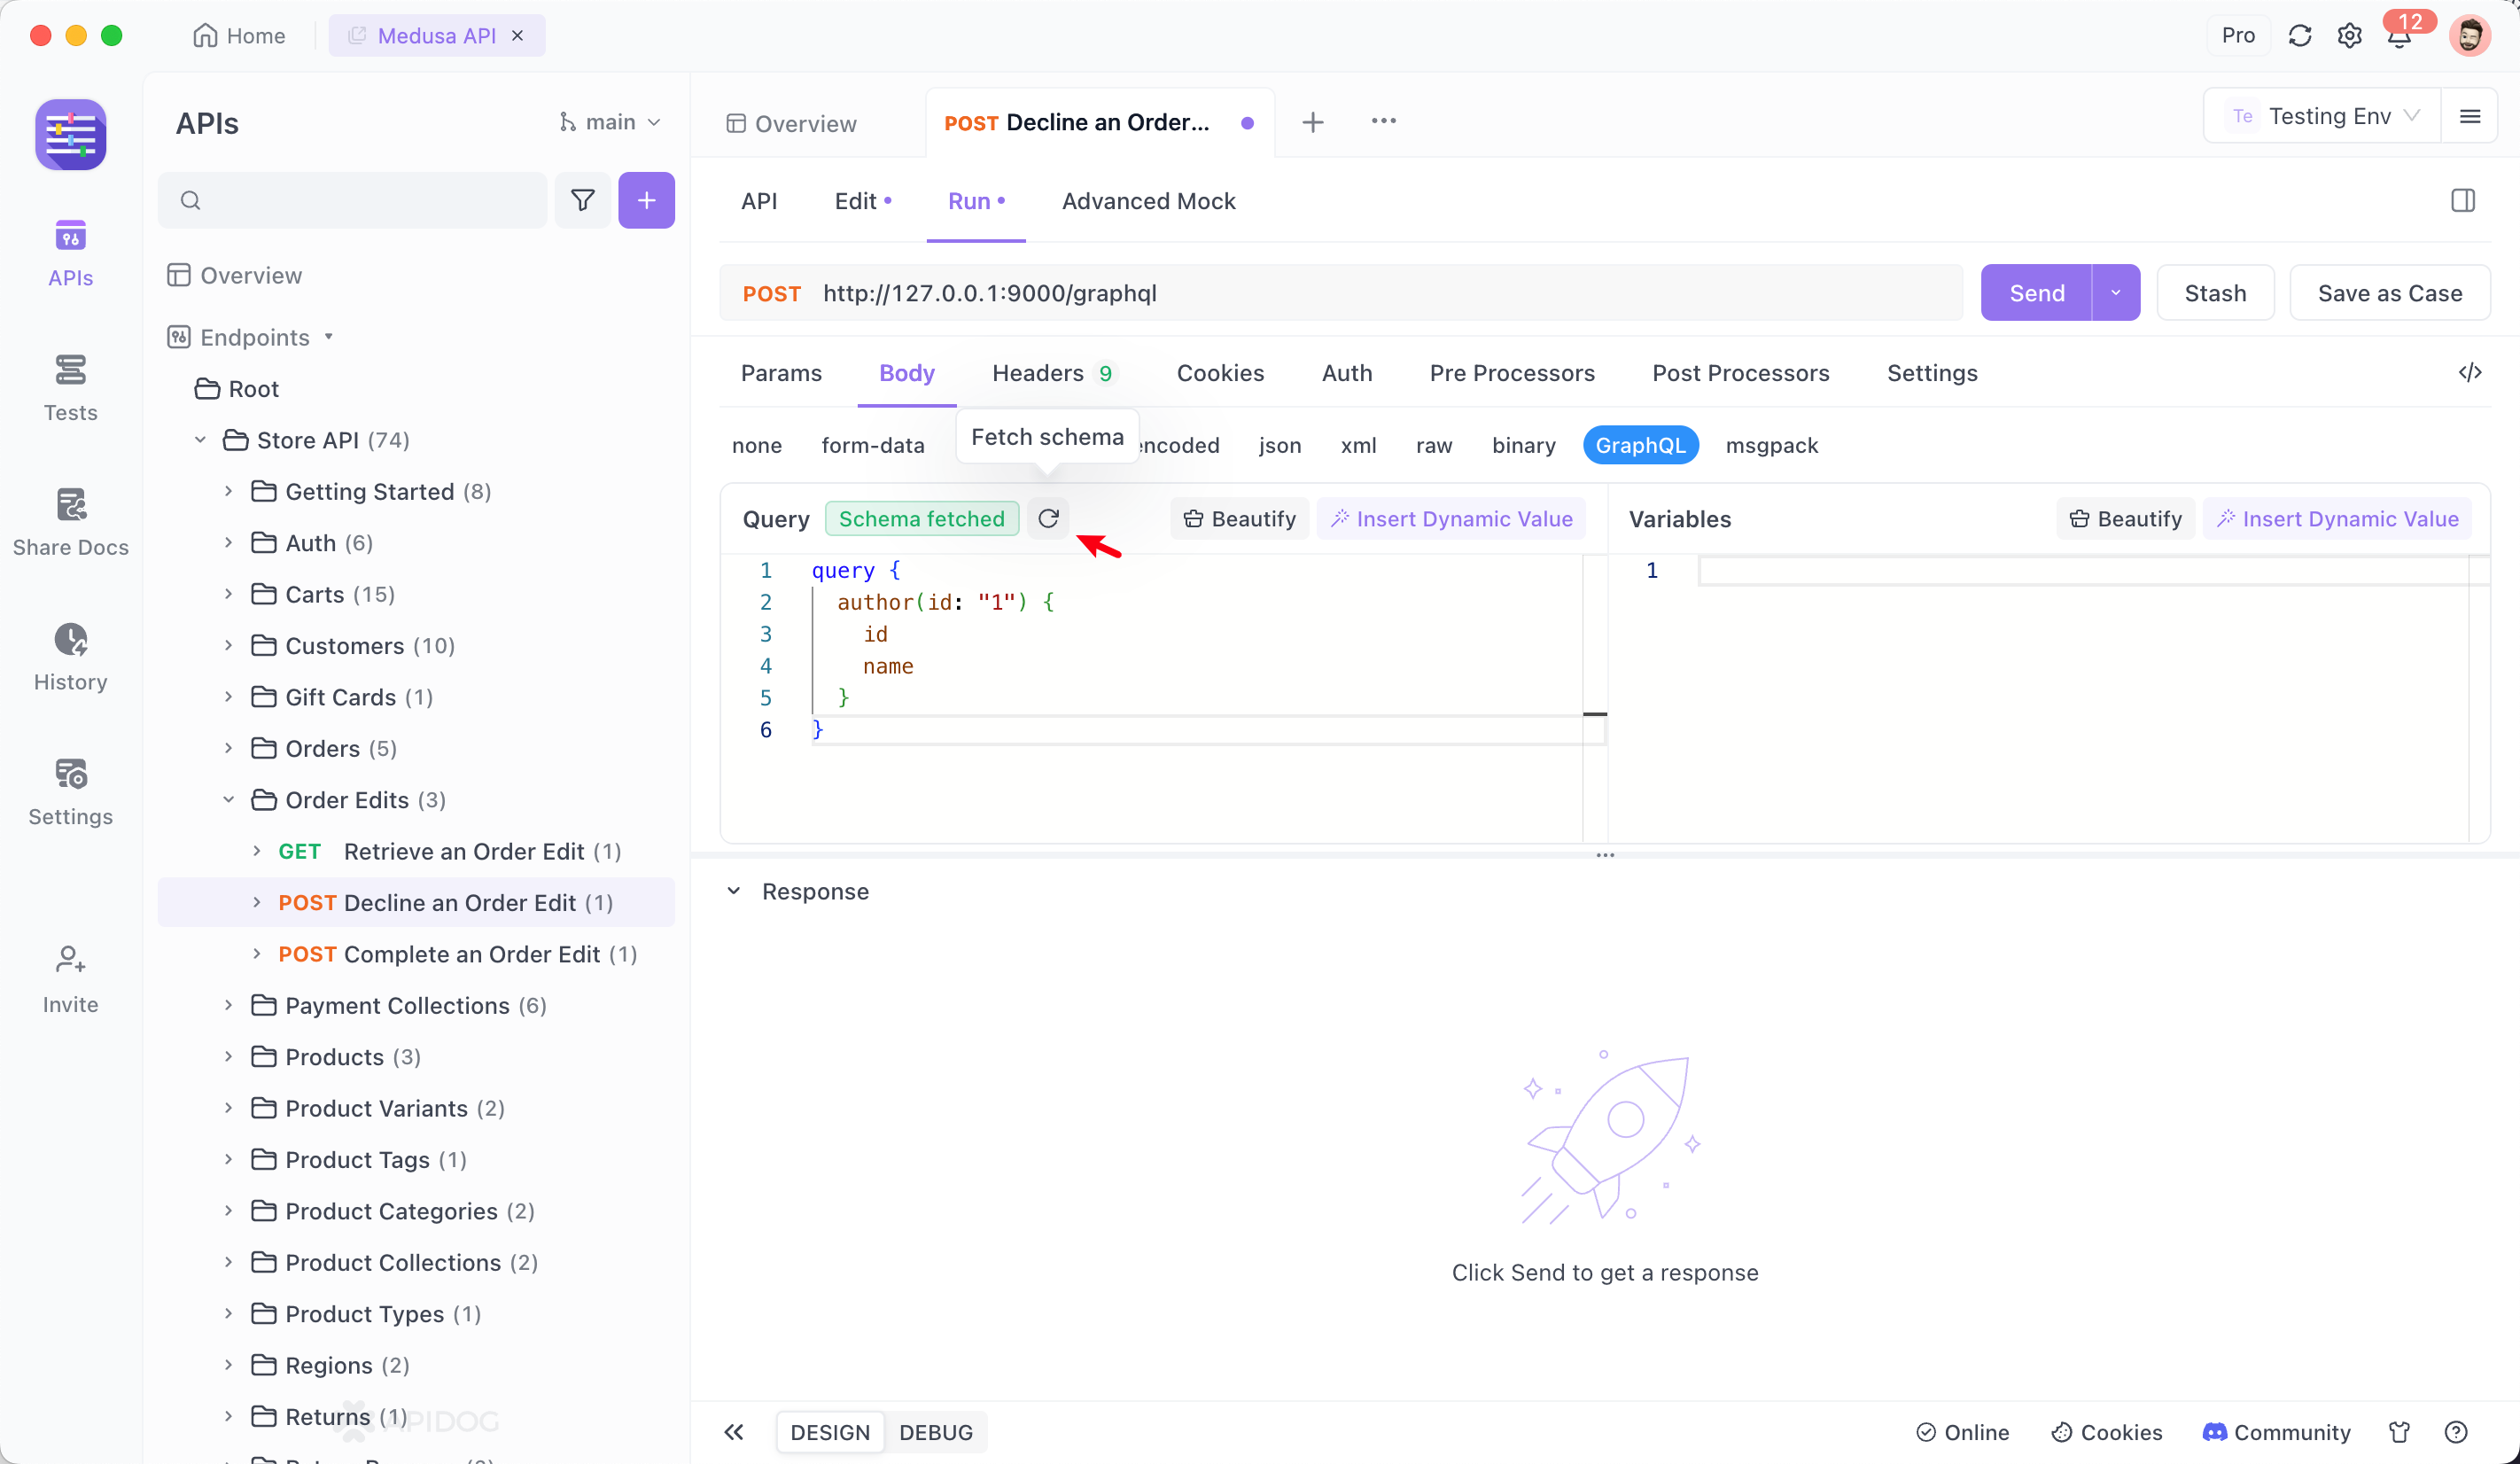
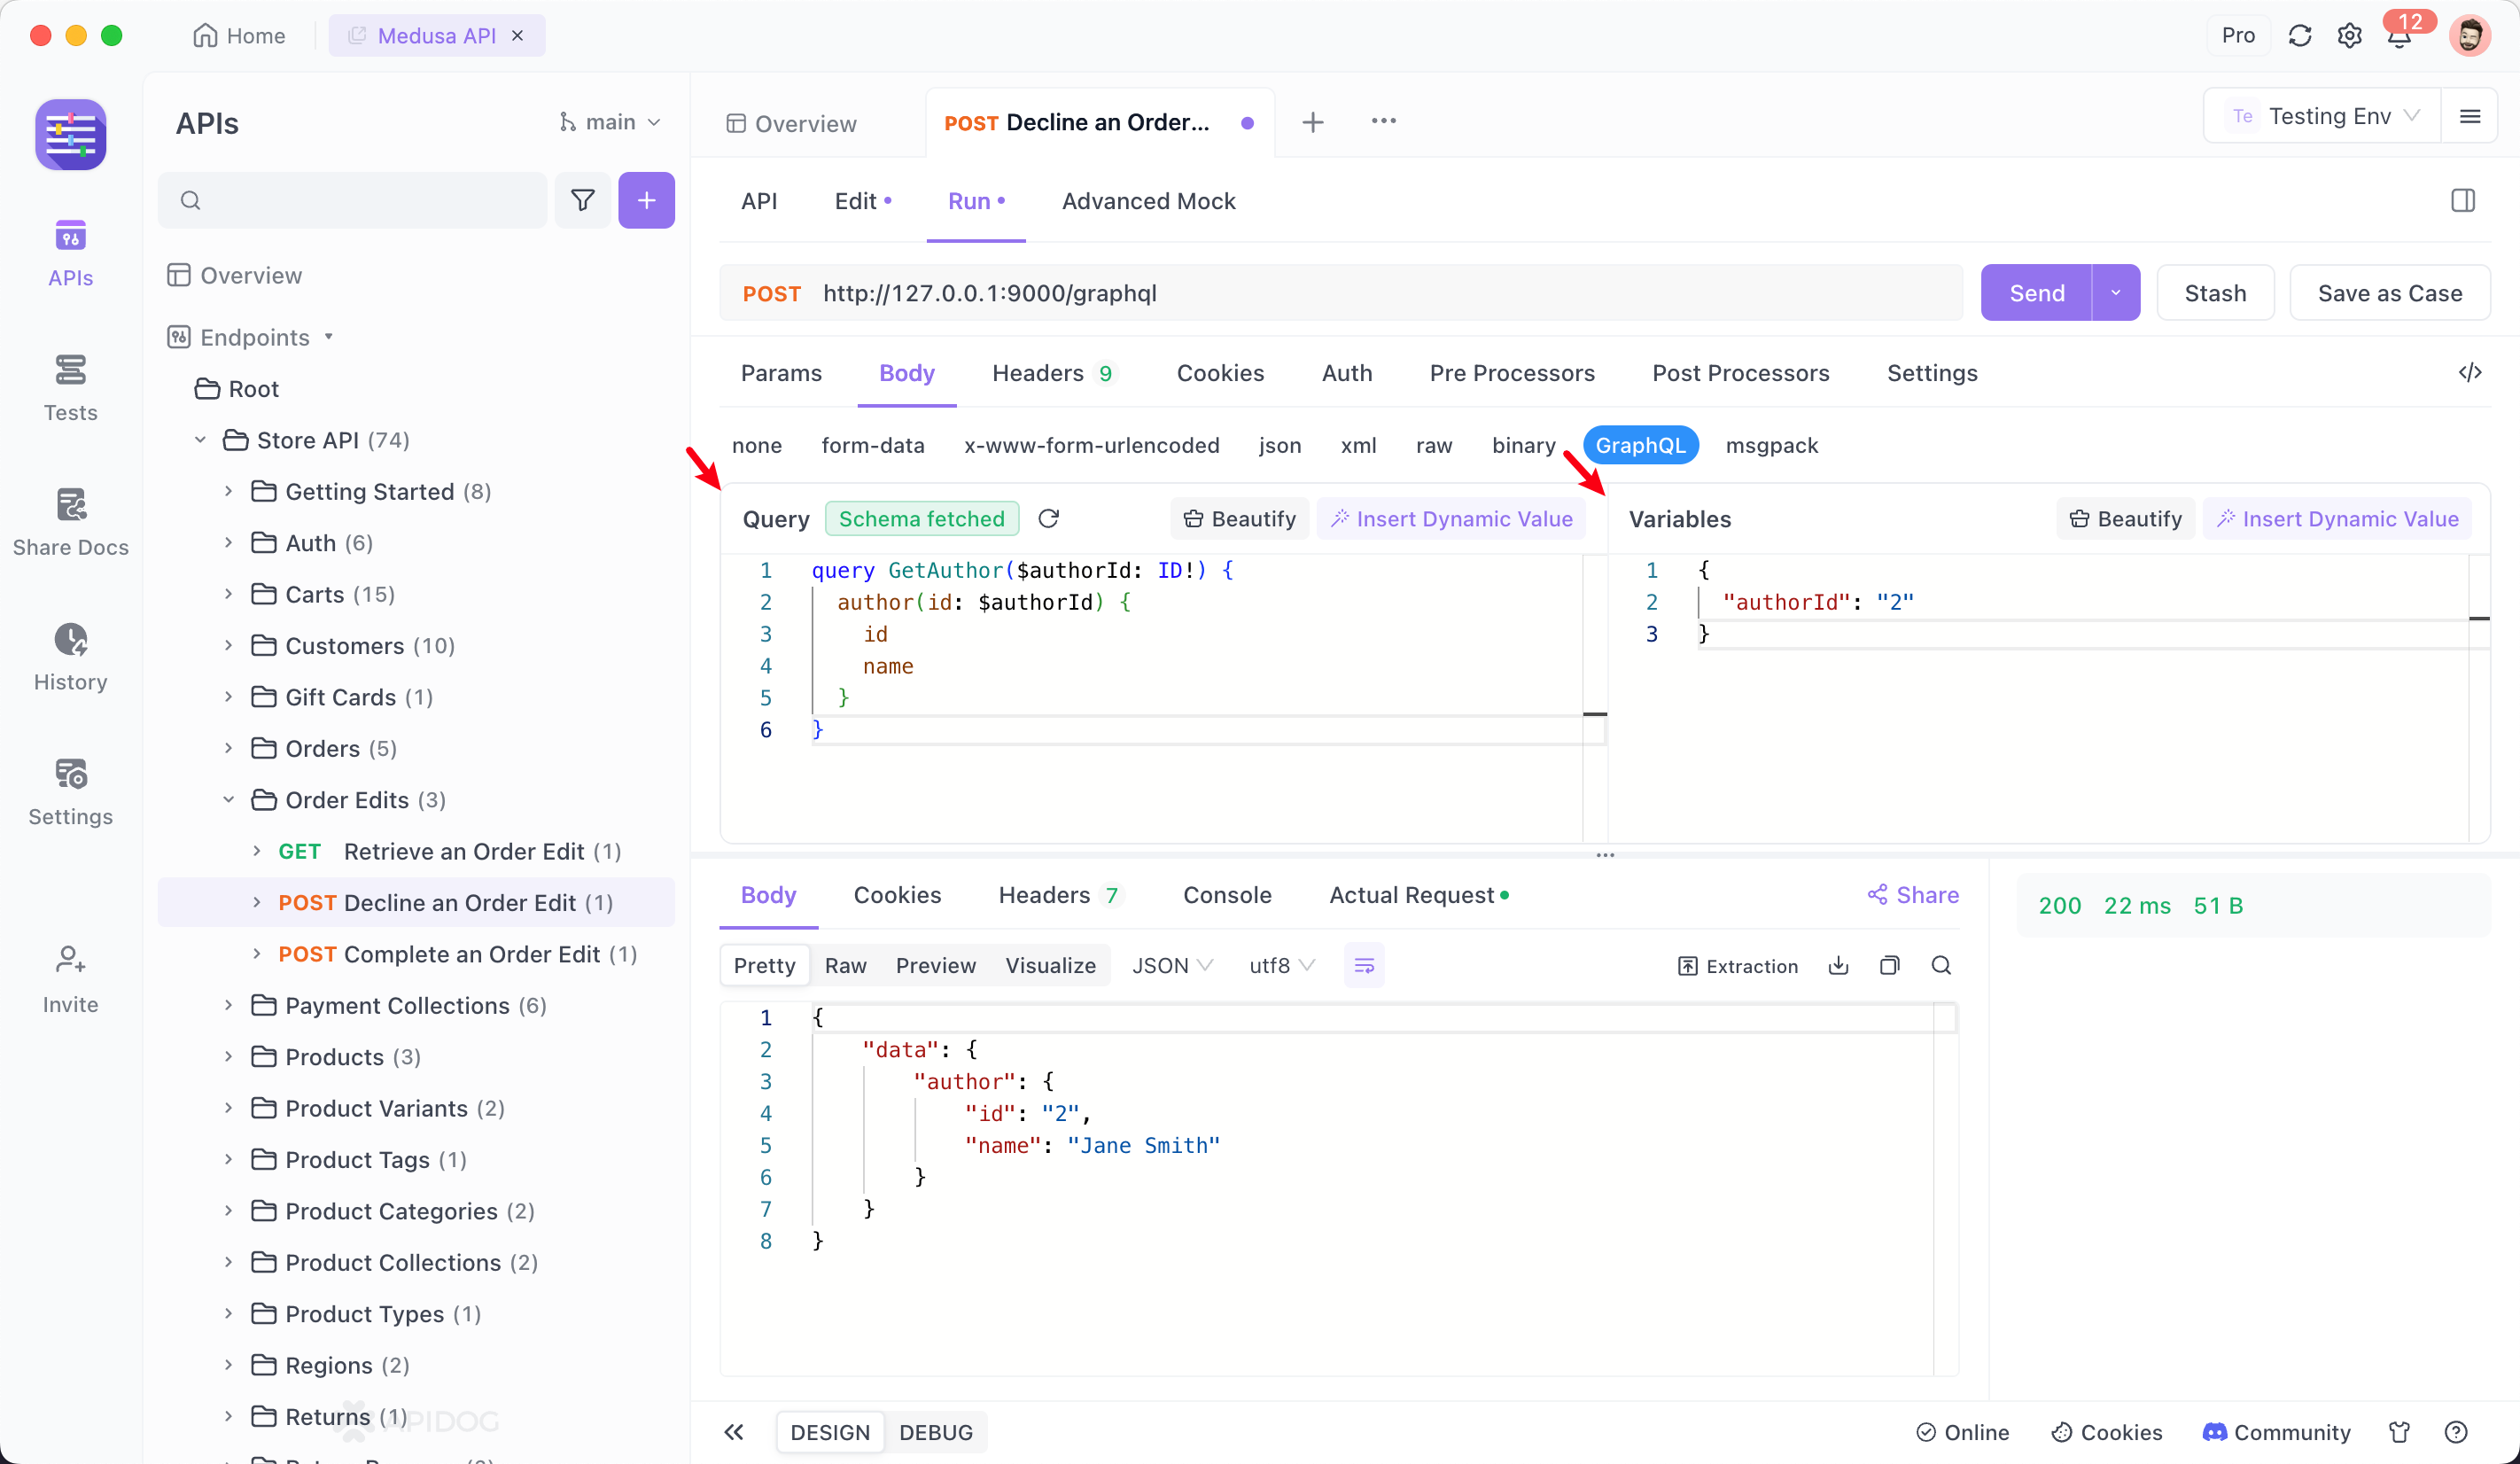
Enter your query in the Query box on the "Run" tab. You can also click the manual Fetch Schema button in the input box to enable the "code completion" feature for Query expressions, assisting in entering Query statements.
Step 3: Test and Document Your API
With your schema imported, you can use Apidog to test your queries and mutations, generate documentation, and even mock responses. This will help you ensure your API is working as expected and provide a comprehensive guide for your API users.
Conclusion: Embrace the Future of API Development
GraphQL and Java together offer a powerful solution for building efficient and flexible APIs. By following this guide, you’ve learned how to set up a GraphQL API in Java, implement advanced features, and enhance your development process with Apidog.
So, what are you waiting for? Download Apidog for free today and start building the next generation of APIs with GraphQL and Java!


