
If you are a web developer, you probably know how important it is to communicate with APIs and fetch data from external sources. React, a popular JavaScript library for building user interfaces, provides a simple and elegant way to do that with the Fetch API.
The Fetch API is a modern interface for making HTTP requests from the browser. It uses JavaScript promises, which make working with asynchronous operations easier and more readable. You can use the Fetch API to make various types of requests, such as GET, POST, DELETE, and PUT.
In this blog post, we will focus on how to use the Fetch API to make PUT requests in React. A PUT request is used to update or replace an existing resource on a server. For example, you may want to use a PUT request to edit a blog post, update a user profile, or change a product price.
What is a PUT Request and When to Use It
A PUT request is one of the four fundamental HTTP methods, along with GET, POST, and DELETE. A PUT request is used to update or replace an existing resource on a server. The request body usually contains the data that you want to update or replace.
For example, suppose you have a blog post with the following data:
{
  "id": 1,
  "title": "How to Use Fetch to Make GET Requests in React",
  "content": "In this blog post, we will learn how to use the Fetch API to make GET requests in React...",
  "author": "David",
  "date": "2023-01-01"
}
If you want to change the title and the content of the blog post, you can use a PUT request to send the new data to the server. The request URL would be something like https://example.com/api/posts/1, where 1 is the id of the blog post. The request body would be something like:
{
  "title": "How to Use Fetch to Make PUT Requests in React",
  "content": "In this blog post, we will learn how to use the Fetch API to make PUT requests in React..."
}
The server would then update the blog post with the new data and return a response with the updated resource or a confirmation message.

A PUT request is different from a POST request, which is used to create a new resource on a server. A POST request does not require an id or a specific URL, while a PUT request does. A POST request may result in a duplicate resource if it is repeated, while a PUT request is idempotent, meaning that it will not change the state of the server if it is repeated.
A PUT request is also different from a PATCH request, which is used to partially update an existing resource on a server. A PATCH request only sends the data that needs to be changed, while a PUT request sends the entire data that replaces the original resource. A PATCH request is more efficient and flexible, but not all servers support it.

How to Make a Simple PUT Request with the Fetch API
Making a PUT request with the Fetch API is very easy and straightforward. You just need to call the fetch() method, pass in the URL to fetch from, and provide an options object with the request method, headers, and body. Then, you can handle the response when it resolves.
Here is an example of how to make a simple PUT request with the Fetch API:
// Define the data to update
const data = {
  title: "How to Use Fetch to Make PUT Requests in React",
  content: "In this blog post, we will learn how to use the Fetch API to make PUT requests in React..."
};

// Define the request options
const requestOptions = {
  method: "PUT", // Specify the request method
  headers: { "Content-Type": "application/json" }, // Specify the content type
  body: JSON.stringify(data) // Send the data in JSON format
};

// Make the request
fetch("https://example.com/api/posts/1", requestOptions)
  .then(response => response.json()) // Parse the response as JSON
  .then(data => console.log(data)) // Do something with the data
  .catch(error => console.error(error)); // Handle errors
In this example, we are updating a blog post with the id of 1 on the server. We are sending the new title and content in the request body, and specifying the content type as application/json. We are also using the json() method to parse the response as JSON, and logging the data to the console. If there is an error, we are catching it and logging it to the console as well.
This is the basic syntax of making a PUT request with the Fetch API. You can use this syntax to make any PUT request to any API that supports it. However, if you are using React, there are some additional steps and considerations that you need to take into account.
How to Use React Hooks to Make a PUT Request in a Functional Component
If you are using React, you may want to make a PUT request in a functional component and update the component state when the data is received. This allows you to fetch data from an API and display it in your UI.
To do that, you can use React hooks, which are special functions that let you use state and other React features in functional components. The most commonly used hooks are useState and useEffect.

The useState hook lets you declare a state variable and a function to update it. The initial state is passed as an argument to the hook, and the returned value is an array with the state variable and the updater function. You can use the state variable to store the data that you want to display in the UI, and the updater function to update the state when the data changes.
The useEffect hook lets you perform side effects, such as making HTTP requests, in functional components. The first argument is a function that runs after the component renders, and the second argument is an array of dependencies that determines when the effect runs. If you pass an empty array, the effect will only run once when the component mounts, similar to the componentDidMount lifecycle method in class components.
Here is an example of how to use React hooks to make a PUT request in a functional component:
import React, { useState, useEffect } from "react";

function App() {
  // Declare a state variable to store the data
  const [data, setData] = useState(null);

  // Define the data to update
  const newData = {
    title: "How to Use Fetch to Make PUT Requests in React",
    content: "In this blog post, we will learn how to use the Fetch API to make PUT requests in React..."
  };

  // Define the request options
  const requestOptions = {
    method: "PUT",
    headers: { "Content-Type": "application/json" },
    body: JSON.stringify(newData)
  };

  // Use the useEffect hook to make the request
  useEffect(() => {
    // Make the request
    fetch("https://example.com/api/posts/1", requestOptions)
      .then(response => response.json()) // Parse the response as JSON
      .then(data => setData(data)) // Update the state with the data
      .catch(error => console.error(error)); // Handle errors
  }, []); // Pass an empty array as the second argument to run the effect only once

  // Return the JSX to render
  return (
    <div className="App">
      <h1>How to Use Fetch to Make PUT Requests in React</h1>
      {data ? ( // Check if the data is available
        <div>
          <h2>{data.title}</h2> // Display the data
          <p>{data.content}</p>
        </div>
      ) : (
        <p>Loading...</p> // Display a loading message
      )}
    </div>
  );
}

export default App;
In this example, we are using the useState hook to declare a state variable called data and a function called setData to update it. The initial state is null, meaning that there is no data available yet.
We are also using the useEffect hook to make the PUT request when the component mounts. We are using the same syntax as before, but instead of logging the data to the console, we are updating the state with the setData function. We are passing an empty array as the second argument to the useEffect hook, so that the effect only runs once.
How to use async/await to make a PUT request with the Fetch API
Async/await is a feature of modern JavaScript that allows you to write asynchronous code in a more readable and concise way. It works with promises, which are objects that represent the outcome of an asynchronous operation. A promise can either be resolved (with a value) or rejected (with an error).
To use async/await to make a PUT request with the Fetch API, you need to do the following steps:
- Define an async function that will make the request. An async function is a function that returns a promise. You can use the
asynckeyword before the function declaration or expression. - Inside the async function, use the
awaitkeyword to wait for the promise returned by thefetch()method. Theawaitkeyword pauses the execution of the async function until the promise is resolved or rejected. It then returns the resolved value or throws an error. - Use the
awaitkeyword again to wait for the promise returned by theresponse.json()method, which parses the response body as JSON and returns another promise. - Handle the data or the error as you wish. You can use
try...catchblocks to catch any errors that may occur during the async operation.

Here is an example of an async function that makes a PUT request with the Fetch API:
// Define an async function that makes a PUT request
async function updatePost() {
  // Define the data to update
  const data = {
    title: "How to Use Fetch to Make PUT Requests in React",
    content: "In this blog post, we will learn how to use the Fetch API to make PUT requests in React..."
  };

  // Define the request options
  const requestOptions = {
    method: "PUT", // Specify the request method
    headers: { "Content-Type": "application/json" }, // Specify the content type
    body: JSON.stringify(data) // Send the data in JSON format
  };

  // Use try...catch to handle errors
  try {
    // Use await to wait for the promise returned by fetch()
    const response = await fetch("https://example.com/api/posts/1", requestOptions);
    // Use await to wait for the promise returned by response.json()
    const data = await response.json();
    // Do something with the data
    console.log(data);
  } catch (error) {
    // Handle the error
    console.error(error);
  }
}

// Call the async function
updatePost();
How to handle errors and loading states when making a PUT request with the Fetch API
When making a PUT request with the Fetch API, you may encounter different types of errors, such as network errors, HTTP errors, or JSON parsing errors. You need to handle these errors properly and provide appropriate feedback to the user.
Handling errors when making a PUT request
One way to handle errors is to use the catch() method of the promise returned by the fetch() method. This method will catch any errors that occur during the request or the response processing. You can use the response.ok property to check if the response status is between 200 and 299, which indicates a successful request. If not, you can throw an error with the response status or message. You can also use the response.headers.get() method to check if the response contains JSON data before calling the response.json() method, which will throw an error if the response is not valid JSON.
Another way to handle errors is to use the try...catch blocks with the async/await syntax. This allows you to write asynchronous code in a more readable and concise way. You can use the await keyword to wait for the promise returned by the fetch() method and the response.json() method, and handle any errors that may occur with the catch block.
Here are some examples of how to handle errors when making a PUT request with the Fetch API:
// Using the catch() method
fetch("https://example.com/api/posts/1", {
  method: "PUT",
  headers: { "Content-Type": "application/json" },
  body: JSON.stringify({ title: "New title" })
})
  .then(response => {
    // Check if the response is successful
    if (!response.ok) {
      // Throw an error with the status or message
      throw Error(response.status || response.statusText);
    }
    // Check if the response contains JSON data
    const isJson = response.headers.get("content-type")?.includes("application/json");
    // Parse the response as JSON if it does, or return null if it doesn't
    return isJson ? response.json() : null;
  })
  .then(data => {
    // Do something with the data
    console.log(data);
  })
  .catch(error => {
    // Handle the error
    console.error(error);
  });

// Using the try...catch blocks with async/await
async function updatePost() {
  try {
    // Wait for the promise returned by the fetch() method
    const response = await fetch("https://example.com/api/posts/1", {
      method: "PUT",
      headers: { "Content-Type": "application/json" },
      body: JSON.stringify({ title: "New title" })
    });
    // Check if the response is successful
    if (!response.ok) {
      // Throw an error with the status or message
      throw Error(response.status || response.statusText);
    }
    // Check if the response contains JSON data
    const isJson = response.headers.get("content-type")?.includes("application/json");
    // Parse the response as JSON if it does, or return null if it doesn't
    const data = isJson ? await response.json() : null;
    // Do something with the data
    console.log(data);
  } catch (error) {
    // Handle the error
    console.error(error);
  }
}

// Call the async function
updatePost();
Handling the loading state when making a PUT request with the Fetch API
To handle the loading state, you can use a state variable to indicate whether the request is in progress or not. You can use the useState hook to declare and update the state variable in a functional component. You can set the state variable to true before making the request, and set it to false after the request is completed or failed. You can then use the state variable to conditionally render a loading indicator or the data in the UI.
Here is an example of how to handle the loading state when making a PUT request with the Fetch API in a functional component:
import React, { useState } from "react";

function App() {
  // Declare a state variable to store the data
  const [data, setData] = useState(null);
  // Declare a state variable to indicate the loading state
  const [loading, setLoading] = useState(false);

  // Define the data to update
  const newData = {
    title: "How to Use Fetch to Make PUT Requests in React",
    content: "In this blog post, we will learn how to use the Fetch API to make PUT requests in React..."
  };

  // Define the request options
  const requestOptions = {
    method: "PUT",
    headers: { "Content-Type": "application/json" },
    body: JSON.stringify(newData)
  };

  // Define a function to make the request
  function updatePost() {
    // Set the loading state to true
    setLoading(true);
    // Make the request
    fetch("https://example.com/api/posts/1", requestOptions)
      .then(response => {
        // Check if the response is successful
        if (!response.ok) {
          // Throw an error with the status or message
          throw Error(response.status || response.statusText);
        }
        // Check if the response contains JSON data
        const isJson = response.headers.get("content-type")?.includes("application/json");
        // Parse the response as JSON if it does, or return null if it doesn't
        return isJson ? response.json() : null;
      })
      .then(data => {
        // Update the state with the data
        setData(data);
        // Set the loading state to false
        setLoading(false);
      })
      .catch(error => {
        // Handle the error
        console.error(error);
        // Set the loading state to false
        setLoading(false);
      });
  }

  // Return the JSX to render
  return (
    <div className="App">
      <h1>How to Use Fetch to Make PUT Requests in React</h1>
      <button onClick={updatePost}>Update Post</button>
      {loading ? ( // Check if the request is in progress
        <p>Loading...</p> // Display a loading message
      ) : data ? ( // Check if the data is available
        <div>
          <h2>{data.title}</h2> // Display the data
          <p>{data.content}</p>
        </div>
      ) : null}
    </div>
  );
}

export default App;
How to use Apidog to generate Fetch client code with one click
Apidog is a web-based platform that helps you discover, test, and integrate web APIs with ease. One of the features that Apidog offers is the ability to generate Fetch client code with one click, based on the API specification that you provide or select.
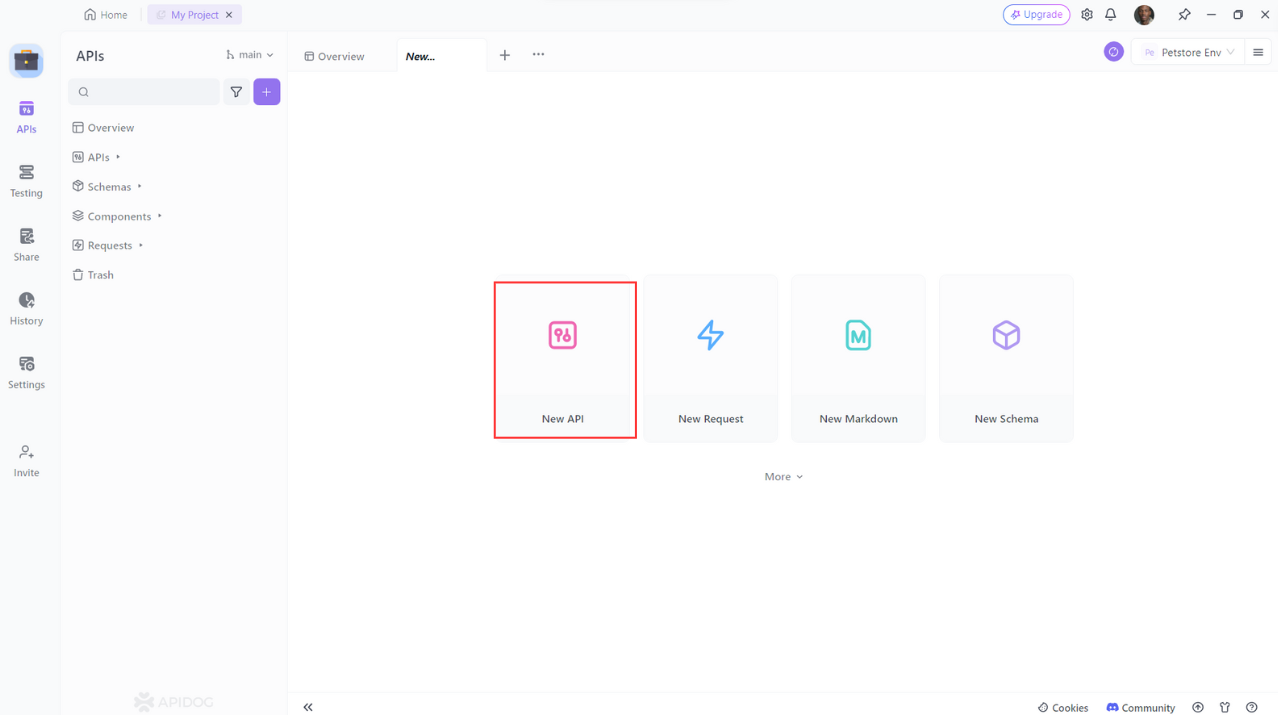
To use Apidog to generate Fetch client code with one click, you can follow these steps:
- Click on the “New API” button on the dashboard or select an existing API from the list.
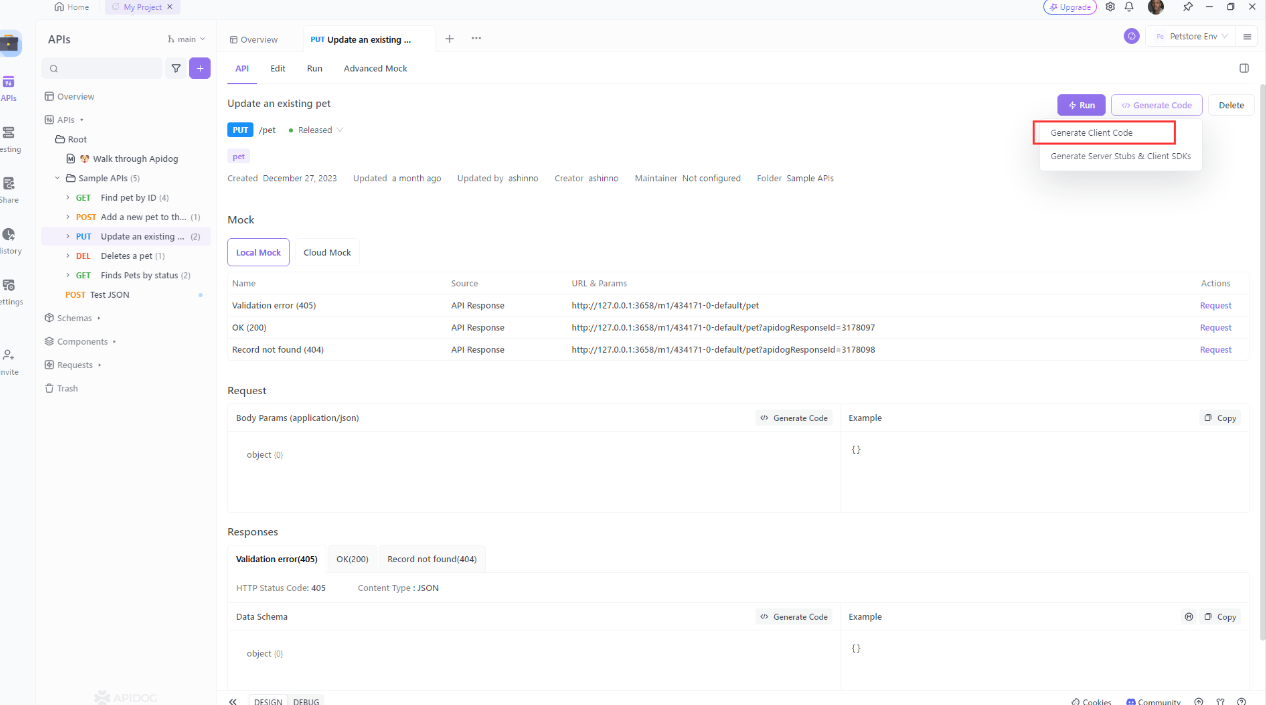
- Click on the “Generate Client Code”.Apidog will use the OpenAPI Generator engine to generate the Fetch client code for your API, matching the endpoints and data structures that you defined or selected.
- You will see a modal window with the generated code, which you can copy to your clipboard.
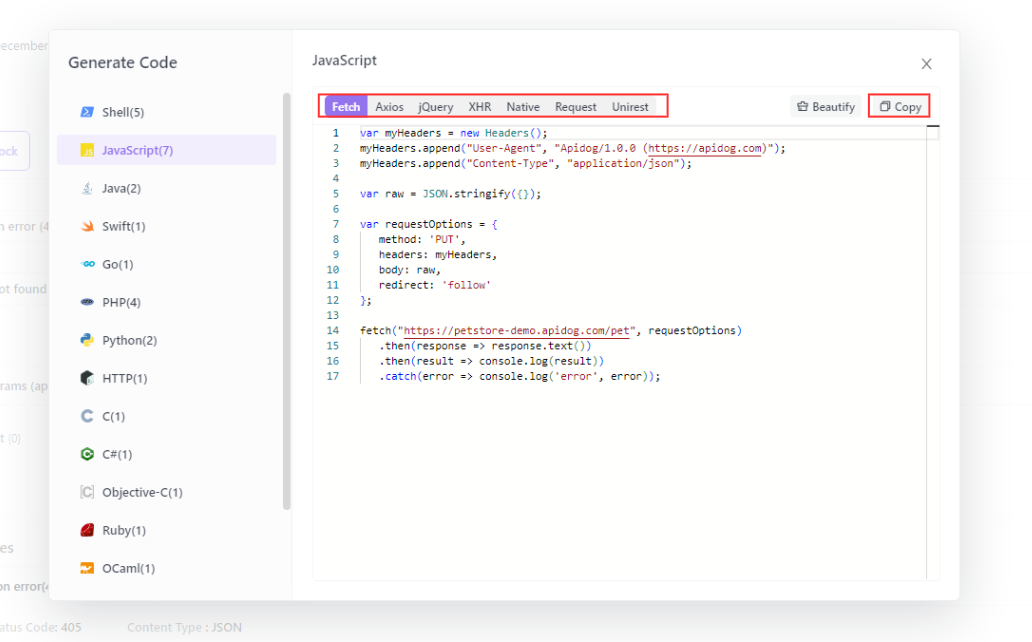
- You can use the generated code in your own project, or modify it as you wish. You can also test the code with the Apidog mock server, which simulates the API responses based on your specification.
That’s it! You have successfully used Apidog to generate Fetch client code with one click. You can use this feature to save time and avoid errors when working with web APIs. You can also explore other features that Apidog offers, such as API documentation, API debugging, API mocking, and API automated testing.
Conclusion
In this post, we have learned how to use the Fetch API to make PUT requests in. The Fetch API is a modern and easy way to communicate with APIs in the browser, and React provides a powerful and declarative way to create user interfaces based on data. By combining these two technologies, we can create dynamic and interactive web applications that consume data from various sources.
Apidog offers the ability to generate Fetch client code with one click, based on the API specification that you provide or select.


