Bearer token authentication is a common authentication method used to protect access to APIs. Adding a Bearer token to Swagger increases API security and restricts access to protected resources to users with valid access tokens.
Bearer token authentication is a common authentication method used to protect access to APIs. Adding a Bearer token to Swagger increases API security and restricts access to protected resources to users with valid access tokens.
💡
Apidog is an all-in-one solution for seamless API protection, offering a versatile range of authentication options to suit your needs. Keep it simple with Basic Authentication, or add flexibility with Bearer tokens.
button
Bearer Authorization
The Bearer authorization is a type of HTTP authentication scheme that is commonly used with OAuth 2.0 and JSON Web Tokens (JWT). It is defined in RFC 6750 and provides a way to transmit access tokens in HTTP requests.
When using Bearer authentication, the access token is included in the Authorization header of the HTTP request, preceded by the string "Bearer " (including the space). For example:
Authorization: Bearer <access_token>
Here, <access_token> is the actual access token value.
The Bearer scheme is often used in scenarios where the client (e.g., a web or mobile application) needs to access protected resources on a server (e.g., an API). The client first obtains an access token from an authorization server (usually by providing client credentials or through an authorization flow like the Authorization Code Grant flow). The client then includes this access token in the Authorization header of subsequent requests to the resource server.
The resource server can then validate the access token and determine if the client is authorized to access the requested resource. The validation process typically involves verifying the token's signature, checking its expiration, and potentially retrieving additional information from the authorization server or a token introspection endpoint.
Bearer authentication is considered more secure than transmitting access tokens as query parameters or in the request body, as headers are generally harder to tamper with and less prone to being accidentally logged or cached.
Preparation for Using Bearer Tokens
To add bearer token authentication in Swagger, you can follow these steps:
Ensure your Swagger specification (OpenAPI spec) is correct and contains all paths and operations you want to protect.
In the Swagger spec, add security definitions for any paths and operations needing authentication, specifying bearer token validation.
At runtime in the Swagger UI, you can add a Authorization header to requests, bearing the valid access token in the Bearer scheme.
How to Add Bearer Token in Swagger
To add a Bearer token to Swagger, follow these steps:
Ensure that your Swagger specification (OpenAPI specification) is correct and has included all the paths and operations that need to be protected.
In the Swagger specification, add security definitions for the paths and operations that need to be authenticated, specifying that the Bearer token is used for authentication.
When running in the Swagger UI, you can add an Authorization field to the request header and carry a valid access token as a Bearer token.
Practice Example of Swagger Bearer Token
Here's a simple hands-on example of how to add a Bearer token in the Swagger Editor:
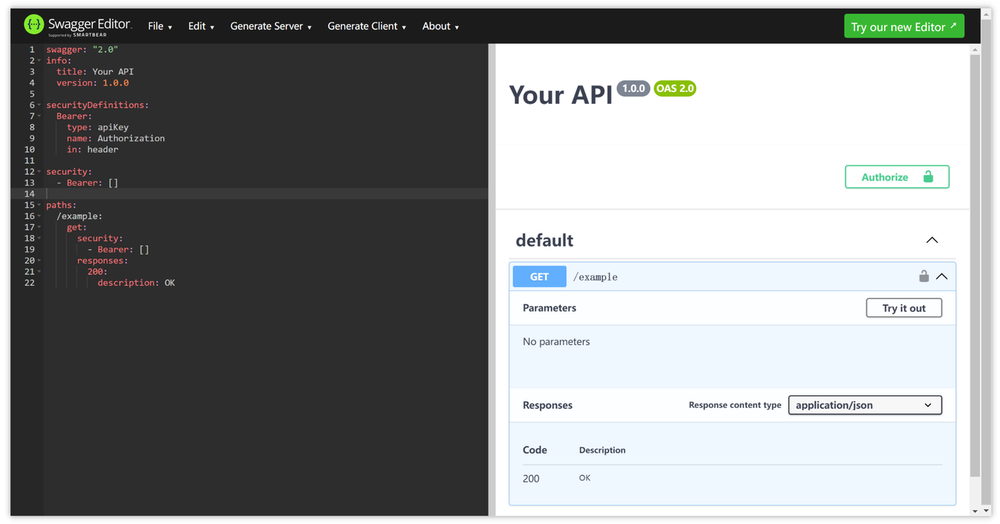
First, open a YAML file in Swagger Editor and add the following snippet:
swagger: "2.0"
info.
  title: Your API
  version: 1.0.0

securityDefinitions.
  swagger: "2.0" info: title: Your API version: 1.0.0.
    type: apiKey
    name: Authorization
    in: header

security: Bearer: []
Bearer: []

paths.
  /example.
    Get: /example: /example.
      security: /example: get: /example: get: /example
        - Bearer: []
      responses.
        200.
          description: OK
In this code, we first define a security definition called Bearer, which is an API Key type of security definition. We name the API Key Authorization and place it in the request header.
Then, we apply the security definition to our path using the security keyword so that we need to provide the Bearer token when accessing the path /example.
Finally, we define a simple GET request and specify that it should be run using the Bearer token.
After running this code in the Swagger Editor, you'll see an "Authorization" request header when requesting /example and you'll need to provide the Bearer token in it.
Configuring in a Spring Boot Project
To use Bearer token authentication with Swagger in a Spring Boot project, you can use Spring Security to handle the authentication and authorization functions. To use Bearer token authentication in your Spring Boot project, follow these steps: 1.
To use the Bearer token for authentication in a Spring Boot project, follow these steps:
1.Introduce the relevant dependencies: In the pom.xml file of the project, add the dependencies for Spring Security and JWT Token.
2. Configure Spring Security: Configure Spring Security related security rules and authentication methods in the configuration class of the project.
Configuration
@EnableWebSecurity
public class SecurityConfig extends WebSecurityConfigurerAdapter { // Configure the urlSecurity that is allowed to be accessed.

    // Configure the url paths to allow access to
    @Override
    protected void configure(HttpSecurity http) throws Exception { // Configure the url path to allow access @Override
        http.authorizeRequests()
            .antMatchers("/api/public").permitAll()
            .anyRequest().authenticated();
    }

    // Configure authentication using the Bearer token
    @Override
    protected void configure(AuthenticationManagerBuilder auth) throws Exception {
        auth.authenticationProvider(jwtAuthenticationProvider());
    }

    @Bean
    public JwtAuthenticationFilter jwtAuthenticationFilter() throws Exception {
        return new JwtAuthenticationFilter();
    }

    @Bean
    public JwtAuthenticationProvider jwtAuthenticationProvider() {
        return new JwtAuthenticationProvider();
    }

    // Configure the password encoder and other related configurations
    // ...
}
3. Implement JwtAuthenticationFilter: Create a custom JwtAuthenticationFilter to parse the JWT Token and perform authentication.
public class JwtAuthenticationFilter extends OncePerRequestFilter {

    @Override
    protected void doFilterInternal(HttpServletRequest request, HttpServletResponse response, FilterChain filterChain) throws ServletException, IOException{
        String token = extractTokenFromRequest(request);
        If (token ! = null) {
            try {
                if (isValidToken(token)) {
                    Authentication authentication = getAuthentication(token);
                    SecurityContextHolder.getContext().setAuthentication(authentication);
                }
            } catch (Exception e) { // Handle authentication failures
                // Handle authentication failures
            }
        }
        filterChain.doFilter(request, response);
    }

    private String extractTokenFromRequest(HttpServletRequest request) { // Extract the Bearer token from the request header or other location.
        // Extract the Bearer token from the request header or elsewhere.
        // ...
    }

    private boolean isValidToken(String token) { // Verify that the Bearer token is valid
        // Verify that the Bearer token is valid
        // ...
    }

    private Authentication getAuthentication(String token) { // Get the authentication information based on the Bearer token and return the Authentication object.
        // Get the authentication information based on the Bearer token and return the Authentication object.
        // ...
    }
}
4. Implement JwtAuthenticationProvider: Create a custom JwtAuthenticationProvider that can be used to validate JWT tokens.
public class JwtAuthenticationProvider implements AuthenticationProvider {

    public class JwtAuthenticationProvider implements AuthenticationProvider { @Override
    public Authentication authenticate(Authentication authentication) throws AuthenticationException { // Validate the validity of the JWT token example
        // Validate the validity of a JWT token
        // ...
    }

    @Override
    public boolean supports(Class<? > authentication) {
        return JwtAuthenticationToken.class.isAssignableFrom(authentication);
    }
}
In the above example, JwtAuthenticationFilter and JwtAuthenticationProvider are custom implementations of authentication based on JWT Token, which can be further customized and adjusted according to specific business logic and requirements.
Bearer Token Authentication in Apidog
Apidog enables seamless testing of Bearer Token authenticated APIs with dedicated UI controls to select the authentication method and input access tokens, which generates standard Authorization request headers automatically. This facilitates validating token handling scenarios to ensure robust auth workflows in API design stages.
While Apidog streamlines testing configurations, additional controls like HTTPS transmission, expiration policies, and prompt revocation must be implemented in production for stringent security. With easy mechanisms to mimic real-world auth protocols, Apidog simplifies Bearer Token integration and testing for developers.
button
Bonus Tips:
The following common issues may be encountered when using the Bearer token authentication feature in Swagger:
Authentication fails to take effect due to a configuration error. Make sure that your Swagger specification and Spring Security configuration correspond correctly.
Validity period management. When using Bearer token for authentication, you need to consider the expiration date management of the token to avoid access issues due to expiration.
Security Risks. When using Bearer tokens for authentication, you need to ensure that you have a reasonable security policy, such as using HTTPS to protect the transmission of the token.