
Boost Your Productivity: How axios.create Simplifies API Integration
Discover the magic of axios.create – your secret weapon for seamless API calls. Learn how to configure custom instances, handle errors, and optimize performance. Get ready to level up your development game
In the dynamic world of web development, where APIs are the lifelines connecting disparate services and applications, the ability to streamline API integration is paramount. Axios emerges as a beacon of efficiency, with its axios.create feature simplifying the orchestration of API calls. But the journey doesn’t end there, tools like Apidog elevate the process by offering an integrated platform for API design, debugging, mocking, and testing.
This blog post is your gateway to mastering axios.create, enriched by the capabilities of Apidog, guiding you through the art of API integration with finesse and precision. Together, they form a duo that empowers developers to build, test, and deploy APIs with confidence and ease.
axios.create. Download Apidog for a streamlined API development experience, and harness the power of axios.create for efficient, reusable HTTP requests. Get started for free now and transform your API workflowUnderstanding Axios.create
Axios is a robust library in the JavaScript ecosystem, revered for its ability to handle HTTP requests with ease and elegance. It’s the bridge between the front-end and back-end, allowing data to flow seamlessly across the divide.
At its core, Axios is a promise-based HTTP client for the browser and Node.js. It provides a single API for dealing with XMLHttpRequests and node’s http interface. Developers favor Axios for its straightforward setup, intuitive API, and ability to intercept request and response data, transform request and response data, and cancel requests.

The Role of axios.create
The axios.create method is a pivotal feature of Axios. It allows you to create a new instance of Axios with customized configuration. This is particularly useful when you have multiple API calls to make and wish to share common configurations across them. Instead of repeating the same settings for each call, you can define them once and use them everywhere.
Benefits of Using axios.create
Using axios.create comes with several advantages:
- Custom Configuration: It allows you to create a custom instance of Axios with predefined configurations, which can be reused across multiple API calls.
- Code Reusability and Organization: By setting a base URL and default headers, you reduce redundancy and keep your code organized.
- Interceptors: You can easily add request and response interceptors to your Axios instances, which are useful for handling global API call behaviors like logging, authentication, and error handling.
- Error Handling: Axios instances created with
axios.createcan have global error handling, making it easier to manage errors across different API calls. - Instance Specificity: You can create multiple instances for different parts of your application, each with its own specific configuration, leading to better modularity
- Enhanced Security: Axios provides built-in protection against cross-site request forgery (XSRF), which is an essential security feature.
By understanding and utilizing axios.create, developers can write cleaner, more maintainable code and focus on building features that matter.

Setting the Stage with Axios.create
When you’re about to embark on the journey of API integration, axios.create is your starting point. It’s like preparing your canvas before you paint; it sets the foundation for all the interactions to come.
Preparing Your Axios Instance
Think of axios.create as your personal assistant, ready to take on the world of APIs with you. You start by defining the default configurations that will apply to every request you make. This includes setting up base URLs, headers, and timeout limits.
Import Axios: Start by importing Axios into your file.
import axios from 'axios';
Create the Instance: Use the axios.create method to create a new instance. You can pass a configuration object to customize it according to your needs.
const apiClient = axios.create({
  baseURL: 'https://your.api/baseurl',
  timeout: 1000,
  headers: {'X-Custom-Header': 'foobar'}
});
Use the Instance: Now, you can use apiClient to make API calls that automatically include the predefined settings.
apiClient.get('/users')
  .then(response => console.log(response))
  .catch(error => console.error(error));
This setup allows you to maintain a clean and organized codebase, especially when dealing with multiple API calls that share common configurations.
Configuring Default Settings
With axios.create, you can configure default settings that align with your project’s needs. Configuring default settings in axios.create involves setting up global configurations that will apply to every request made with the Axios instance. Here’s how you can do it:
Create an Axios Instance: Use axios.create to create a new instance of Axios.
const axiosInstance = axios.create({
  baseURL: 'https://api.example.com',
  timeout: 1000,
  headers: {'Content-Type': 'application/json'}
});
Set Global Defaults: Define default configurations for your instance, such as base URLs, headers, and timeouts.
axiosInstance.defaults.baseURL = 'https://api.example.com';
axiosInstance.defaults.headers.common['Authorization'] = 'Bearer token';
axiosInstance.defaults.headers.post['Content-Type'] = 'application/x-www-form-urlencoded';
Use Interceptors: Optionally, you can use interceptors to modify requests or responses before they are handled by then or catch.
axiosInstance.interceptors.request.use(config => {
  // Perform actions before request is sent
  return config;
}, error => {
  // Handle request error
  return Promise.reject(error);
});
Simplifying Multiple Requests
One of the most significant advantages of using axios.create is the ability to simplify the management of multiple requests. By creating instances with specific configurations, you can easily manage different API endpoints or services within your application. It’s like having a specialized tool for each task, making your work more efficient and organized.
Create a Base Instance: Start by creating a base Axios instance with common configurations that will be shared across multiple requests.
const api = axios.create({
  baseURL: 'https://api.example.com',
  headers: {
    'Content-Type': 'application/json',
    // Add any other common headers here
  }
});
Use Axios Methods: Utilize Axios methods like get, post, put, and delete with the base instance to make requests.
api.get('/endpoint1').then(response => {
  // Handle response
});
api.post('/endpoint2', data).then(response => {
  // Handle response
});
Handle Concurrent Requests: If you need to make multiple requests at the same time, use axios.all to handle them concurrently.
const requestOne = api.get('/endpoint1');
const requestTwo = api.get('/endpoint2');

axios.all([requestOne, requestTwo]).then(axios.spread((...responses) => {
  const responseOne = responses[0];
  const responseTwo = responses[1];
  // Handle responses
}));

Real-world Examples of axios.create
In the real world, axios.create shines in scenarios where consistency and efficiency are paramount. For instance, a developer working on a large-scale application with numerous API endpoints can use axios.create to manage different service configurations.
Real-world examples of axios.create often involve setting up a base instance of Axios with predefined configurations that can be reused across multiple API calls within an application. Here are a few scenarios where axios.create is particularly useful:
- Single Page Applications (SPAs): Developers can create an Axios instance with a base URL and headers that are common to all API calls, streamlining the process of making requests to a backend server1.
- Large Projects: In projects with many API endpoints,
axios.createhelps organize and manage API requests by allowing developers to define modules for handling different types of requests, such as GET, POST, PUT, and DELETE. - React and Vue.js Applications:
axios.createis used in conjunction with React hooks or Vue.js properties to make API requests more efficient, handling state changes and component lifecycle events. - Environment-Specific Configurations: Developers can use
axios.createto set up different instances for development, staging, and production environments, each with its own base URL and other settings.
Optimizing Your API Performance with Axios.create
Optimizing API performance with axios.create is akin to fine-tuning a high-performance engine. Every adjustment contributes to a smoother, faster, and more reliable ride.
Best Practices for Efficient API Calls when using Axios.create
To optimize your API calls, it’s essential to follow best practices to ensure efficiency:
- Create an Instance: Use
axios.create()to create a custom instance of Axios with pre-configured settings. This helps in reusing the same configuration across multiple requests. - Configure Defaults: Set default configurations for your Axios instance, like base URLs and headers, to avoid repetitive code.
- Use Interceptors: Implement request and response interceptors to handle preprocessing and error handling globally.
- Handle Errors: Always include error handling to prevent crashes and deal with unexpected API responses gracefully.
- Async/Await: Use async/await for cleaner, more readable asynchronous code.
- Cancel Tokens: Utilize cancel tokens to cancel HTTP requests when they are no longer needed, which can help prevent memory leaks.
- Timeouts: Set timeouts to ensure your application doesn’t wait indefinitely for an API response.
By following these practices, you can make your API calls more secure, efficient, and maintainable. Remember to tailor these practices to fit the specific needs of your project and API design. Happy coding! 🚀
Monitoring and Improving Response Times
To monitor and improve response times with axios.create, you can use Axios interceptors to measure how long an API call takes.
- Create Axios Instance: Use
axios.createto set up a new instance with your desired configurations. - Set Up Interceptors: Implement request and response interceptors. The request interceptor can record the start time, and the response interceptor can calculate the duration.
- Calculate Response Time: In the response interceptor, subtract the start time from the end time to get the duration of the API call.
- Log Response Times: Use the calculated duration to log response times for monitoring purposes.
- Analyze and Optimize: Analyze the logged times to identify slow requests and optimize them by adjusting configurations or improving server performance.
Testing and Debugging with Axios.create
The true test of any performance is not just in the execution but in the rehearsals. Testing and debugging with axios.create are akin to these essential preparations, ensuring a flawless delivery when the spotlight shines.
Testing strategies with axios.create involve creating mock requests and responses to simulate various scenarios. This allows you to verify that your API behaves as expected under different conditions, much like an actor rehearsing their lines.
Apidog: tool for testing and debugging axios.create
Apidog is an integrated platform that streamlines API design, debugging, mocking, and testing, combining features of tools like Postman and Swagger into one solution. Apidog offer a detailed view of your axios.create calls, allowing you to inspect headers, parameters, and responses, and pinpoint any issues.
Testing and debugging axios.create with Apidog involves a few straightforward steps. Here’s how you can do it:
Open Apidog: Start by launching Apidog and creating a new request.
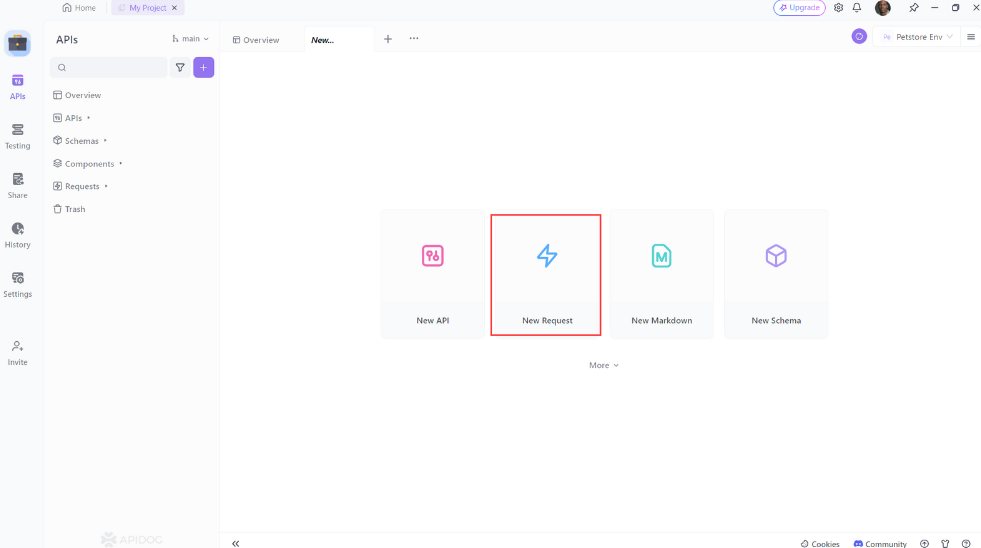
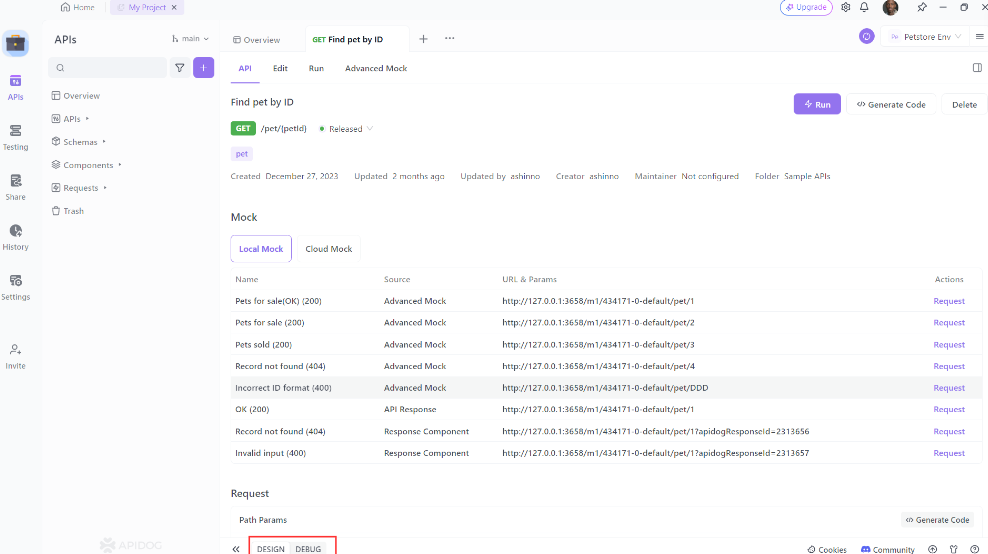
Configure Your Request: Enter the details of the API endpoint you want to test. This includes the URL, any headers, and query string parameters.

Design Interface: Switch to the design interface of Apidog to fine-tune your request.
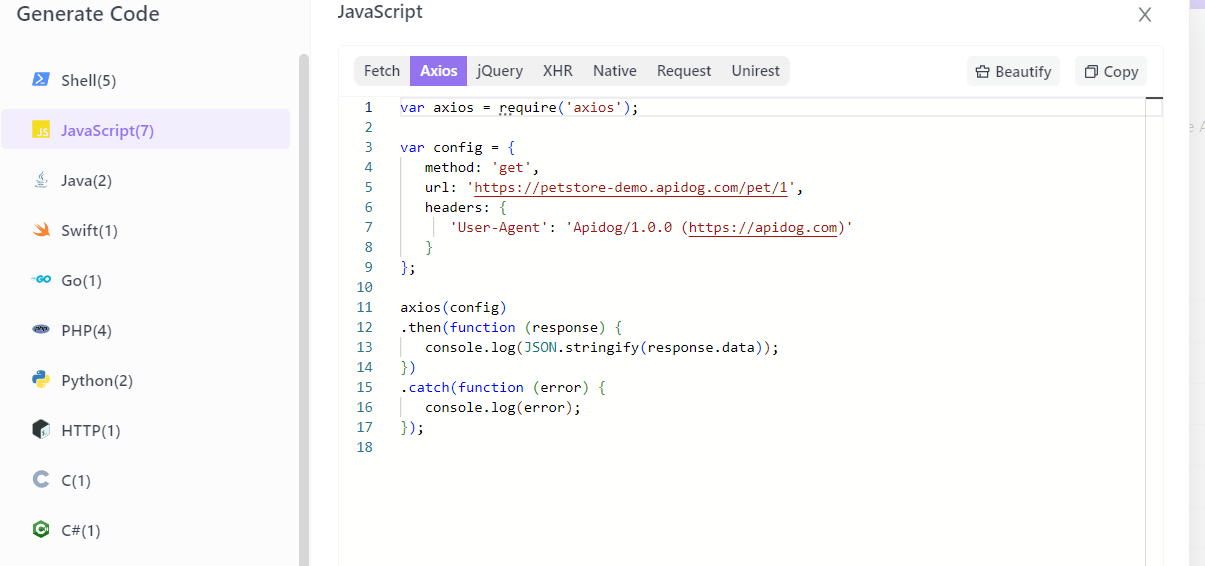
Generate Client Code: Use the “Generate client code” feature in Apidog to create the Axios code for your request.

Run and Inspect: Execute the request within Apidog and observe the response. Look for any errors or unexpected behavior.
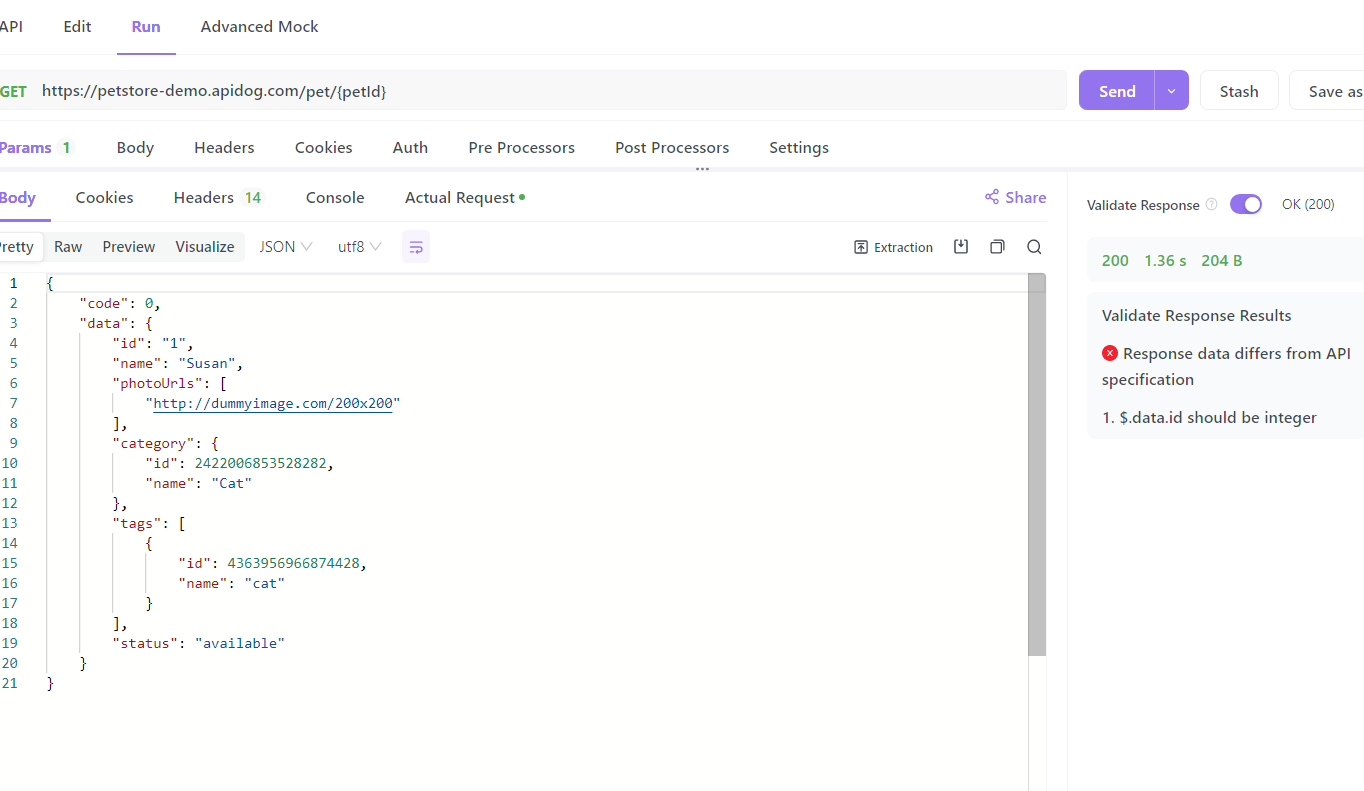
Review Logs: If Apidog provides logging features, review the logs for additional insights into the request and response cycle.
Remember, when testing with Apidog, you can simulate different scenarios and inspect the results, ensuring that your axios.create configuration works as expected. It’s a great way to validate your API calls before integrating them into your application.
Conclusion
As we draw the curtains on our exploration of axios.create, let’s reflect on the journey we’ve undertaken. From the dawn of API integration to the intricate dance of crafting the perfect API call, axios.create has stood as a beacon of efficiency and customization.
The API Integration Maestro has led us through the nuances of setting up instances and optimizing performance. It has shown us the importance of testing and debugging, ensuring that our applications perform at their best. With tools like Apidog enhancing our ability to ensure that our applications not only meet but exceed expectations.
Happy coding, and may your API journeys be ever prosperous! 🚀🌟
