
In the dynamic world of web development, real-time communication has become a cornerstone of modern applications. Whether it's a live chat, real-time notifications, or a dynamic dashboard, real-time data transfer is crucial. Enter WSS WebSocket—a protocol that has revolutionized how we think about web communication. In this blog post, we'll dive deep into the world of WSS WebSocket, exploring its capabilities, how it works, and why it stands out in the realm of APIs and tools like Apidog.
Apidog is your go-to tool for designing, testing, and monitoring APIs, including WebSocket endpoints. Streamline your development process and ensure top-notch performance for your real-time applications.
What is WSS WebSocket?
To understand WSS WebSocket, let's first break down what a WebSocket is. A WebSocket is a protocol that allows for full-duplex communication channels over a single, long-lived connection. Unlike HTTP, which is a request-response protocol, WebSocket provides a persistent connection between the client and the server. This means data can flow freely in both directions at any time.
Now, add the WSS part. WSS stands for WebSocket Secure. It's the secure version of WebSocket, similar to how HTTPS is the secure version of HTTP. WSS uses TLS (Transport Layer Security) to ensure that the data being transferred is encrypted and secure from eavesdroppers.
Why Choose WSS WebSocket?
With a plethora of communication protocols available, why should you consider WSS WebSocket? Here are a few compelling reasons:
Real-Time Communication: WSS WebSocket supports real-time data exchange, making it ideal for applications that require instant updates, such as live chats, gaming, and financial tickers.
Efficiency: Once a WebSocket connection is established, it remains open, eliminating the overhead of establishing multiple HTTP connections. This makes it more efficient for data transfer.
Security: With WSS, you get the added layer of security via TLS, ensuring that your data remains private and protected from cyber threats.
Bi-Directional Communication: Unlike HTTP, where the client requests and the server responds, WebSocket allows for two-way communication. This is perfect for applications that require a continuous exchange of data between the client and server.
How Does WSS WebSocket Work?
The beauty of WSS WebSocket lies in its simplicity and efficiency. Here's a step-by-step breakdown of how it works:
1. Establishing the Connection
The process begins with the client sending a WebSocket handshake request to the server. This is an HTTP request that includes an Upgrade header, indicating the desire to switch from HTTP to WebSocket.
2. Server Response
The server responds with a 101 status code, indicating that the protocol is switching to WebSocket. From this point, the connection is established, and both parties can start exchanging data.
3. Data Exchange
Once the connection is open, either the client or the server can send messages at any time. These messages are sent in frames, which can be either text or binary.
4. Closing the Connection
When either party wants to close the connection, they send a close frame. The connection is then gracefully shut down.
Implementing WSS WebSocket in Your Application
Ready to get your hands dirty? Let’s dive into how you can implement WSS WebSocket in your application. For this example, we’ll use JavaScript on the client side and Node.js on the server side.
Client-Side Implementation
Here’s a simple example of how to create a WebSocket connection in JavaScript:
const socket = new WebSocket('wss://yourserver.com/socket');

socket.onopen = function(event) {
    console.log('Connection established');
    socket.send('Hello Server!');
};

socket.onmessage = function(event) {
    console.log('Message from server', event.data);
};

socket.onclose = function(event) {
    console.log('Connection closed');
};

socket.onerror = function(error) {
    console.log('WebSocket Error: ' + error);
};
Server-Side Implementation
On the server side, we'll use Node.js with the ws library to handle WebSocket connections:
const WebSocket = require('ws');
const server = new WebSocket.Server({ port: 8080 });

server.on('connection', socket => {
    console.log('Client connected');
    socket.on('message', message => {
        console.log('Received:', message);
        socket.send('Hello Client!');
    });

    socket.on('close', () => {
        console.log('Client disconnected');
    });
});
With this basic setup, you've established a secure WebSocket connection between your client and server, enabling real-time communication.
Enhancing Your API with WSS WebSocket
In the context of APIs, WSS WebSocket can add a new dimension of interactivity and responsiveness. Traditional REST APIs are stateless and follow a request-response model, which can be limiting for real-time applications. By integrating WebSocket, you can push updates to clients instantly.
Use Case: Real-Time Notifications
Imagine you have an e-commerce platform and you want to notify users in real-time about order updates. Using WSS WebSocket, you can push notifications directly to the user's browser as soon as an order status changes.
Using Apidog for API Management
Managing APIs can be a daunting task, especially when integrating new technologies like WebSocket. This is where tools like Apidog come in handy. Apidog is an API management platform that simplifies the process of designing, testing, and monitoring APIs.
Benefits of Using Apidog
- Easy Integration: Apidog provides a user-friendly interface for designing and testing APIs, including WebSocket endpoints.
- Collaboration: Teams can collaborate on API development, ensuring everyone is on the same page.
- Monitoring: Keep an eye on your API performance and ensure everything is running smoothly.
Setting Up WSS WebSocket in Apidog
Here’s a quick guide on how to set up a WSS WebSocket endpoint in Apidog:
Here’s how you can use Apidog to debug a WebSocket client:
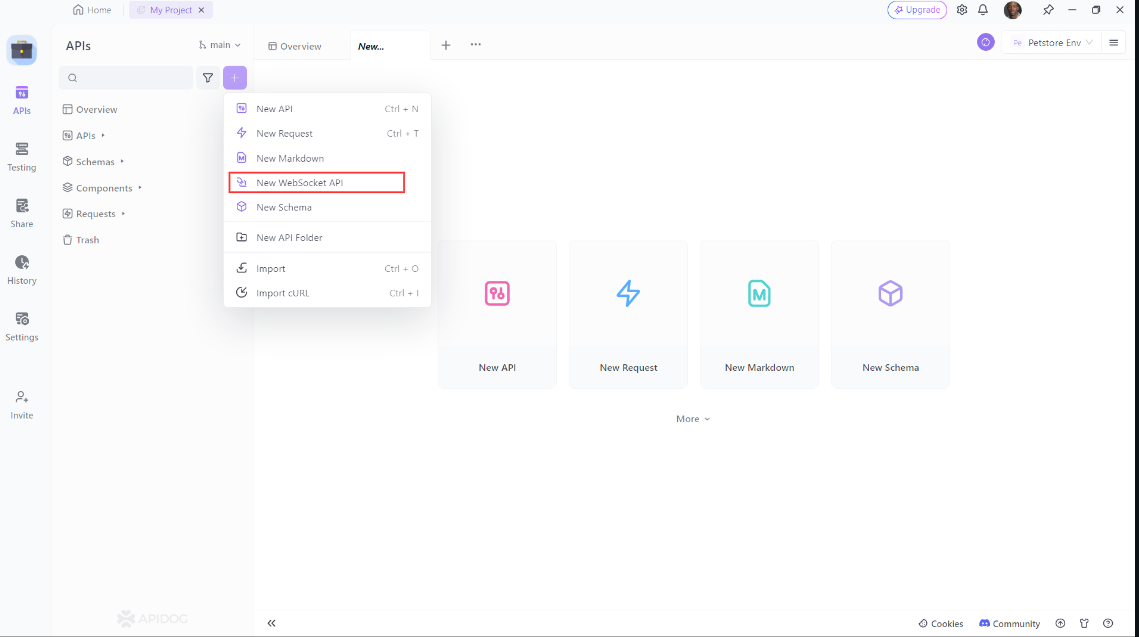
- Open Apidog: First, start the Apidog application and click on the "+" button on the left side, A new drop-down will be opened. From there choose "New WebSocket API":
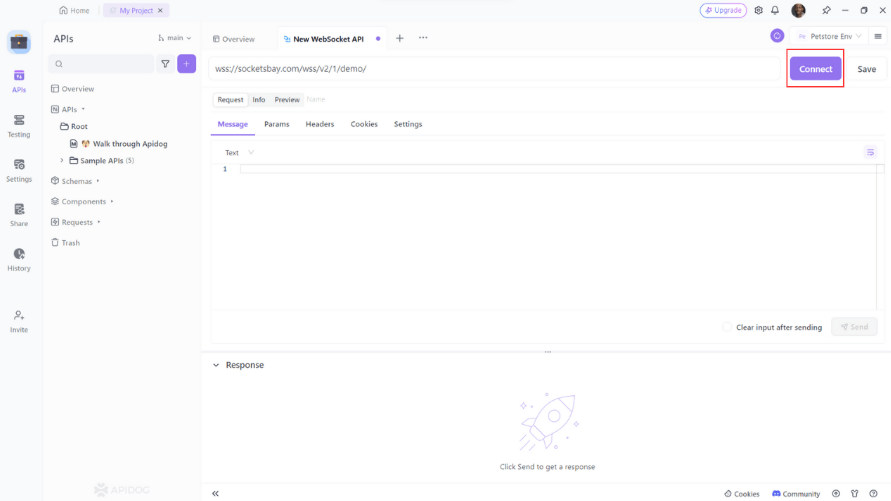
2. Establish a Connection: Start by entering the WebSocket API URL in Apidog’s address bar. You can then click the “Connect” button to initiate the handshake process and establish a connection. Apidog allows you to customize parameters such as Params, Headers, and Cookies during the handshake.
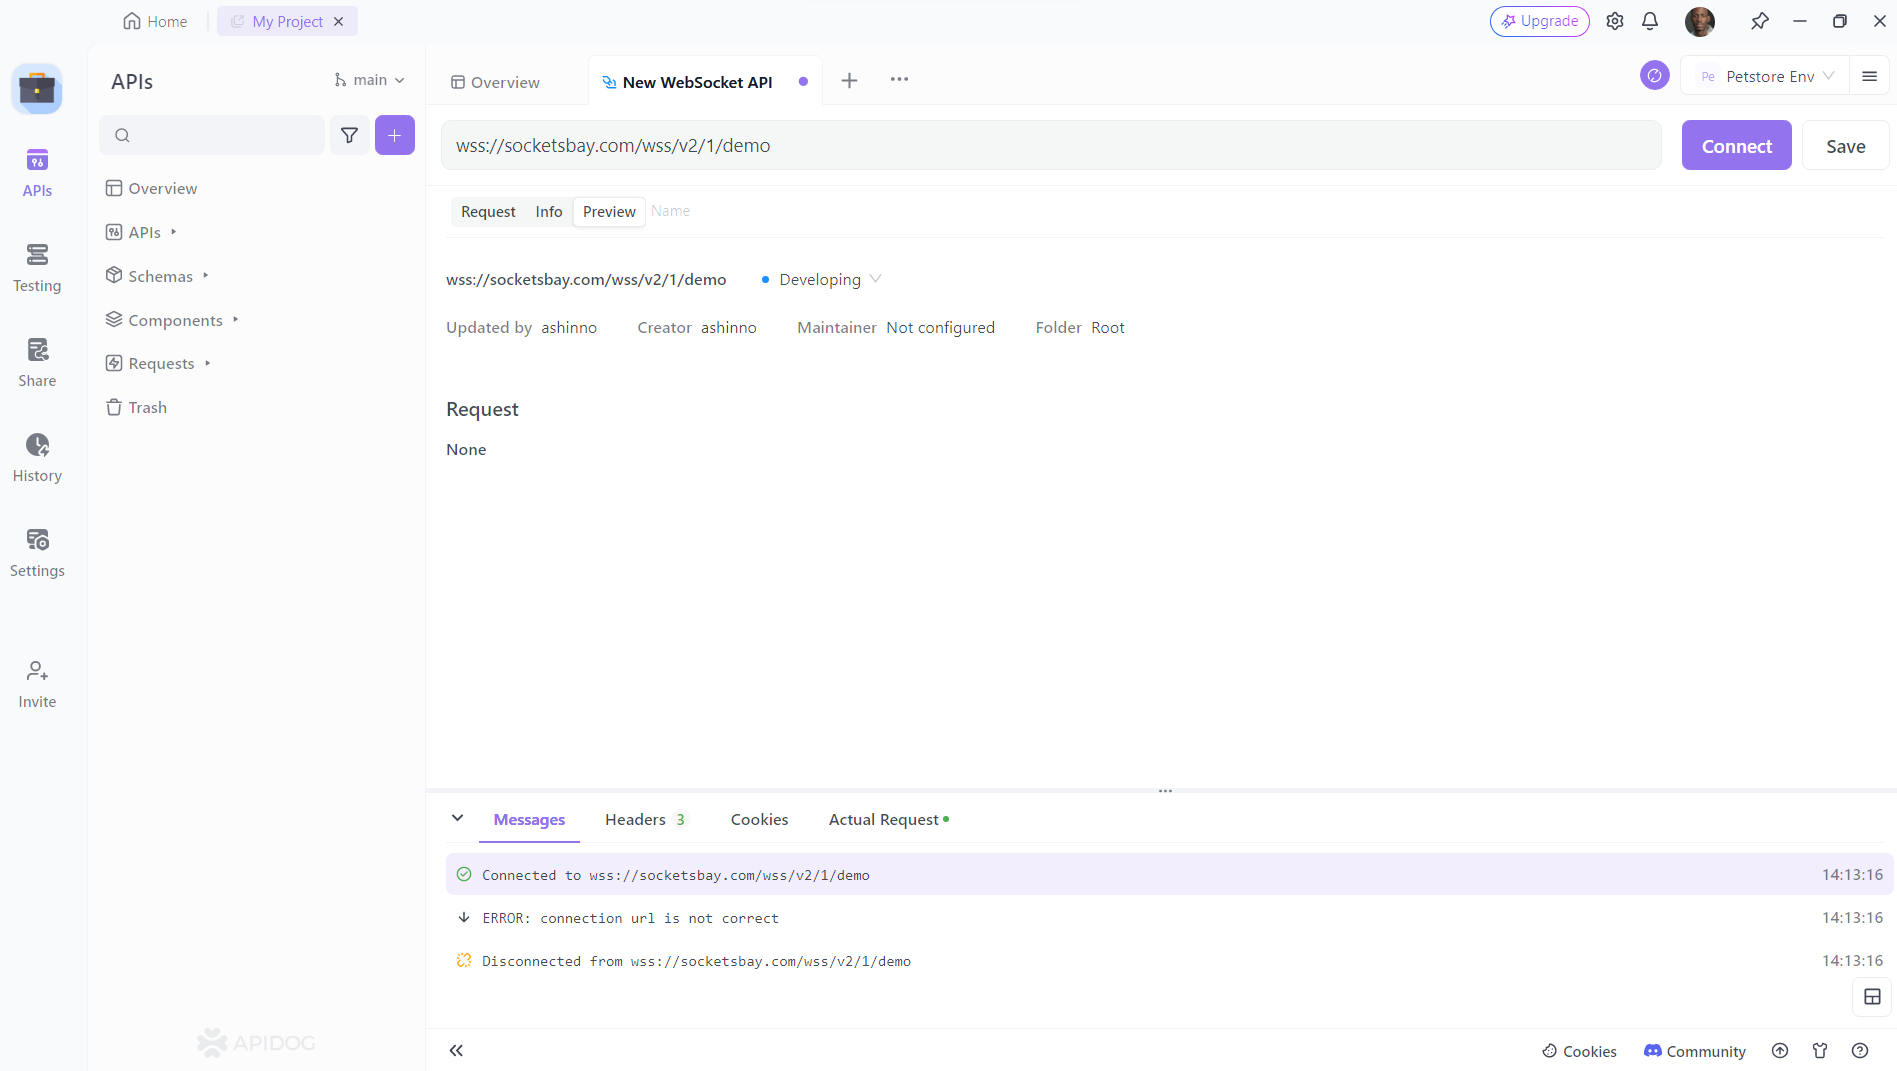
3. Send and Receive Messages: Once the connection is established, you can send messages under the "Message" tab. You can write text, JSON, XML, HTML, and other text format messages, as well as binary format messages using Base64 or Hexadecimal. Apidog's new timeline view shows the connection status, sent messages and received messages in chronological order. When you click on a message, you can easily view its details.

4. API Documentation: Apidog inherits its robust API documentation functionality for WebSocket APIs, allowing you to document your WebSocket interactions effectively.
Best Practices for Using WSS WebSocket
To get the most out of WSS WebSocket, consider these best practices:
1. Handle Errors Gracefully
Ensure your application can handle errors, such as connection drops or message parsing issues. Implement retry mechanisms and provide informative error messages to users.
2. Secure Your Connections
Always use WSS to secure your WebSocket connections. This adds an essential layer of encryption, protecting your data from malicious actors.
3. Optimize Message Size
Keep your messages as small as possible to reduce latency and bandwidth usage. Use binary frames for large or complex data structures.
4. Monitor and Scale
Regularly monitor your WebSocket connections and be prepared to scale your server infrastructure as your user base grows.
5. Leverage API Management Tools
Use tools like Apidog to streamline your API development and management process. This ensures your APIs are well-documented, tested, and monitored.
Conclusion
WSS WebSocket has emerged as a game-changer in the world of web communication, offering real-time, secure, and efficient data transfer. Whether you're developing a live chat application, a real-time dashboard, or any application requiring instantaneous data exchange, WSS WebSocket is a powerful tool in your arsenal.
By integrating WSS WebSocket with your APIs and leveraging tools like Apidog, you can create robust, real-time applications that meet the demands of today's users. So, dive in, start experimenting, and unlock the full potential of real-time communication in your web projects.


