
Passing Bearer Token in Fetch Requests
In modern web development, secure client-server communication is crucial. A common method to ensure this security is by using a bearer token for API authentication. This blog will explain what a bearer token is, its importance, and how to use it in Fetch requests.

In modern web development, secure communication between the client and server is crucial. One common way to ensure this security is by using a Bearer Token for API authentication. This blog will guide you through what a Bearer Token is, why it's important, and how to pass a Bearer Token in Fetch requests.
What is a Bearer Token?
A bearer token is a type of access token that allows the bearer, or holder, to access a particular resource. It’s typically used in OAuth 2.0 authentication. The token is issued by an authentication server and must be included in the HTTP request headers when making API calls to protected endpoints.
Why Use Bearer Tokens?
- Security: Bearer Tokens ensure that only authorized users can access specific resources.
- Simplicity: Once issued, tokens are easy to use for subsequent API requests.
- Flexibility: Tokens can have varying lifetimes and scopes, allowing fine-grained access control.
What is Fetch Requests?
Fetch requests are a way to make network requests in JavaScript, typically used for fetching resources from a server. The Fetch API provides a modern and flexible interface for making HTTP requests, offering a more powerful and flexible feature set compared to the older XMLHttpRequest.
Fetch requests can be used to retrieve data, submit data, or perform various other network operations. The API supports promises, which allows for easier and cleaner handling of asynchronous operations.
Basic Syntax
The basic syntax for a fetch request is as follows:
fetch(url, options)
  .then(response => {
    if (!response.ok) {
      throw new Error('Network response was not ok');
    }
    return response.json();
  })
  .then(data => console.log(data))
  .catch(error => console.error('There has been a problem with your fetch operation:', error));
url: The URL of the resource you wish to fetch.options: An optional object containing any custom settings for the request (e.g., method, headers, body).
Example
Here's a simple example of a GET request using the Fetch API:
fetch('https://api.example.com/data')
  .then(response => response.json())
  .then(data => console.log(data))
  .catch(error => console.error('Error:', error));
This fetch request retrieves data from the specified URL and logs it to the console.
Getting a Bearer Token for Fetch Requests
Before making requests, you need to obtain a Bearer Token. This usually involves authenticating with an OAuth 2.0 server. Here's a simplified example of getting a token:
const tokenUrl = 'https://auth.server.com/token';
const clientId = 'your-client-id';
const clientSecret = 'your-client-secret';

async function getToken() {
    const response = await fetch(tokenUrl, {
        method: 'POST',
        headers: {
            'Content-Type': 'application/x-www-form-urlencoded',
        },
        body: `grant_type=client_credentials&client_id=${clientId}&client_secret=${clientSecret}`,
    });
    const data = await response.json();
    return data.access_token;
}
Passing a Bearer Token in Fetch Requests
Once you have the Bearer Token, you can use it to make authenticated API requests. The token should be included in the Authorization header of your Fetch request.
async function fetchData() {
    const token = await getToken();
    const apiUrl = 'https://api.server.com/data';

    const response = await fetch(apiUrl, {
        method: 'GET',
        headers: {
            'Authorization': `Bearer ${token}`,
            'Content-Type': 'application/json',
        },
    });

    if (!response.ok) {
        throw new Error(`Error: ${response.statusText}`);
    }

    const data = await response.json();
    console.log(data);
}
Example: Fetching Protected Data
Let's walk through a complete example where we fetch protected data from an API using a Bearer Token.
- Get the Token: First, we need to get the token from the authentication server.
- Make the Request: Next, we use the token to make a GET request to the protected API endpoint.
Here’s the complete code:
async function getToken() {
    const tokenUrl = 'https://auth.server.com/token';
    const clientId = 'your-client-id';
    const clientSecret = 'your-client-secret';

    const response = await fetch(tokenUrl, {
        method: 'POST',
        headers: {
            'Content-Type': 'application/x-www-form-urlencoded',
        },
        body: `grant_type=client_credentials&client_id=${clientId}&client_secret=${clientSecret}`,
    });

    if (!response.ok) {
        throw new Error('Failed to obtain token');
    }

    const data = await response.json();
    return data.access_token;
}

async function fetchData() {
    try {
        const token = await getToken();
        const apiUrl = 'https://api.server.com/data';

        const response = await fetch(apiUrl, {
            method: 'GET',
            headers: {
                'Authorization': `Bearer ${token}`,
                'Content-Type': 'application/json',
            },
        });

        if (!response.ok) {
            throw new Error(`Error: ${response.statusText}`);
        }

        const data = await response.json();
        console.log(data);
    } catch (error) {
        console.error('Error fetching data:', error);
    }
}

fetchData();
How to Pass Bearer Tokens in Fetch Requests Using Apidog
When working with APIs that require authentication, passing bearer tokens in fetch requests is a common task. While this can be done manually by adding the token to the request headers, Apidog provides a more convenient way to handle bearer tokens without writing code. In this blog post, we'll explore how Apidog simplifies the process of passing bearer tokens in fetch requests.
What is Apidog?
Apidog is a powerful API testing, design, and documentation tool that allows developers to easily test and interact with APIs. It provides a user-friendly interface for sending HTTP requests, managing authentication, and inspecting responses. Apidog supports various authentication methods, including bearer tokens.
Use Apidog to Get a Bearer Token
Obtaining a valid bearer token is the first step to send the fetch request. Using Apidog to get a bearer token for your API requests is easy without coding. Here is how:
Prerequisites:
Before we begin, make sure you have the following:
- Access to the API documentation or authentication endpoints
- Required credentials (e.g., username, password, client ID, client secret)
- Apidog installed on your machine
Step 1: Open Apidog and Create a New Request
Launch the Apidog application and create a new request by clicking on the "New Request" button.
Step 2: Configure the Authentication Request
In the request configuration panel, enter the authentication endpoint URL provided by the API documentation or simply import the cURL into Apidog. This endpoint is typically responsible for issuing bearer tokens upon successful authentication.
Set the HTTP method to POST (or the appropriate method specified by the API documentation).
Step 3: Set Request Headers
If the API requires any specific headers for the authentication request, add them in the "Headers" tab of the request configuration panel. Common headers include Content-Type and Accept.
Step 4: Configure Request Body
In the "Body" tab of the request configuration panel, select the appropriate body type (e.g., JSON, form-data) and enter the required authentication parameters. These parameters typically include:
- Username and password
- Client ID and client secret
- Grant type (e.g., "password", "client_credentials")
Refer to the API documentation for the specific parameters and their formats.
Step 5: Send the Authentication Request
Once you have configured the authentication request, click the "Send" button to send the request to the API server.
Step 6: Inspect the Response
After sending the request, Apidog will display the API response in the response panel. Look for the bearer token in the response body. It is usually returned as a JSON object with a key named "access_token" or similar.

Step 7: Copy the Bearer Token
Locate the bearer token in the response body and copy it to your clipboard. You will need this token to authenticate subsequent API requests.
Step 8: Save the Bearer Token (Optional)
If you want to reuse the bearer token for future requests, you can save it in Apidog's environment variables. This allows you to easily reference the token in other requests without manually copying and pasting it each time.
Passing Bearer Token with Apidog
Apidog makes it effortless to pass bearer tokens in fetch requests. Here's how you can do it:
Step 1. Open Apidog: Launch the Apidog application and create a new request.
Step 2. Configure Authentication: In the request configuration panel, locate the "Auth" tab. From the dropdown menu, select "Bearer Token" as the authentication type.
Step 3. Enter Bearer Token: In the input field provided, enter your bearer token. Apidog securely stores the token and automatically includes it in the request headers when sending the request.
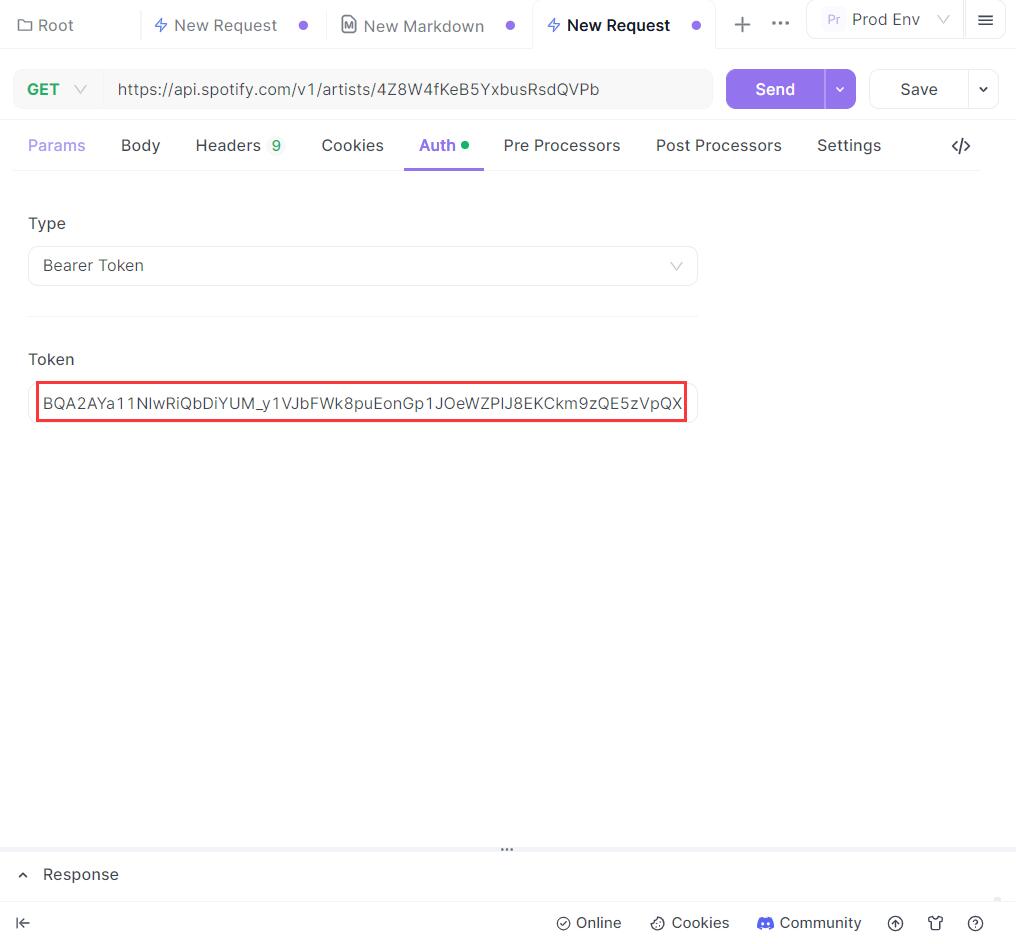
Step 4: Send the Request: With the bearer token configured, you can now send the request to the API endpoint. Apidog will include the token in the Authorization header of the request automatically, in the format Bearer your-bearer-token.
Step 5: View the Response: Once the request is sent, Apidog will display the API response. You can inspect the response body, headers, and status code to verify the successful authentication and access to the protected resource.
Benefits of Using Apidog for Bearer Tokens:
1. Simplified Authentication:
Apidog eliminates the need to manually add the bearer token to the request headers in your code. It handles the authentication seamlessly, saving you time and effort.
2. Easy Testing and Debugging
With Apidog, you can quickly test and debug APIs that require bearer token authentication. You can easily switch between different tokens, inspect requests and responses, and troubleshoot any authentication issues.
3. Collaboration and Sharing
Apidog allows you to share your API requests and documentation with team members. You can collaborate on API development, testing, and documentation, ensuring everyone has access to the necessary authentication details.
Conclusion
Passing bearer tokens in fetch requests is a common requirement when working with authenticated APIs. While it can be done manually in code, Apidog offers a hassle-free solution. By leveraging Apidog's bearer token authentication feature, you can easily include tokens in your requests without writing any code. This simplifies the authentication process, enhances security, and streamlines API testing and debugging. Give Apidog a try and experience the convenience of effortless bearer token authentication in your API development workflow.