
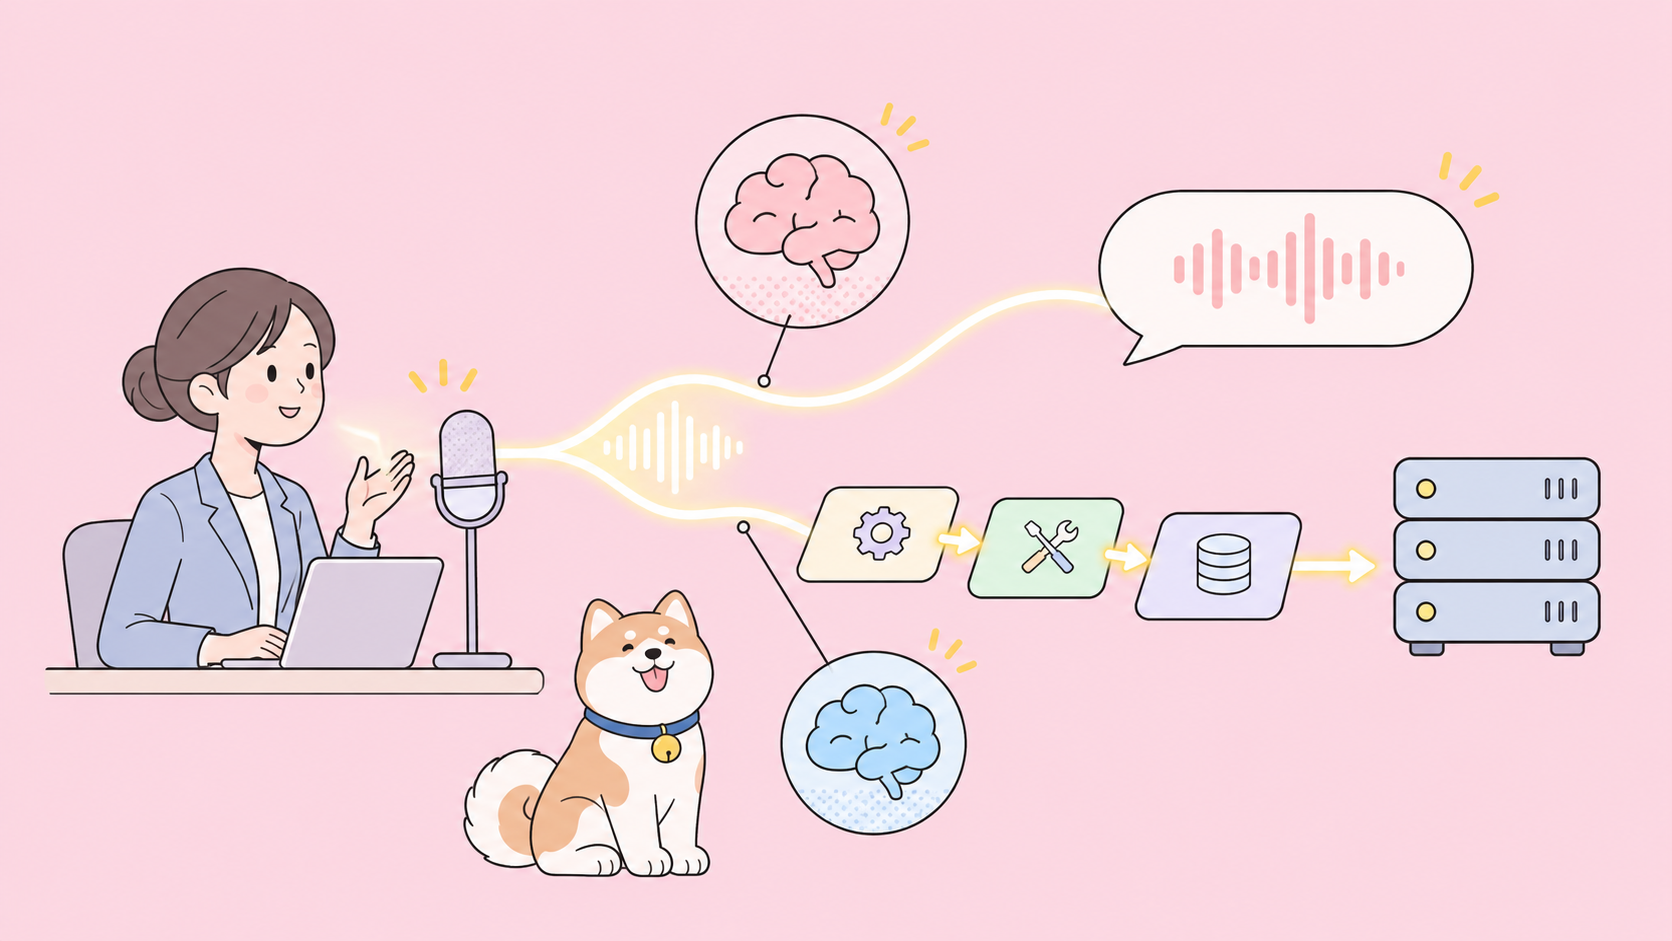
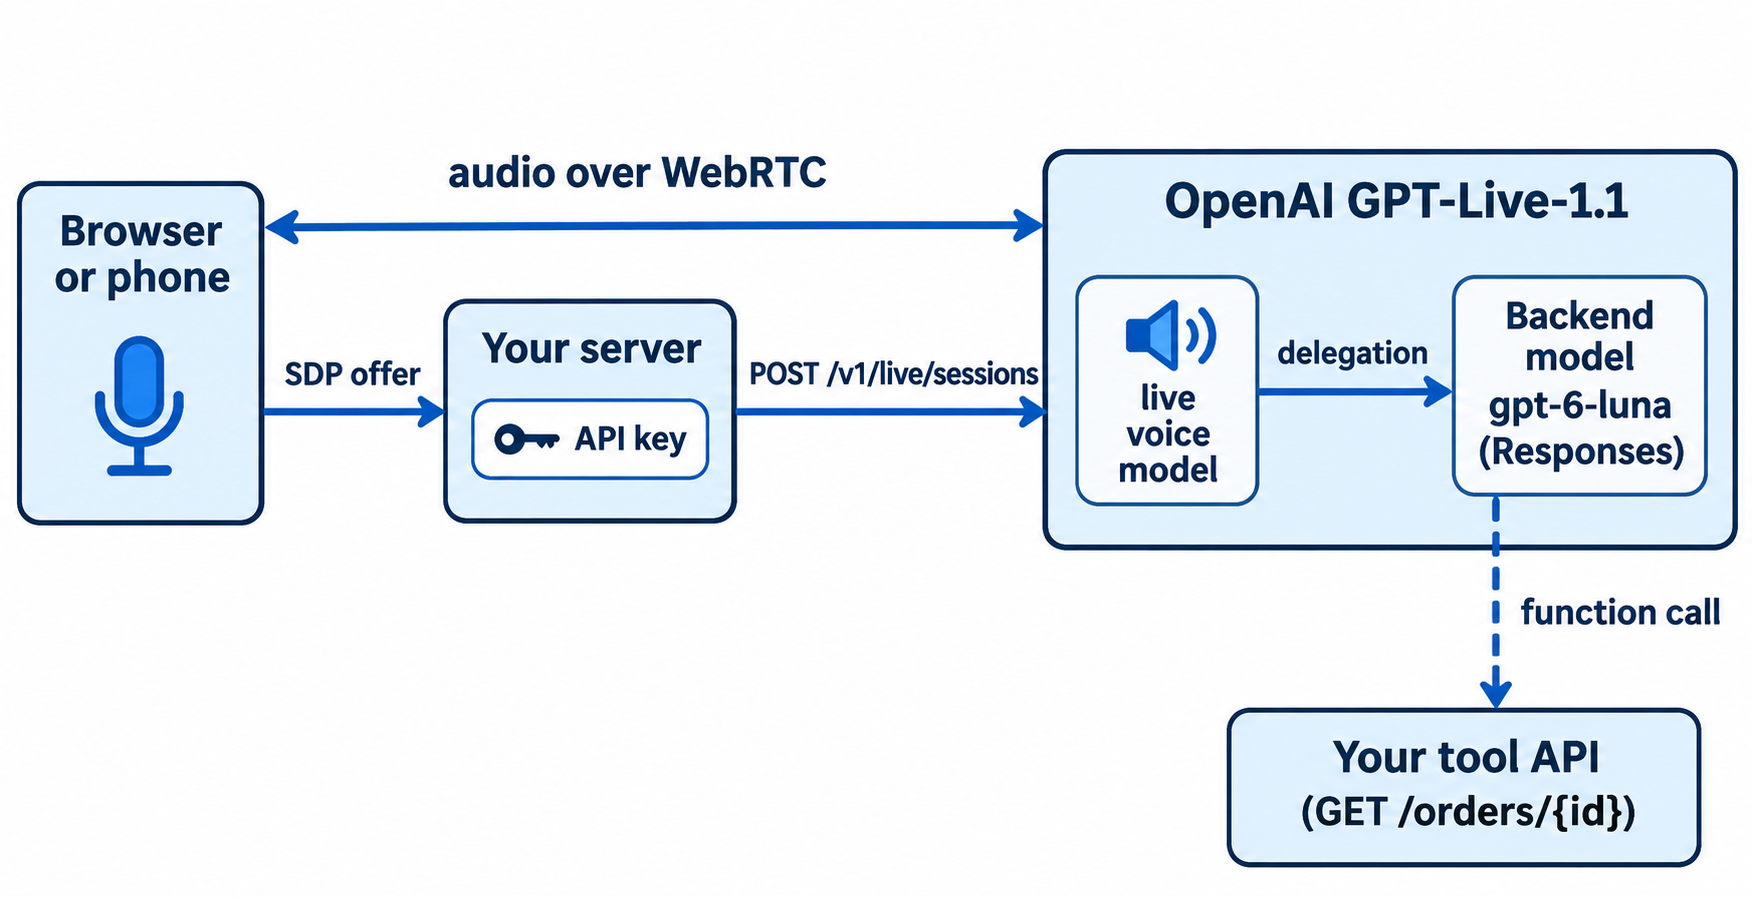
GPT-Live-1.1 API คือโมเดลเสียงแบบ full-duplex ของ OpenAI ที่ให้บริการผ่าน v1/live/sessions คุณเปิด session ผ่าน WebRTC, WebSocket หรือ SIP ส่ง config แบบ session ที่ระบุโมเดล instructions และ voice แล้วปล่อยให้มันส่งงาน reasoning และ tool calls ไปยังโมเดล Responses ที่ backend ผ่านการทำ delegation ค่าใช้จ่ายอยู่ที่ $0.05 ต่อนาทีที่ใช้งานจริง และ $0.02 ต่อนาทีในโหมดสแตนด์บาย
OpenAI เปิดให้ใช้ GPT-Live-1.1 ใน API เมื่อวันที่ 20 พฤศจิกายน 2026 ตามประกาศของ OpenAI Developers หากคุณอ่านบทความของเราเมื่อเดือนกรกฎาคมเรื่อง มี GPT-Live API หรือยัง? คำตอบในตอนนั้นคือ "ยังไม่มี" ซึ่งตอนนี้เปลี่ยนไปแล้ว บทความนี้จะพาคุณไปดูการสร้าง session ที่ใช้งานได้จริง, config สำหรับ delegation, function tool และการตั้งค่าการทดสอบ backend ที่ voice agent ของคุณเรียกใช้
GPT-Live-1.1 API คืออะไร?
GPT-Live-1.1 เป็นโมเดลแบบรับเสียงเข้า-ส่งเสียงออก ที่ฟังไปพร้อมกับพูดได้ มันทำงานบน endpoint v1/live/sessions ไม่ใช่ v1/realtime หรือ v1/responses หน้าที่หลักของมันคือการสนทนา ส่วน reasoning ที่ซับซ้อนและการใช้เครื่องมือจะถูกส่งไปยังโมเดล backend ที่คุณกำหนด ทำให้เสียงยังคงตอบสนองรวดเร็วในขณะที่งานกำลังดำเนินไป
นี่คือสิ่งที่หน้าโมเดล GPT-Live-1.1 ระบุไว้ในปัจจุบัน:
| รายการ | GPT-Live-1.1 |
|---|---|
| Model ID | gpt-live-1.1 (snapshot เดียว) |
| Input / output | รับเสียงและข้อความ ส่งออกเสียงและข้อความ |
| Endpoint | v1/live/sessions เท่านั้น |
| Transports | WebRTC (แนะนำ), WebSocket, SIP |
| ราคาโหมดใช้งาน | $0.05 ต่อนาที |
| ราคาโหมดสแตนด์บาย | $0.02 ต่อนาที (WebRTC, หยุด inference) |
| โมเดลและเครื่องมือ backend | คิดค่าบริการแยกตามราคาปกติ |
| Concurrency | โควตาแยกจาก GPT-Live-1 ต่อองค์กร |
สำหรับข้อมูลเบื้องหลังของผลิตภัณฑ์ ดูได้ที่ GPT-Live คืออะไร และมันต่างจาก GPT Realtime อย่างไร
GPT-Live-1.1 vs GPT-Live-1: อะไรเปลี่ยนไปบ้าง
หน้าโมเดลและคู่มือ prompting ระบุความแตกต่างที่ใช้งานได้จริง 4 ประการ:
- การถอดเสียง: 1.1 "ถอดความพูดได้แม่นยำยิ่งขึ้น"
- เสียง: 1.1 รักษา "accent และเสียงให้สม่ำเสมอข้ามหลายภาษา"
- Prompt สำหรับ delegation: 1.1 รับภาษาธรรมชาติ ("Delegate to the backend when:") GPT-Live-1 ต้องใช้ marker
<|SpawnThinking|>ใน policy - ถ้อยคำเรื่องการเรียกเก็บเงิน: GPT-Live-1 คิดค่าบริการเป็นวินาทีและไม่ปัดขึ้นเป็นนาทีเต็ม ส่วนหน้า 1.1 ระบุเพียงว่า "คิดค่าบริการตามระยะเวลา"
ทั้งสองโมเดลใช้ endpoint, ราคา และรูปแบบ session เดียวกัน ดังนั้นการย้ายไป 1.1 ส่วนใหญ่แค่เปลี่ยนสตริงโมเดลและปรับ prompt ให้สะอาดขึ้นเท่านั้น
วิธีเปิด GPT-Live-1.1 session
คู่มือเริ่มต้น GPT-Live แนะนำ WebRTC สำหรับเสียงบนเบราว์เซอร์ มือถือ และเซิร์ฟเวอร์ ส่วน WebSocket เป็นทางที่ง่ายกว่าสำหรับ prototype ฝั่งเซิร์ฟเวอร์ เริ่มจากตรงนี้:
- เปิด
wss://api.openai.com/v1/live/sessionsด้วยAuthorization: Bearer $OPENAI_API_KEYโดยไม่ต้องมี query parameters - ส่ง
session.startเป็นข้อความแรก พร้อม configsessionของคุณ - รอ
session.startedก่อนส่งเสียง - สตรีมเสียงในรูปแบบที่คุณเลือก ค่าเริ่มต้นคือ PCM 24 kHz
import WebSocket from "ws";

const ws = new WebSocket("wss://api.openai.com/v1/live/sessions", {
  headers: { Authorization: `Bearer ${process.env.OPENAI_API_KEY}` },
});

ws.on("open", () => {
  ws.send(JSON.stringify({
    type: "session.start",
    event_id: "start_1",
    session: {
      model: "gpt-live-1.1",
      instructions: "You are the voice agent for Acme order support. Keep answers short.",
      audio: {
        format: { type: "audio/pcm", rate: 24000 },
        output: { voice: "marin" },
      },
    },
  }));
});

ws.on("message", (raw) => {
  const msg = JSON.parse(raw);
  if (msg.type === "session.started") console.log("Session ready");
});
กฎการ config บางข้อจากคู่มือการสนทนา:
instructionsรับได้สูงสุด 16,384 tokens เพิ่มเนื้อหาระหว่าง session ด้วยsession.instructions.append(500 tokens ต่อครั้ง)audio.output.voiceค่าเริ่มต้นคือmarinชื่ออื่นๆ ใน API ได้แก่quartz,stone,meridianและwillow- รูปแบบ WebSocket ได้แก่
audio/pcmที่ 24,000 หรือ 16,000 Hz และaudio/pcmuหรือaudio/pcmaที่ 8,000 Hz สำหรับระบบโทรศัพท์ storeค่าเริ่มต้นเป็นfalseการเปลี่ยนmodelต้องเปิด session ใหม่
สำหรับ production บนเบราว์เซอร์ ให้เปลี่ยนไปใช้ WebRTC เซิร์ฟเวอร์ของคุณเก็บ API key และส่งต่อ SDP offer จากเบราว์เซอร์:
const res = await fetch("https://api.openai.com/v1/live/sessions", {
  method: "POST",
  headers: {
    Authorization: `Bearer ${process.env.OPENAI_API_KEY}`,
    "Content-Type": "application/json",
  },
  body: JSON.stringify({
    session: { model: "gpt-live-1.1", instructions: "..." },
    transport: { type: "webrtc", sdp: offerSdp },
  }),
});
const { session, transport } = await res.json(); // HTTP 201
// session.id looks like "live_123"; return transport.sdp to the browser
ไม่ต้องใส่ audio.format ในคำขอ WebRTC และอย่าส่ง session.start บน data channel ข้อควรรู้เรื่องการเรียกเก็บเงิน: การสร้าง session WebRTC จะถูกคิดค่าใช้จ่าย 15 วินาทีระหว่างการเริ่มต้น ซึ่งจะคืนเมื่อ session เริ่มทำงาน
Delegation ของ GPT-Live-1.1: ให้โมเดล backend เป็นผู้คิด
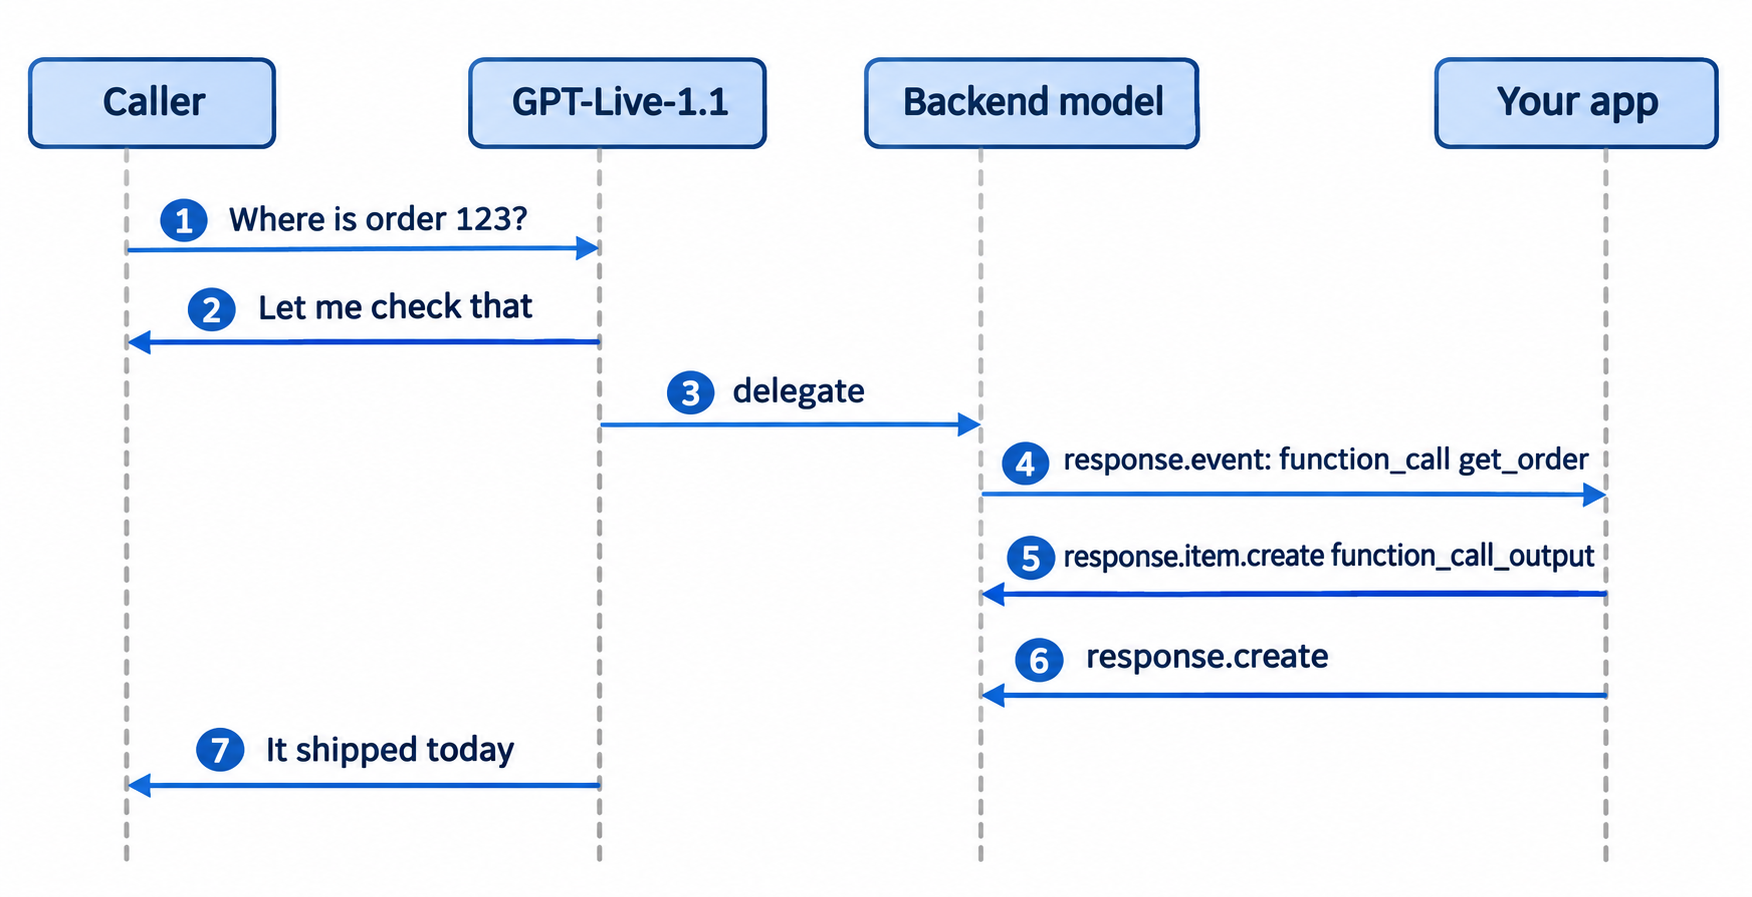
Delegation คือเหตุผลที่ API นี้มีอยู่ โมเดลเสียงยังคงพูดต่อไปขณะที่โมเดล backend กำลัง reasoning ค้นหา หรือเรียกใช้เครื่องมือ คุณเลือกโหมดใดโหมดหนึ่งจากสองโหมดตอนสร้าง session และไม่สามารถเปลี่ยนโหมดกลาง session ได้
| โหมด | delegation.type |
ใครรัน backend | เหมาะกับ |
|---|---|---|---|
| Responses | "responses" |
OpenAI โดยใช้โมเดลและเครื่องมือที่คุณกำหนด | แอปส่วนใหญ่; hosted tools, function calling |
| Client | "client" (เป็นค่าเริ่มต้นด้วย) |
แอปของคุณ | Agent loop ของคุณเอง หรือ backend ที่ไม่ใช่ OpenAI |
คู่มือ delegation แนะนำให้เริ่มด้วย gpt-6-luna และลอง gpt-6-sol สำหรับงาน backend ที่ยากขึ้น หากยังไม่เลือก ของเรามีภาพรวม GPT-6 Luna ที่เปรียบเทียบข้อดีข้อเสียให้
"delegation": {
  "type": "responses",
  "responses": {
    "model": "gpt-6-luna",
    "instructions": "Look up orders with get_order. Answer in one sentence.",
    "tools": [{ "type": "web_search" }],
    "tool_choice": "auto",
    "parallel_tool_calls": false
  }
}
บล็อก responses ยังรับ max_output_tokens (16 ขึ้นไป), service_tier (auto, default, flex หรือ priority โดย priority คือโหมดเร็ว) และค่าตั้ง reasoning กับ text ที่โมเดล backend ของคุณรองรับ คุณเปลี่ยนฟิลด์เหล่านี้กลาง session ได้ด้วย session.update การ validate เป็นแบบ asynchronous: config ที่ผิดจะมาถึงเป็น error โค้ด responses_validation_failed และ session ยังเปิดค้างไว้
จากนั้นบอกโมเดลเสียงว่าเมื่อไรควร delegate ใน 1.1 ทำได้ด้วยภาษาธรรมชาติใน instructions:
Delegate to the backend when: the caller asks about an order, a refund or anything you must look up.
Do not delegate when: the caller greets you, asks you to repeat, or says goodbye.
While the backend works, briefly say what you are checking.
คู่มือ prompting เตือนว่าการพูดว่า "กำลังตรวจสอบอยู่" ไม่ได้พิสูจน์ว่า backend เริ่มทำงานแล้ว ให้เฝ้าดู session.delegation.created ใน logs ของคุณแทน
เพิ่ม function calling ให้ GPT-Live-1.1 session
Hosted tools อย่าง web search รันอยู่ภายใน OpenAI ส่วนฟังก์ชันของคุณเองรันในแอปของคุณ ใส่ function tool แบบ Responses มาตรฐานไว้ใน delegation.responses.tools:
{
  "type": "function",
  "name": "get_order",
  "description": "Get the shipping status of an order by its ID.",
  "parameters": {
    "type": "object",
    "properties": { "order_id": { "type": "string" } },
    "required": ["order_id"],
    "additionalProperties": false
  },
  "strict": true
}
Events จาก backend จะถึงหาคุณในรูป envelope response.event ที่มี delegation_id และ event ที่ซ้อนอยู่ข้างใน function call ที่เสร็จสิ้นจะมาถึงเป็น response.output_item.done ที่ซ้อนอยู่ โดย item มี call_id, name และ arguments รันฟังก์ชัน ส่ง response.item.create พร้อมผลลัพธ์ แล้วส่ง response.create:
ws.on("message", async (raw) => {
  const msg = JSON.parse(raw);
  if (msg.type !== "response.event") return;
  const ev = msg.event;
  if (ev.type !== "response.output_item.done" || ev.item?.type !== "function_call") return;

  const { order_id } = JSON.parse(ev.item.arguments);
  const order = await fetch(`${ORDERS_API}/orders/${order_id}`).then((r) => r.json());

  ws.send(JSON.stringify({
    type: "response.item.create",
    item: { type: "function_call_output", call_id: ev.item.call_id, output: JSON.stringify(order) },
  }));
  ws.send(JSON.stringify({ type: "response.create" }));
});
สามจุดที่มักทำให้สับสน:
- การส่ง output ไปเพียงอย่างเดียวไม่ทำให้ backend ทำงานต่อ คุณต้องส่ง
response.create - ถ้าข้ามผลลัพธ์ที่รออยู่ คุณจะได้รับ
function_call_outputs_requiredcall_idที่ซ้ำหรือไม่ตรงกันจะถูกปฏิเสธ - Events
response.completedที่ถูก forward มาจะมีresponse.outputเป็นค่าว่าง ให้อ่านจาก output-item events แต่ละรายการแทน
ราคาและข้อจำกัดของ GPT-Live-1.1
เวลาเสียงคำนวณค่าใช้จ่ายได้ง่าย สายสนับสนุน 5 นาทีที่ใช้งานตลอดเวลามีค่าเสียง 5 × $0.05 = $0.25 ถ้ามีพันสายแบบนั้นคือ $250 บวกกับค่าใช้จ่ายของโมเดลและเครื่องมือ backend ตามราคาปกติของแต่ละตัว
| รายการค่าใช้จ่าย | อัตรา |
|---|---|
| เสียงโหมดใช้งาน | $0.05 ต่อนาที |
| เสียงโหมดสแตนด์บาย (WebRTC, หยุด inference) | $0.02 ต่อนาที |
| การเริ่มต้น WebRTC | 15 วินาที คืนเมื่อ session เริ่มทำงาน |
| โมเดลและเครื่องมือ backend | ราคาปกติของโมเดลและเครื่องมือนั้น |
Rate limits นับจำนวน concurrent sessions ไม่ใช่ tokens GPT-Live-1.1 และ GPT-Live-1 มีโควตาแยกกัน ซึ่งใช้ร่วมกันข้าม inference regions หน้า GPT-Live-1 ระบุ 50, 300 และ 500 concurrent sessions สำหรับ tier Build, Launch และ Grow โดยไม่มีสิทธิ์ใช้ใน Free tier หน้า 1.1 ไม่ได้ระบุตัวเลข ดังนั้นตรวจสอบหน้า limits ขององค์กรคุณก่อนเปิดตัว
ให้ coding agent ของคุณทดสอบ tool backend ด้วย Apidog CLI
Voice agent ของคุณจะน่าเชื่อถือแค่ไหนขึ้นอยู่กับ API ที่อยู่เบื้องหลัง get_order การตอบกลับที่ช้าหรือผิดรูปแบบจะกลายเป็นช่วงเงียบหรือคำตอบผิดๆ ที่ถูกพูดออกมาจริง ดังนั้นทดสอบ backend นั้นก่อนที่ผู้โทรคนใดจะได้ยิน และให้ coding agent ของคุณจัดการด้วย Apidog CLI
ตั้งค่าเพียงครั้งเดียว:
npm install -g apidog-cli@latest
apidog auth login --with-token <YOUR_TOKEN>
apidog skill install
จากนั้นสั่ง Claude Code, Codex หรือ Cursor ด้วย prompt เดียว:
Import ./orders-openapi.yaml into Apidog project <projectId>. Create test cases for
GET /orders/{order_id}: a known ID returns 200 with a status field in under 800 ms,
and an unknown ID returns 404 with a JSON error. Run them against the staging
environment and tell me what failed.
Agent จะอ่าน schema, validate payload, สร้าง test cases และรันมัน:
apidog import --project <projectId> --format openapi --file ./orders-openapi.yaml
apidog cli-schema get test-case-create
apidog cli-schema validate test-case-create --file case.json
apidog test-case create --project <projectId> --file case.json
apidog run --test-case <caseId> --project <projectId> -e <envId> -r cli,json
เวลา 800 ms มีความสำคัญกับเสียงมาก: ผู้โทรได้ยินทุกมิลลิวินาทีที่เครื่องมือของคุณใช้เวลา ใส่ apidog run คำสั่งเดียวกันพร้อม -r junit ใน CI เพื่อให้ regression ทำให้ build ล้มเหลว ตามที่แสดงในคู่มือ Apidog CLI CI/CD ของเรา มือใหม่กับ workflow ของ agent? เริ่มจากApidog CLI ใน Claude Code แพน Free ของ Apidog รองรับผู้ใช้ได้ถึง 4 คน
FAQ
GPT-Live-1.1 ใช้ได้ใน API หรือยัง? ใช้แล้ว ตั้งแต่วันที่ 20 พฤศจิกายน 2026 คุณเรียก gpt-live-1.1 บน v1/live/sessions ผ่าน WebRTC, WebSocket หรือ SIP ได้ แต่ไม่ได้ให้บริการบน v1/realtime, v1/responses หรือ Chat Completions
GPT-Live-1.1 API ราคาเท่าไร? $0.05 ต่อนาทีที่ใช้งาน และ $0.02 ต่อนาทีสแตนด์บาย การเรียกโมเดล backend และเครื่องมือถูกคิดค่าบริการแยกตามอัตราของแต่ละตัว
GPT-Live-1.1 ต่างจาก GPT Realtime อย่างไร? GPT-Live รันบน endpoint ของตัวเอง คิดค่าบริการตามระยะเวลาเสียง และส่งงาน reasoning ให้โมเดล backend ผ่าน delegation ส่วน GPT Realtime รันบน v1/realtime ดูการเปรียบเทียบ GPT-Live vs GPT Realtime ของเรา
ควรใช้โมเดล backend ตัวไหนสำหรับ delegation? คู่มือของ OpenAI แนะนำ gpt-6-luna สำหรับเริ่มต้น และ gpt-6-sol สำหรับงาน backend ที่ซับซ้อนกว่า ตั้ง service_tier เป็น priority หาก latency สำคัญกว่าค่าใช้จ่าย
ใช้ agent ของตัวเองแทนโมเดล Responses ได้ไหม? ได้ ตั้ง delegation.type เป็น client แอปของคุณจะรันงาน backend และส่งผลลัพธ์กลับด้วย session.commentary.append และคุณก็ต้องจัดการ transcripts เองด้วย
GPT-Live-1.1 รองรับ function calling หรือไม่? รองรับ ผ่าน Responses delegation กำหนดฟังก์ชันใน delegation.responses.tools อ่าน calls จาก response.event และส่งผลลัพธ์กลับด้วย response.item.create ร่วมกับ response.create