
Zig은 견고하고 최적화되며 유지보수가 용이하도록 설계된 현대적인 프로그래밍 언어입니다. 성능, 메모리 할당에 대한 명시적 제어, 컴파일 시간 기능에 중점을 두고 있는 Zig은 최소한의 자원 사용으로 상당한 부하를 처리해야 하는 REST API를 포함한 고성능 애플리케이션을 구축하는 데 탁월한 선택입니다.
이 튜토리얼에서는 Zig를 활용하여 "눈부신 속도"를 가지는 REST API를 만드는 방법을 탐구할 것입니다. 프로젝트 설정, 핵심 API 기능 구현 및 최적화 과정을 함께 살펴보겠습니다. 튜토리얼이 끝나면 Zig를 사용하여 고성능 웹 서비스를 구축하는 탄탄한 기반을 갖추게 될 것입니다.

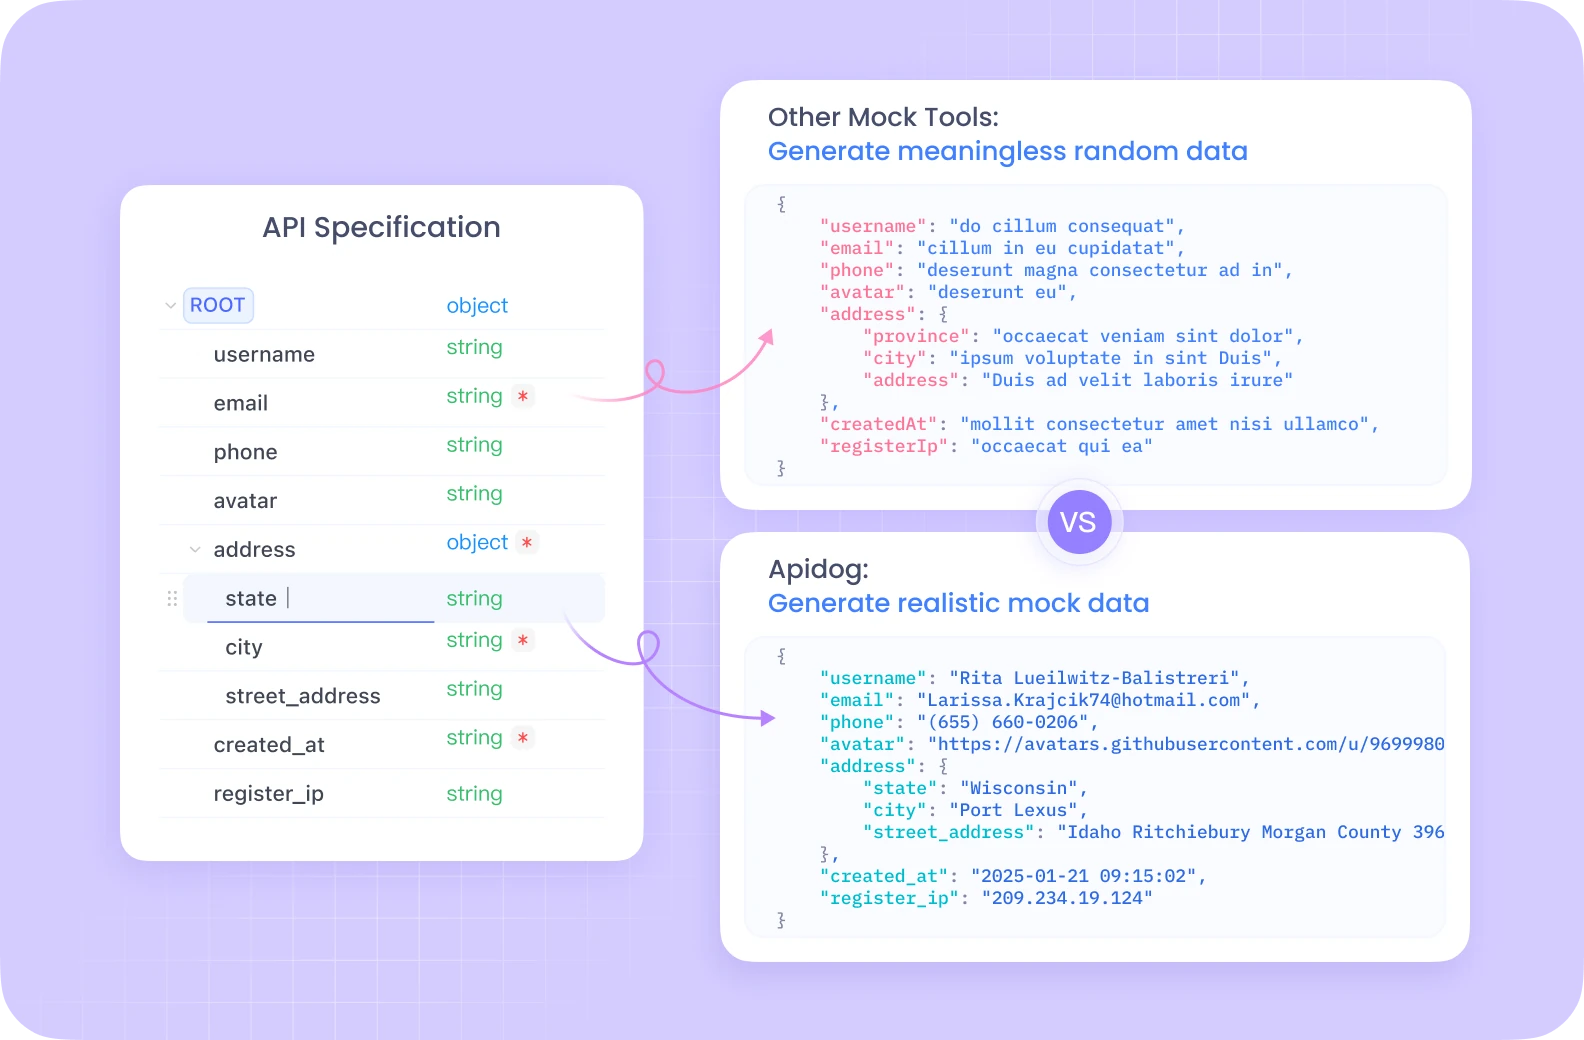
Apidog는 API 문서, 디자인, 테스트 및 디버깅을 하나의 원활한 워크플로우로 통합하여 우리의 고성능 Zig API를 테스트하는 데 적합하게 만듭니다.
Zig 개발 환경 설정
코딩을 시작하기 전에 Zig로 개발하는 데 필요한 모든 것이 갖추어졌는지 확인합시다:
Zig 설치: ziglang.org에서 최신 버전을 다운로드하거나 패키지 관리자를 사용하세요:
# macOS에서 Homebrew 사용 시
brew install zig

# Linux에서 apt 사용 시
sudo apt install zig
설치 확인:
zig version
프로젝트 구조
깨끗한 프로젝트 구조를 생성합시다:
mkdir zig-rest-api
cd zig-rest-api
zig init-exe
이렇게 하면 src/main.zig 파일이 있는 기본 Zig 프로젝트가 생성됩니다. 이 구조를 확장해 보겠습니다:
zig-rest-api/
├── src/
│   ├── main.zig
│   ├── server.zig
│   ├── router.zig
│   ├── handlers/
│   │   ├── users.zig
│   │   └── products.zig
│   └── models/
│       ├── user.zig
│       └── product.zig
├── build.zig
└── README.md
HTTP 서버 구현
먼저, 기본 HTTP 서버를 생성합시다. Zig의 표준 라이브러리는 네트워킹 원시 기능을 제공하지만, 전체 HTTP 서버는 포함되어 있지 않습니다. 우리는 훌륭한 zhttp 패키지를 사용할 것입니다.
다음과 같이 build.zig에 이 종속성을 추가하세요:
const std = @import("std");

pub fn build(b: *std.Build) void {
    const target = b.standardTargetOptions(.{});
    const optimize = b.standardOptimizeOption(.{});

    const zhttp = b.dependency("zhttp", .{});

    const exe = b.addExecutable(.{
        .name = "zig-rest-api",
        .root_source_file = .{ .path = "src/main.zig" },
        .target = target,
        .optimize = optimize,
    });

    exe.addModule("zhttp", zhttp.module("zhttp"));

    b.installArtifact(exe);
}
이제 src/server.zig에서 서버를 구현합시다:
const std = @import("std");
const zhttp = @import("zhttp");
const Allocator = std.mem.Allocator;

pub const Server = struct {
    server: zhttp.Server,
    allocator: Allocator,

    pub fn init(allocator: Allocator, port: u16) !Server {
        return Server{
            .server = try zhttp.Server.init(allocator, .{
                .address = "0.0.0.0",
                .port = port,
            }),
            .allocator = allocator,
        };
    }

    pub fn deinit(self: *Server) void {
        self.server.deinit();
    }

    pub fn start(self: *Server) !void {
        std.log.info("서버가 포트 {d}에서 수신 중", .{self.server.port});
        try self.server.start();
    }
};
라우터 및 요청 처리 추가
src/router.zig에서 간단한 라우터를 생성합시다:
const std = @import("std");
const zhttp = @import("zhttp");
const Allocator = std.mem.Allocator;

pub const Router = struct {
    routes: std.StringHashMap(HandlerFn),
    allocator: Allocator,

    pub const HandlerFn = fn(zhttp.Request, *zhttp.Response) anyerror!void;

    pub fn init(allocator: Allocator) Router {
        return Router{
            .routes = std.StringHashMap(HandlerFn).init(allocator),
            .allocator = allocator,
        };
    }

    pub fn deinit(self: *Router) void {
        self.routes.deinit();
    }

    pub fn addRoute(self: *Router, path: []const u8, handler: HandlerFn) !void {
        try self.routes.put(try self.allocator.dupe(u8, path), handler);
    }

    pub fn handleRequest(self: *Router, req: zhttp.Request, res: *zhttp.Response) !void {
        const handler = self.routes.get(req.path) orelse {
            res.status = .not_found;
            try res.send("찾을 수 없음");
            return;
        };

        try handler(req, res);
    }
};
JSON 처리
JSON으로 작업하기 위한 유틸리티 함수를 만들어 봅시다:
// src/json_utils.zig
const std = @import("std");

pub fn parseJson(comptime T: type, json_str: []const u8, allocator: std.mem.Allocator) !T {
    var tokens = std.json.TokenStream.init(json_str);
    return try std.json.parse(T, &tokens, .{
        .allocator = allocator,
        .ignore_unknown_fields = true,
    });
}

pub fn stringify(value: anytype, allocator: std.mem.Allocator) ![]const u8 {
    return std.json.stringifyAlloc(allocator, value, .{});
}
API 핸들러 구축
이제 src/handlers/users.zig에서 사용자 리소스를 위한 핸들러를 생성합시다:
const std = @import("std");
const zhttp = @import("zhttp");
const json_utils = @import("../json_utils.zig");

const User = struct {
    id: usize,
    name: []const u8,
    email: []const u8,
};

// 시연을 위한 인메모리 저장소
var users = std.ArrayList(User).init(std.heap.page_allocator);

pub fn getUsers(req: zhttp.Request, res: *zhttp.Response) !void {
    const json = try json_utils.stringify(users.items, req.allocator);
    res.headers.put("Content-Type", "application/json") catch unreachable;
    try res.send(json);
}

pub fn getUserById(req: zhttp.Request, res: *zhttp.Response) !void {
    // URL 경로 매개변수에서 ID 추출
    const id_str = req.params.get("id") orelse {
        res.status = .bad_request;
        try res.send("ID 매개변수가 누락되었습니다");
        return;
    };

    const id = try std.fmt.parseInt(usize, id_str, 10);

    // 일치하는 ID의 사용자 찾기
    for (users.items) |user| {
        if (user.id == id) {
            const json = try json_utils.stringify(user, req.allocator);
            res.headers.put("Content-Type", "application/json") catch unreachable;
            try res.send(json);
            return;
        }
    }

    res.status = .not_found;
    try res.send("사용자를 찾을 수 없습니다");
}

pub fn createUser(req: zhttp.Request, res: *zhttp.Response) !void {
    const body = try req.body();
    var user = try json_utils.parseJson(User, body, req.allocator);

    // 새로운 ID 생성
    user.id = users.items.len + 1;

    try users.append(user);

    res.status = .created;
    res.headers.put("Content-Type", "application/json") catch unreachable;
    const json = try json_utils.stringify(user, req.allocator);
    try res.send(json);
}
모든 것을 결합하기
이제 모든 것을 통합하기 위해 src/main.zig를 업데이트하겠습니다:
const std = @import("std");
const Server = @import("server.zig").Server;
const Router = @import("router.zig").Router;
const users = @import("handlers/users.zig");

pub fn main() !void {
    // 아레나 할당자 생성
    var arena = std.heap.ArenaAllocator.init(std.heap.page_allocator);
    defer arena.deinit();
    const allocator = arena.allocator();

    var router = Router.init(allocator);
    defer router.deinit();

    // 경로 등록
    try router.addRoute("/api/users", users.getUsers);
    try router.addRoute("/api/users/{id}", users.getUserById);
    try router.addRoute("/api/users", users.createUser);

    var server = try Server.init(allocator, 8080);
    defer server.deinit();

    // 요청 핸들러 설정
    server.server.setRequestHandler(handler);

    // 서버 시작
    try server.start();
}

fn handler(req: zhttp.Request, res: *zhttp.Response) !void {
    std.log.info("{s} {s}", .{@tagName(req.method), req.path});
    try router.handleRequest(req, res);
}
성능 최적화
Zig는 우리의 API를 눈부시게 빠르게 만들기 위한 여러 기능을 제공합니다:
- 제로 비용 추상화: Zig의 접근 방식은 추상화가 오버헤드를 추가하지 않도록 보장합니다.
- 컴파일 시간 메타프로그래밍: 런타임 대신 컴파일 시에 작업을 수행할 수 있습니다.
- 수동 메모리 관리: 할당을 제어함으로써 가비지 수집 중단을 피할 수 있습니다.
- 아레나 할당자: 한 번에 신속하게 해제할 수 있는 요청 범위 메모리에 적합합니다.
- 인라인 함수: 중요 경로는 함수 호출 오버헤드를 제거하기 위해 인라인으로 만들 수 있습니다.
라우터를 최적화합시다:
// 중요 함수에 인라인 속성 추가
pub inline fn handleRequest(self: *Router, req: zhttp.Request, res: *zhttp.Response) !void {
    // 기존 코드...
}
그리고 스레드 풀을 사용해 요청 핸들러를 최적화합시다:
const ThreadPool = struct {
    threads: []std.Thread,

    pub fn init(thread_count: usize) !ThreadPool {
        var threads = try std.heap.page_allocator.alloc(std.Thread, thread_count);

        for (threads) |*thread, i| {
            thread.* = try std.Thread.spawn(.{}, workerFn, .{i});
        }

        return ThreadPool{ .threads = threads };
    }

    fn workerFn(id: usize) void {
        // 들어오는 요청 처리
        while (true) {
            // 큐에서 요청을 가져와 처리
        }
    }
};
결론
이 튜토리얼에서는 Zig의 성능 중심 기능을 활용하여 고성능 REST API를 구축하는 방법을 살펴보았습니다. Zig의 수동 메모리 관리, 컴파일 시간 기능 및 제로 비용 추상화를 이용하여 견고하고 눈부시게 빠른 API 서버를 만들었습니다.
다루었던 내용은 다음과 같습니다:
- Zig 개발 환경 설정
- 기본 HTTP 서버 구축
- API 엔드포인트를 처리하기 위한 라우터 생성
- JSON 직렬화 및 역직렬화 구현
- API 엔드포인트 핸들러 추가
- 성능 최적화
이 기반은 여러분이 Zig에서 제작할 준비가 된 API를 구축하는데 필요한 도구를 제공합니다. Zig로 계속 개발하면서 컴파일 타임, 오류 처리 및 크로스 컴파일과 같은 고급 기능도 탐색하여 애플리케이션을 더욱 향상시킬 수 있습니다.