In today's digital world, web applications and services often rely on APIs (Application Programming Interfaces) to interact and share data with one another. One of the most popular types of APIs is the REST API, which has become a cornerstone in modern web development. But what exactly is a REST API, and how do you create one?
In this blog, we will explore the concept of REST APIs, their principles, and walk through the steps on how to create your own RESTful API.
What is REST API?
A REST API (Representational State Transfer API) is a type of API that adheres to the principles and constraints of the REST architectural style. REST was introduced by Roy Fielding in 2000 as part of his doctoral dissertation, and it has since become the dominant approach for designing networked applications, especially web-based APIs.
Unlike other types of APIs, RESTful APIs are simple, stateless, scalable, and lightweight, making them ideal for the web. They allow clients (e.g., web browsers or mobile apps) to interact with server-side resources using HTTP methods like GET, POST, PUT, DELETE, and others.
Components of a REST API
REST API consists of three main components:
1. Resources: Anything you want to expose to the client, such as data or functionality. Resources can be images, documents, users, or even services.
2. URIs (Uniform Resource Identifiers): Every resource in a REST API is uniquely identified by a URI, which the client uses to request the resource.
3. HTTP Methods: RESTful APIs use standard HTTP methods to perform operations on resources. Common methods include:
- GET: Retrieve information (e.g., get a list of users)
- POST: Create a new resource (e.g., add a new user)
- PUT: Update an existing resource (e.g., update user information)
- DELETE: Remove a resource (e.g., delete a user)
4. Representation: Resources are represented in various formats such as JSON, XML, or HTML. The server sends a representation of the resource back to the client.
Key Principles of REST API
Before we dive into the steps for creating a REST API, let's take a look at the core principles that define REST.
- Statelessness: Each request from the client to the server must contain all the information needed to process the request. The server does not store any session data between requests, which ensures that each request is independent.
- Uniform Interface: RESTful APIs use standard HTTP methods (GET, POST, PUT, DELETE) to interact with resources. These resources are identified by URIs (Uniform Resource Identifiers), making the system simple and predictable.
- Client-Server Architecture: REST APIs separate the concerns of the client (user interface) from the server (data storage), allowing both to evolve independently. The client doesn't need to know how the server processes requests, and vice versa.
- Cacheability: Responses from the server can be labeled as cacheable or non-cacheable, enabling clients to reuse responses when appropriate, improving performance and reducing server load.
- Layered System: A REST API can be built using multiple layers, such as load balancers, authentication servers, or databases. Each layer only interacts with the adjacent layer, providing better security and scalability.
- Code on Demand (Optional): Clients can extend their functionality by downloading and executing code (such as applets or scripts) from the server, although this is rarely used in practice.
- Self-Describing Messages: REST APIs use self-describing messages, which means that each request and response contains enough information to describe itself. This enables clients and servers to be decoupled and allows the API to evolve over time without breaking existing clients.
How to Create a REST API?
Creating a RESTful API involves several steps, from setting up your environment and choosing the right tools to defining resources and testing your API. Let's go step-by-step through the process of building a REST API using Node.js and Express.
Step 1. Choose a Programming Language and Framework
The first step in creating a REST API is choosing a programming language and a framework that can handle HTTP requests. Several languages and frameworks are popular for API development, such as:
- Node.js with Express (for JavaScript/TypeScript)
- Python with Flask or Django (for Python)
- Java with Spring Boot (for Java)
- Ruby on Rails (for Ruby)
- PHP with Laravel (for PHP)
For this guide, we'll use Node.js with Express, as it's lightweight, scalable, and easy to set up. Express is a minimal framework that simplifies the process of building web APIs with Node.js.
Step 2. Set Up Your Development Environment
To begin, make sure you have Node.js and npm (Node Package Manager) installed on your machine. You can check if you have them installed by running this command in your terminal:
node -v
npm -v
If Node.js and npm aren't installed, you can download and install them from nodejs.org.
Once Node.js is installed, create a new directory for your project:
mkdir my-rest-api
cd my-rest-api
Now, initialize a new Node.js project by running:
npm init -yThis command generates a package.json file, which keeps track of your project's dependencies.
Next, install Express by running the following command:
npm install expressExpress will allow us to easily handle HTTP requests, define routes, and send responses.
Step 3. Define Your API Structure
Think of your API as a collection of resources. In a RESTful API, resources could be anything—users, products, orders, or blog posts. Each resource will have a unique URI (Uniform Resource Identifier), which is used by the client to interact with it.
For example, if you're building a simple API for managing users, your resources might include:
/users: List of all users/users/{id}: Retrieve, update, or delete a specific user by ID
You will also need to decide on the HTTP methods to use for each resource. Common methods include:
- GET: Retrieve data (e.g., fetch all users)
- POST: Create a new resource (e.g., add a new user)
- PUT: Update an existing resource (e.g., modify user information)
- DELETE: Remove a resource (e.g., delete a user)
Step 4. Write the API Code
Now that your environment is set up, let’s build a simple REST API for managing users.
Create a file named server.js:
const express = require('express');
const app = express();
const port = 3000;

// In-memory data store
let users = [
  { id: 1, name: 'John Doe' },
  { id: 2, name: 'Jane Smith' }
];

// Middleware to parse JSON bodies
app.use(express.json());

// GET /users - Retrieve all users
app.get('/users', (req, res) => {
  res.status(200).json(users);
});

// GET /users/:id - Retrieve a user by ID
app.get('/users/:id', (req, res) => {
  const userId = parseInt(req.params.id);
  const user = users.find(u => u.id === userId);

  if (user) {
    res.status(200).json(user);
  } else {
    res.status(404).json({ error: "User not found" });
  }
});

// POST /users - Create a new user
app.post('/users', (req, res) => {
  const newUser = req.body;
  newUser.id = users.length + 1;
  users.push(newUser);
  res.status(201).json(newUser);
});

// PUT /users/:id - Update a user by ID
app.put('/users/:id', (req, res) => {
  const userId = parseInt(req.params.id);
  const userIndex = users.findIndex(u => u.id === userId);

  if (userIndex !== -1) {
    users[userIndex] = { ...users[userIndex], ...req.body };
    res.status(200).json(users[userIndex]);
  } else {
    res.status(404).json({ error: "User not found" });
  }
});

// DELETE /users/:id - Delete a user by ID
app.delete('/users/:id', (req, res) => {
  const userId = parseInt(req.params.id);
  users = users.filter(u => u.id !== userId);
  res.status(204).send();
});

app.listen(port, () => {
  console.log(`Server is running on http://localhost:${port}`);
});
Explanation:
- In-memory data store: We are using a simple array
usersto store the user data for this example. In a real-world application, you would likely interact with a database (such as MongoDB, PostgreSQL, or MySQL). - Middleware: The
express.json()middleware is used to automatically parse incoming JSON data in the request body, so we don't have to manually handle it.
- Routes:
GET /users: Fetch all users.GET /users/:id: Fetch a user by ID.POST /users: Create a new user.PUT /users/:id: Update an existing user.DELETE /users/:id: Delete a user by ID.
Step 5. Test Your API
Once your server is running, test the endpoints using a tool like Apidog to send HTTP requests.
To start the server:
node server.jsNow you can interact with the API via the following endpoints:
- GET
http://localhost:3000/users– Retrieves all users - GET
http://localhost:3000/users/1– Retrieves user with ID 1 - POST
http://localhost:3000/users– Adds a new user - PUT
http://localhost:3000/users/1– Updates user with ID 1 - DELETE
http://localhost:3000/users/1– Deletes user with ID 1
For example, to create a new user via cURL:
curl -X POST -H "Content-Type: application/json" -d '{"name": "Alice Wonderland"}' http://localhost:3000/users
Step 6. Handle Errors
Error handling is essential in any API to ensure that clients know when something goes wrong. You should return appropriate HTTP status codes and error messages. For example:
- 404 Not Found: When the resource doesn't exist.
- 400 Bad Request: When the client sends invalid data.
- 500 Internal Server Error: When something goes wrong on the server.
In the example above, we return a 404 status if a user is not found, and 400 or 500 for other errors.
Step 7. Secure Your API
To secure your API, you should implement authentication and authorization mechanisms. Common practices include:
- JWT (JSON Web Tokens): A widely-used method for stateless authentication.
- OAuth2: A standard for third-party authorization.
For example, you might require a user to provide a valid token in the Authorization header for protected routes.
Step 8. Deploy Your API
Once your API is working locally, the next step is deployment. Popular platforms for deploying Node.js applications include:
- Heroku: Easy-to-use platform for deploying Node.js applications.
- AWS (Amazon Web Services): Provides EC2 instances, Lambda functions, and other services for deploying APIs.
- DigitalOcean: A cloud service with straightforward deployment options.
Step 9. Version Your API
API versioning is an important consideration for backward compatibility. You can version your API using:
- URI versioning:
http://api.example.com/v1/users - Header versioning: Through the
Acceptheader, such asAccept: application/vnd.myapi.v1+json.
Use Apidog to Develop REST APIs More Quickly
When it comes to building REST APIs, efficiency and simplicity are key. Apidog is an all-in-one API development tool that streamlines the entire process—from design and documentation to testing and deployment.
What Is Apidog?
Apidog is a robust API development platform designed to simplify API creation. It combines multiple features, such as API design, testing, mocking, and documentation, into one easy-to-use interface. Whether you're working alone or as part of a team, Apidog enhances collaboration and accelerates the API development lifecycle.
Benefits of Using Apidog for REST API Development
- Easy API Design
Apidog allows you to design your REST API with a graphical user interface (GUI). The drag-and-drop interface makes it easy to define endpoints, request parameters, and response formats without writing complex code. This is particularly helpful for teams that need to quickly prototype or iterate on API designs. - Comprehensive API Documentation Creation
Apidog automatically generates detailed API documentation as you design your REST API. This includes descriptions, request/response examples, and authentication details. The documentation is interactive, allowing your users to easily test API calls directly from the documentation itself. - Instant API Mocking
One of Apidog’s standout features is its ability to instantly mock APIs. This means you can simulate API responses before the backend is even ready, allowing front-end developers to continue working in parallel. Mocking also helps test how different components interact early in the development process. - Automated API Testing
With Apidog, you can automate REST API testing using pre-built test cases or custom ones tailored to your needs. The platform supports all HTTP methods like GET, POST, PUT, DELETE, and PATCH, so you can thoroughly test your endpoints for edge cases, performance, and security. - API Collaboration Made Simple
Apidog supports real-time collaboration, allowing teams to work together on API projects. Whether you're a backend developer, a front-end developer, or a tester, everyone can access the same project, make changes, and track progress seamlessly.
How to Design and Document REST APIs Using Apidog?
Here’s a step-by-step guide to creating your first REST API using Apidog:
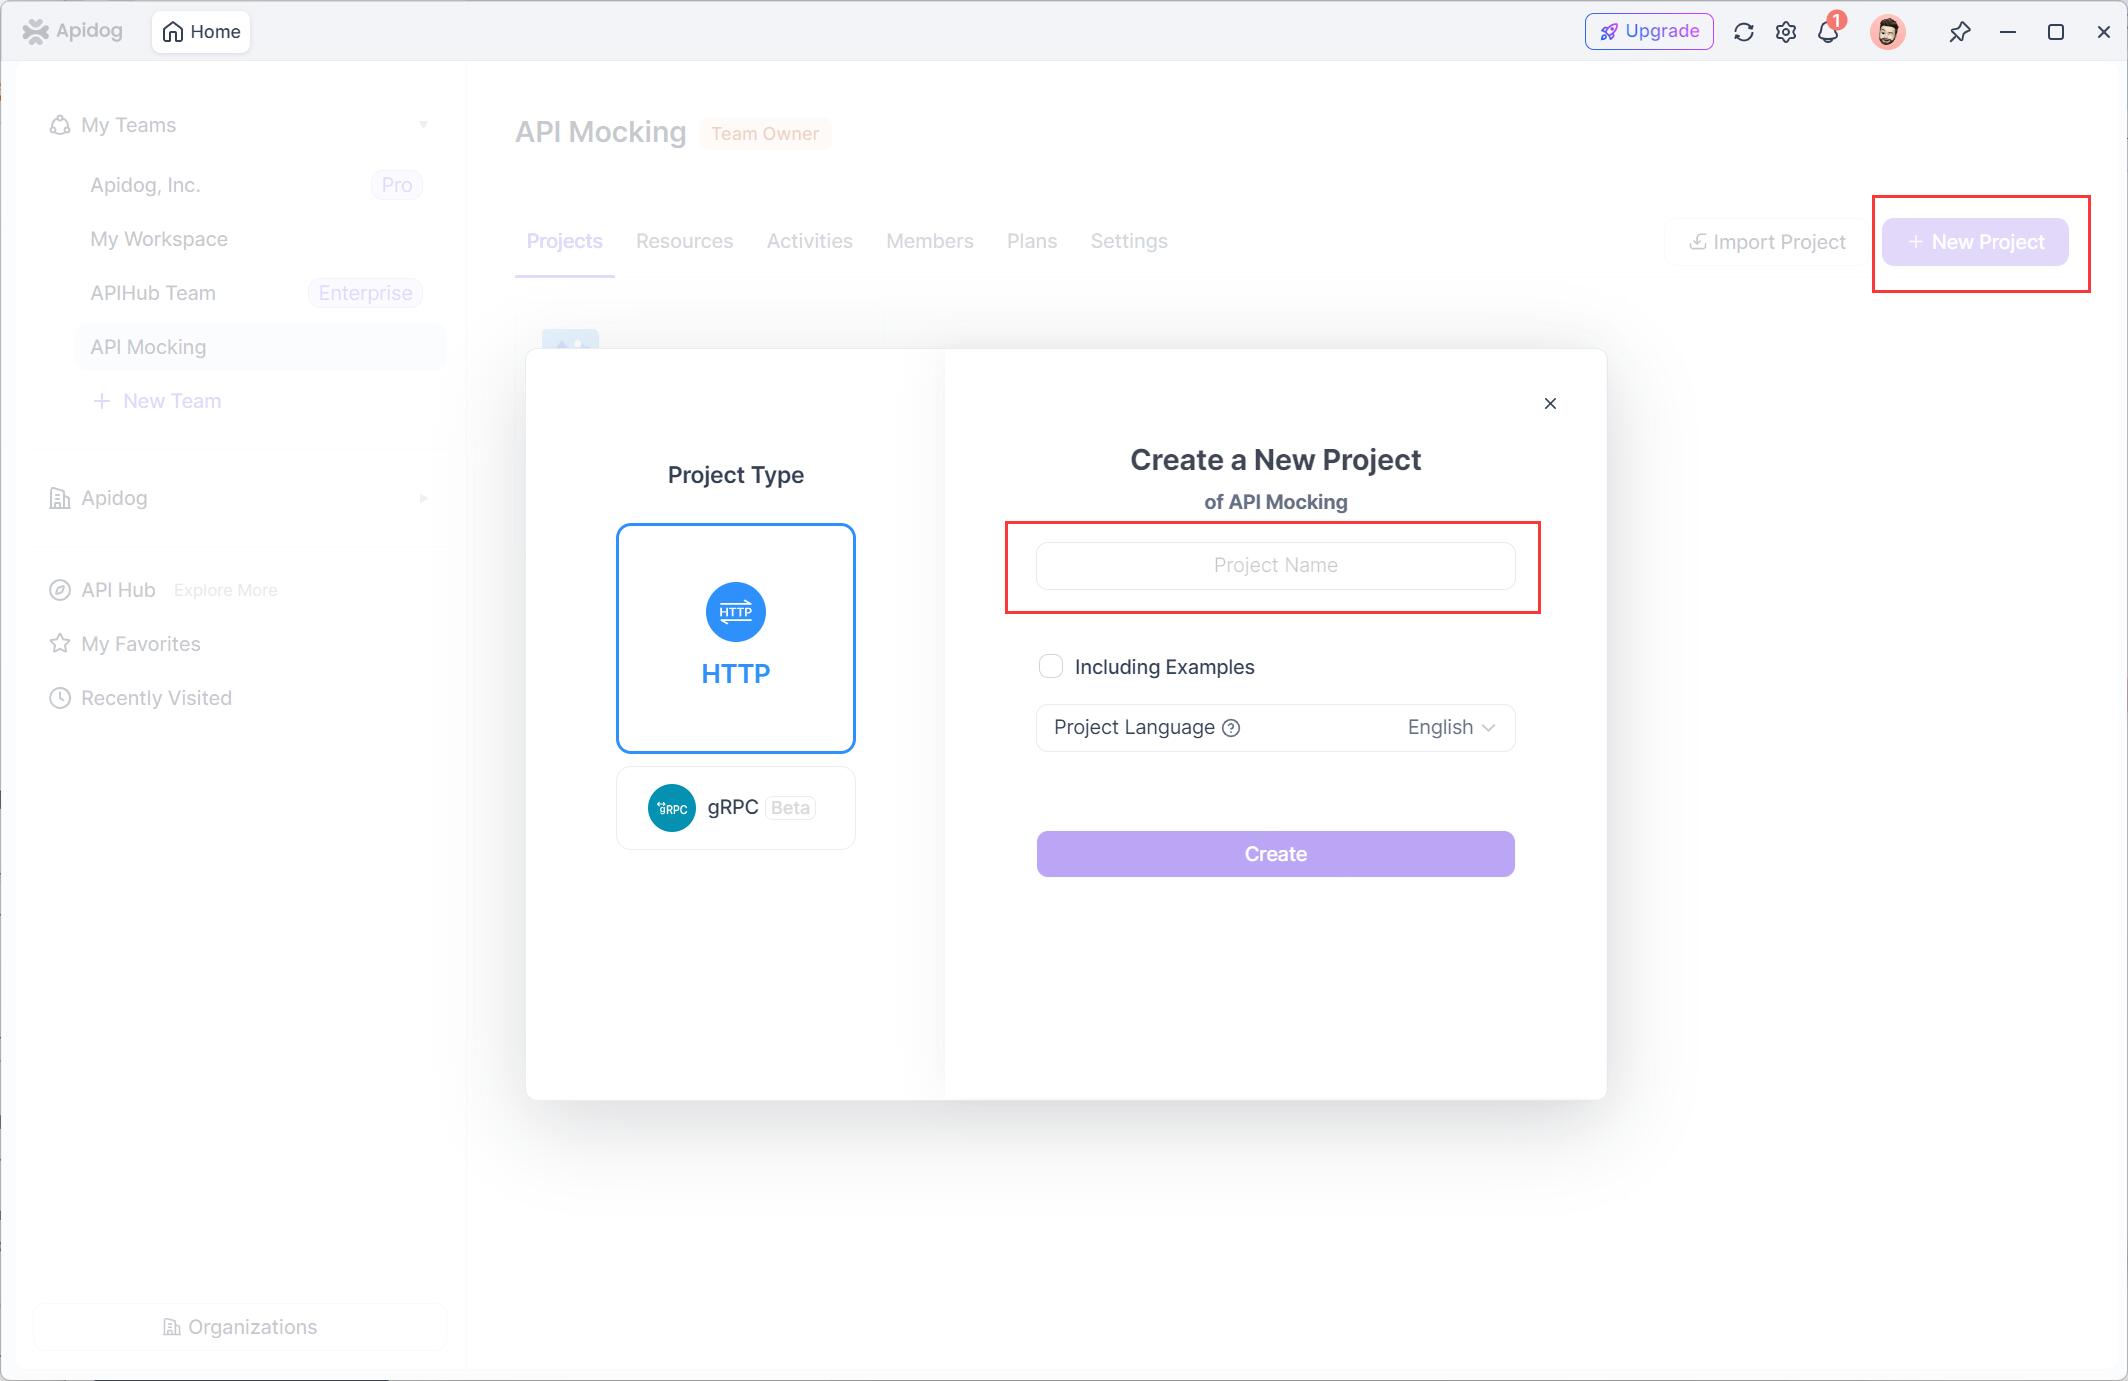
Step 1. Sign up and Create a Project
Start by signing up for an Apidog account. Once logged in, create a new project and give it a name. You can organize your APIs into workspaces, which is helpful if you’re working on multiple APIs at once.
Step 2. Design the API Endpoint Specifications
Use the intuitive visual editor to define your API’s endpoints. For each endpoint, you can specify:
- Endpoint descriptions
- The HTTP method (GET, POST, PUT, DELETE, etc.)
- The request parameters
- The expected response format (JSON, XML, etc.) & examples

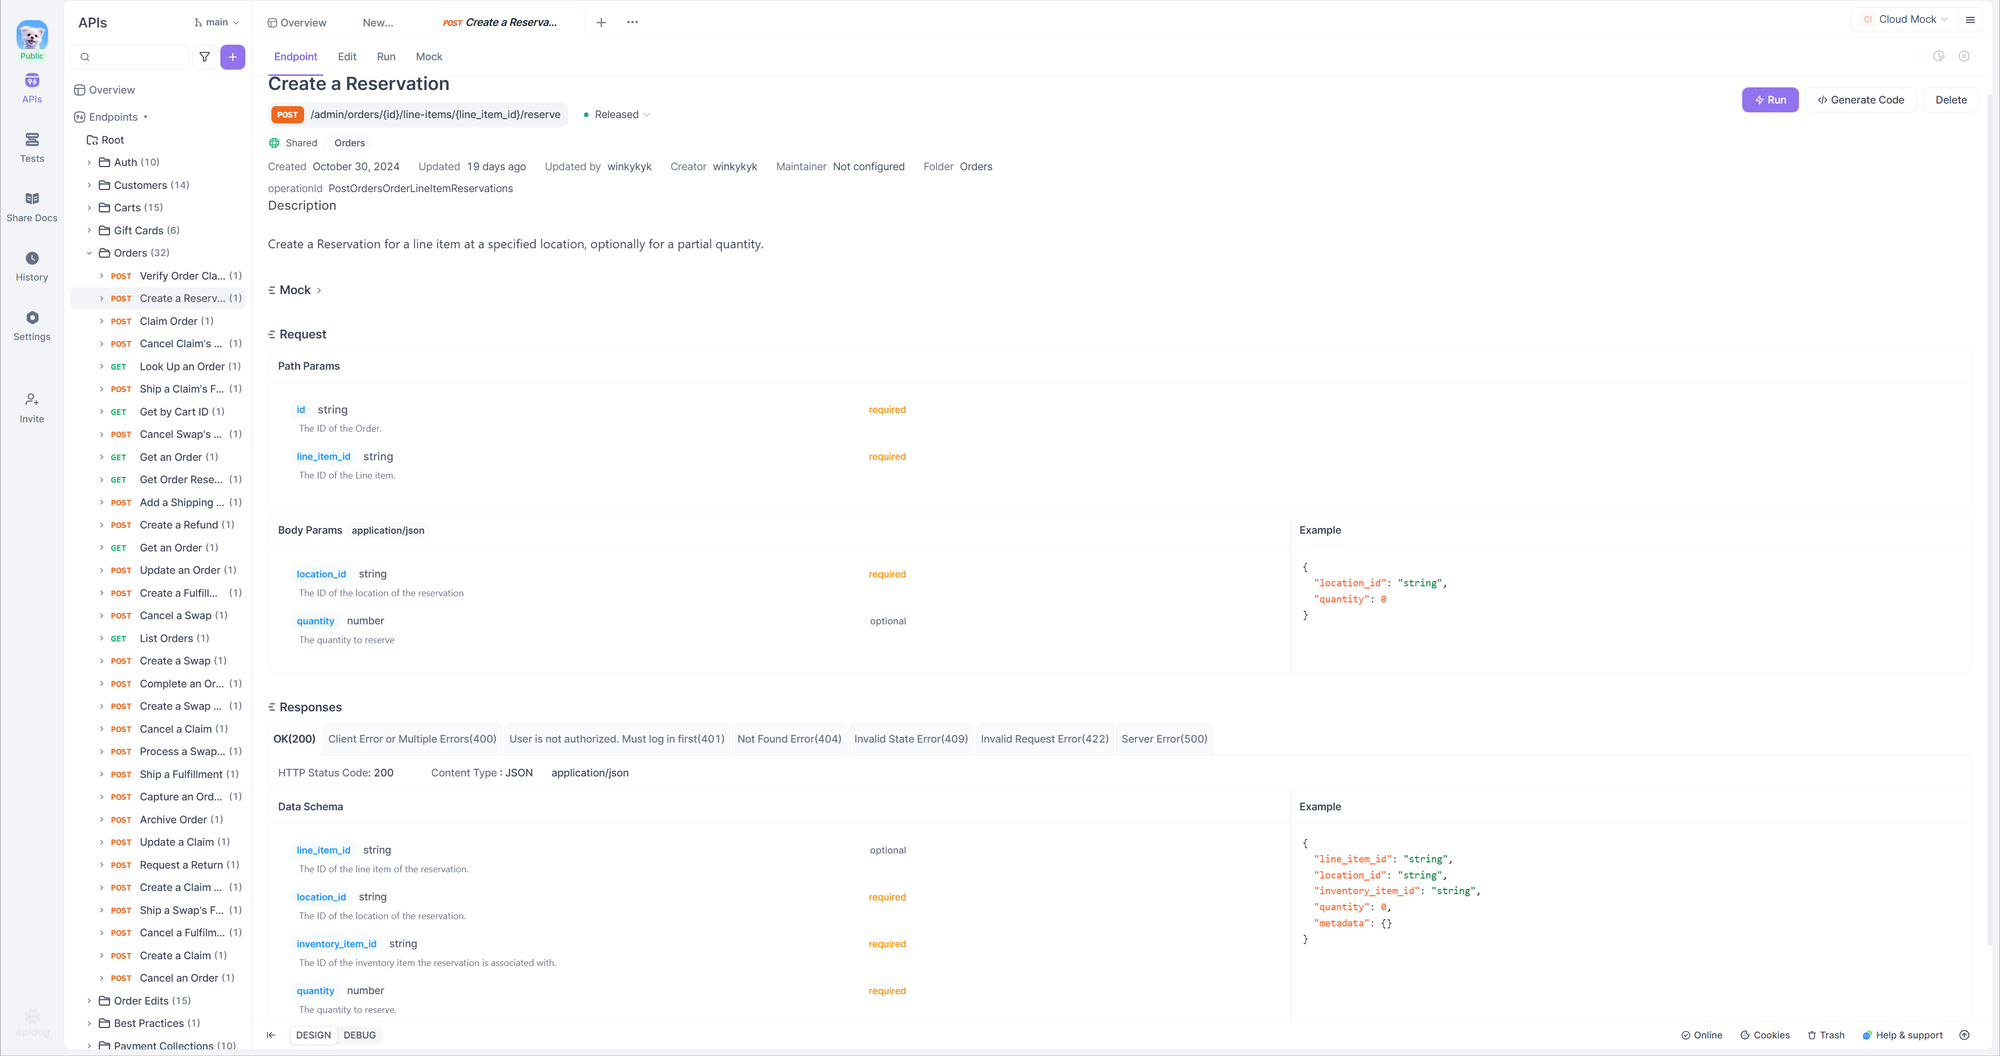
Step 3. Automatically Generate REST API Documentation
Simply click Save at the top-right corner to instantly generate well-structured API documentation.
And that's it, you will get a well-structured Rest API documentation just like the one below:
How to Debug/Test REST APIs Using Apidog?
Debugging/Testing REST APIs is crucial for identifying and resolving issues during development. Apidog makes this process easy and efficient. Follow these steps to debug your REST APIs quickly:
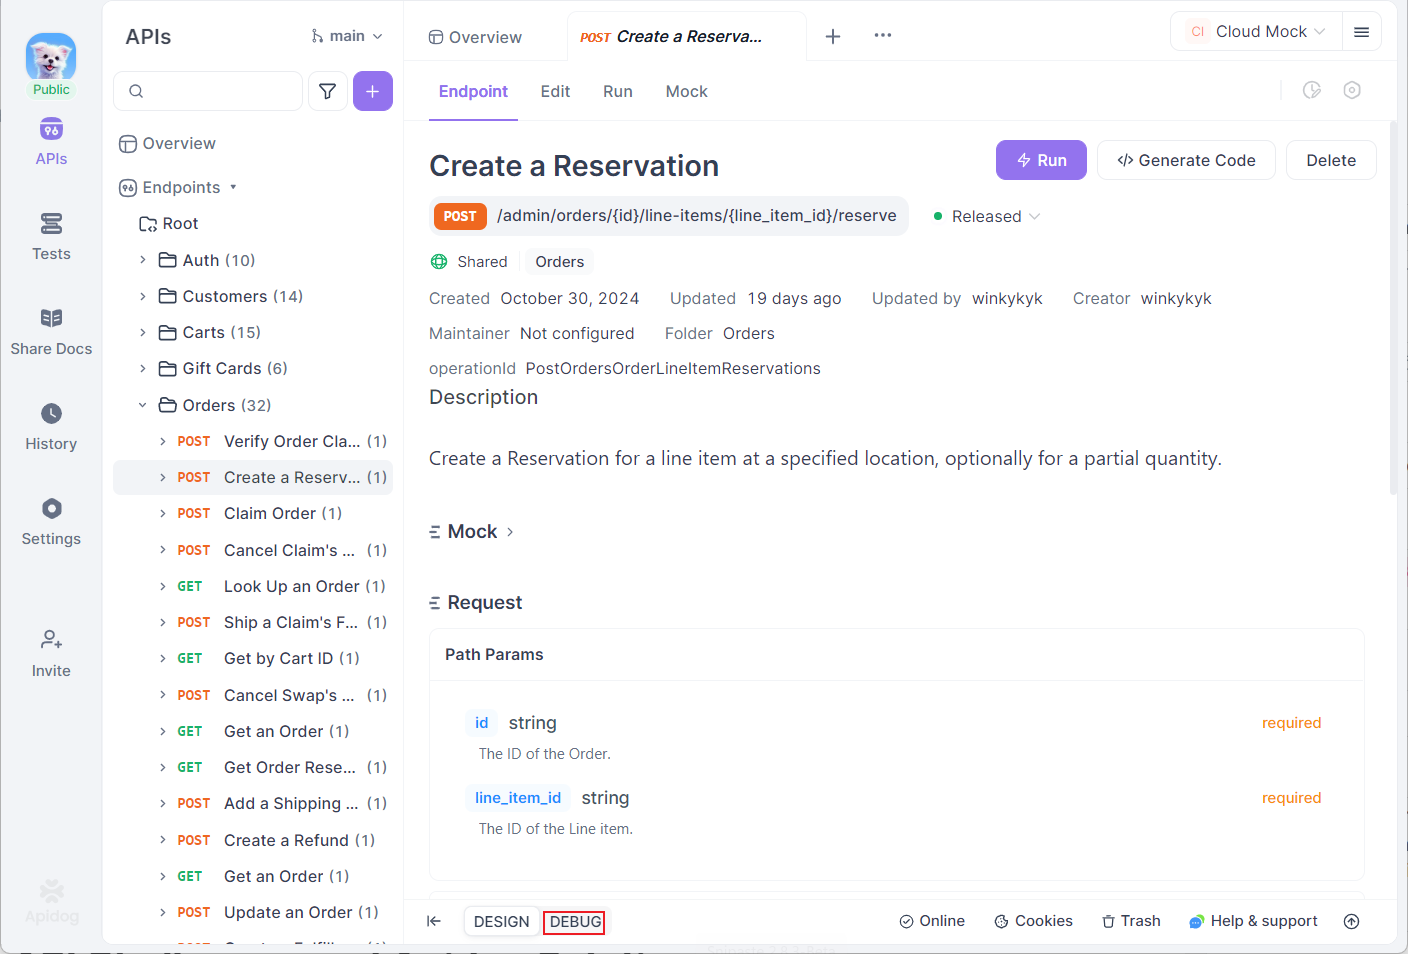
Step 1. Enable Debug Mode for API Documentation
In your newly created API documentation, click the DEBUG button located at the bottom-left corner of the page to switch to debug mode.
Step 2. Send the API Request
Once you're in debug mode, click the Send button at the top-right corner to initiate the API request. Apidog will make the call to your REST API and display the results in real time.
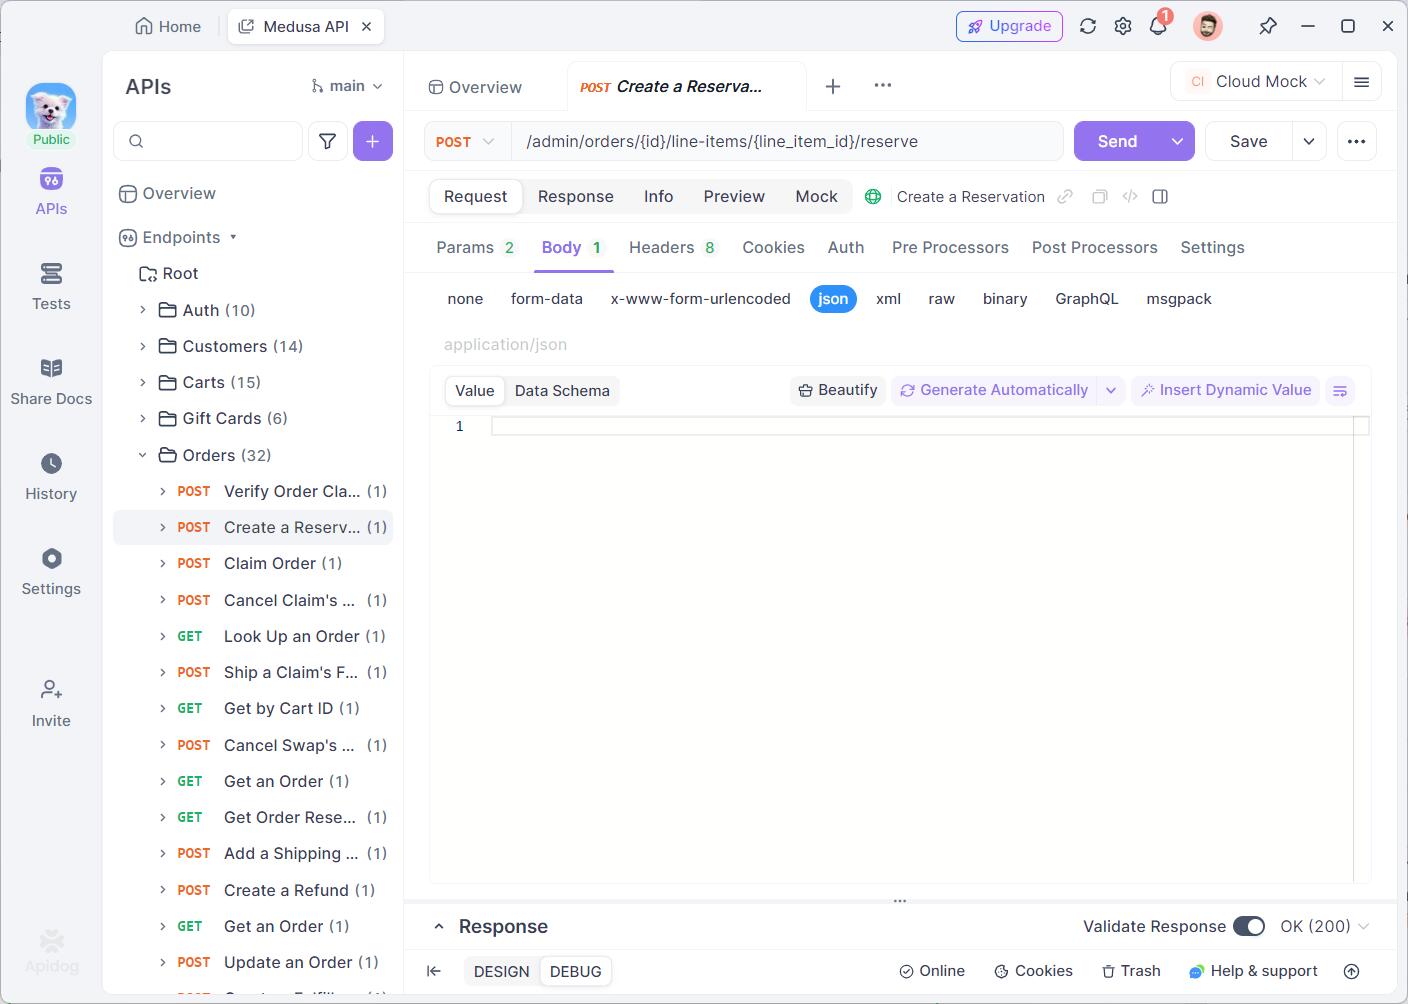
Step 3: Validate API Response
After sending the REST API request, Apidog will process the request and show the response report in real time:
- Response Status Code: The HTTP status code that shows the success or failure of the request (e.g., 200 OK, 404 Not Found).
- Response Headers: These contain metadata about the response, such as content type, caching directives, and more.
- Response Body: The body will display the actual content returned from the API (e.g., JSON, XML, HTML).
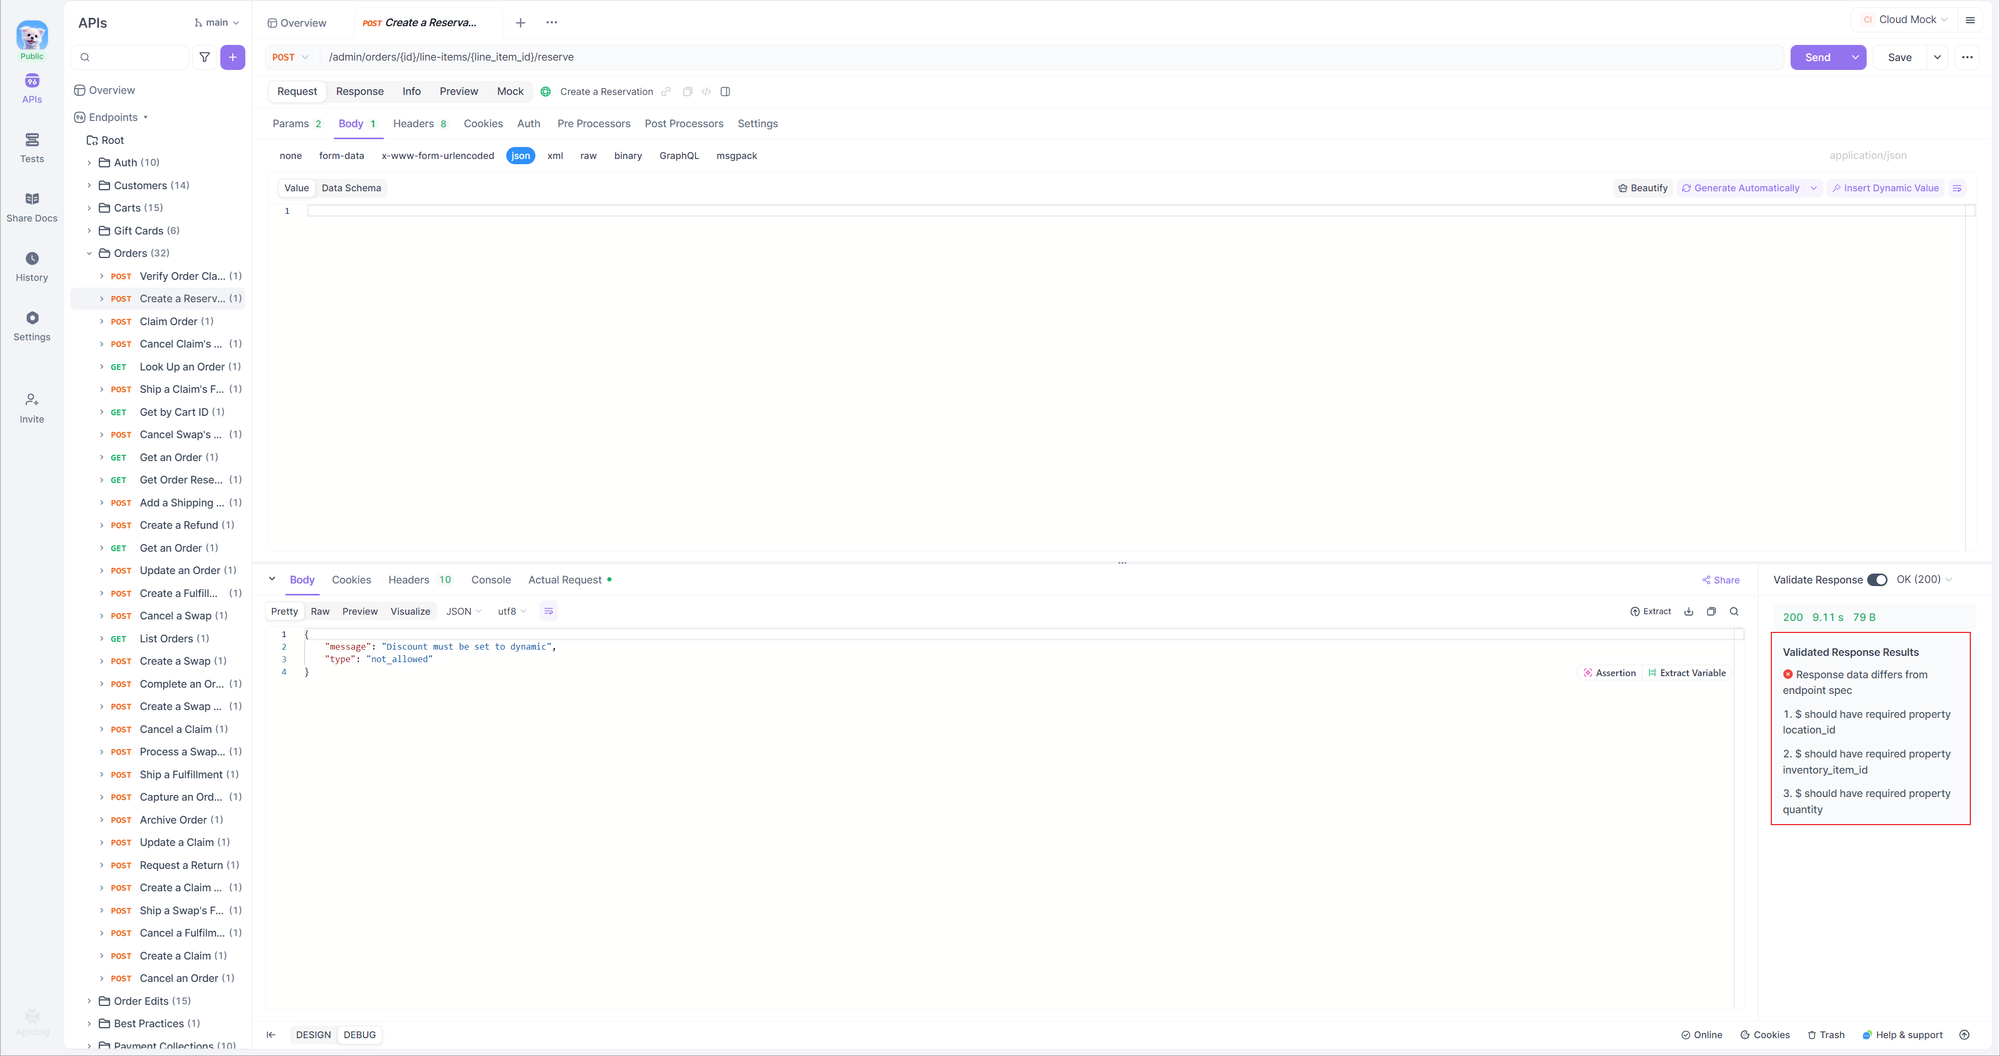
This real-time report helps you quickly identify and resolve issues with your API, ensuring a smoother development process.
Apidog also offers API mocking and automated API testing features to further enhance your workflow.
Learn how to mock APIs in one minute using Apidog.
Explore how to design API test scenarios and test APIs automatically.
Advantages of REST API
REST APIs have become a popular choice for developers due to their many advantages. Here are some of the key benefits of using RESTful APIs:
- Scalability: RESTful APIs are scalable which means they can handle a large number of requests and help in expanding existing resources.
- Simplicity: REST APIs are simple and easy to use, with a clear separation between the client and server.
- Flexibility: REST APIs support various data formats, such as JSON, XML, and HTML which makes them highly adaptable to different use cases. This makes it easy to develop applications that meet specific business needs.
- Security: REST APIs can be secured using industry-standard authentication and encryption protocols, such as OAuth and SSL. This ensures that sensitive data is protected from unauthorized access.
- Performance: REST APIs are lightweight and efficient, which makes them fast and responsive. They also support caching, which can further improve performance.
- Cost-effectiveness: REST APIs require minimal infrastructure and software, which makes them a cost-effective solution for building web applications. They are also easy to scale, which reduces infrastructure costs.
Conclusion
Building and managing REST APIs can be complex, but with the right tools and a solid understanding of the principles behind REST, the process becomes much more manageable. Apidog simplifies API development by offering a user-friendly platform that combines API design, documentation, testing, and versioning—all in one place.
By using Apidog, you can focus on what matters most—building high-quality, reliable APIs—while leaving the complexity of development processes to the tool. So, if you’re looking to streamline your API development workflow, Apidog is the perfect solution. Try it out today and experience a faster, more efficient way to create and manage your REST APIs.
