
Before introducing JMeter Load Testing, we will briefly talk about Apache JMeter. JMeter is a versatile open-source performance testing tool widely used to measure the performance and load of web applications under various scenarios. It supports multiple protocols such as HTTP, SOAP, HTTPS, FTP, and more, making it suitable for testing a wide range of applications.
JMeter allows you to create test plans, define custom test scenarios, and generate detailed reports to evaluate application performance. It is a powerful tool that helps developers and testers ensure their web applications' reliability, scalability, and efficiency, with components including samplers, listeners, controllers, and more.
Components of JMeter
JMeter has several components, including Thread Group, Sampler, Configuration Element, Pre-Processor, Post-Processor, Timer, Assertion, Logic Controller, and Listener. These components collectively enable efficient and comprehensive testing in JMeter.
What is Load Testing?
Load testing is a type of performance testing that simulates a real-world load on any software, application, or website. The concept of long connections and short connections applies to TCP connections. A TCP connection is a two-way channel that can remain open for a period of time.
A long connection refers to maintaining the connection after the link establishment and keeping it active during idle periods. On the other hand, a short connection is terminated after each communication, and a new connection is established for the next communication. Frequent use of short connections can lead to socket errors and frequent creation of sockets wastes resources.
Importance of Load Testing for Web Applications
Load Testing is paramount for web applications for several reasons:
- Performance Insight: It provides insight into the application's performance under various loads. It helps identify an application's maximum operating capacity and any bottlenecks or performance issues that could impact the user experience.
- Scalability: Load testing can help determine an application's scalability and whether it can handle future load increases, which is critical for planning growth or expansion.
- Stability: It ensures that the application remains stable under varying loads. This is essential for maintaining a consistent user experience, especially during peak usage.
- Infrastructure Planning: By understanding the application's behavior under different load conditions, organizations can make informed decisions about infrastructure requirements and cost optimization.
Planning the Load Test
Load testing is the process of putting demand on a software system or computing device and measuring its response. Planning your load tests properly is crucial to ensure they're effective and provide useful results.
- Identify the Load Test Objectives: First, decide what to achieve with the load test. This could be determining the system's response under peak load, understanding how many users your system can handle, or identifying any bottlenecks.
- Define the Load Test Scenario: The test scenario outlines the sequence of actions that a user might take on your application. It should reflect real-world use as much as possible.
- Identify the Metrics to Monitor: Decide what metrics you'll track during the test. This could be response time, throughput, error rate, etc.
Setting Up JMeter for Load Testing: A Comprehensive Guide
To harness the full power of JMeter's load testing capabilities, it's crucial to understand how to set it up properly. This expanded guide will help you start..
Installation and Environment Setup
Before installing JMeter, you should install the latest Java Development Kit (JDK) on your machine. JMeter is a Java-based application, so this step is crucial.
After you've confirmed your JDK installation, you can download the latest stable version of JMeter from the Apache JMeter website. Once downloaded, extract the zip file to your preferred location.
Download Apache JMeter
Firstly, you'll need to download Apache JMeter to your machine. This is open-source software that is designed to load test functional behavior and measure performance. It was originally designed for testing Web Applications but has since expanded to other test functions.
Here is how you can download it:
- Navigate to the official Apache JMeter website using your preferred web browser.
- Look for the download section and select the suitable package based on your operating system, i.e., whether you use Windows, Linux, or MacOS.
- Click on the package to start the download process.
Install Apache JMeter
After downloading Apache JMeter, the next step is to install it on your system.
Here's how you can do it:
- Locate the downloaded JMeter package in your system's download folder or wherever you've chosen to download files.
- Extract the zip file to your preferred location on your computer. This can be any location where you prefer to keep installed software.
- After extracting, navigate to the bin directory within the unzipped JMeter folder.
- Double-click on jmeter.bat (for Windows) or run ./jmeter in the terminal (for Unix-based systems) to start JMeter.
Open the JMeter Application
Once JMeter has been installed, you need to start the application.
Here's how:
- Locate and double-click the JMeter batch file or script you ran in the previous step. This will open up the JMeter GUI.
- You'll notice a tree structure on the left side of the GUI. This tree structure includes a "Test Plan" and "WorkBench".
Create a New Test Plan
Now that you've opened the application, it's time to set up a new test plan:
- Right-click on the "Test Plan" in the tree structure on the left side of the interface.
- Select "Add" -> "Threads (Users)" -> "Thread Group". This Thread Group symbolizes a pool of users executing the test plan.
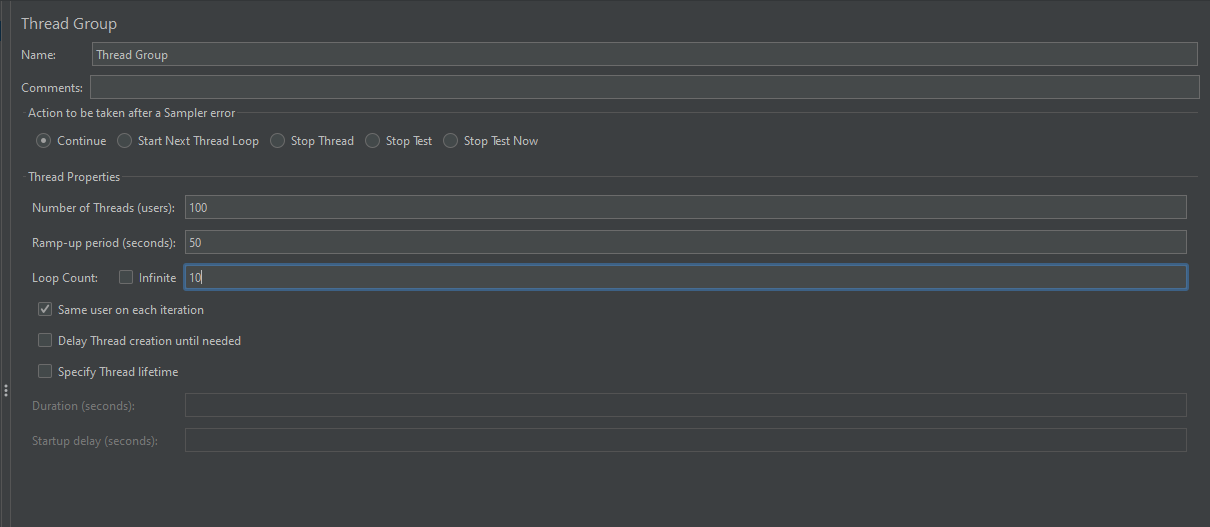
Set User Load Levels
The next step is to configure the user load levels. These settings will dictate the number of users simulated, the rate at which they become active, and how many times they execute the test:
- Click on the newly created Thread Group to bring up its Control Panel on the right side of the screen.
- Set the "Number of Threads (users)" to the number of virtual users you want to simulate. For our example, we will be using 100.
- Set the "Ramp-up period (seconds)" to the duration over which all users become active. In our example, we will use 50 seconds. This means all 100 users will become active over 50 seconds.
- Set the "Loop Count" to the number of times each user will repeat the test. For our example, this is set to 10, meaning each user will execute the test 10 times.
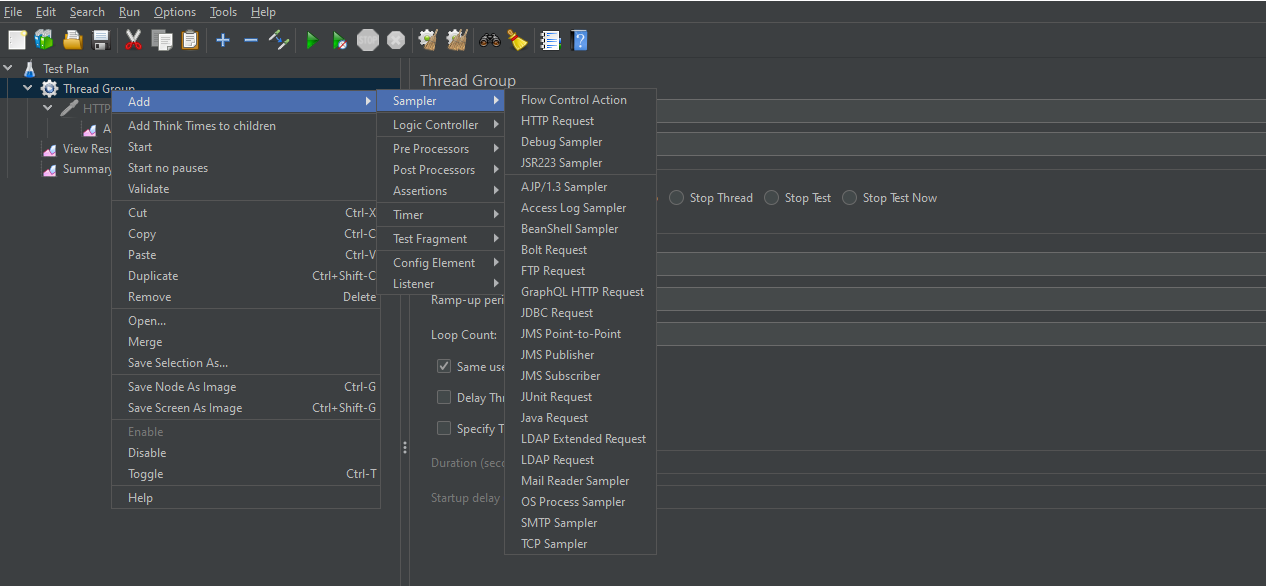
Sampler to Thread Group
The HTTP Request Sampler simulates a user request to the server. Here's how you add it:
- Right-click on the Thread Group.
- Then select "Add" -> "Sampler" -> "HTTP Request".
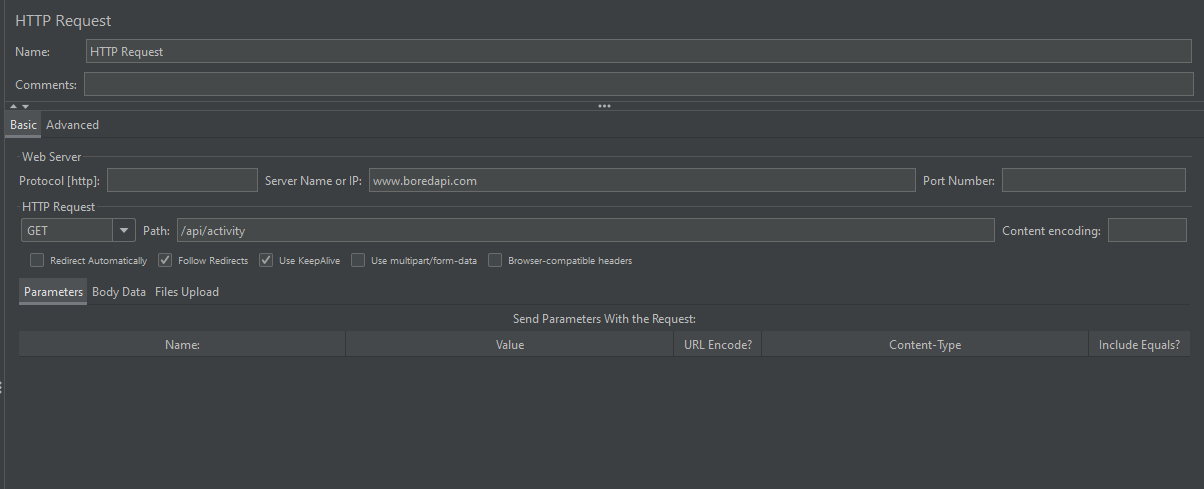
Set Server Name or IP
The HTTP Request Sampler needs to be configured with the server's details. Here's how:
- Click on the newly created HTTP Request Sampler to open its Control Panel on the right side of the screen.
- Set the "Server Name or IP" field to www.boredapi.com, the server name for the Bored API in our example.
Set the Path
The path and method for the HTTP request also need to be specified:
- In the "Path" field, type in /api/activity, the specific endpoint for the Bored API in our example.
- Ensure the "Method" dropdown menu is set to "GET". This is the HTTP method that the request will use.
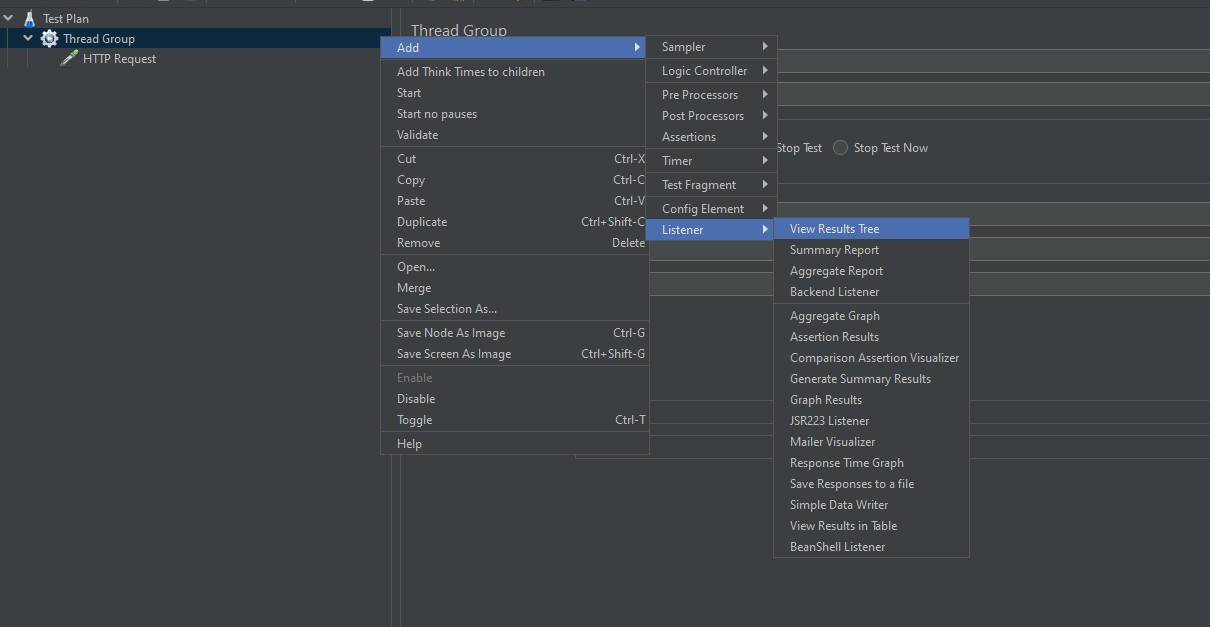
Add Summary Report Listener
The Summary Report Listener allows you to view the results of the load test in a table format:
- Right-click on the Thread Group.
- Select "Add" -> "Listener" -> "Summary Report".
Run the Test
Now that everything is set up, you can execute the load test:
- Click the green "Run" button at the top of the JMeter GUI.
- The Summary Report Listener will start populating with data as the test runs.
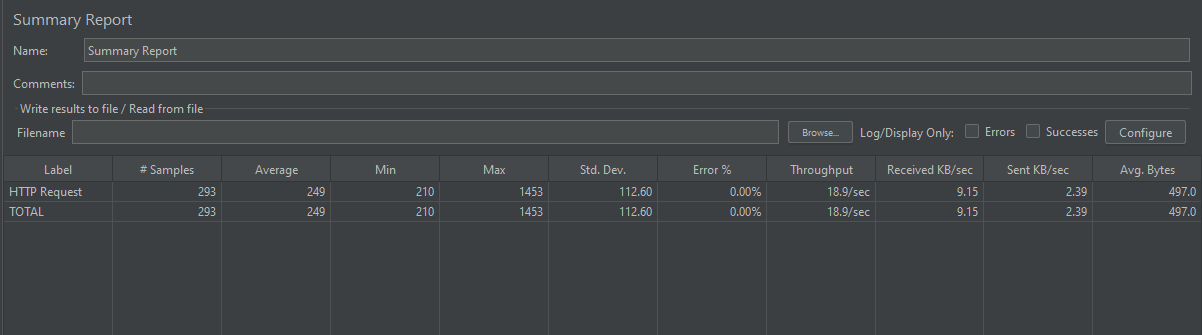
Check Summary Report
The final step is to review the results:
- After the test has been completed, go to the Summary Report.
- This report contains crucial information about the test, including the number of requests, the average response time, and more. Review these statistics to understand the performance of your application under the simulated load.
Apidog: A Superior Alternative to JMeter
Given JMeter's complexity and intricate setup process, one might wonder if a more intuitive and user-friendly tool is available. That's where Apidog comes in. Apidog significantly streamlines the testing process by simplifying configuration, making it an excellent alternative to JMeter.
Advantages of Apidog Over JMeter
Apidog's main strength lies in its simplicity and user-centric design. It eliminates the need for intricate setup processes and provides a straightforward testing environment.
Simplified Interface Creation
Apidog allows users to create an interface for testing in an easy-to-navigate platform. This intuitive approach negates the need for detailed technical knowledge, making it a more user-friendly experience.
Seamless Import into Automation Testing
With Apidog, you can effortlessly import your interface into the automation testing environment. This eliminates manual configuration, a common challenge faced when using JMeter.
Easy Test Execution
Finally, Apidog simplifies the test execution process. Unlike JMeter, where complex configurations are necessary, with Apidog, you only need to click "Run". The testing process initiates smoothly without the need for further user intervention.
Detailed Apidog
Setup
Here is the detailed step-by-step guide on how to test API using Apidog.
Step 1: Access Apidog
- Open your preferred web browser and navigate to the official Apidog website.
- If you have an account, log in using your credentials. Register for an account to use the platform if you're a new user.
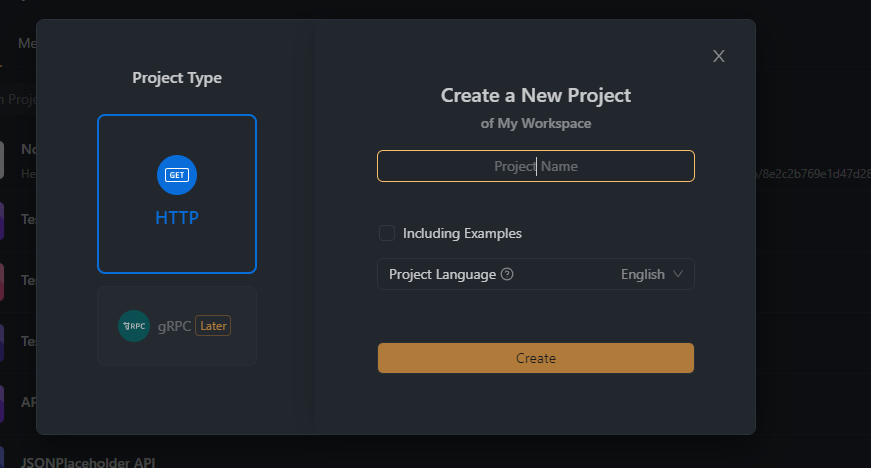
Step 2: Create a New Project
- Click on "New Project" in the user dashboard.
- Provide a suitable name for the project, for example, "API Testing."
Step 3: Set Up API Request
- In the newly created project, click on "Add Request."
- Name the request appropriately, like "GET Activity."
Step 4: Configure API Request Details
- Set the request method to "GET."
- In the URL field, enter "https://www.boredapi.com/api/activity." This is the endpoint we're testing in this example.
- If any headers, query parameters, or body parameters are required, fill them in accordingly. For this specific endpoint, no such parameters are needed.

Step 5: Execute API Request
- Click the "Send" button to execute the request.
- Apidog will now send the API request to www.boredapi.com and fetch the response.
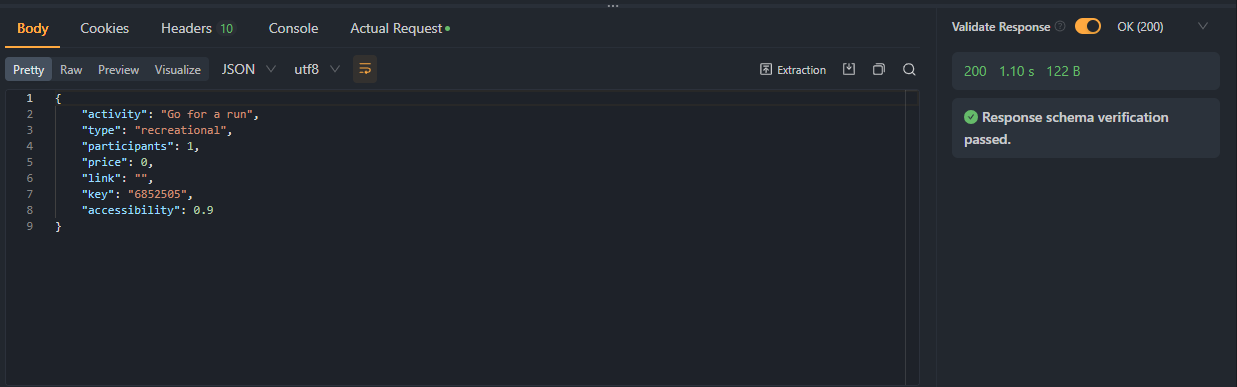
Step 6: Analyze the Response
- After the request is completed, the response will be displayed in the "Response" section of the Apidog interface.
- Review the status code, headers, and response body to ensure the API is functioning as expected.

With Apidog, you can easily repeat these steps to test other endpoints or make requests (POST, DELETE, etc.) to the Bored API. You can also save these requests in your project for future use, making your testing process faster and more efficient.
Conclusion
In conclusion, Apache JMeter is a powerful open-source tool for performance testing web applications, offering versatility and detailed reporting capabilities. However, the complex setup process and technical requirements may deter some users from adopting it.
As an alternative, Apidog emerges as a superior choice, offering a simplified interface creation, seamless import into automation testing, and easy test execution. With Apidog, load testing becomes more accessible and user-friendly, providing valuable insights into application performance without the hassle of intricate configurations. By harnessing the power of Apidog, users can streamline their testing process and focus on obtaining accurate results efficiently.


