
AI 기반 애플리케이션 시대에, 고급 언어 모델을 소프트웨어에 통합하면 지능형 챗봇에서 데이터 분석 도구에 이르기까지 전례 없는 기능을 발휘할 수 있습니다. DeepSeek의 API는 최첨단 AI 기능을 제공하지만, 실제 도전 과제는 디버깅이나 보일러플레이트 코드에 얽매이지 않고 이를 앱에 원활하게 통합하는 것입니다.
이 가이드는 DeepSeek API를 애플리케이션에 통합하는 전체 과정을 안내하며, 직관적인 API 플랫폼인 Apidog를 활용하여 몇 분 안에 테스트, 디버깅 및 완전한 코드 스니펫을 생성할 수 있습니다. Python 백엔드를 구축하든 JavaScript 프론트엔드를 구축하든 이 기사를 다 읽고 나면 최소의 노력으로 완전한 API 통합을 갖추게 될 것입니다.
사전 요구 사항
- DeepSeek 계정 (여기에서 가입하세요).
- REST API 및 프로그래밍에 대한 기본 지식 (여기에서는 Python/JavaScript 사용).
- API를 테스트할 도구인 Apidog.
1단계: DeepSeek API 키 얻기
모든 API 요청은 인증이 필요합니다. 키를 얻는 방법은 다음과 같습니다:
- DeepSeek 계정에 로그인하십시오.
- 계정 설정에서
API Keys로 이동합니다. Create new API key를 클릭하고 복사합니다.
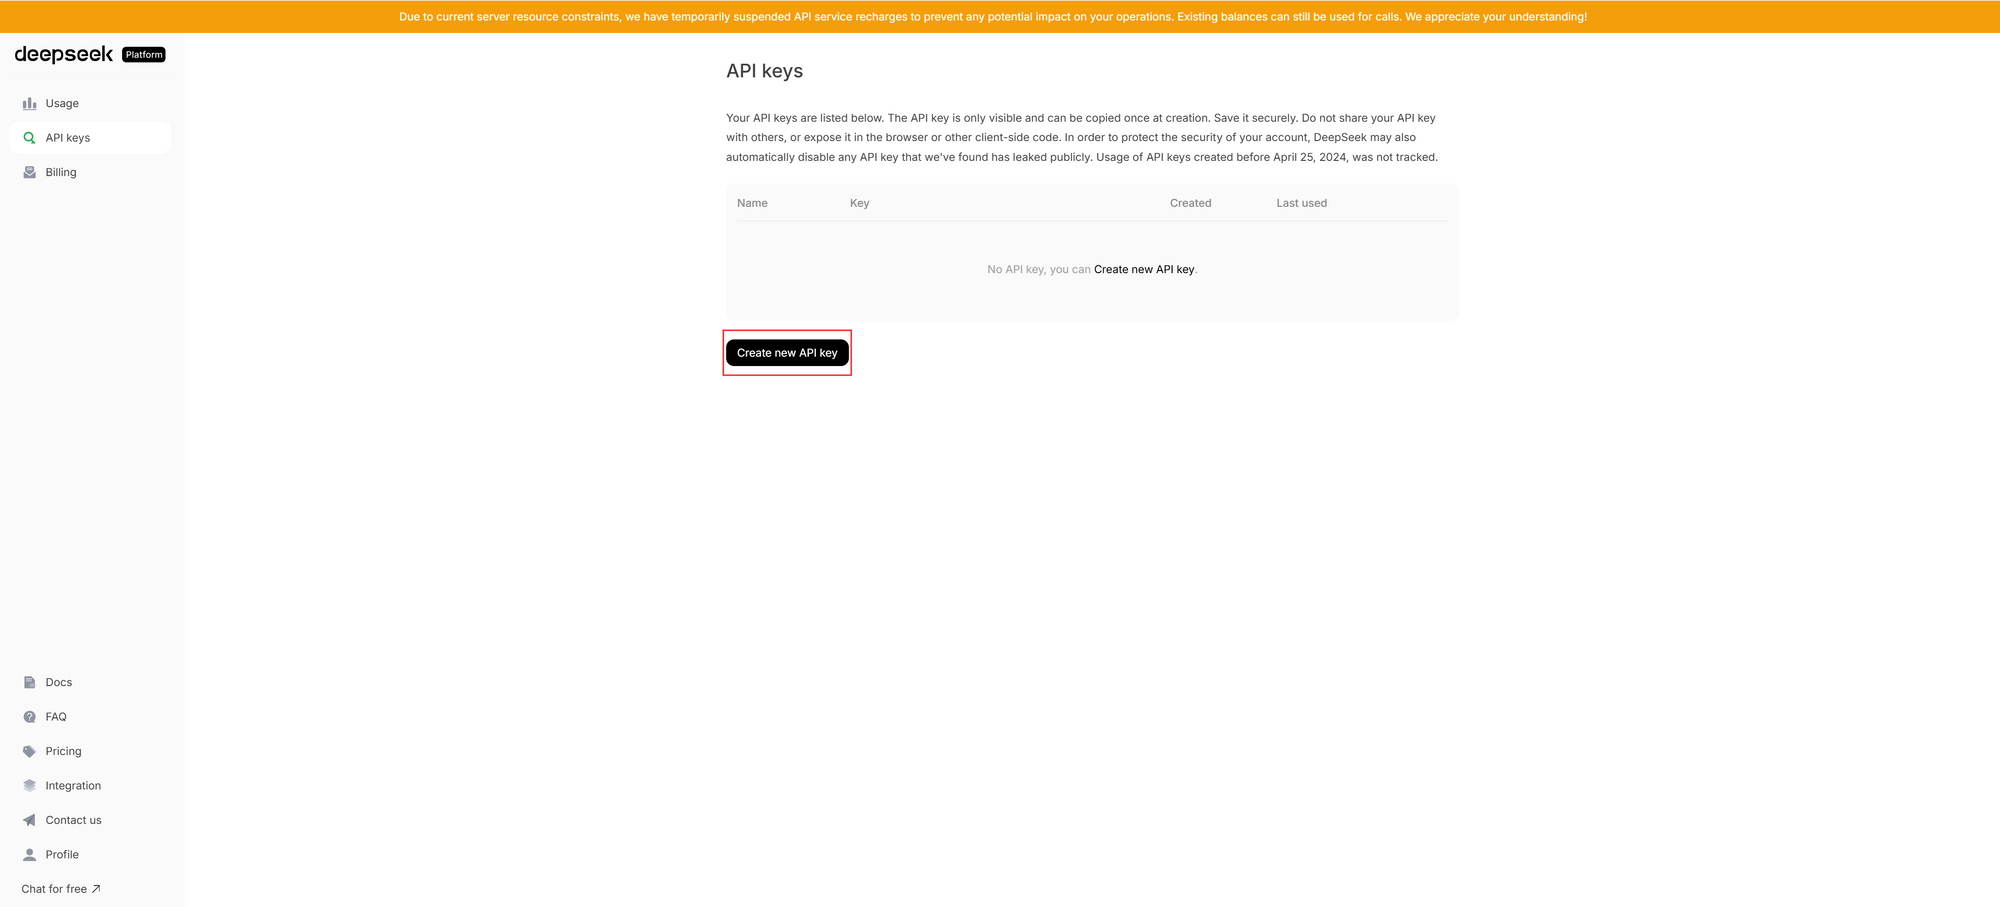
⚠️ 중요: 이 키는 비밀번호처럼 취급하세요. 클라이언트 측 코드나 공개 저장소에 노출하지 마십시오.
2단계: DeepSeek API 테스트
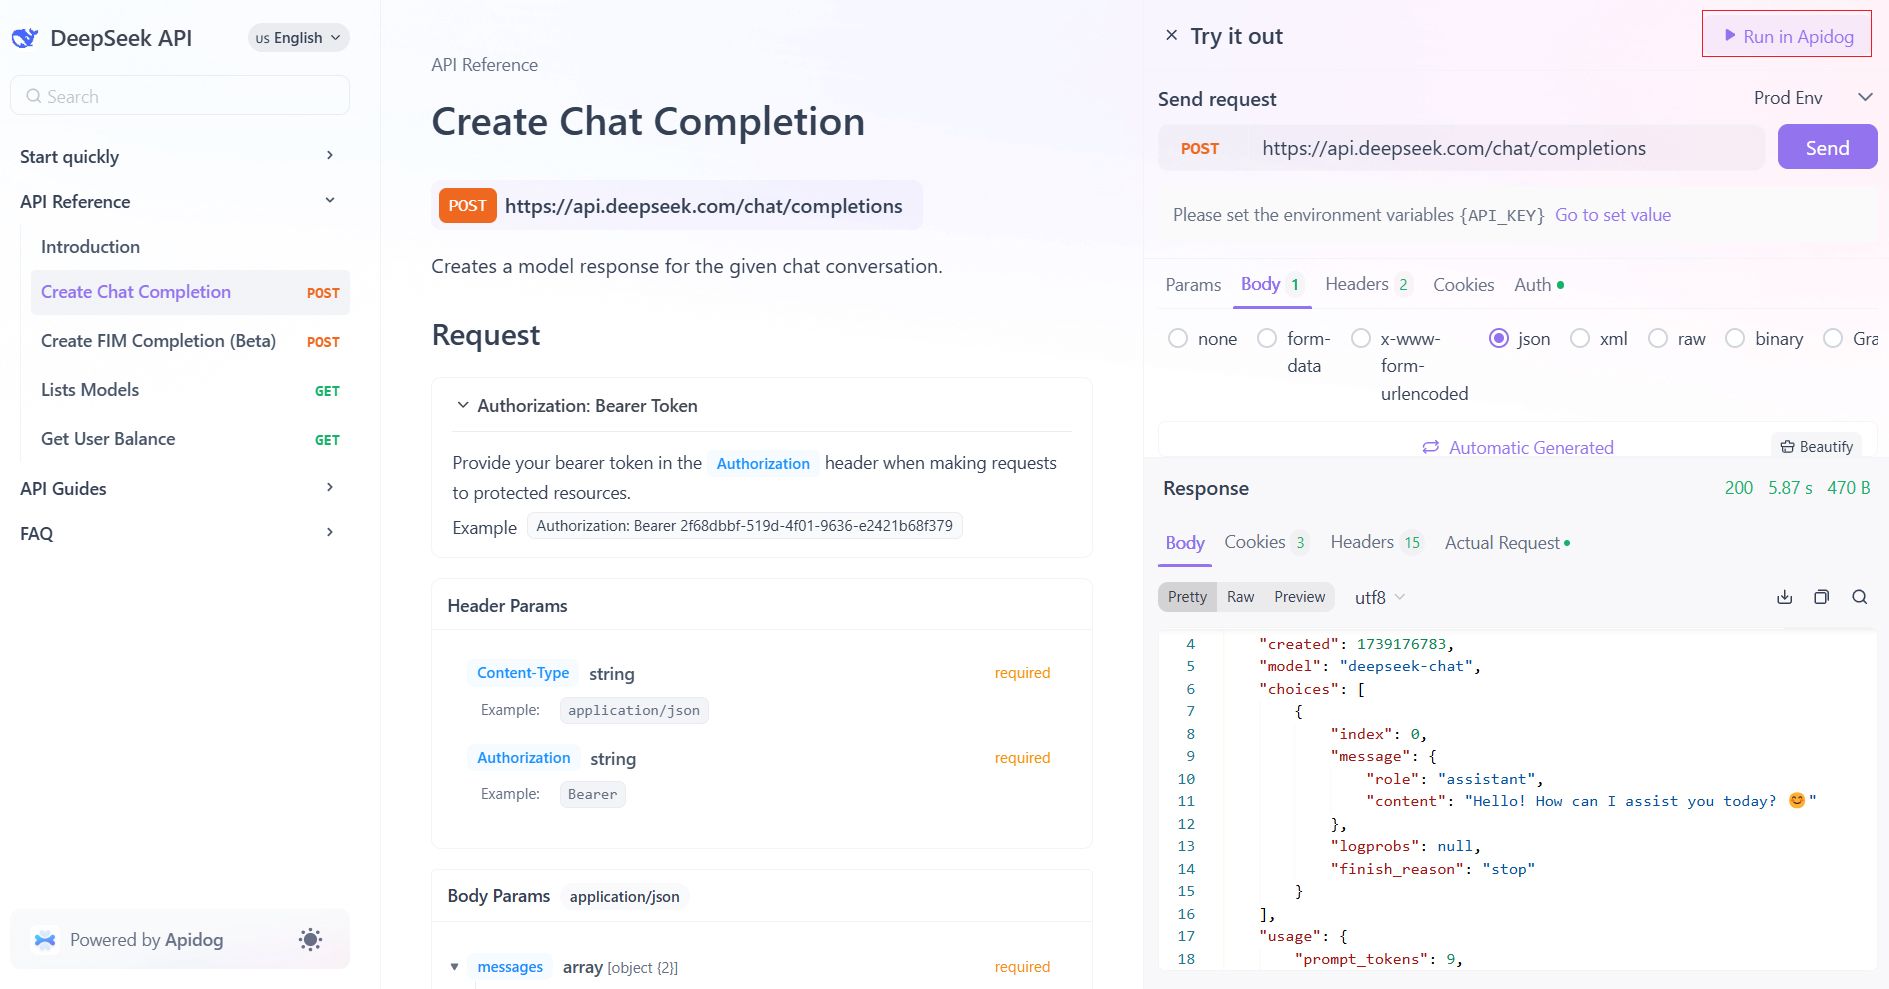
DeepSeek의 API 문서는 코드 한 줄도 작성하지 않고 문서에서 직접 엔드포인트를 테스트할 수 있는 인터랙티브한 플레이그라운드를 제공합니다. 방법은 다음과 같습니다:
1. 문서 열기: Create Chat Completion 엔드포인트로 이동합니다.

2. 인증하기:
Try it out또는Run in Apidog를 클릭합니다.- 팝업 요청 패널에서 Headers 또는 Auth 섹션으로 이동하여 API 키를 추가합니다:
Authorization: Bearer YOUR_API_KEY 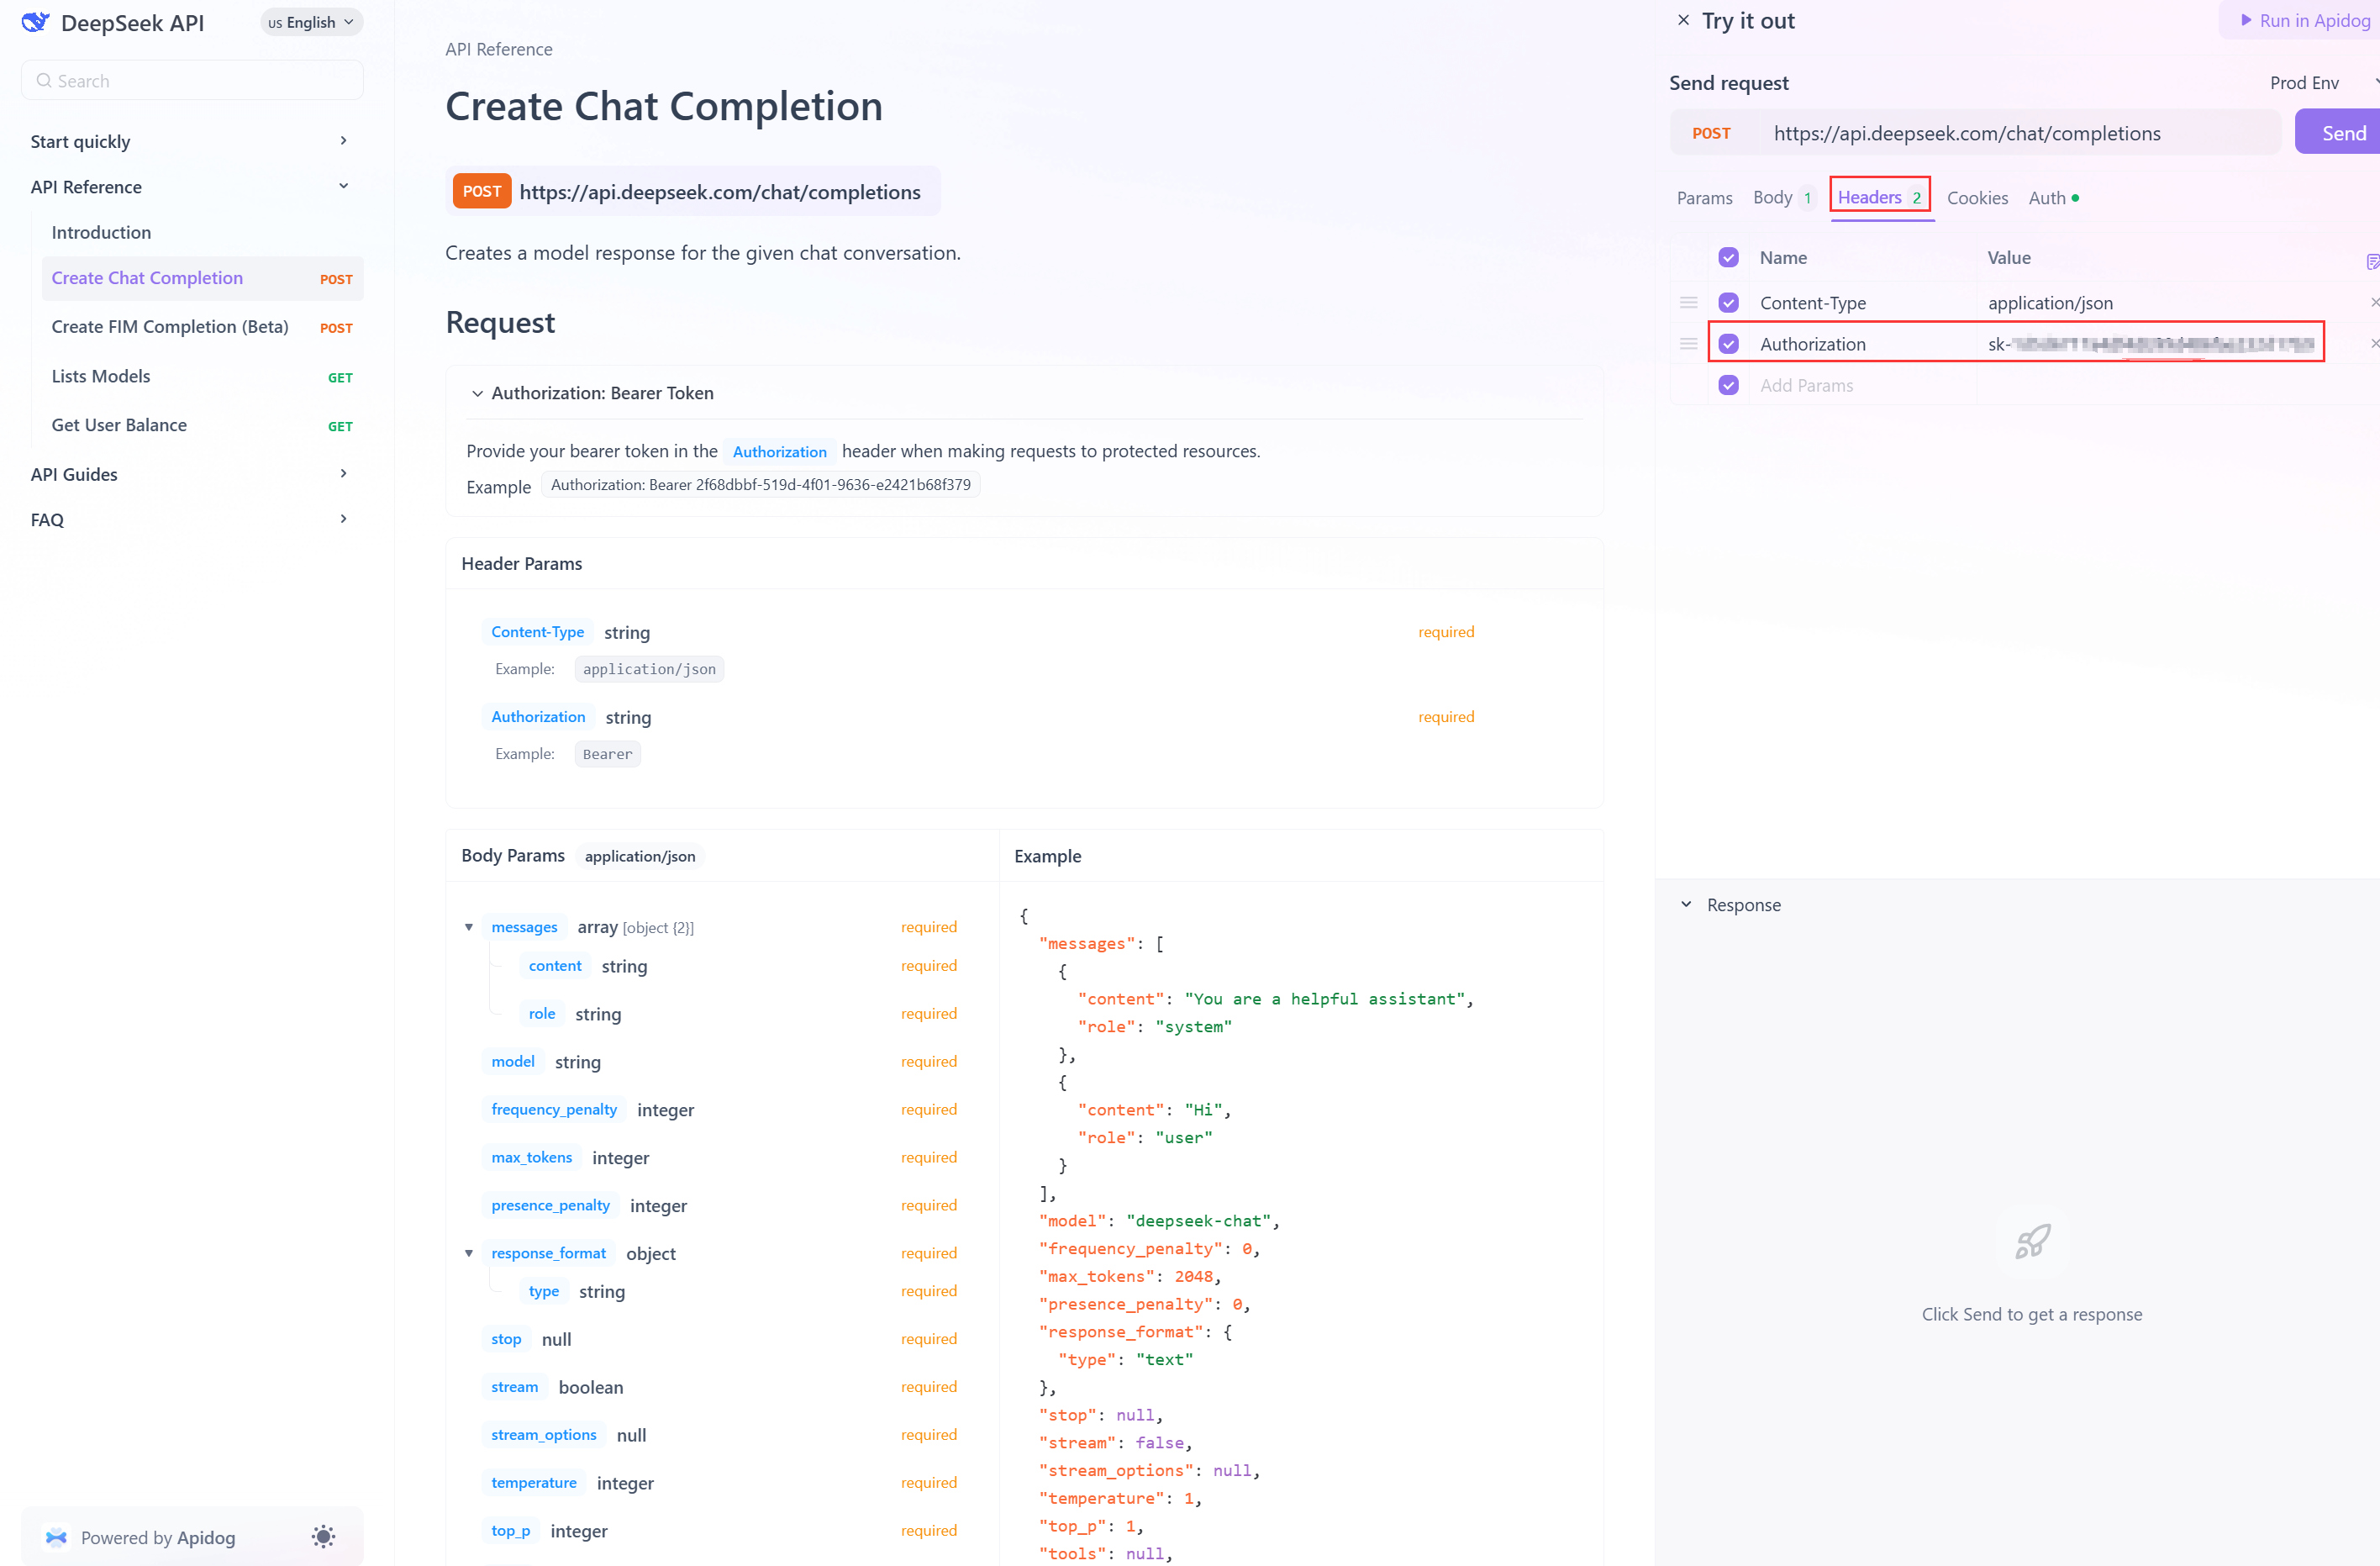
3. 요청 작성하기:
요청 본문에서 모델 (예: deepseek-chat)을 지정하고 메시지를 추가합니다:
{
  "model": "deepseek-chat",
  "messages": [
    {"role": "user", "content": "양자 컴퓨팅을 3문장으로 설명하십시오."}
  ]
}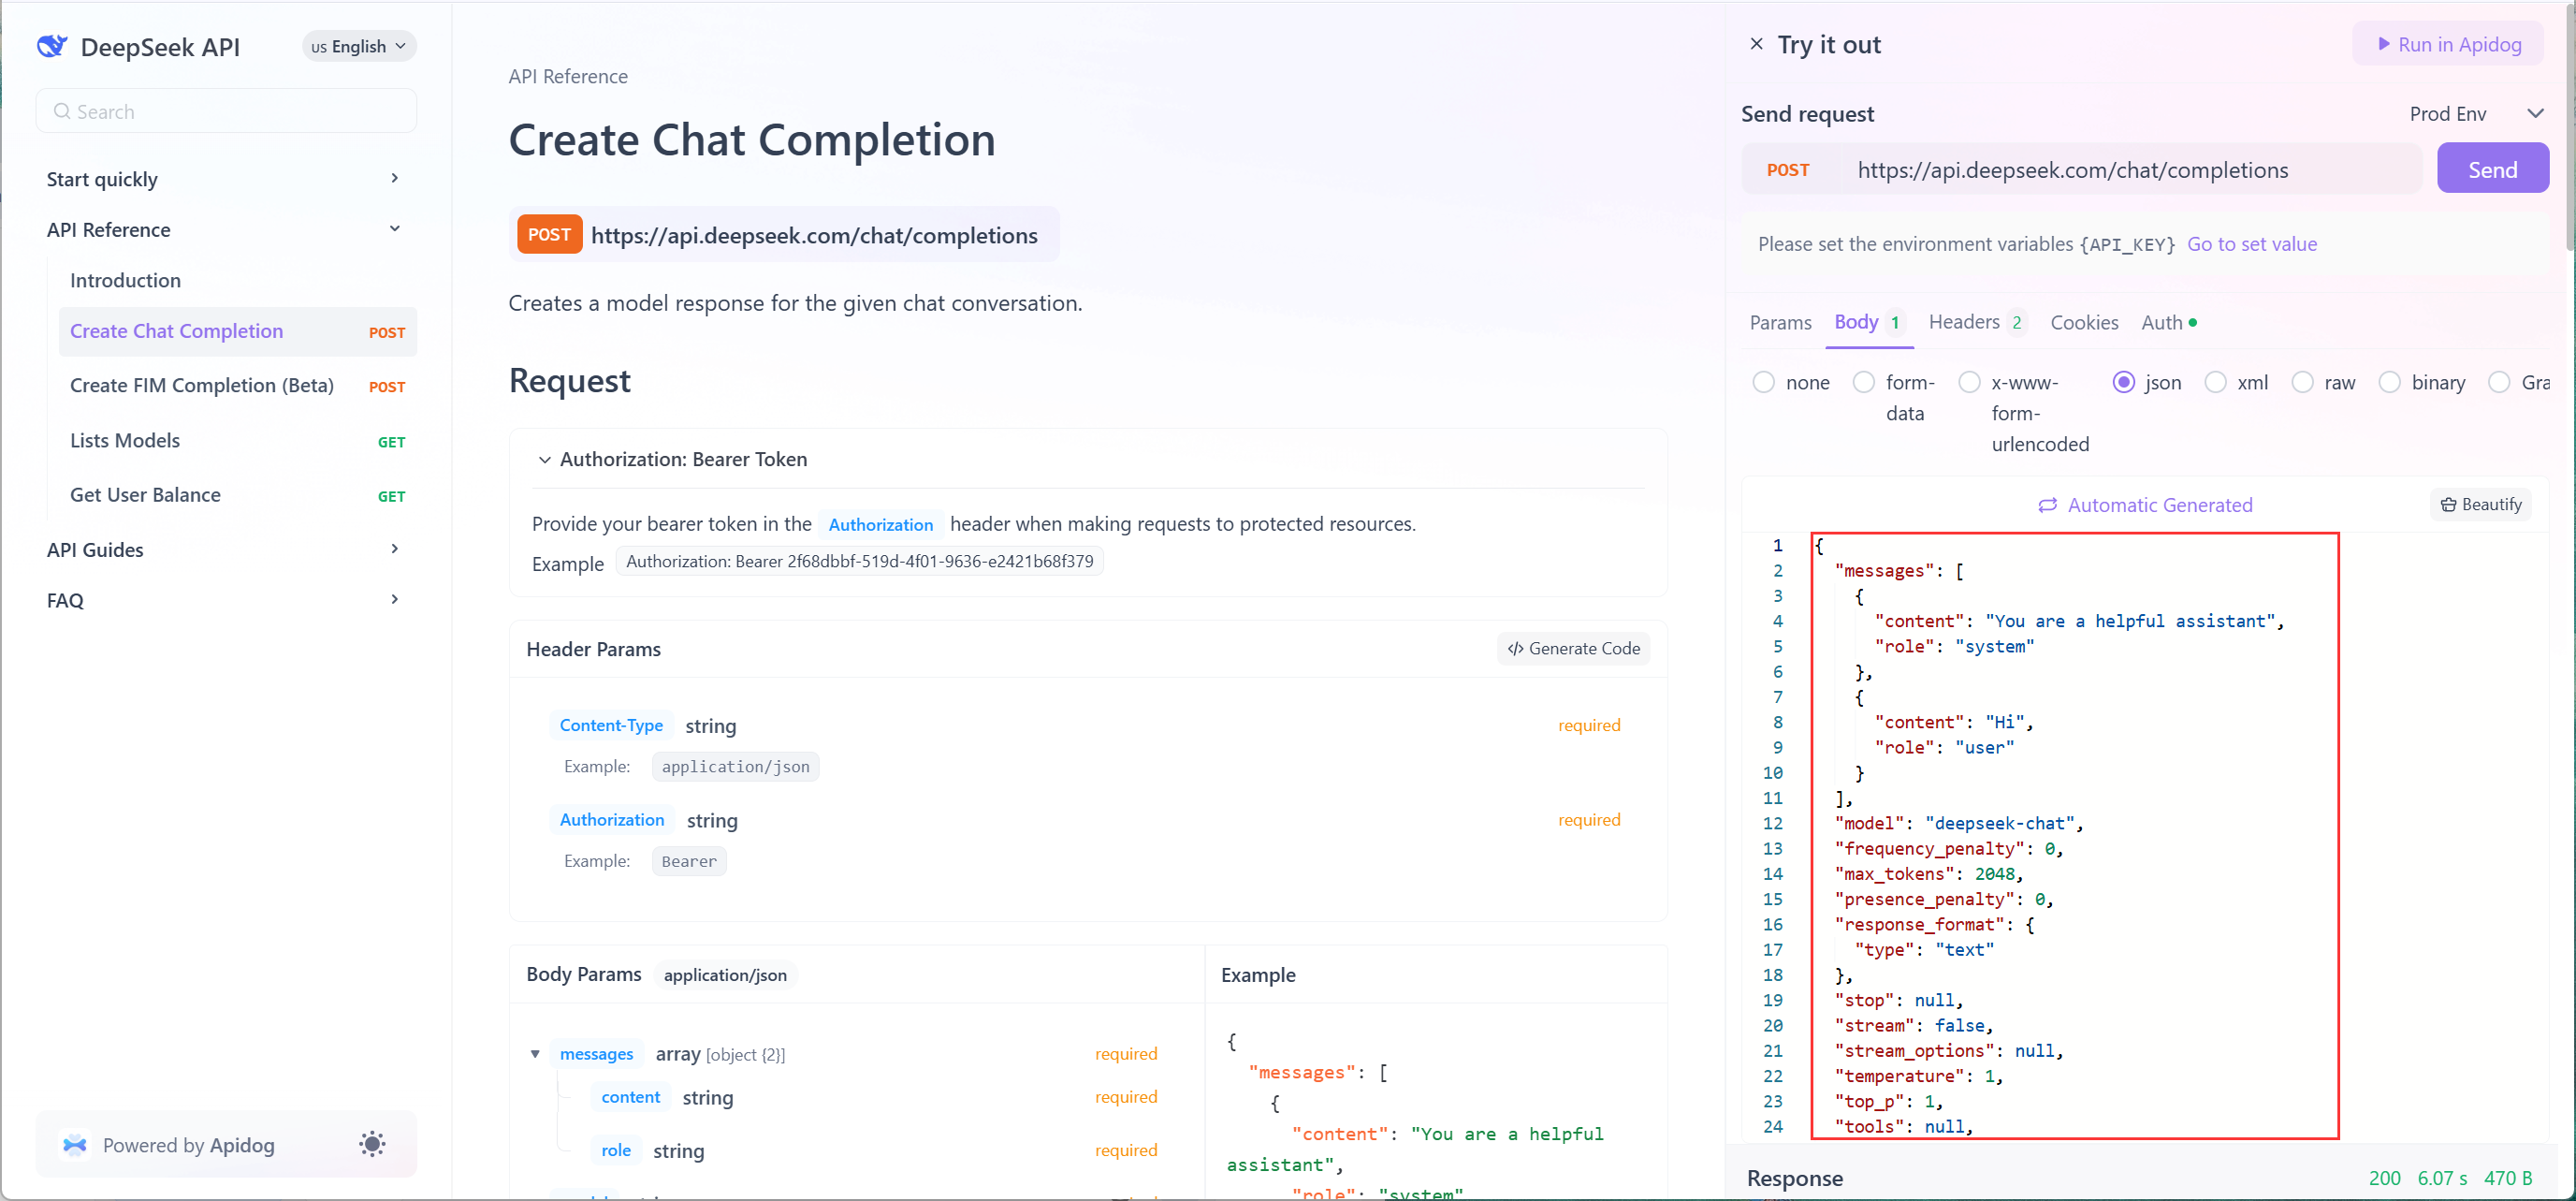
4. 요청 전송하기: Send를 클릭하고 실시간으로 응답을 확인합니다.
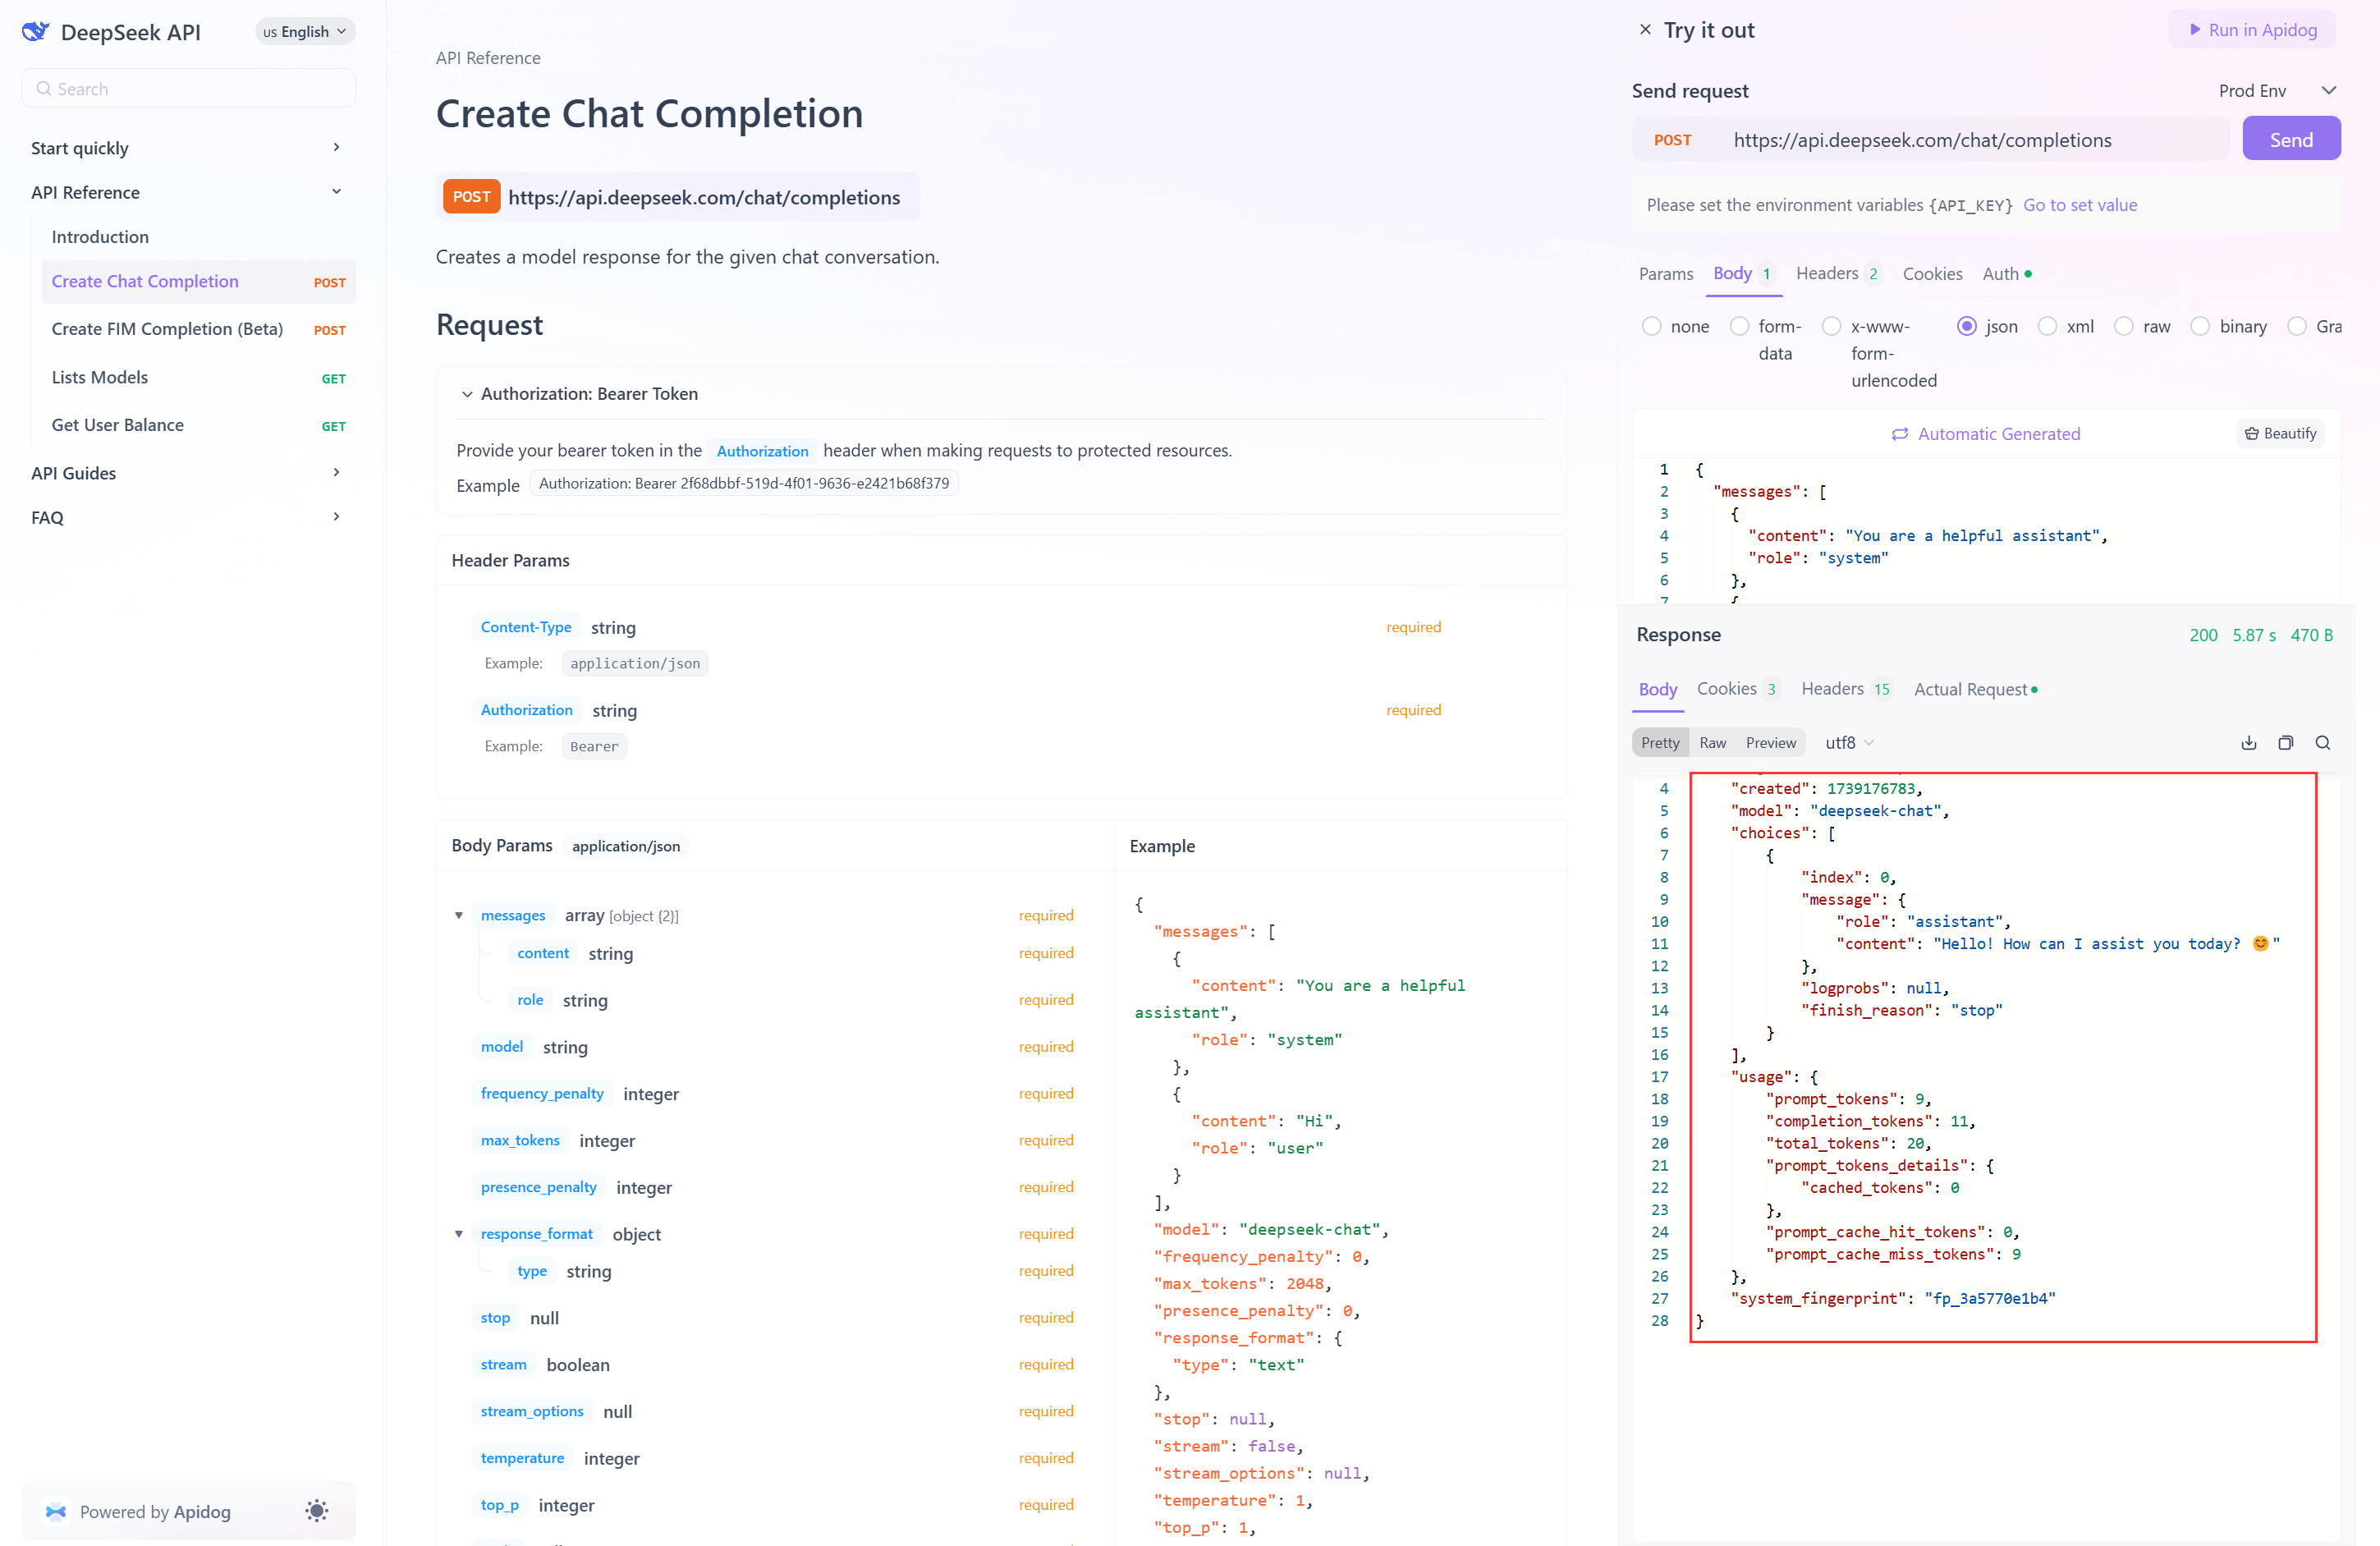
왜 이것이 중요한가: API를 수동으로 테스트하면 통합 코드를 작성하기 전에 페이로드 구조와 오류 처리의 유효성을 확인할 수 있습니다.
3단계: 스택을 위한 코드 스니펫 생성하기
Apidog를 사용하면 API 문서를 기반으로 다양한 언어 및 프레임워크를 위한 즉시 사용 가능한 비즈니스 코드를 생성할 수 있습니다. 방법은 다음과 같습니다:
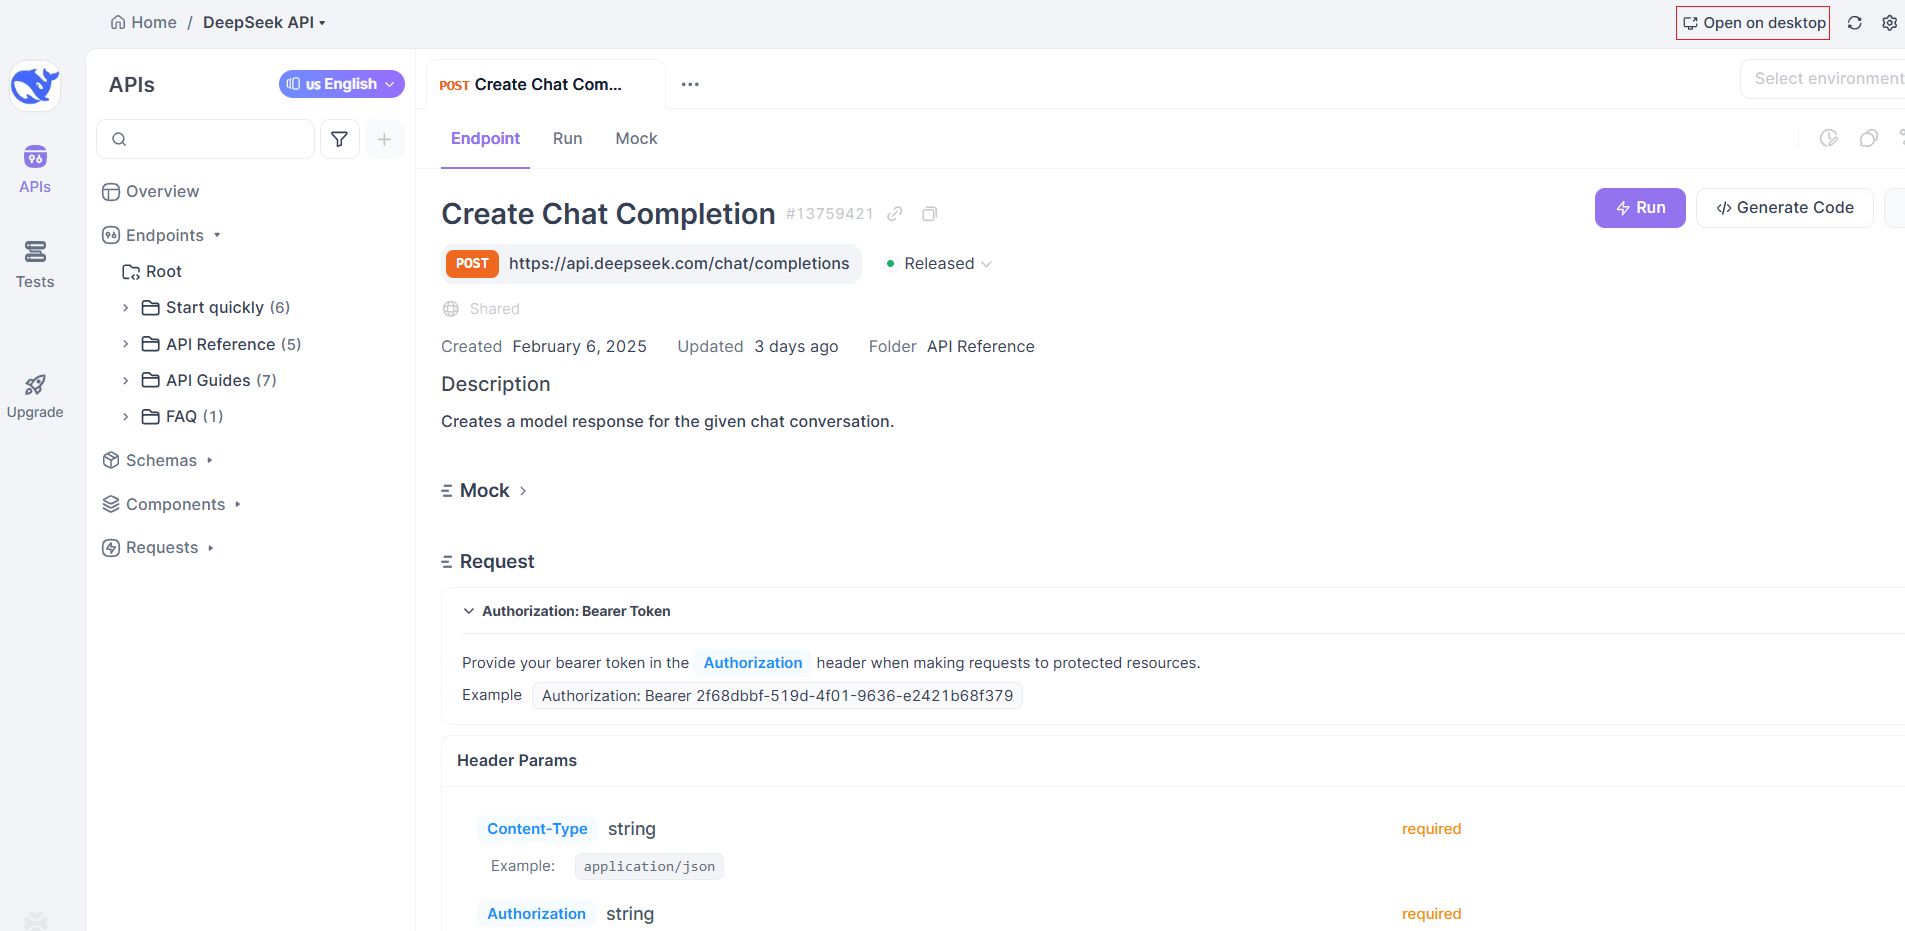
1. Apidog 앱에서 DeepSeek 프로젝트 열기:
- Apidog 웹 앱에서 DeepSeek API 프로젝트를 열려면 문서 오른쪽 상단의 "Run in Apidog"를 클릭하십시오.
- 프로 팁: Apidog 데스크탑 앱에서 프로젝트를 열려면, 그 후 오른쪽 상단의 "Open on desktop"를 클릭하면 됩니다.
2. 언어 선택하기:
- DeepSeek API 문서 페이지에서
</> Generate Code버튼을 클릭합니다.
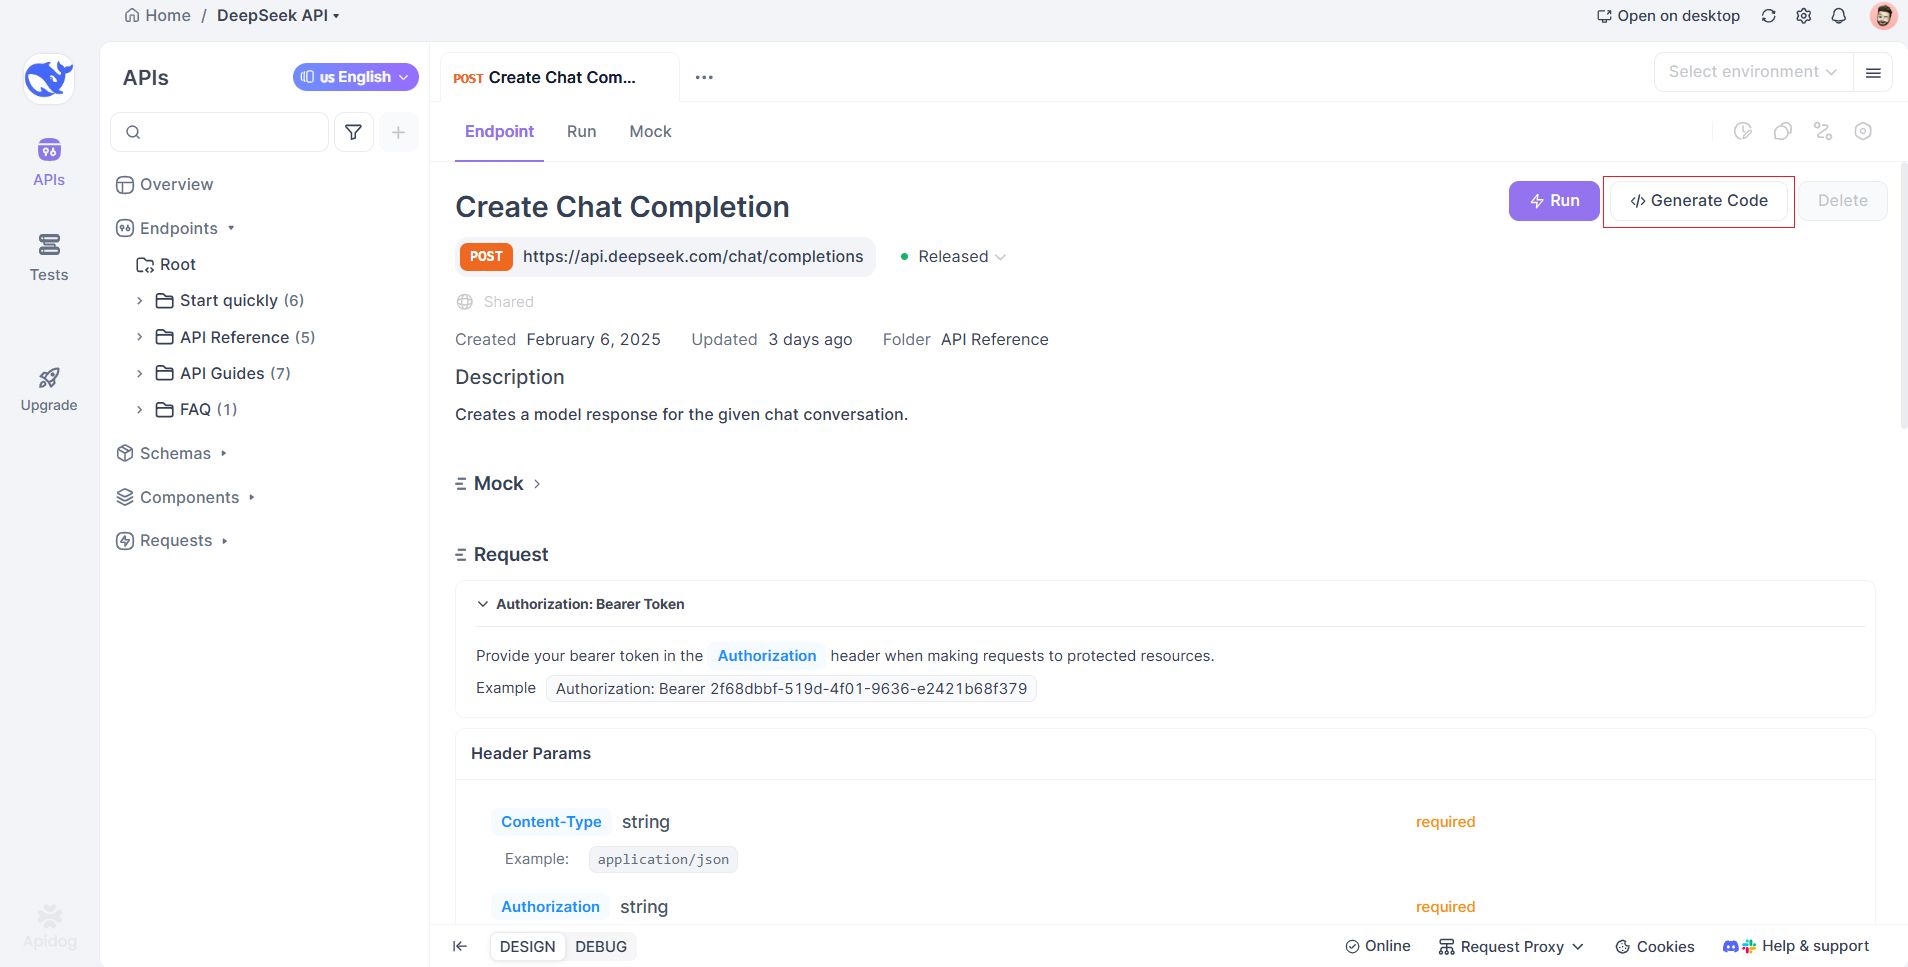
- 언어를 선택합니다 (예: Python, JavaScript, Go 등).
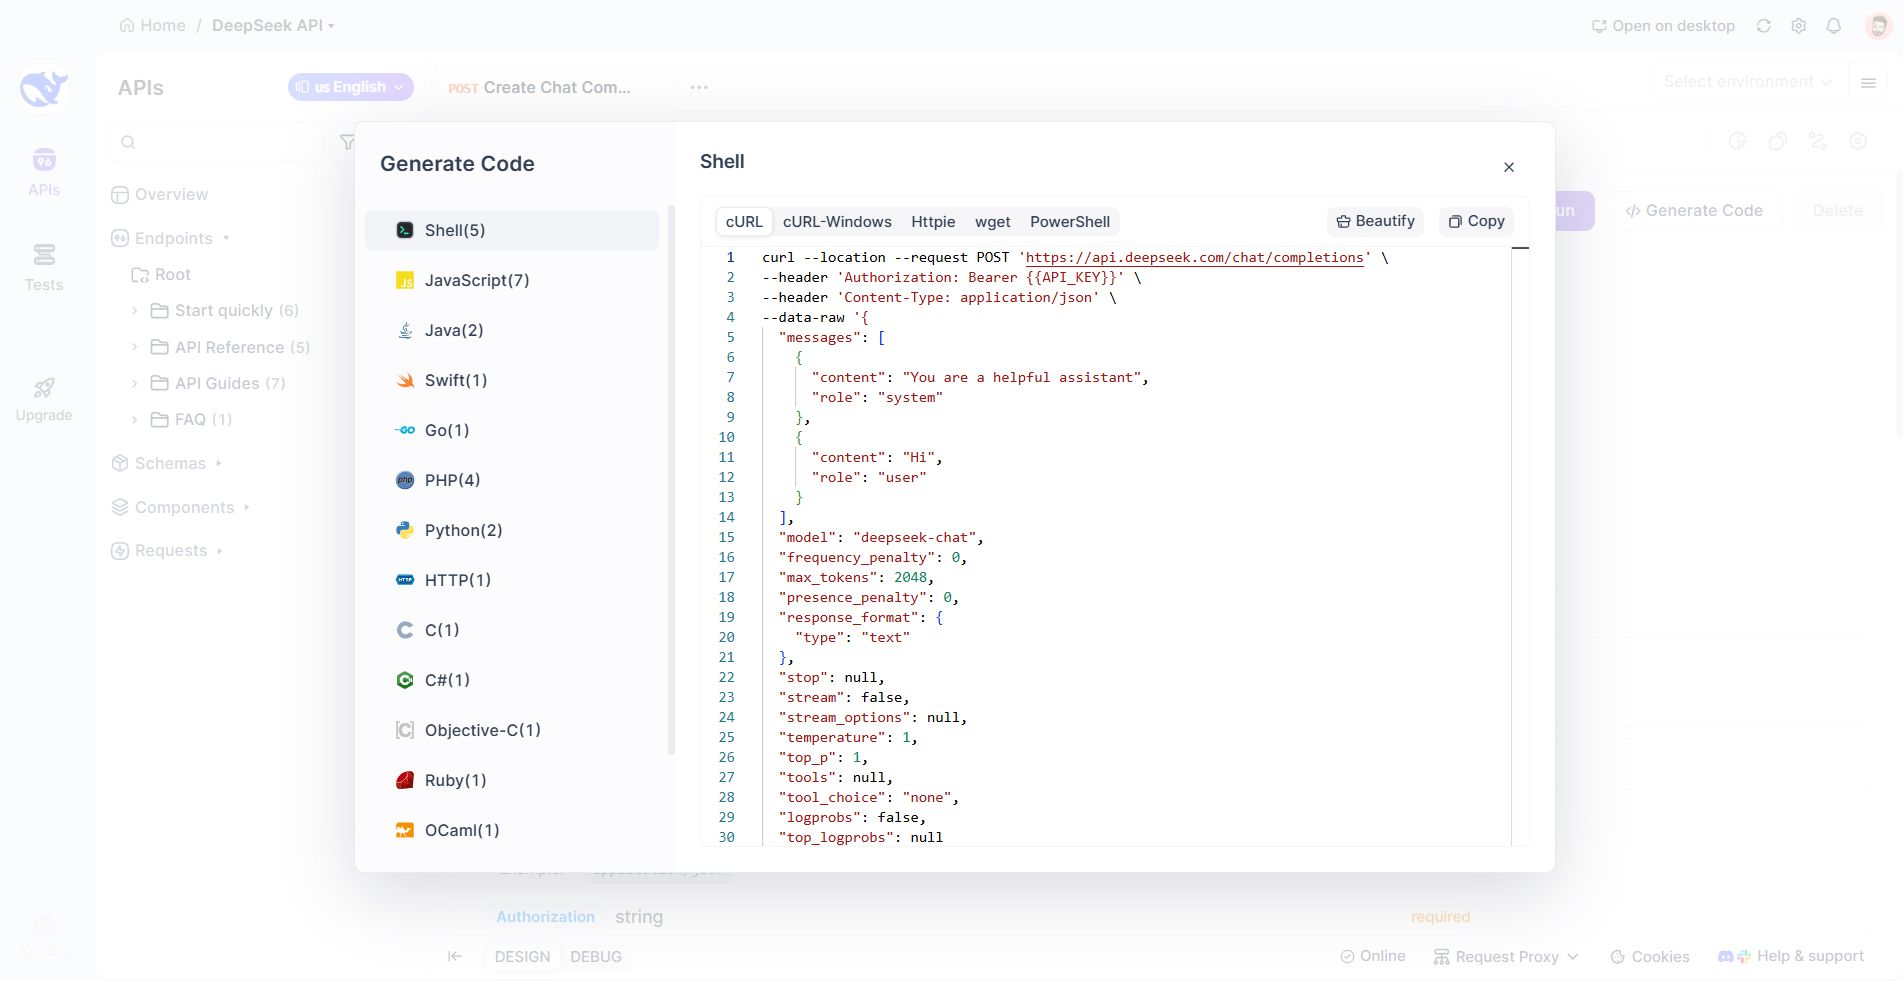
3. 코드 복사-붙여넣기:
- Python의 경우 (using
requests):
import requests
import json

url = "https://api.deepseek.com/chat/completions"

payload = json.dumps({
   "messages": [
      {
         "content": "당신은 유용한 도우미입니다",
         "role": "system"
      },
      {
         "content": "안녕하세요",
         "role": "user"
      }
   ],
   "model": "deepseek-chat",
   "frequency_penalty": 0,
   "max_tokens": 2048,
   "presence_penalty": 0,
   "response_format": {
      "type": "text"
   },
   "stop": None,
   "stream": False,
   "stream_options": None,
   "temperature": 1,
   "top_p": 1,
   "tools": None,
   "tool_choice": "none",
   "logprobs": False,
   "top_logprobs": None
})
headers = {
   'Authorization': 'Bearer {{API_KEY}}',
   'Content-Type': 'application/json'
}

response = requests.request("POST", url, headers=headers, data=payload)

print(response.text)- JavaScript의 경우 (using
fetch):
var myHeaders = new Headers();
myHeaders.append("Authorization", "Bearer {{API_KEY}}");
myHeaders.append("Content-Type", "application/json");

var raw = JSON.stringify({
   "messages": [
      {
         "content": "당신은 유용한 도우미입니다",
         "role": "system"
      },
      {
         "content": "안녕하세요",
         "role": "user"
      }
   ],
   "model": "deepseek-chat",
   "frequency_penalty": 0,
   "max_tokens": 2048,
   "presence_penalty": 0,
   "response_format": {
      "type": "text"
   },
   "stop": null,
   "stream": false,
   "stream_options": null,
   "temperature": 1,
   "top_p": 1,
   "tools": null,
   "tool_choice": "none",
   "logprobs": false,
   "top_logprobs": null
});

var requestOptions = {
   method: 'POST',
   headers: myHeaders,
   body: raw,
   redirect: 'follow'
};

fetch("https://api.deepseek.com/chat/completions", requestOptions)
   .then(response => response.text())
   .then(result => console.log(result))
   .catch(error => console.log('error', error));
4. 코드 수정하기: YOUR_API_KEY를 교체하고 메시지 내용을 수정합니다.
4단계: 애플리케이션에 통합하기
DeepSeek의 API를 사용하여 사용자 질문에 답하는 간단한 Python CLI 앱을 만들어 보겠습니다.
프로젝트 설정
1. 디렉토리를 만들고 의존성을 설치합니다:
mkdir deepseek-cli && cd deepseek-cli
pip install requests python-dotenv
2. .env를 사용하여 API 키를 안전하게 저장합니다:
echo "DEEPSEEK_API_KEY=your_api_key_here" > .env 코드 구현
import argparse
import asyncio
import json
import os
import sys
from typing import AsyncGenerator, Generator

import httpx
import requests


async def async_deepseek(
    api_key: str,
    model: str,
    messages: list,
    temperature: float
) -> AsyncGenerator[str, None]:
    """
    DeepSeek 응답을 스트리밍하기 위한 비동기 생성기
    """
    headers = {
        "Content-Type": "application/json",
        "Authorization": f"Bearer {api_key}",
    }
    data = {
        "model": model,
        "messages": messages,
        "temperature": temperature,
        "stream": True,
    }

    async with httpx.AsyncClient() as client:
        async with client.stream(
            "POST",
            "https://api.deepseek.com/v1/chat/completions",
            headers=headers,
            json=data,
        ) as response:
            response.raise_for_status()
            async for line in response.aiter_lines():
                if line.startswith("data: "):
                    try:
                        json_data = json.loads(line[6:])
                        if chunk := json_data["choices"][0]["delta"].get("content", ""):
                            yield chunk
                    except json.JSONDecodeError:
                        pass


def sync_deepseek(
    api_key: str,
    model: str,
    messages: list,
    temperature: float
) -> Generator[str, None, None]:
    """
    DeepSeek 응답을 스트리밍하기 위한 동기 생성기
    """
    headers = {
        "Content-Type": "application/json",
        "Authorization": f"Bearer {api_key}",
    }
    data = {
        "model": model,
        "messages": messages,
        "temperature": temperature,
        "stream": True,
    }

    with requests.post(
        "https://api.deepseek.com/v1/chat/completions",
        headers=headers,
        json=data,
        stream=True,
    ) as response:
        response.raise_for_status()
        for line in response.iter_lines():
            if line:
                decoded_line = line.decode("utf-8")
                if decoded_line.startswith("data: "):
                    try:
                        json_data = json.loads(decoded_line[6:])
                        if chunk := json_data["choices"][0]["delta"].get("content", ""):
                            yield chunk
                    except json.JSONDecodeError:
                        pass


def main():
    parser = argparse.ArgumentParser(
        description="DeepSeek CLI 클라이언트 - DeepSeek 모델로 채팅하기"
    )
    parser.add_argument(
        "prompt",
        type=str,
        help="DeepSeek에 보낼 메시지"
    )
    parser.add_argument(
        "--model",
        type=str,
        default="deepseek-chat",
        help="사용할 모델 (기본값: deepseek-chat)"
    )
    parser.add_argument(
        "--temperature",
        type=float,
        default=0.7,
        help="온도 매개변수 (기본값: 0.7)"
    )
    parser.add_argument(
        "--async-mode",
        action="store_true",
        help="비동기 모드 사용 (Python 3.7 이상 필요)"
    )
    args = parser.parse_args()

    api_key = os.getenv("DEEPSEEK_API_KEY")
    if not api_key:
        print("오류: DEEPSEEK_API_KEY 환경 변수에 API 키를 설정하세요")
        sys.exit(1)

    messages = [{"role": "user", "content": args.prompt}]

    try:
        if args.async_mode:
            async def run_async():
                try:
                    async for chunk in async_deepseek(
                        api_key=api_key,
                        model=args.model,
                        messages=messages,
                        temperature=args.temperature
                    ):
                        print(chunk, end="", flush=True)
                    print()
                except httpx.HTTPStatusError as e:
                    print(f"\nHTTP 오류 발생: {e.response.status_code} {e.response.reason_phrase}")
                except Exception as e:
                    print(f"\n오류 발생: {str(e)}")

            asyncio.run(run_async())
        else:
            try:
                for chunk in sync_deepseek(
                    api_key=api_key,
                    model=args.model,
                    messages=messages,
                    temperature=args.temperature
                ):
                    print(chunk, end="", flush=True)
                print()
            except requests.exceptions.HTTPError as e:
                print(f"\nHTTP 오류 발생: {e.response.status_code} {e.response.reason_phrase}")
            except Exception as e:
                print(f"\n오류 발생: {str(e)}")

    except KeyboardInterrupt:
        print("\n\n사용자에 의해 작업이 중단됨")
        sys.exit(0)


if __name__ == "__main__":
    main()
앱 실행하기
질문을 입력하세요 (예: “프랑스의 수도는 어디인가요?”) 그리고 응답을 확인하십시오!
5단계: 오류 및 엣지 케이스 처리하기
API는 비율 제한, 잘못된 키 또는 네트워크 문제로 인해 실패할 수 있습니다. 강력한 오류 처리를 구현하세요:
1. HTTP 상태 코드 확인하기:
401 Unauthorized: 잘못된 API 키.429 Too Many Requests: 비율 제한 초과.500 Internal Server Error: 서버 측 문제.
2. 재시도 메커니즘:
from time import sleep

def get_deepseek_response(prompt, retries=3):
    # ... 기존 코드 ...
    except requests.exceptions.RequestException as e:
        if retries > 0:
            sleep(2)
            return get_deepseek_response(prompt, retries - 1)
        else:
            return f"오류: {str(e)}"
3. 입력 유효성 검사하기:
프롬프트가 토큰 제한 내에 있고 제대로 형식화되어 있는지 확인하십시오.
6단계: 프로덕션 최적화하기
- 응답 캐시하기: Redis 또는 Memcached를 사용하여 빈번한 쿼리를 저장합니다.
- 사용 모니터링하기: 쿼트를 초과하지 않도록 API 호출을 추적합니다.
- 비동기 처리: 높은 처리량의 앱을 위해
aiohttp(Python) 또는axios(JavaScript)와 같은 비동기 라이브러리를 사용합니다.
결론
DeepSeek의 API를 앱에 통합하는 것은 시간 낭비가 될 필요가 없습니다. 엔드포인트를 테스트하고, 코드를 생성하며, 즉석에서 디버깅하기 위해 인터랙티브 문서를 활용함으로써 수 시간 내에 AI 기반 기능을 배포할 수 있습니다.
위의 예는 빙산의 일각에 불과합니다. DeepSeek 모델을 사용하면 자동화된 콘텐츠 생성기부터 AI 튜터에 이르기까지 무엇이든 구축할 수 있습니다. 이제 청사진을 가지고 있으니, 앱을 AI 강국으로 변모시키세요!