
AI駆動アプリケーションの時代において、先進的な言語モデルをソフトウェアに統合することで、インテリジェントなチャットボットからデータ分析ツールまで、前例のない機能を解放できます。 DeepSeekのAPIは最先端のAI機能を提供しますが、実際の課題は、デバッグやボイラープレートコードに煩わされることなく、それらをアプリにシームレスに統合することです。
このガイドでは、アプリケーションにDeepSeekのAPIを統合するためのプロセス全体を説明します。直感的なAPIプラットフォームであるApidogを活用して、数分でテスト、デバッグ、使用可能なコードスニペットを生成します。PythonバックエンドまたはJavaScriptフロントエンドを構築しているかに関わらず、この記事の終わりには、最小限の労力で完全に機能するAPI統合を持つことができます。
前提条件
- DeepSeekアカウント (ここでサインアップ).
- REST APIとプログラミング(ここではPython/JavaScriptが使用されます)の基本知識。
- APIをテストするためのApidogのようなツール。
ステップ1: DeepSeek APIキーを取得する
すべてのAPIリクエストには認証が必要です。キーを取得する方法は次のとおりです:
- DeepSeekアカウントにログインします。
- アカウント設定の
API Keyに移動します。 Create new API keyをクリックしてコピーします。
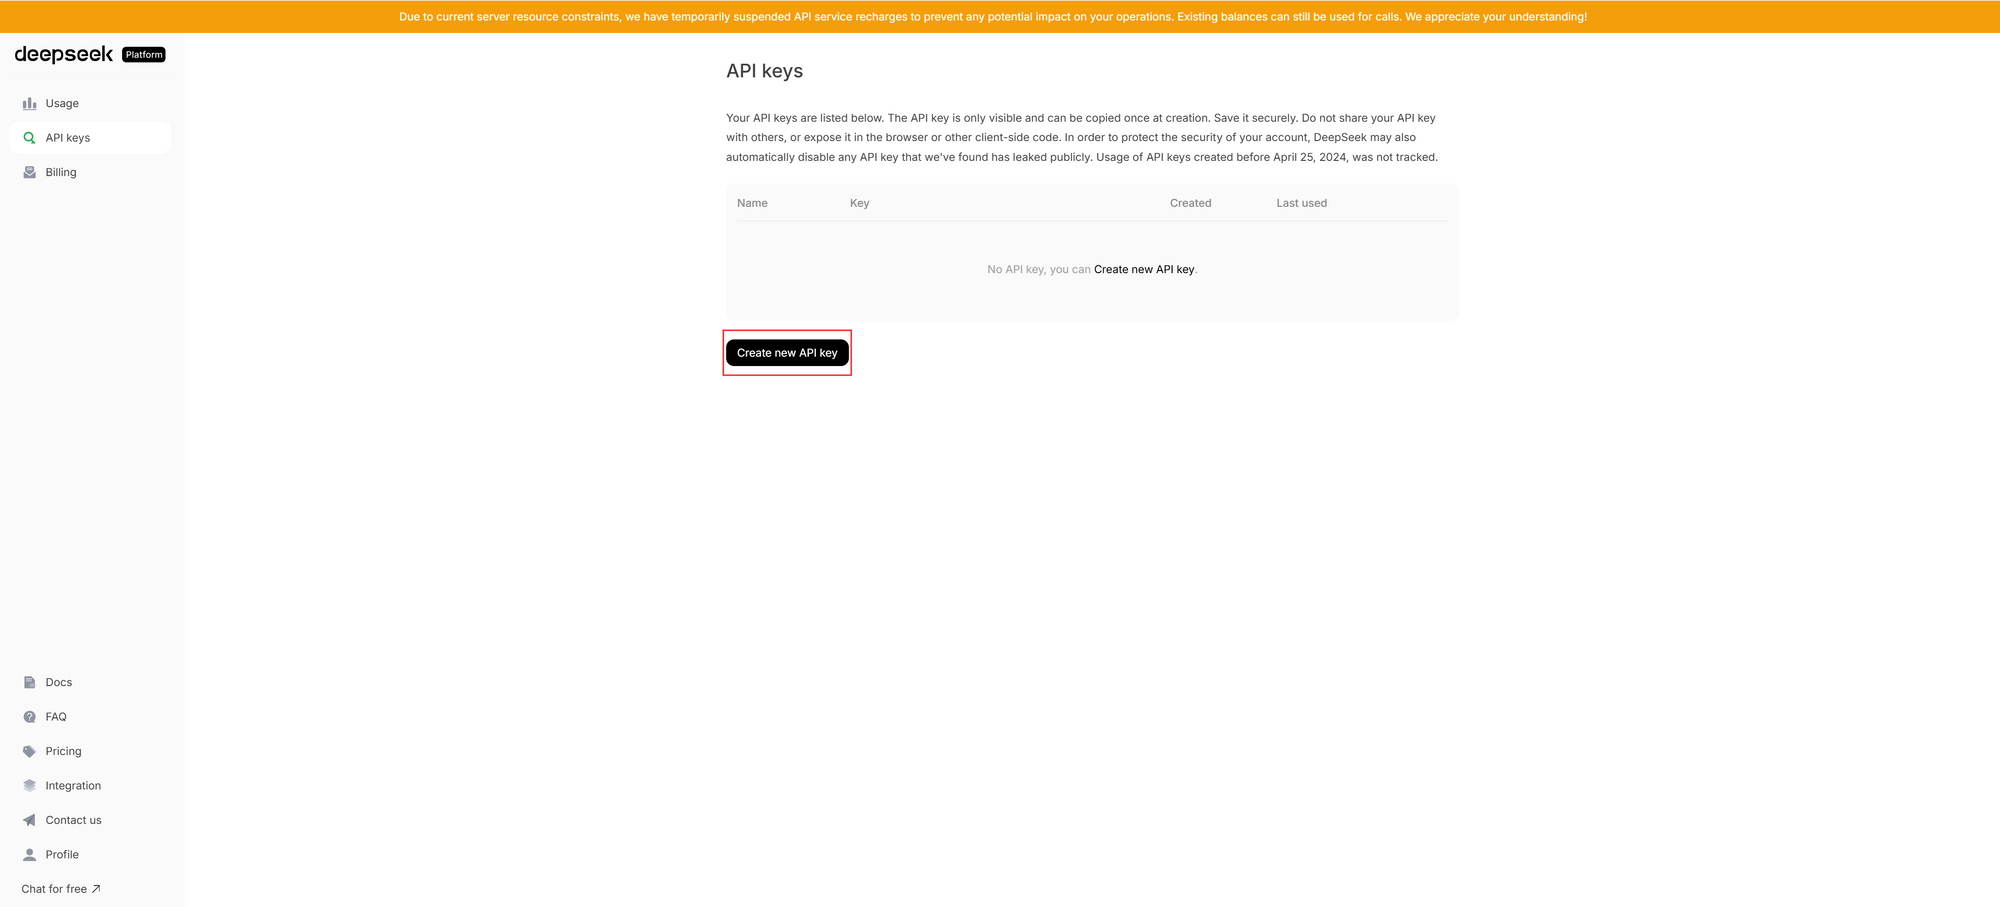
⚠️ 重要: このキーはパスワードのように扱ってください。クライアント側のコードや公開リポジトリに公開しないでください。
ステップ2: DeepSeek APIをテストする
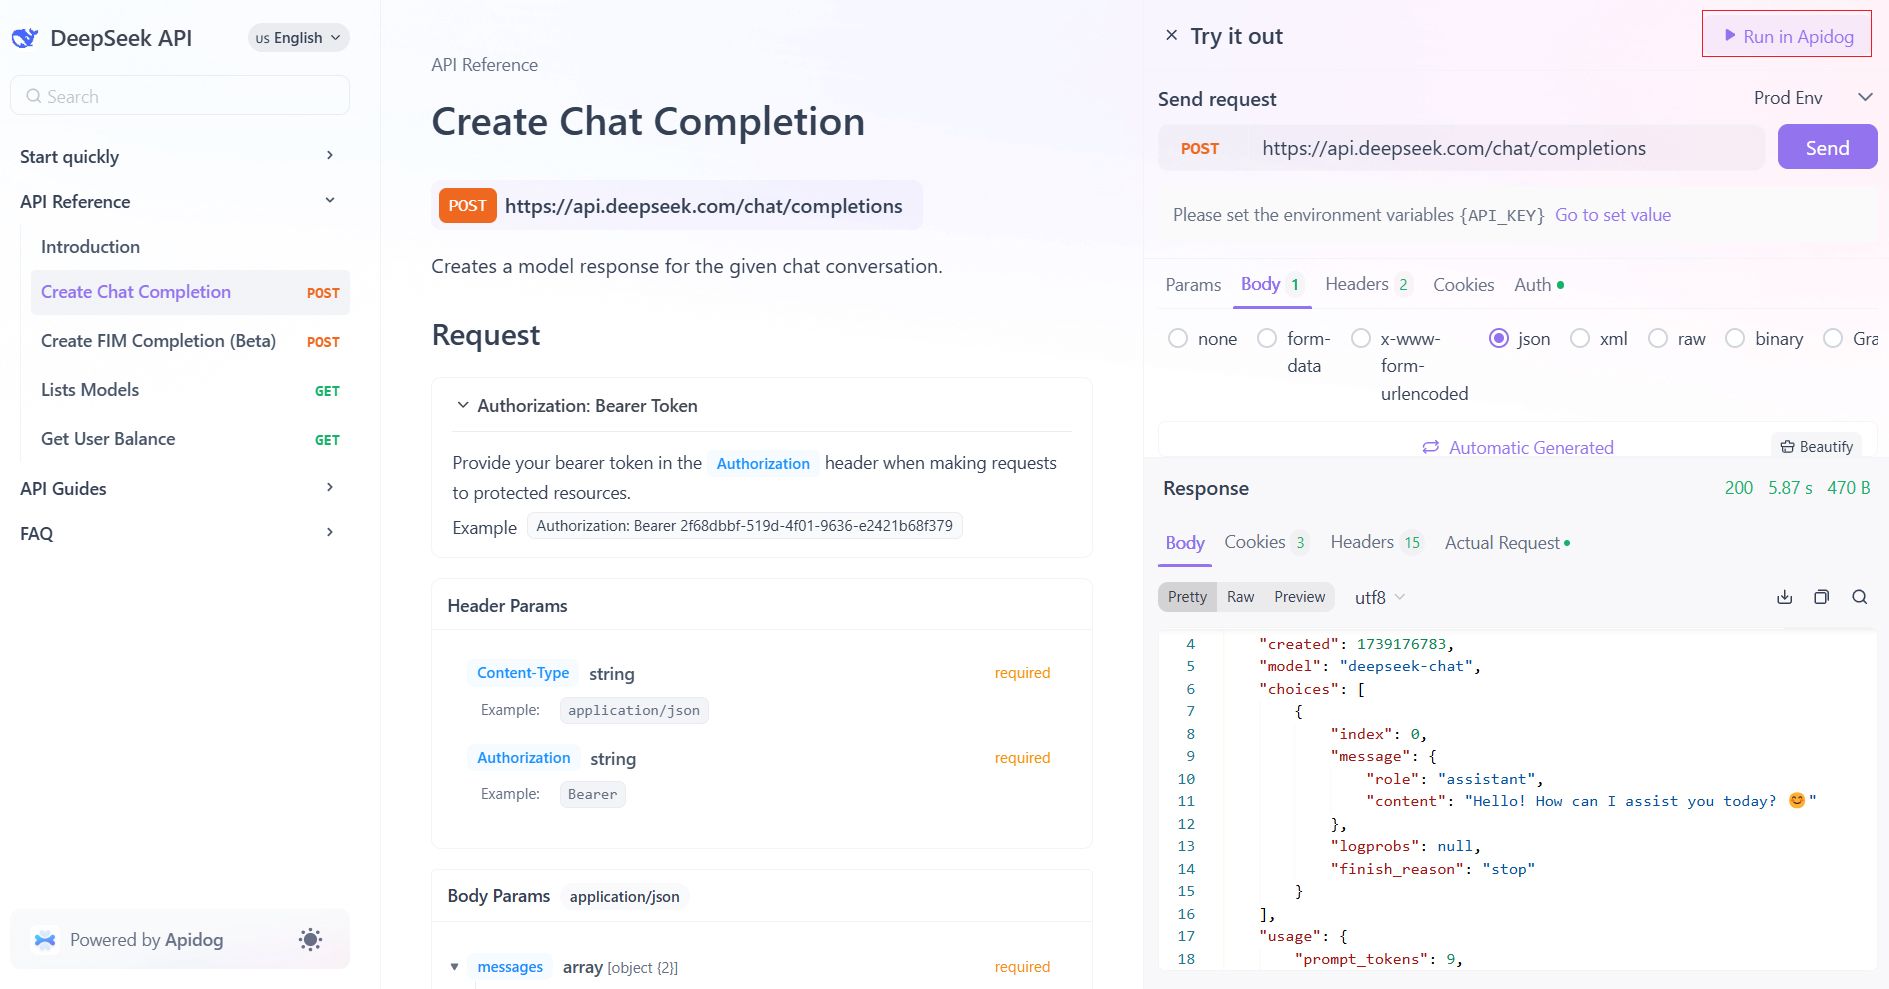
DeepSeekのAPIドキュメントはApidogによって作成されたインタラクティブなプラウドグラウンドを提供し、単一のコード行を書くことなくドキュメント上でエンドポイントを直接テストできます。方法は次のとおりです:
1. ドキュメントを開く:チャット完成を作成エンドポイントに移動します。

2. 認証する:
Try it outまたはRun in Apidogをクリックします。- ポップアウトリクエストパネルのHeadersまたはAuthセクションに移動し、APIキーを追加します:
Authorization: Bearer YOUR_API_KEY 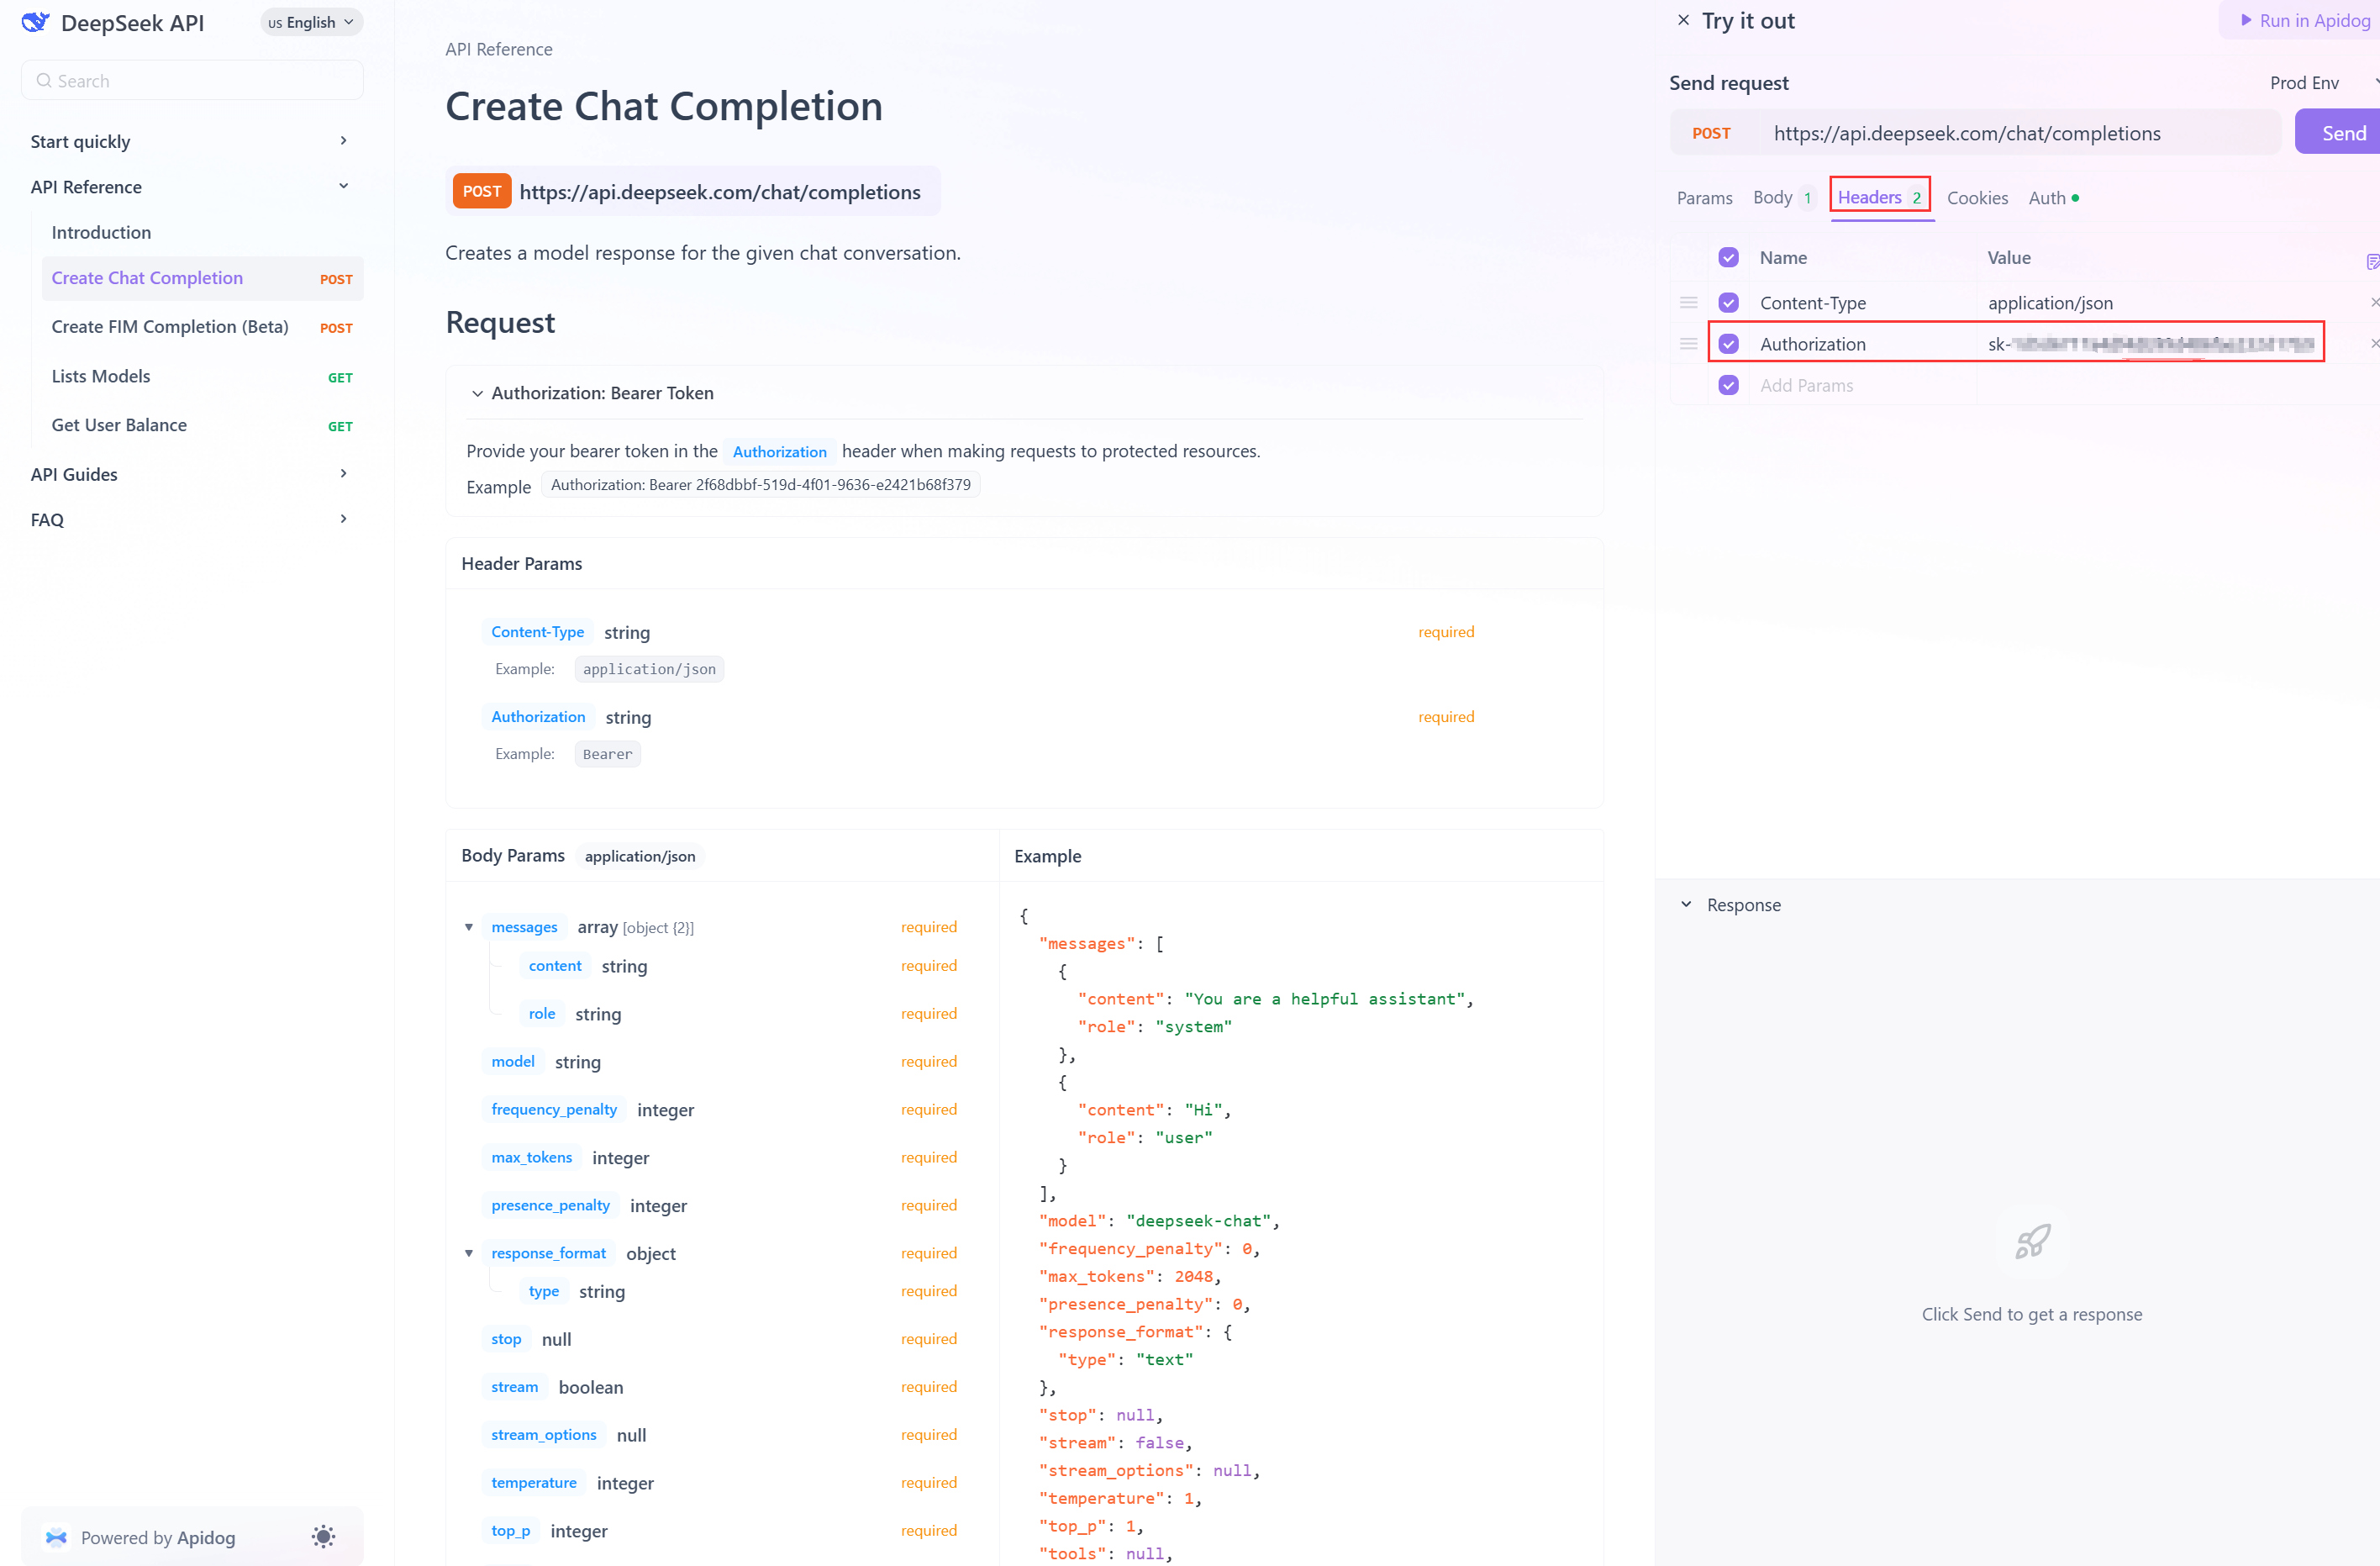
3. リクエストを作成する:
リクエストボディで、モデル(例: deepseek-chat)を指定し、メッセージを追加します:
{
  "model": "deepseek-chat",
  "messages": [
    {"role": "user", "content": "量子コンピューティングを3文で説明してください。"}
  ]
}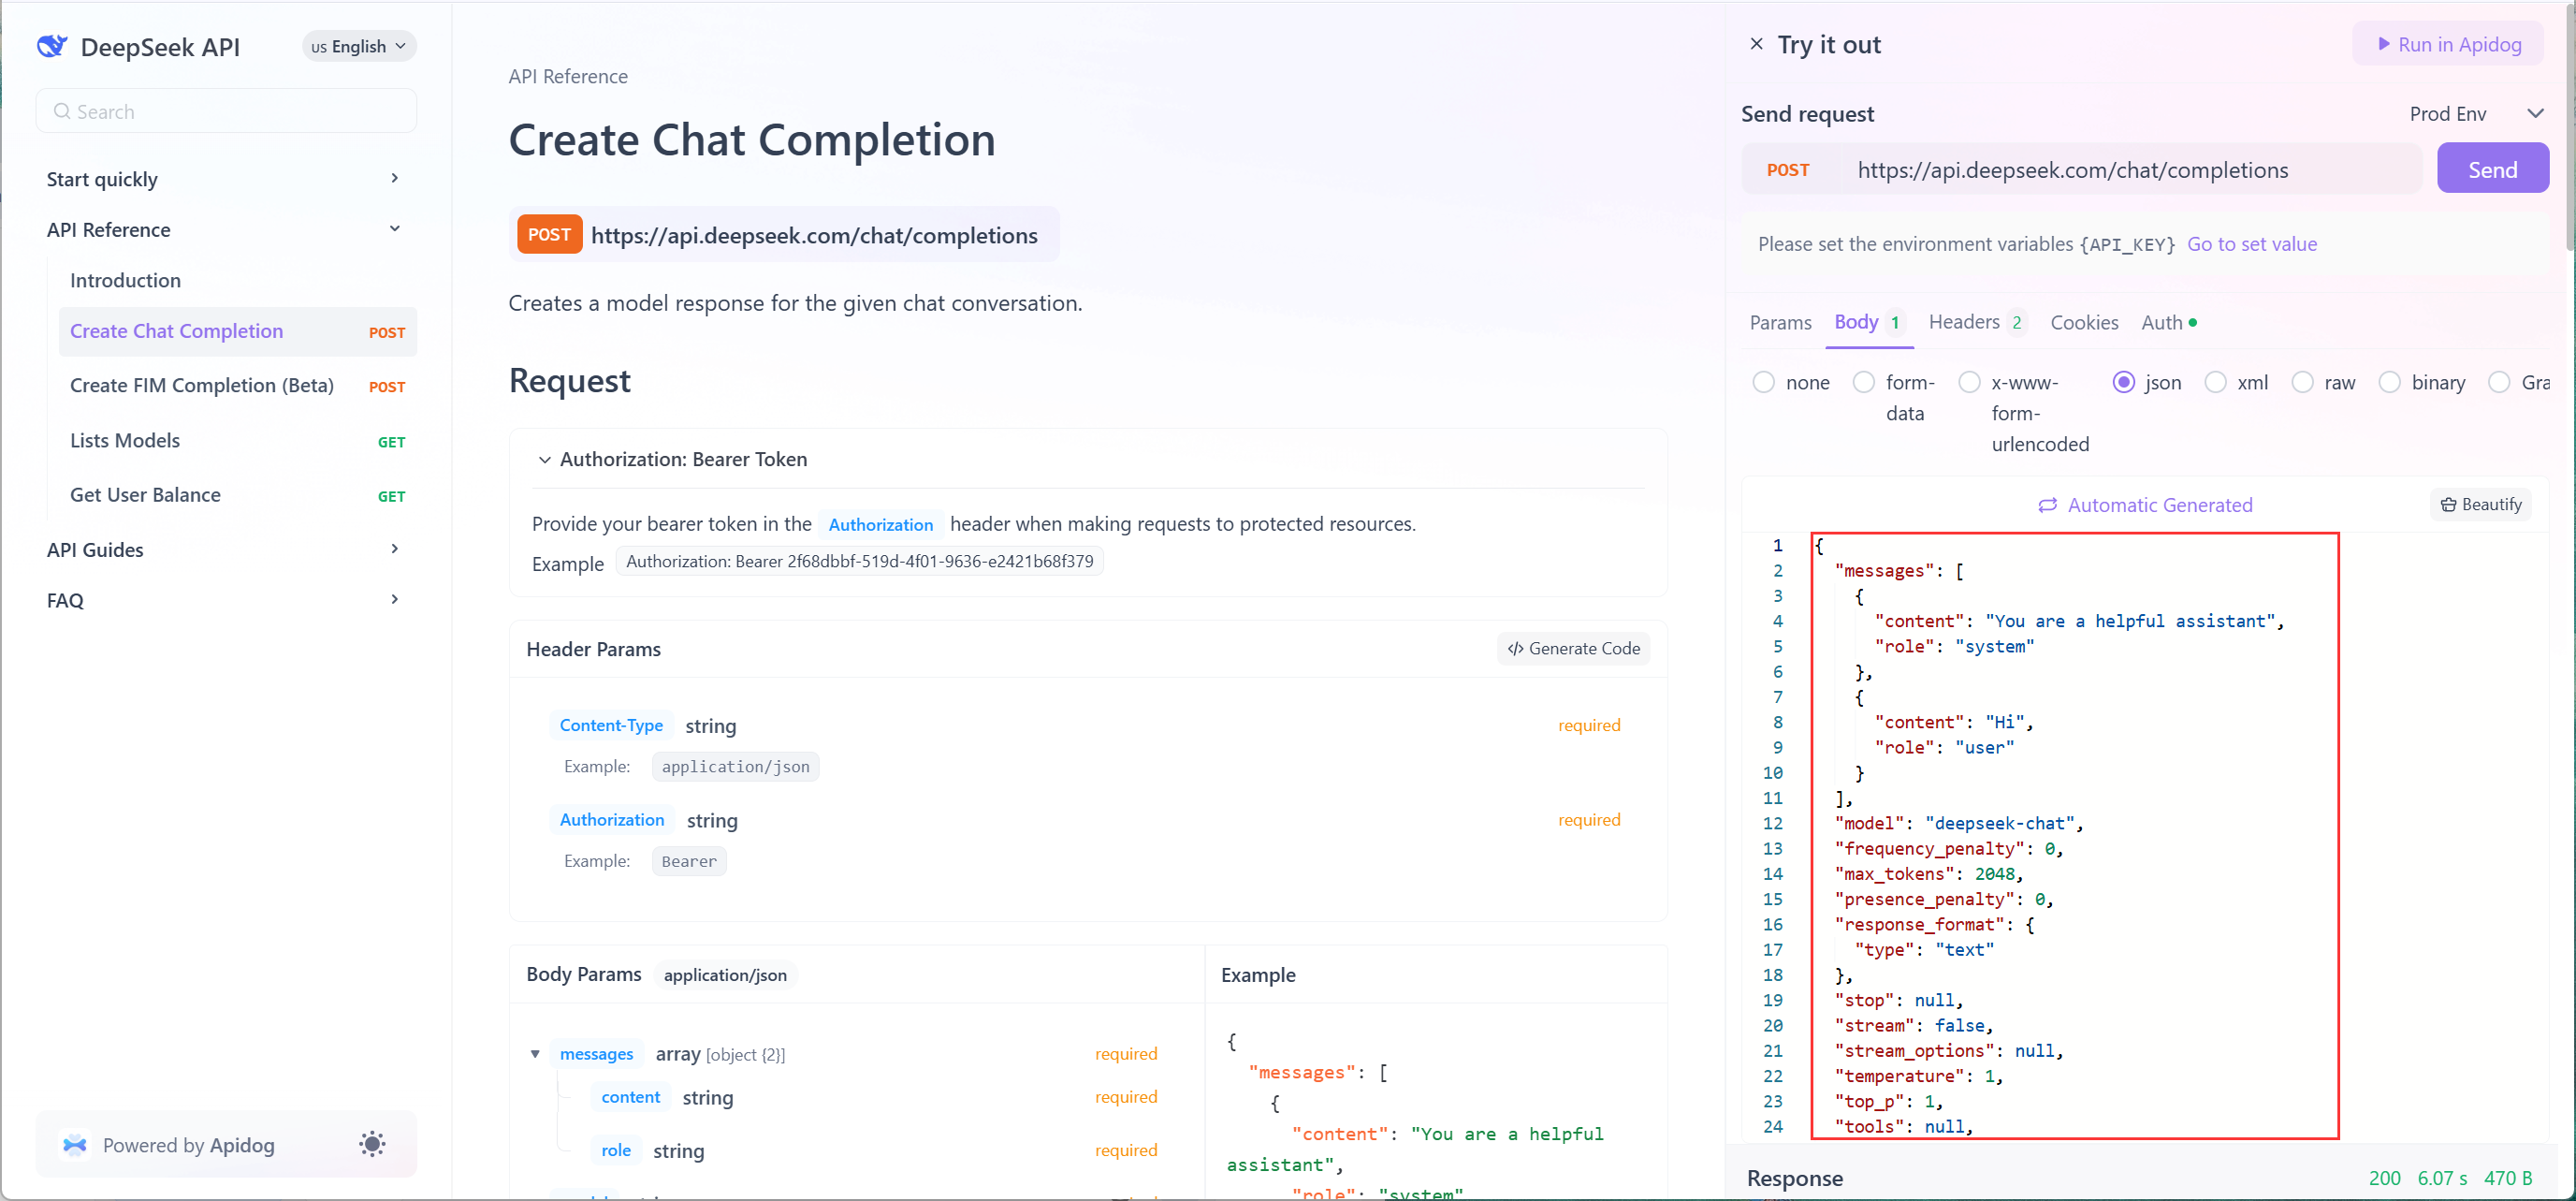
4. リクエストを送信する: Sendをクリックして、リアルタイムでレスポンスを表示します。
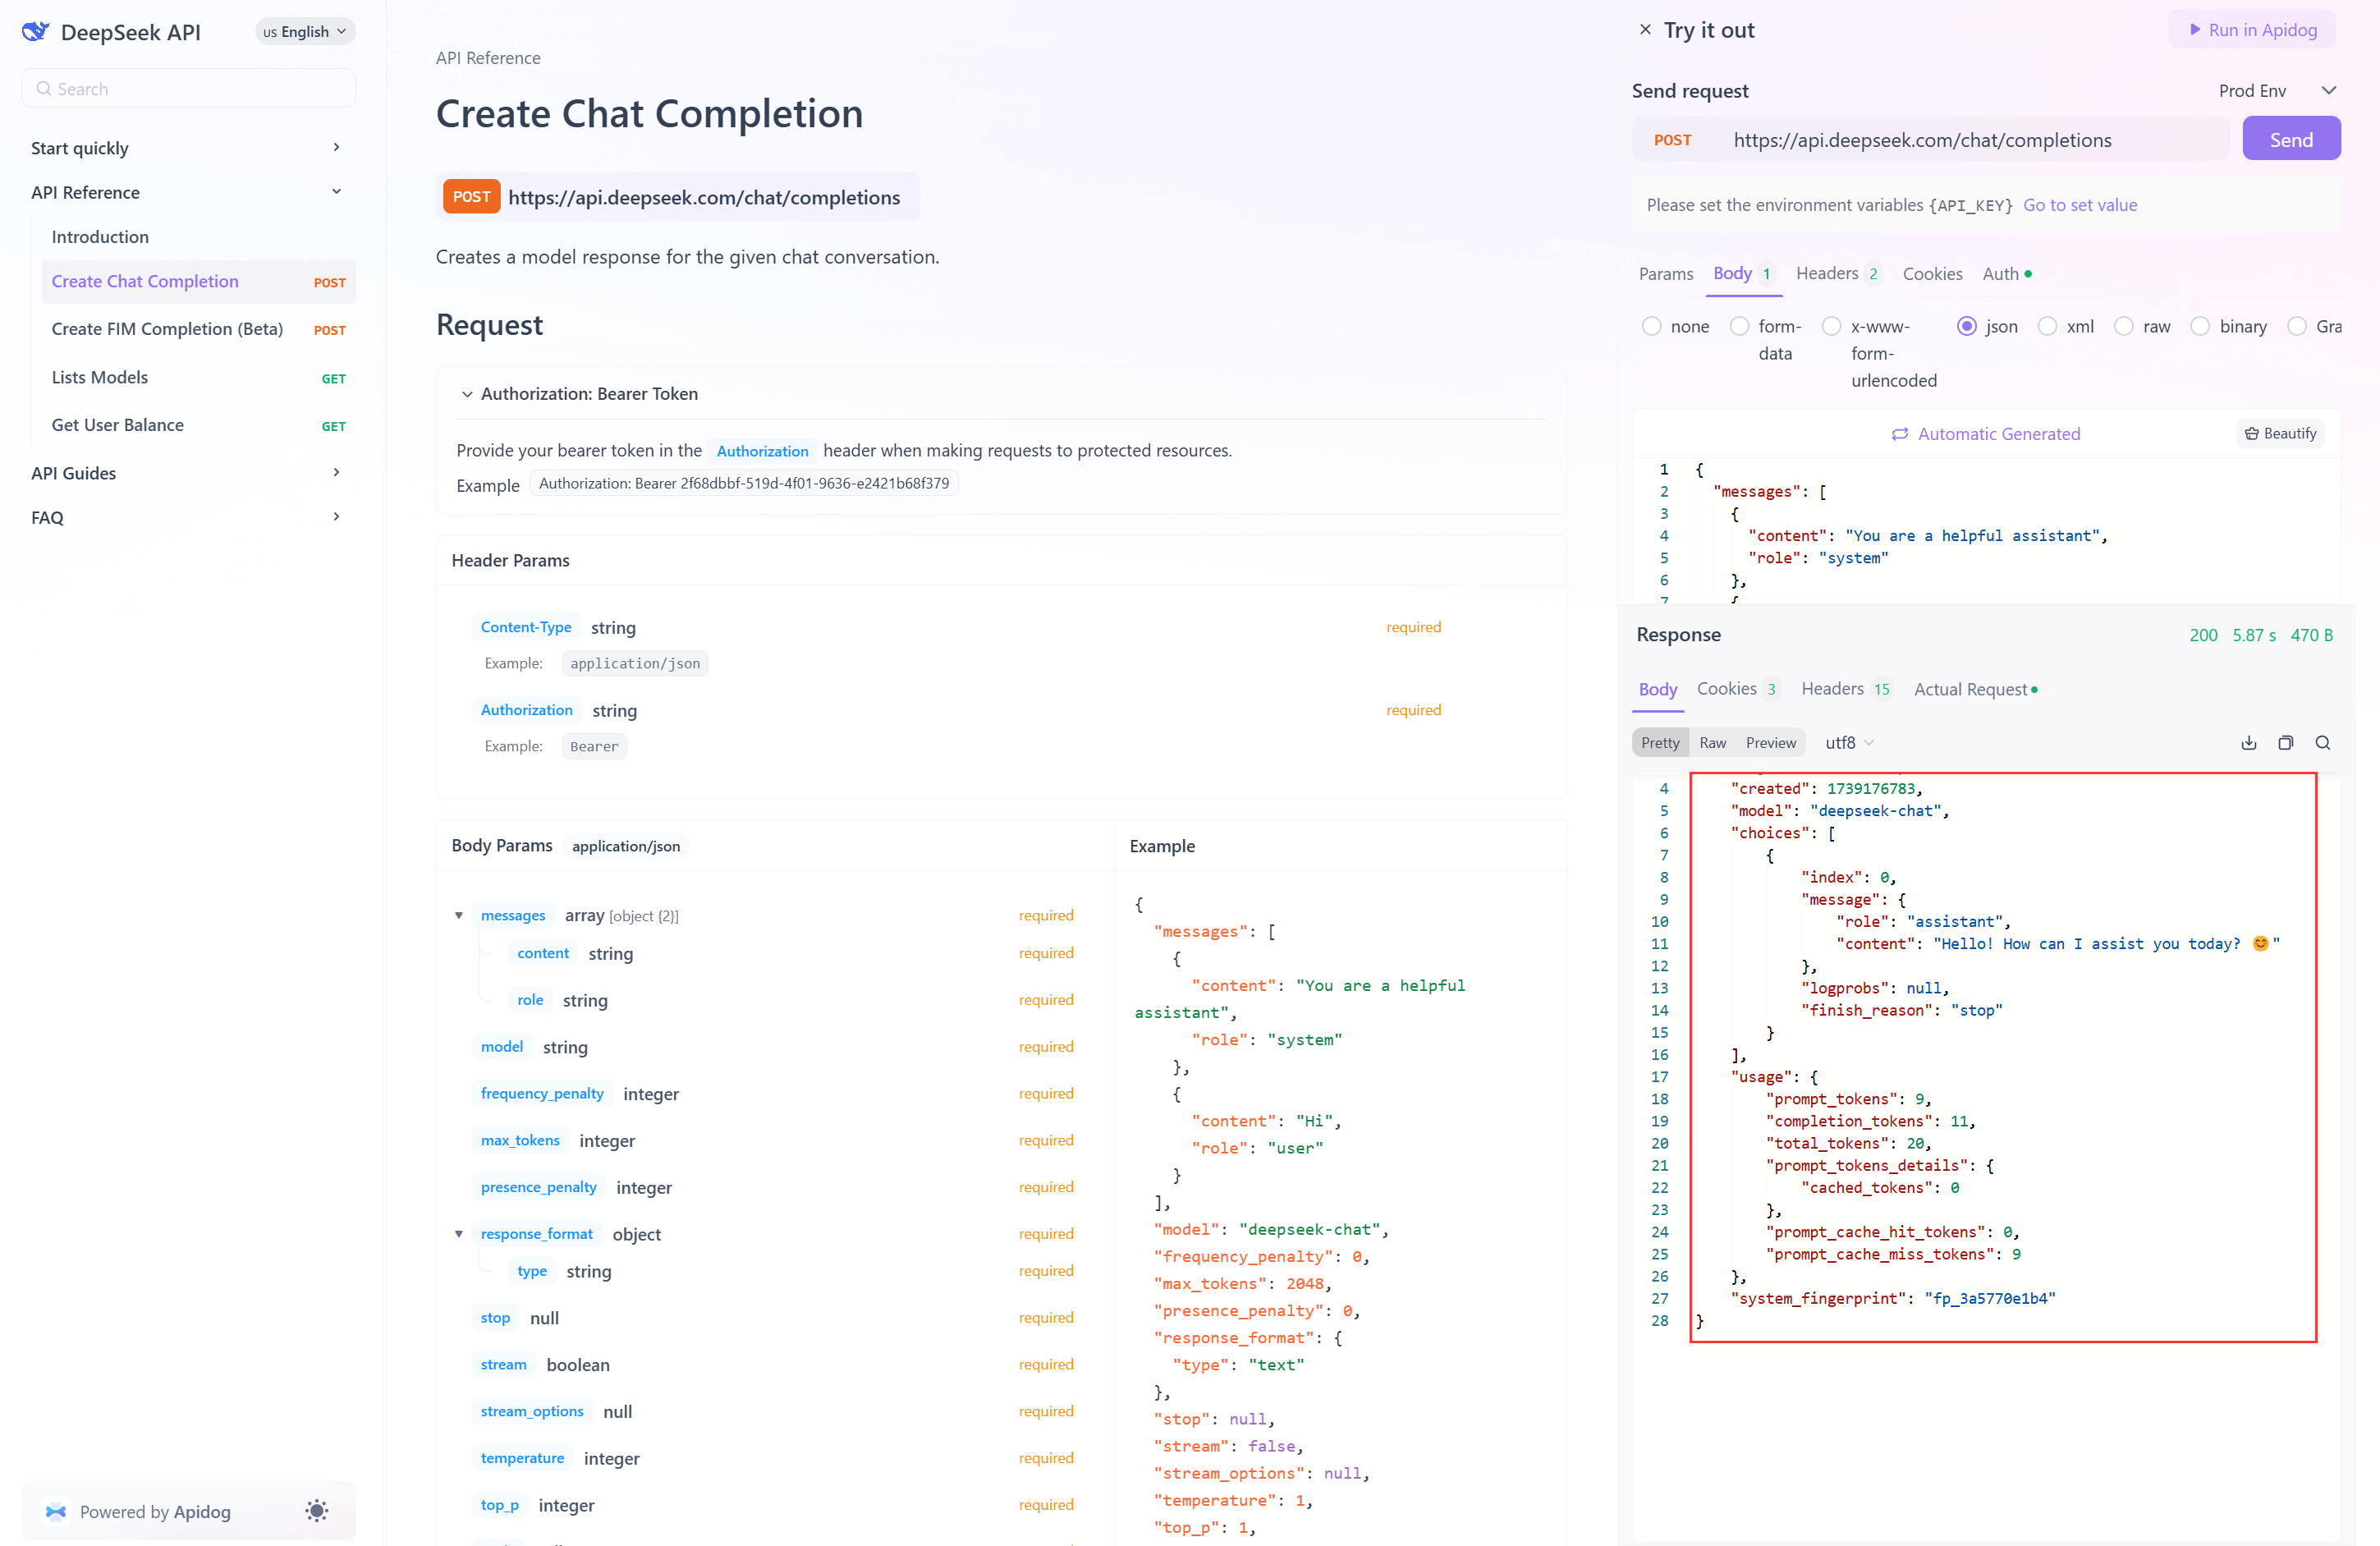
なぜこれが重要なのか: APIを手動でテストすることで、統合コードを書く前にペイロード構造とエラーハンドリングを検証できます。
ステップ3: スタックのコードスニペットを生成する
Apidogを使用すると、さまざまな言語やフレームワーク用のボックスから生成されたビジネスコードを生成できます APIドキュメントに基づいて、それをスタックで直接使用できます。方法は次のとおりです:
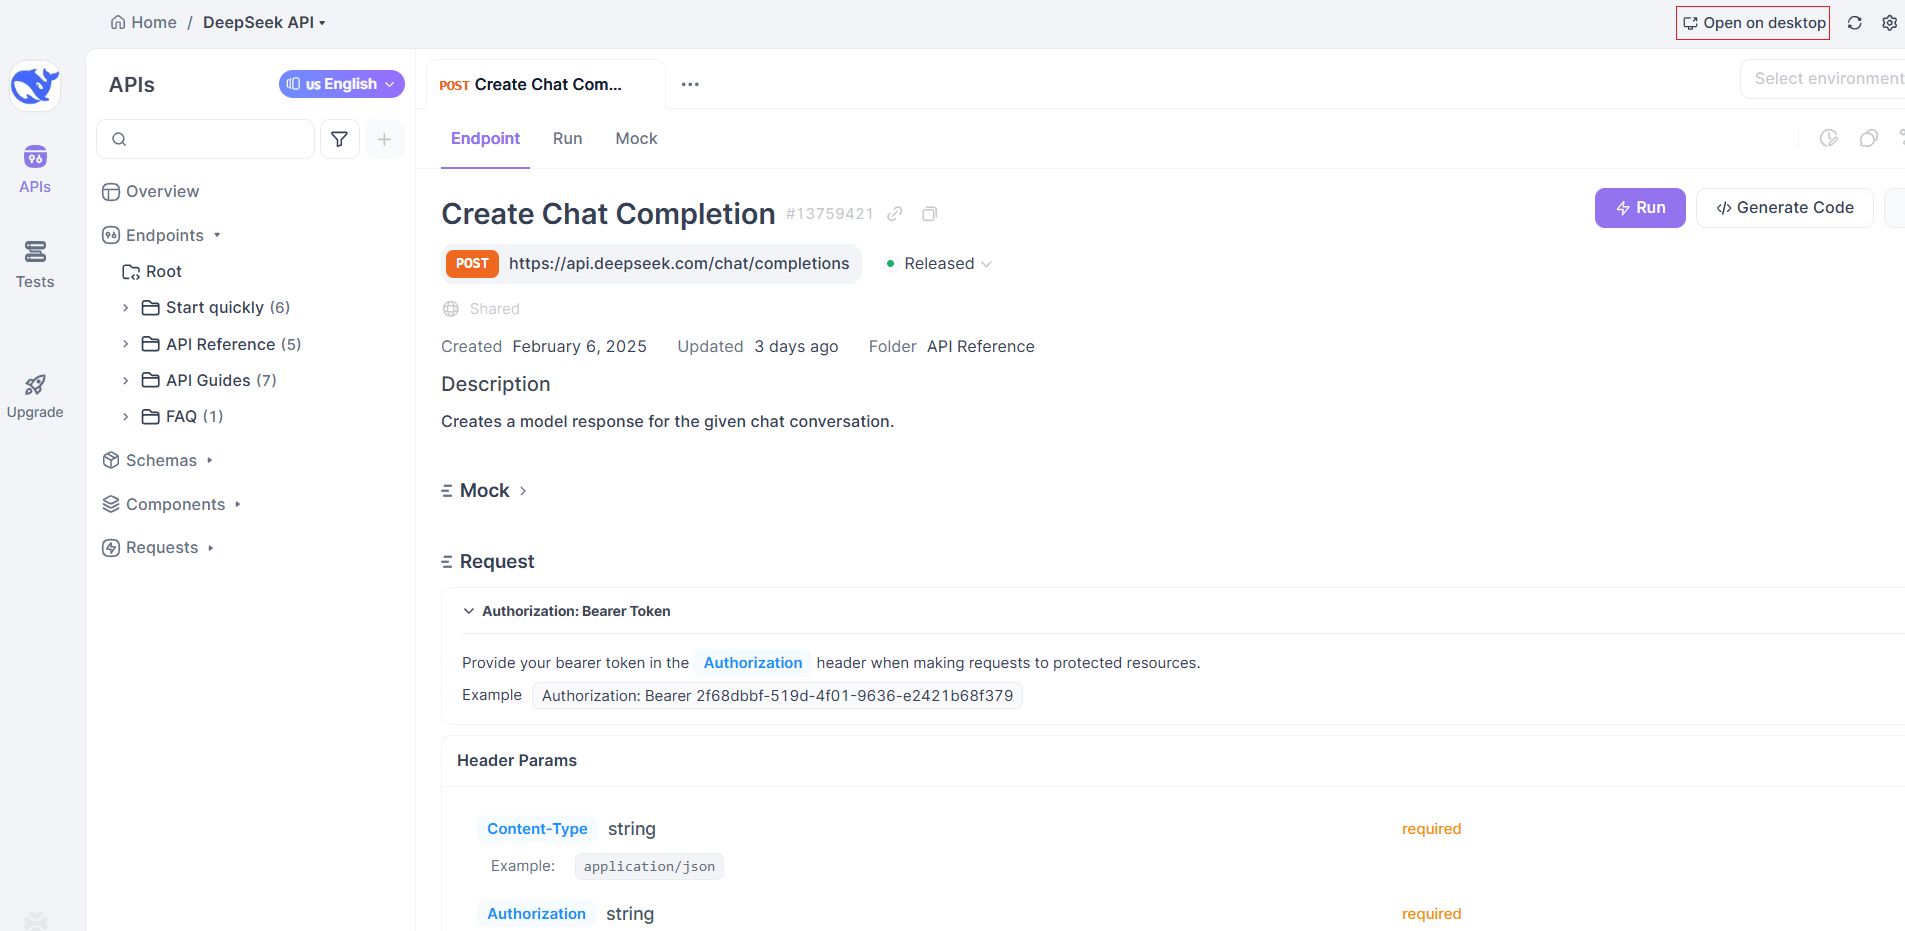
1. ApidogアプリでDeepSeekプロジェクトを開く:
- ApidogのWebアプリでDeepSeek APIプロジェクトを開くには、単にドキュメントの右上にある"Run in Apidog"をクリックします。
- プロのヒント: Apidogデスクトップアプリでプロジェクトを開くには、その後右上の"Open on desktop"をクリックしてください。
2. 言語を選択する:
- DeepSeek APIドキュメントページで、
</> Generate Codeボタンをクリックします。
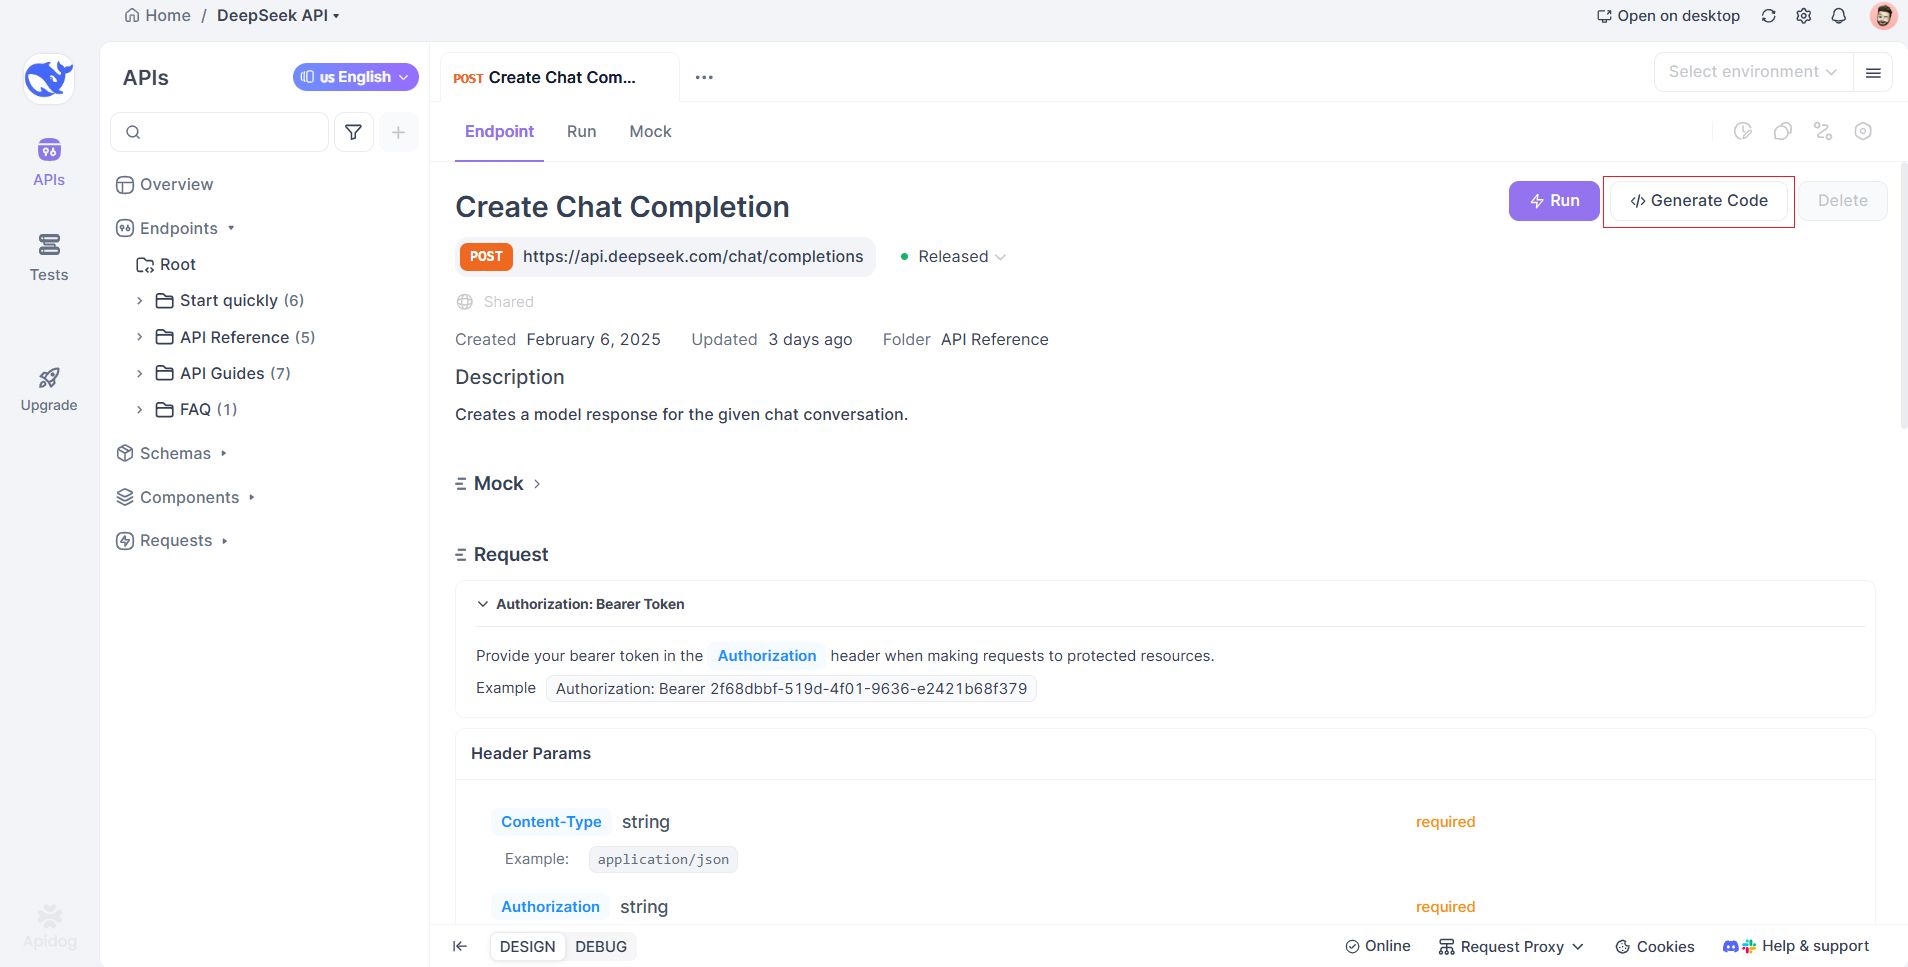
- 言語を選択します(例: Python、JavaScript、Goなど)。
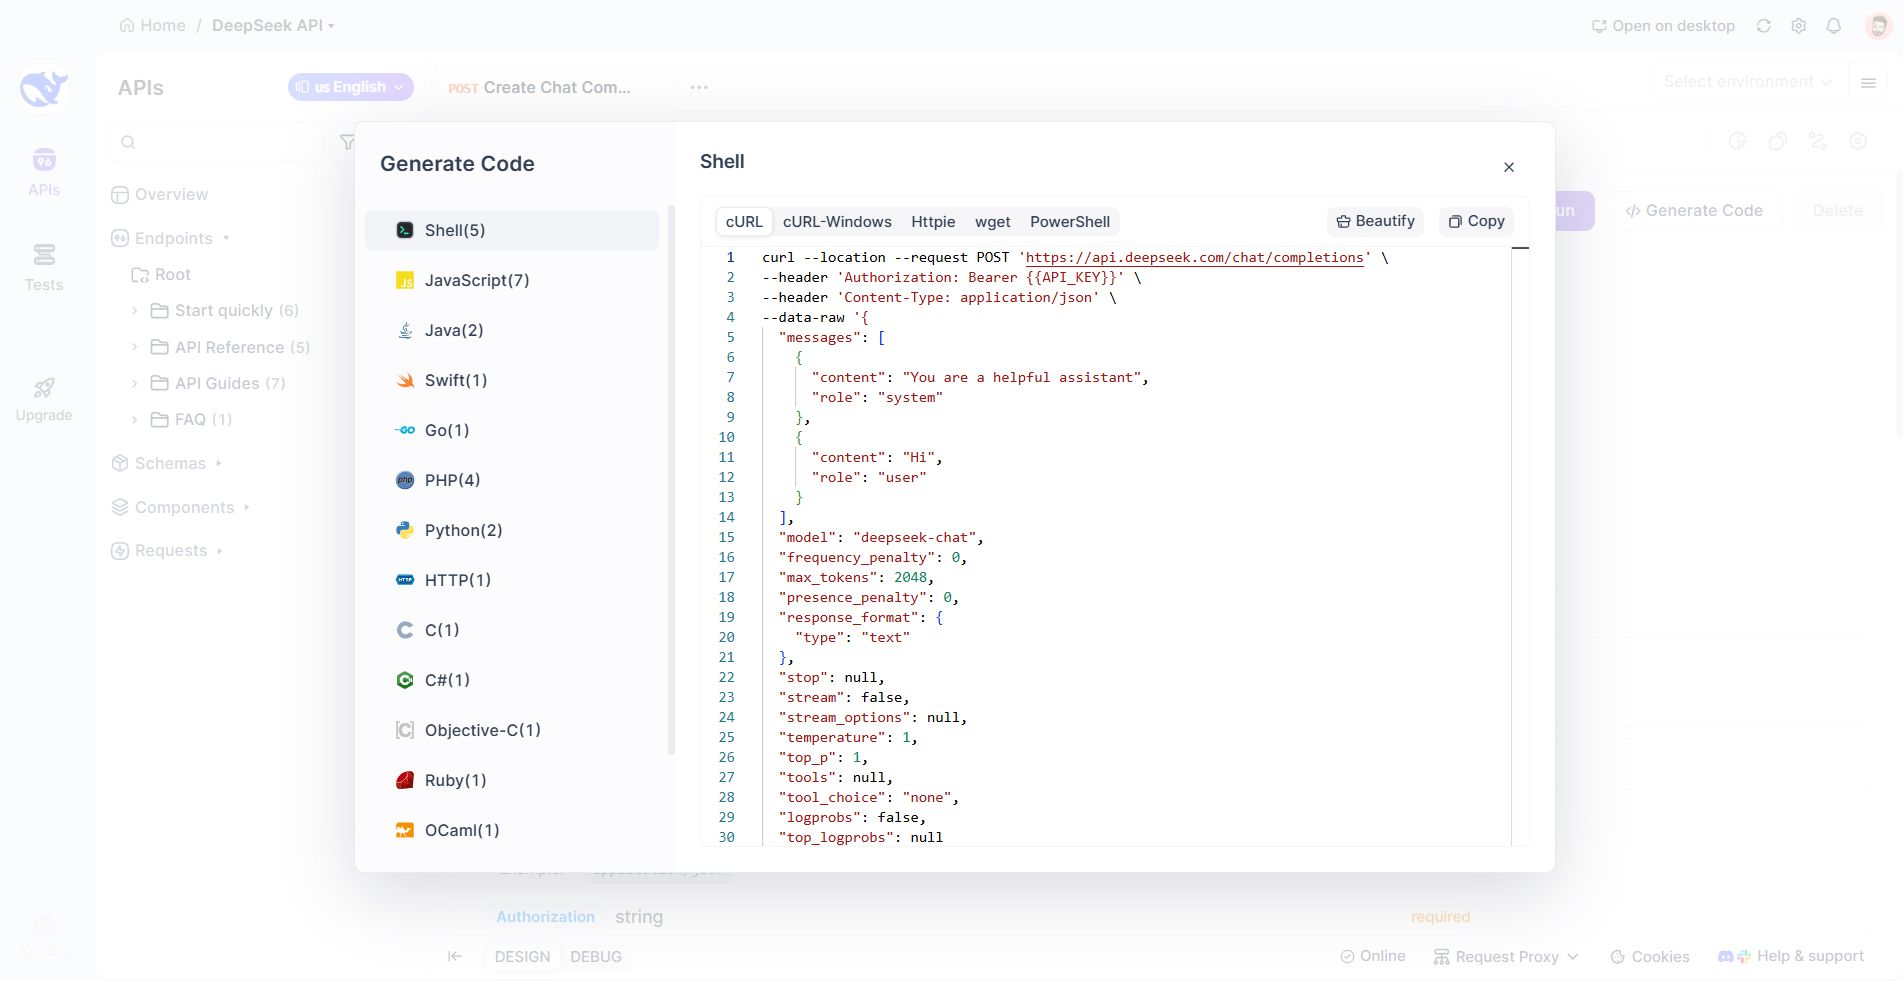
3. コードをコピーして貼り付ける:
- Pythonの場合(
requestsを使用):
import requests
import json

url = "https://api.deepseek.com/chat/completions"

payload = json.dumps({
   "messages": [
      {
         "content": "あなたは役に立つアシスタントです",
         "role": "system"
      },
      {
         "content": "こんにちは",
         "role": "user"
      }
   ],
   "model": "deepseek-chat",
   "frequency_penalty": 0,
   "max_tokens": 2048,
   "presence_penalty": 0,
   "response_format": {
      "type": "text"
   },
   "stop": None,
   "stream": False,
   "stream_options": None,
   "temperature": 1,
   "top_p": 1,
   "tools": None,
   "tool_choice": "none",
   "logprobs": False,
   "top_logprobs": None
})
headers = {
   'Authorization': 'Bearer {{API_KEY}}',
   'Content-Type': 'application/json'
}

response = requests.request("POST", url, headers=headers, data=payload)

print(response.text)- JavaScriptの場合(
fetchを使用):
var myHeaders = new Headers();
myHeaders.append("Authorization", "Bearer {{API_KEY}}");
myHeaders.append("Content-Type", "application/json");

var raw = JSON.stringify({
   "messages": [
      {
         "content": "あなたは役に立つアシスタントです",
         "role": "system"
      },
      {
         "content": "こんにちは",
         "role": "user"
      }
   ],
   "model": "deepseek-chat",
   "frequency_penalty": 0,
   "max_tokens": 2048,
   "presence_penalty": 0,
   "response_format": {
      "type": "text"
   },
   "stop": null,
   "stream": false,
   "stream_options": null,
   "temperature": 1,
   "top_p": 1,
   "tools": null,
   "tool_choice": "none",
   "logprobs": false,
   "top_logprobs": null
});

var requestOptions = {
   method: 'POST',
   headers: myHeaders,
   body: raw,
   redirect: 'follow'
};

fetch("https://api.deepseek.com/chat/completions", requestOptions)
   .then(response => response.text())
   .then(result => console.log(result))
   .catch(error => console.log('error', error));
4. コードをカスタマイズする: YOUR_API_KEYを置き換え、メッセージの内容を変更します。
ステップ4: アプリケーションに統合する
DeepSeekのAPIを使用してユーザーの質問に答えるシンプルなPython CLIアプリを作成しましょう。
プロジェクトのセットアップ
1. ディレクトリを作成し、依存関係をインストールします:
mkdir deepseek-cli && cd deepseek-cli
pip install requests python-dotenv
2. .envを使用してAPIキーを安全に保存します:
echo "DEEPSEEK_API_KEY=your_api_key_here" > .env コードの実装
import argparse
import asyncio
import json
import os
import sys
from typing import AsyncGenerator, Generator

import httpx
import requests


async def async_deepseek(
    api_key: str,
    model: str,
    messages: list,
    temperature: float
) -> AsyncGenerator[str, None]:
    """
    DeepSeekの応答をストリーミングする非同期ジェネレーター
    """
    headers = {
        "Content-Type": "application/json",
        "Authorization": f"Bearer {api_key}",
    }
    data = {
        "model": model,
        "messages": messages,
        "temperature": temperature,
        "stream": True,
    }

    async with httpx.AsyncClient() as client:
        async with client.stream(
            "POST",
            "https://api.deepseek.com/v1/chat/completions",
            headers=headers,
            json=data,
        ) as response:
            response.raise_for_status()
            async for line in response.aiter_lines():
                if line.startswith("data: "):
                    try:
                        json_data = json.loads(line[6:])
                        if chunk := json_data["choices"][0]["delta"].get("content", ""):
                            yield chunk
                    except json.JSONDecodeError:
                        pass


def sync_deepseek(
    api_key: str,
    model: str,
    messages: list,
    temperature: float
) -> Generator[str, None, None]:
    """
    DeepSeekの応答をストリーミングする同期ジェネレーター
    """
    headers = {
        "Content-Type": "application/json",
        "Authorization": f"Bearer {api_key}",
    }
    data = {
        "model": model,
        "messages": messages,
        "temperature": temperature,
        "stream": True,
    }

    with requests.post(
        "https://api.deepseek.com/v1/chat/completions",
        headers=headers,
        json=data,
        stream=True,
    ) as response:
        response.raise_for_status()
        for line in response.iter_lines():
            if line:
                decoded_line = line.decode("utf-8")
                if decoded_line.startswith("data: "):
                    try:
                        json_data = json.loads(decoded_line[6:])
                        if chunk := json_data["choices"][0]["delta"].get("content", ""):
                            yield chunk
                    except json.JSONDecodeError:
                        pass


def main():
    parser = argparse.ArgumentParser(
        description="DeepSeek CLI Client - DeepSeekモデルとチャットする"
    )
    parser.add_argument(
        "prompt",
        type=str,
        help="DeepSeekに送信するメッセージ"
    )
    parser.add_argument(
        "--model",
        type=str,
        default="deepseek-chat",
        help="使用するモデル(デフォルト: deepseek-chat)"
    )
    parser.add_argument(
        "--temperature",
        type=float,
        default=0.7,
        help="温度パラメータ(デフォルト: 0.7)"
    )
    parser.add_argument(
        "--async-mode",
        action="store_true",
        help="非同期モードを使用(Python 3.7以上が必要)"
    )
    args = parser.parse_args()

    api_key = os.getenv("DEEPSEEK_API_KEY")
    if not api_key:
        print("エラー: DEEPSEEK_API_KEY環境変数にAPIキーを設定してください")
        sys.exit(1)

    messages = [{"role": "user", "content": args.prompt}]

    try:
        if args.async_mode:
            async def run_async():
                try:
                    async for chunk in async_deepseek(
                        api_key=api_key,
                        model=args.model,
                        messages=messages,
                        temperature=args.temperature
                    ):
                        print(chunk, end="", flush=True)
                    print()
                except httpx.HTTPStatusError as e:
                    print(f"\nHTTPエラーが発生しました: {e.response.status_code} {e.response.reason_phrase}")
                except Exception as e:
                    print(f"\nエラーが発生しました: {str(e)}")

            asyncio.run(run_async())
        else:
            try:
                for chunk in sync_deepseek(
                    api_key=api_key,
                    model=args.model,
                    messages=messages,
                    temperature=args.temperature
                ):
                    print(chunk, end="", flush=True)
                print()
            except requests.exceptions.HTTPError as e:
                print(f"\nHTTPエラーが発生しました: {e.response.status_code} {e.response.reason_phrase}")
            except Exception as e:
                print(f"\nエラーが発生しました: {str(e)}")

    except KeyboardInterrupt:
        print("\n\nユーザーによって操作が中断されました")
        sys.exit(0)


if __name__ == "__main__":
    main()
アプリを実行する
質問を入力してください(例: "フランスの首都はどこですか?")そしてレスポンスを確認してください!
ステップ5: エラーとエッジケースを扱う
APIはレート制限、無効なキー、またはネットワークの問題によって失敗する可能性があります。堅牢なエラーハンドリングを実装してください:
1. HTTPステータスコードをチェックする:
401 Unauthorized: 無効なAPIキー。429 Too Many Requests: レート制限を超えました。500 Internal Server Error: サーバー側の問題。
2. リトライメカニズム:
from time import sleep

def get_deepseek_response(prompt, retries=3):
    # ... 既存のコード ...
    except requests.exceptions.RequestException as e:
        if retries > 0:
            sleep(2)
            return get_deepseek_response(prompt, retries - 1)
        else:
            return f"エラー: {str(e)}"
3. 入力を検証する:
プロンプトがトークン制限内であり、適切にフォーマットされていることを確認してください。
ステップ6: 本番環境向けに最適化する
- レスポンスをキャッシュする: RedisやMemcachedを使用して、頻繁にクエリされるものを保存します。
- 利用状況を監視する: API呼び出しを追跡し、クォータを超えないようにします。
- 非同期処理: 高スループットアプリの場合、
aiohttp(Python)やaxios(JavaScript)などの非同期ライブラリを使用します。
結論
DeepSeekのAPIをアプリに統合することは、時間の無駄ではありません。インタラクティブなドキュメントを使用してエンドポイントをテストし、コードを生成し、リアルタイムでデバッグすることで、数時間でAI駆動の機能を出荷できます—数日ではありません。
上記の例は氷山の一角にすぎません。DeepSeekのモデルを使用すれば、オートメーションコンテンツジェネレーターからAIチューターまで、あらゆるものを構築できます。設計図を手に入れたので、アプリをAIパワーハウスに変革してみてください!


