API-First Design is an approach to API development that focuses on designing the API first, before writing any code. This methodology emphasizes the importance of clear and well-defined API specifications, which serve as the blueprint for building the actual API implementation. By designing the API first, developers can ensure that the API meets the needs of its consumers and is easy to use, maintain, and scale.
A Comprehensive Guide to Using RAML for API Design
RAML (RESTful API Modeling Language) is a powerful tool for designing REST APIs. It provides a comprehensive and standardized way to define APIs, making it easier for developers to understand and work with the API specifications. In this section, we will explore how to get started with RAML and use it effectively for API design.
What is RAML Used for?
To get started with RAML, you need to install a RAML parser and editor. There are several tools available for working with RAML, such as the RAML Console, API Designer, and Mulesoft's Anypoint Platform. These tools provide a graphical interface for designing and testing APIs, as well as generating documentation and code.
Once you have the necessary tools, you can start designing your API using RAML. The first step is to define the resources and methods of your API. RAML uses a hierarchical structure to represent the API resources, with each resource having one or more HTTP methods (e.g., GET, POST, PUT, DELETE). You can specify the request and response parameters, headers, and bodies for each method.
RAML also allows you to define data types, security schemes, and other aspects of your API. You can use RAML's built-in types or define your own custom types using JSON Schema or XML Schema. RAML supports various authentication and authorization mechanisms, such as OAuth 2.0 and Basic Authentication, allowing you to secure your API.
A Detailed Guide to Create RESTful APIs using RAML
To create RESTful APIs with API-First Design using RAML, you can follow these steps:
- Install RAML Tools: Install a RAML editor or use an online RAML editor like API Designer (https://raml.org/) to create and edit your RAML files.
2. Create a Root RAML File: Start by creating a root RAML file (e.g., api.raml) that serves as the entry point for your API specification.
3. Define API Version and Base URI: Specify the API version and base URI in your root RAML file using the version and baseUri properties.
Define Resources: Define the resources that your API will expose using the resource keyword. Each resource should represent a logical endpoint in your API.
Define HTTP Methods and Endpoints: For each resource, specify the HTTP methods (GET, POST, PUT, DELETE, etc.) that are allowed and define the endpoints for these methods using the method keyword.
Define Request and Response Bodies: Specify the request and response bodies using the body keyword. Define the data structures using RAML data types, which can be inline or referenced from external files.
4. Document Your API: Add descriptive documentation to your RAML file using the description and documentation properties. Include information about each resource, method, and data model.
5. Handle Error Responses: Define error responses for each method using the responses keyword. Specify HTTP status codes and descriptions for different error scenarios.
6. Security Definitions: If your API requires authentication or authorization, define security schemes and requirements using the securitySchemes and securedBy properties.
7. Mocking and Testing: Use RAML mocking tools like "API Console" or "prism" to generate mock APIs based on your RAML definition. This helps you test your API design before implementation.
8. Collaborate and Iterate: Collaborate with your team and stakeholders to review the RAML specification and make necessary changes. The API-First approach encourages iterative development.
9. Generate Server and Client Code: Once your RAML specification is finalized, you can use tools like the "RAML to Code" generator to automatically generate server and client code in your preferred programming language.
Implement the API: Use the generated code or implement your API according to the RAML specification. Ensure that the implementation matches the API design.
10. Test and Validate: Test your API thoroughly to ensure it works as expected. Use RAML validation tools to validate requests and responses against your RAML definition.
By following these essential steps, you can create RESTful APIs using API-First design principles in RAML, ensuring a well-defined and well-documented API that meets your application's requirements.
The Best Alternative Way: Using Apidog for API Design
One powerful tool that can assist in the API-First Design process is Apidog. Apidog is a comprehensive API design and documentation platform that provides developers with a range of features to create RESTful APIs. With Apidog, developers can easily design, document, and test their APIs, all in one place.
The Key Features of Apidog
One of the key features of Apidog is its ability to generate interactive API documentation. By simply importing a RAML or OpenAPI specification, Apidog can automatically generate a comprehensive API reference that includes detailed information about each endpoint, request/response examples, and even the ability to make test requests directly from the documentation. This not only saves developers time and effort in manually creating and updating documentation but also ensures that the documentation remains up-to-date and accurate.
Another key capability is Apidog's collaboration features. Multiple team members can work on the same API simultaneously with automatic syncing of changes. Now, when you invite a new user can get a $10 credit. This improves efficiency and reduces conflicts in API design. Apidog also has powerful testing and debugging tools to identify and fix API issues before deployment. Its automation and collaboration make Apidog an invaluable API development tool.

Furthermore, Apidog provides powerful testing and debugging tools that can help developers identify and fix issues in their APIs. It allows developers to simulate API requests and responses, inspect the data being sent and received, and even set up breakpoints for debugging. This can greatly simplify the process of troubleshooting and ensure that the API is functioning correctly before it is deployed.
A Step-by-step Guide to Creating a RESTful API in Apidog
To create a successful API using API-First Design principles and Apidog, follow these steps:
Step 1. Use Apidog's intuitive interface to design the API endpoints. Click the "+" button with one click.
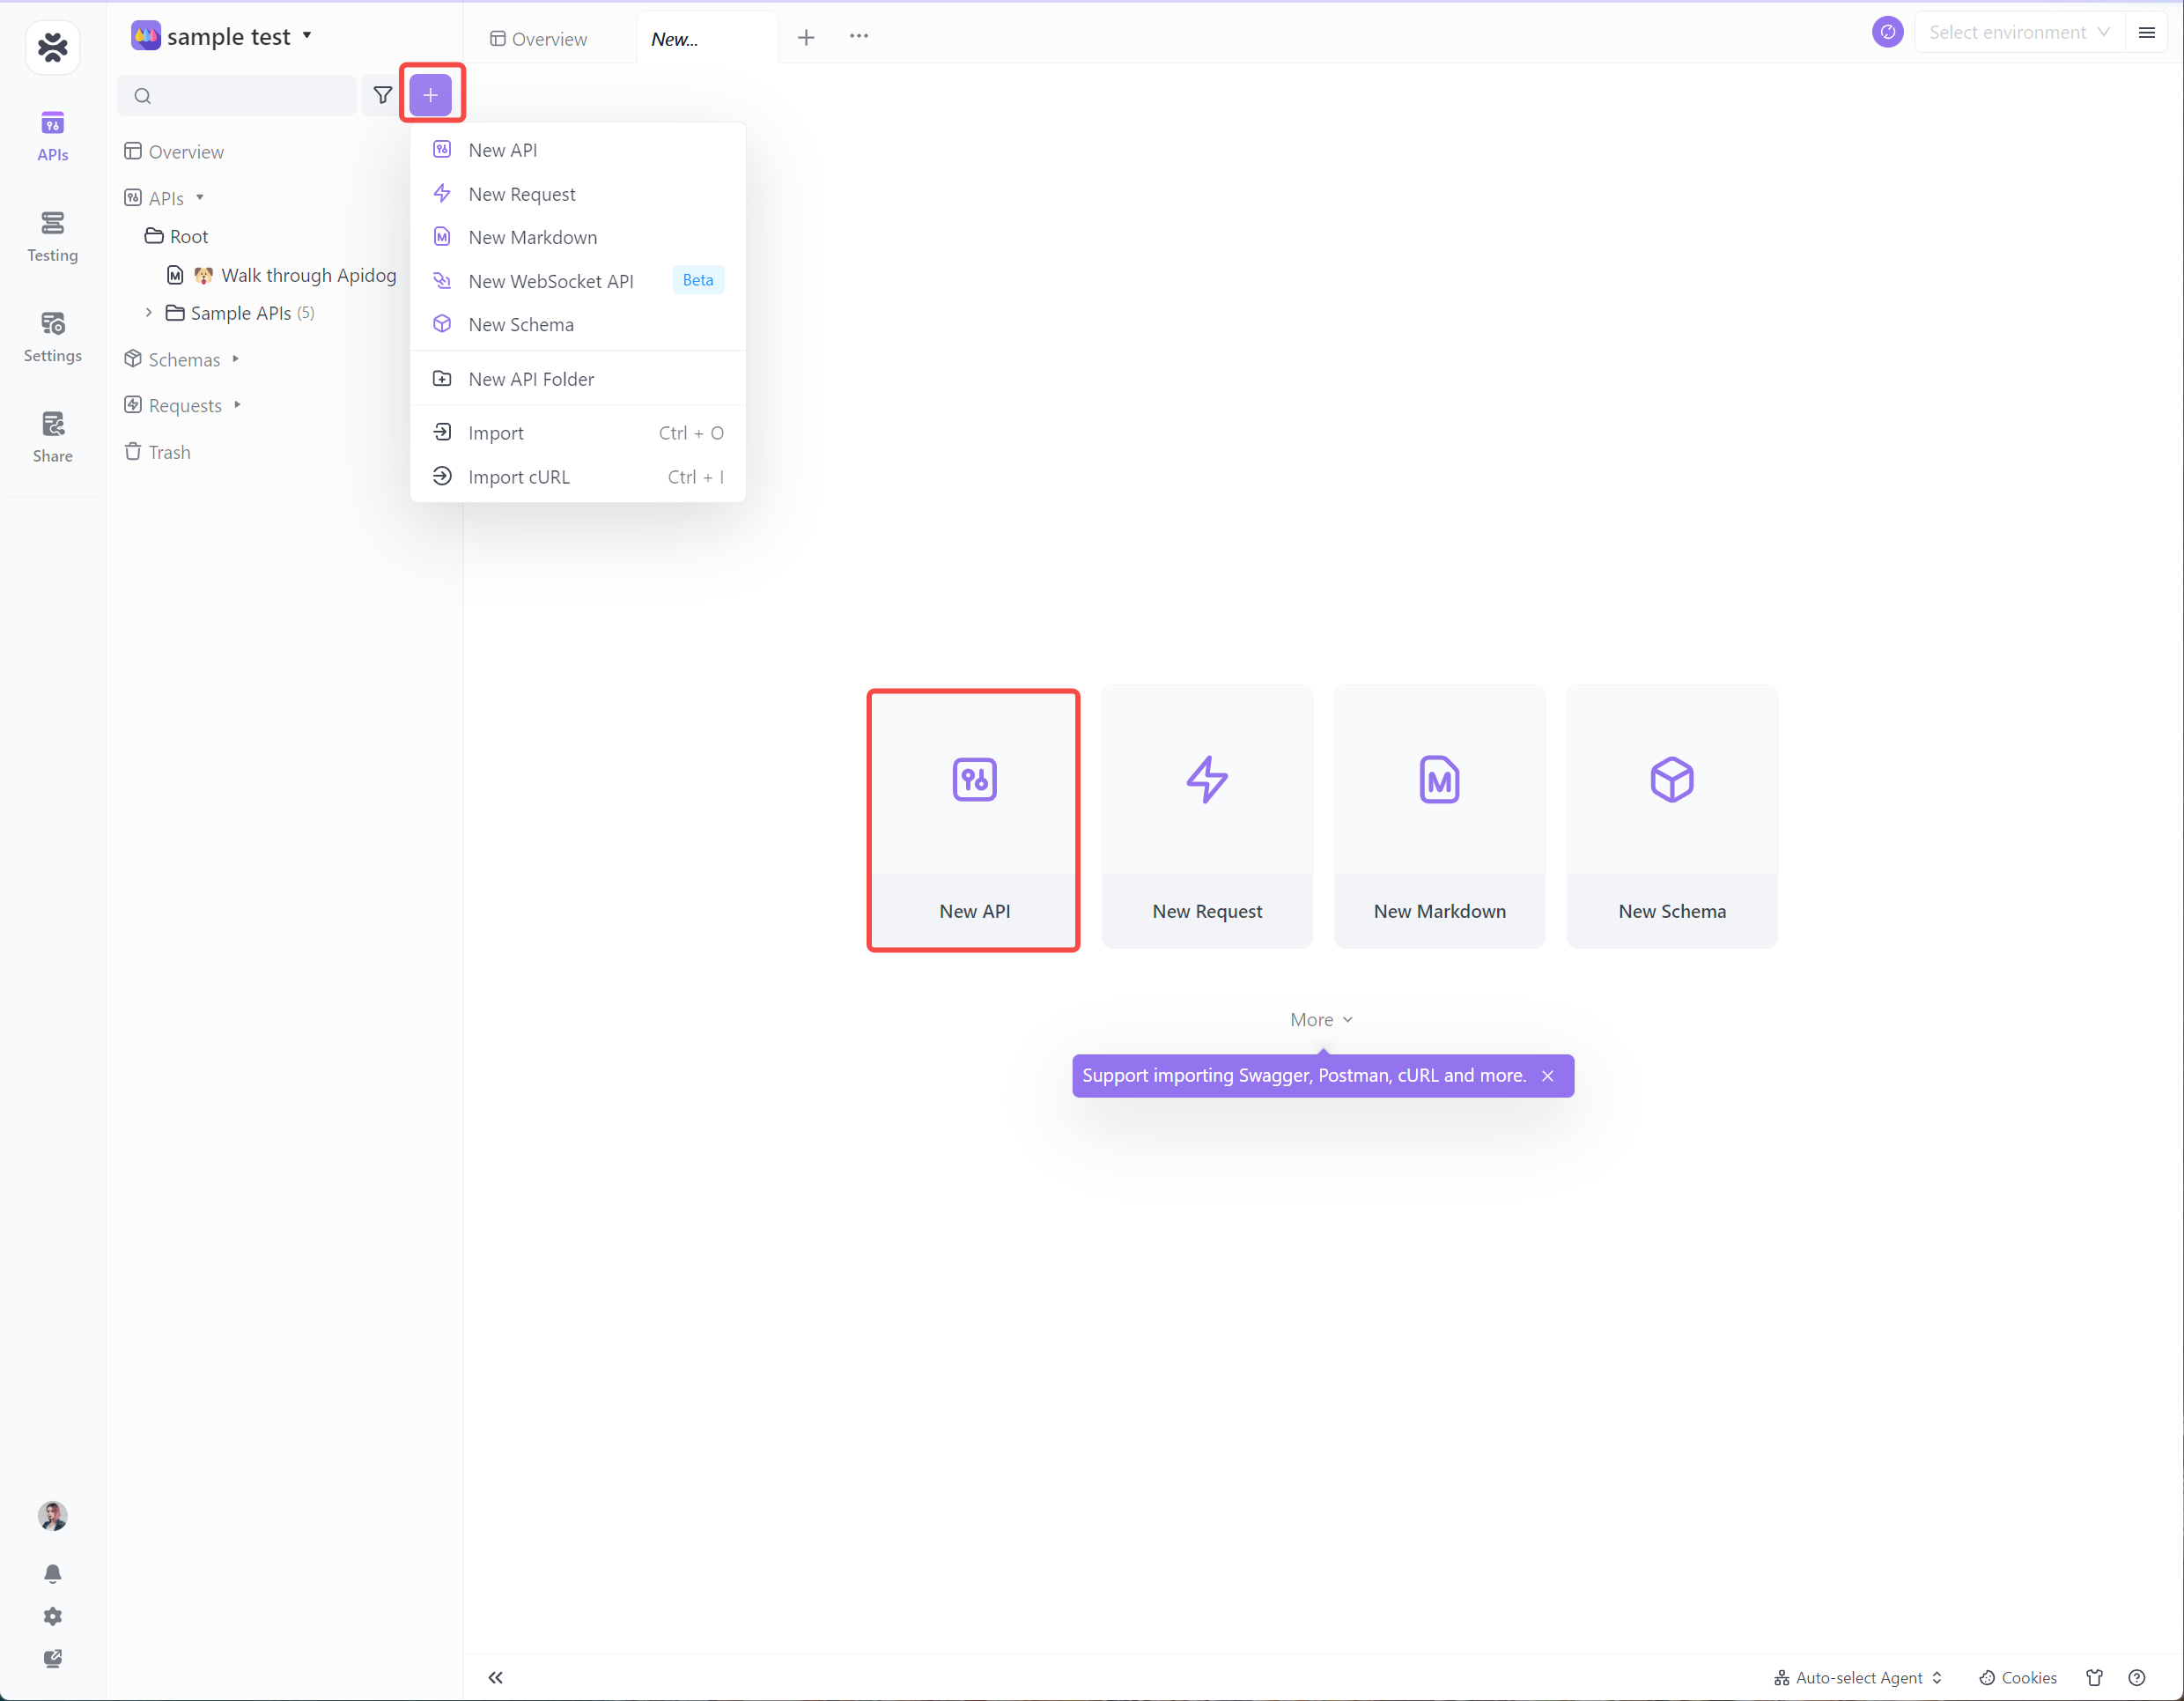
Step 2. Define the HTTP methods, request/response models, query parameters, headers, etc.

When you complete the API parameters or other elements, please click save as API case for the next usage easily.
Step 3. Test the API: Utilize Apidog's built-in testing capabilities to test the API endpoints. Verify that the endpoints return the expected responses and handle various scenarios correctly.

Benefits of Using Apidog for API Design
By following best practices such as designing for simplicity, maintaining consistent naming conventions, handling errors effectively, and versioning the API, developers can create robust and user-friendly APIs using Apidog.
- Visual Interface: Apidog provides a user-friendly visual interface that allows developers to design APIs without the need to write complex code. The drag-and-drop functionality makes it easy to create API endpoints, define request and response parameters, and establish relationships between resources.
- Collaboration: Apidog allows multiple team members to collaborate on API design. It provides features such as version control, commenting, and sharing, which facilitate effective communication and collaboration among team members. This ensures that everyone is on the same page and can contribute to the API design process.
- Documentation Generation: Apidog automatically generates interactive API documentation based on the design created. This documentation includes details about endpoints, request and response parameters, error codes, and example requests and responses. This feature saves developers a significant amount of time and effort in manually documenting the API.
- Mock Server: Apidog allows developers to create a mock server for testing purposes. This mock server can simulate API responses based on the defined API design, enabling developers to test their applications without relying on the actual backend implementation. This helps in identifying and fixing issues early in the development process.
