
Django is a Python web framework that is designed to assist developers in quickly and easily building web applications. It is free, open-source, and has a large and active community of developers.
Do you want to learn how to create and test a Django API that can send and receive JSON data? If yes, then you are in the right place. By the end of this post, you will be able to create and test a Django API that can send and receive JSON data like a pro. Let’s get started!
You can also inspect the headers, cookies, status codes, and other details of the response. Apidog also lets you manipulate the response data using JavaScript, filter the data using JSONPath, and validate the data using JSON Schema.
What is JSON?
JSON stands for JavaScript Object Notation. It's a standardized format for representing structured data. It is a text-based format that uses human-readable text to store and transmit data objects consisting of attribute-value pairs and arrays (or other serializable values). JSON is commonly used for transmitting data in web applications, such as sending data from the server to the client, or vice versa.
JSON can represent six types of data natively: strings, numbers, booleans, null, arrays, and objects. For example, here is a JSON representation of a post:
{
  "id": 1001,
  "title": "What is JSON?",
  "author": {
    "id": 1,
    "name": "James Walker"
  },
  "tags": [
    "api",
    "json",
    "programming"
  ],
  "published": false,
  "publishedTimestamp": null
}
This example demonstrates all the JSON data types. It also illustrates the concision of JSON-formatted data, one of the characteristics that’s made it so appealing for use in APIs.
Basics of POST Request Method
The POST request method is an HTTP request type used to send data to a server for creating or updating a resource. It is commonly used for uploading files or submitting completed web forms. The method asks the web server to accept the data enclosed in the request message's body, typically for storage purposes.
JSON, short for JavaScript Object Notation, is frequently employed in POST requests because of its ability to transmit structured data to a server. This structured format enables easy interpretation and processing by the server, especially when creating or updating resources.
JSON's standardized format for representing objects and data makes it a popular choice for sending data in POST requests. By using JSON, developers can ensure that the data sent to the server is well-organized and easily understandable, thereby enhancing the efficiency of resource creation and updates.

What is Django and Why Should You Use It?
Django is a web framework that helps you build web applications quickly and easily. It is written in Python and follows the Model-View-Template (MVT) pattern. It provides you with various features and tools, such as:
- A built-in admin interface that lets you manage your data and users
- A powerful ORM that lets you interact with various databases using Python code
- A flexible URL dispatcher that lets you map URLs to views
- A template engine that lets you create dynamic HTML pages using Python code and variables
- A forms framework that lets you create and validate web forms
- A testing framework that lets you write and run automated tests
- A security framework that protects your web application from common attacks, such as CSRF, XSS, SQL injection, etc.
Django is a great framework for anyone who wants to build web applications, whether you are a beginner or an expert. It helps you to:
- Develop web applications faster and easier by providing you with a lot of functionality out of the box
- Write clean and maintainable code by following the DRY (Don’t Repeat Yourself) and KISS (Keep It Simple, Stupid) principles
- Scale your web application easily by using Django’s caching, middleware, and deployment features
- Learn and improve your Python and web development skills by using Django’s extensive documentation and community resources
How to Set Up a Django Project to Fetch Post JSON Data
To create and test a Django API that can send and receive JSON data, you need to set up a Django project and create a simple API app.
Installation of Django
You also need to install some dependencies and tools, such as:
- Python: The programming language that Django is based on. You can download and install Python from the official website: https://www.python.org/
- Pip: The package manager that lets you install and manage Python packages. You can install Pip by following the instructions from the official website: https://pip.pypa.io/en/stable/installing/
- Virtualenv: The tool that lets you create and manage isolated Python environments. You can install Virtualenv by running the following command in your terminal:
pip install virtualenv
- Django: The web framework that you will use to create your web application. You can install Django by running the following command in your terminal:
pip install django
- Django REST framework: The library that lets you create and test RESTful APIs using Django. You can install Django REST framework by running the following command in your terminal:
pip install djangorestframework
After installing these dependencies and tools, you can create a Django project by running the following command in your terminal:
django-admin startproject django_post_json
This command will create a folder named django_post_json that contains the following files and folders:
django_post_json: The main folder that contains the project settings and configuration files, such assettings.py,urls.py,wsgi.py, etc.manage.py: The script that lets you run various commands and tasks for your project, such asrunserver,migrate,test, etc.db.sqlite3: The default database file that Django uses to store your data.
Creating Django API
You can also create a simple API app by running the following command in your terminal:
python manage.py startapp api
This command will create a folder named api that contains the following files and folders:
migrations: The folder that contains the files that track the changes to your database schema__init__.py: The file that marks the folder as a Python packageadmin.py: The file that lets you register your models with the Django admin interfaceapps.py: The file that contains the configuration for your appmodels.py: The file that lets you define your data modelstests.py: The file that lets you write and run tests for your appviews.py: The file that lets you define your views and logic for your app
You also need to add your app to the INSTALLED_APPS list in the settings.py file of your project. You can do this by adding the following line to the end of the list:
'api.apps.ApiConfig',
You also need to add the Django REST framework to the INSTALLED_APPS list. You can do this by adding the following line to the end of the list:
'rest_framework',
You have now set up a Django project and created a simple API app. You can run your project by running the following command in your terminal:
python manage.py runserver
This command will start a development server that you can access from your browser at http://127.0.0.1:8000/. You should see a page that says “The install worked successfully! Congratulations!”
How to Create a View to Fetch POST JSON Data in Django
To create and test a Django API that can send and receive JSON data, you need to create a view and a URL for the API endpoint. A view is a Python function or class that handles the request and response for a specific URL. It defines the logic and behavior of your app. A URL is a string that maps to a view. It defines the address and the pattern of your app.
- Get a list of all the messages in JSON format
- Create a new message in JSON format
- Get a single message in JSON format
- Update a single message in JSON format
- Delete a single message in JSON format
How to Create a View for Your Django
You can create a view for this API endpoint in the views.py file of your app. You can do this by adding the following code to the file:
from rest_framework import generics
from .models import Message
from .serializers import MessageSerializer

class MessageListCreateView(generics.ListCreateAPIView):
  queryset = Message.objects.all()
  serializer_class = MessageSerializer

class MessageRetrieveUpdateDestroyView(generics.RetrieveUpdateDestroyAPIView):
  queryset = Message.objects.all()
  serializer_class = MessageSerializer
This code will create two views that inherit from the generic views of the Django REST framework. The MessageListCreateView view will handle the GET and POST requests for the list of messages. The MessageRetrieveUpdateDestroyView view will handle the GET, PUT, PATCH, and DELETE requests for a single message.
Both views will use the queryset and the serializer_class attributes to specify the data source and the data format. You can learn more about the generic views and their methods from the Django REST framework documentation: https://www.django-rest-framework.org/api-guide/generic-views/
You can also create a URL for this API endpoint in the urls.py file of your app. You can create this file in the same folder as your views.py file. You can do this by adding the following code to the file:
from django.urls import path
from .views import MessageListCreateView, MessageRetrieveUpdateDestroyView

urlpatterns = [
  path('messages/', MessageListCreateView.as_view(), name='message-list'),
  path('messages/<int:pk>/', MessageRetrieveUpdateDestroyView.as_view(), name='message-detail'),
]
This code will create two URL patterns that map to the views that you created. The first pattern will match the /messages/ URL and will use the MessageListCreateView view. The second pattern will match the /messages/<int:pk>/ URL and will use the MessageRetrieveUpdateDestroyView view. The <int:pk> part is a path converter that will capture an integer value and pass it to the view as the pk argument. This value will be used to identify the message object that the view will operate on. You can also add a name argument to each pattern to give it a unique identifier that you can use to refer to the URL in your code.
How to Create the URL for Your Django
You also need to include the URL patterns of your app in the urls.py file of your project. You can do this by adding the following code to the file:
from django.urls import path, include

urlpatterns = [
  path('api/', include('api.urls')),
]
This code will create a URL pattern that will match the /api/ URL and will include the URL patterns of your app. This way, you can create a namespace for your app and avoid any conflicts with other apps or URLs. You can also add a trailing slash to the end of the URL to make it consistent and avoid any redirection issues.
You have now created a view and a URL for the API endpoint. You can test your API by running the following command in your terminal:
python manage.py runserver
This command will start a development server that you can access from your browser at http://127.0.0.1:8000/. You can also use Apidog, a web-based tool that lets you test and debug APIs with ease, to test your API. I will show you how to do that in the next section.
Handling POST JSON data in Django
Handling post JSON data in Django is a common task for web developers who want to create and test RESTful APIs. Django provides various features and tools to help you with this task, such as:
- The
request.bodyproperty that lets you access the raw data of the request body as bytes. You can use thejsonmodule to parse the data into a Python dictionary. For example, you can write the following code in your view:
import json
from django.http import JsonResponse

def my_view(request):
  if request.method == 'POST':
    data = json.loads(request.body) # parse the JSON data into a dictionary
    # do something with the data
    return JsonResponse(data) # return the data as a JSON response
- The
JsonResponseclass that lets you return a response that is serialized into JSON format. You can pass a Python dictionary or a list as the first argument, and optionally specify other arguments, such asstatus,safe,json_dumps_params, etc. For example, you can write the following code in your view:
from django.http import JsonResponse

def my_view(request):
  if request.method == 'GET':
    data = {'name': 'Alice', 'email': 'alice@example.com'} # create a dictionary
    return JsonResponse(data, status=200, safe=True) # return the dictionary as a JSON response
- The Django REST framework, a third-party library that lets you create and test RESTful APIs using Django. It provides you with various features and tools, such as serializers, generic views, routers, permissions, authentication, etc. For example, you can write the following code in your
serializers.pyfile:
from rest_framework import serializers
from .models import Message

class MessageSerializer(serializers.ModelSerializer):
  class Meta:
    model = Message
    fields = ['name', 'email', 'message']
This code will create a serializer that converts your Message model into JSON format and vice versa. You can learn more about the Django REST framework and its features and tools from this article:

These are some of the advanced techniques for handling post JSON data in Django. You can use them to create and test your own Django APIs that can send and receive JSON data.
Fetch Django POST JSON Data with Apidog
Apidog is a great tool for anyone who works with APIs, whether you are a developer, a tester, a designer, or a student. It helps you to:
- Learn how to use different APIs and explore their features
- Test and debug your own APIs and find errors and bugs
- Experiment with different parameters and options and see how they affect the response
- Document and demonstrate your API usage and results
- Collaborate and communicate with other API users and developers
To test your Django API that can send and receive JSON data using Apidog, you need to follow these steps:
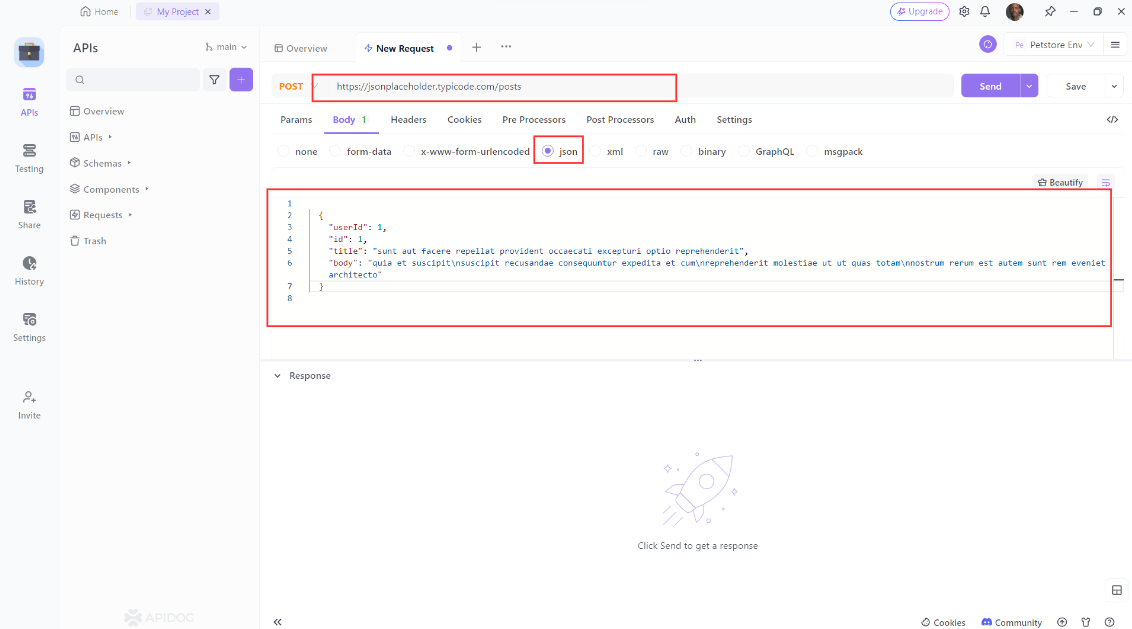
- Visit the Apidog website and create a free account. You can also use Apidog without an account, but you won’t be able to save and share your requests. Open Apidog and create a new request.
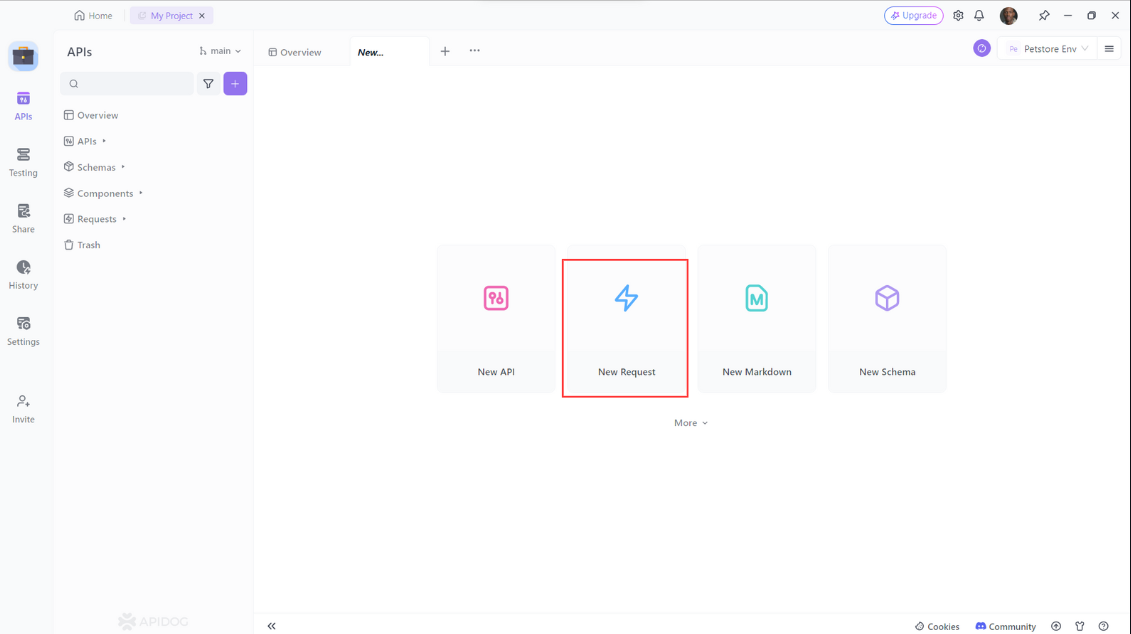
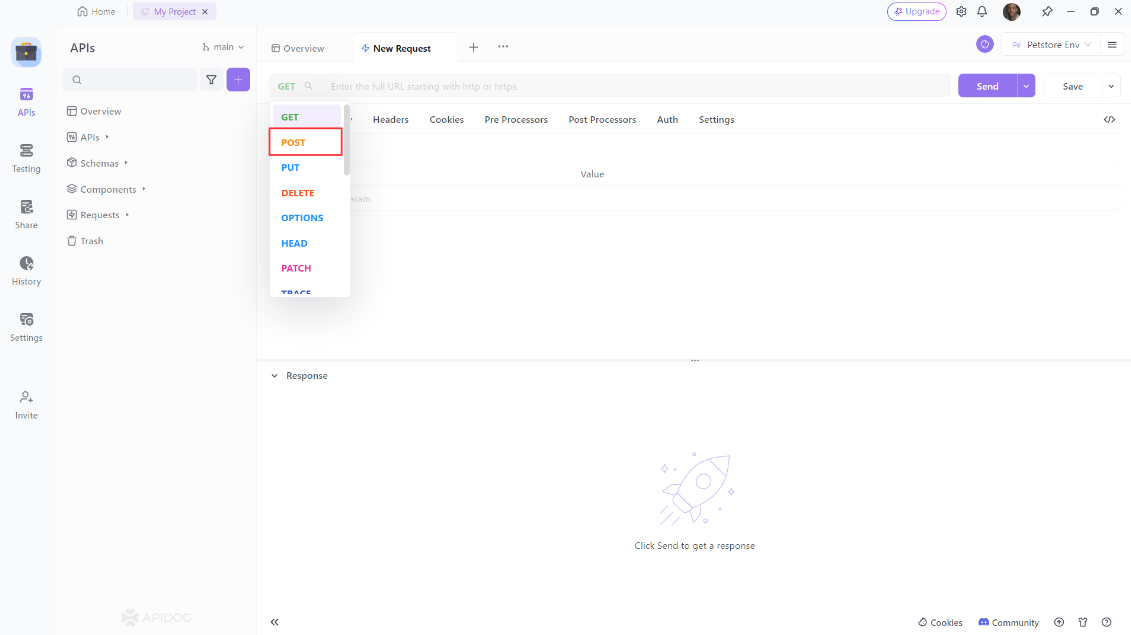
- Select the HTTP method that you want to use. For example, if you want to get the list of messages, you can select the GET method. If you want to create a new message, you can select the POST method.
- Enter the URL of your API endpoint in the URL input field. Add any headers, cookies, or parameters that you need for your request. For example, if you want to create a new message, you need to add the
Content-Typeheader with the valueapplication/jsonand write the data in JSON format in the body input field. For example, you can write the following data:
- Click on the Send button to send the request to your API. Apidog will then display the response from your API in the Response tab. You can also switch to the Headers, Cookies, or Raw tabs to see other details of the response.
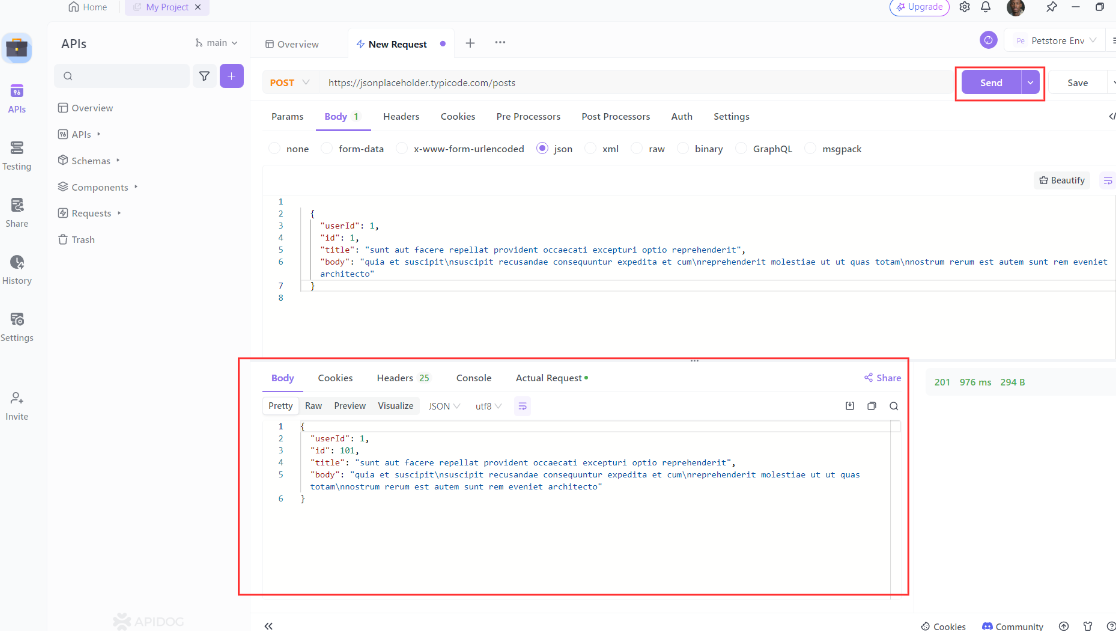
- Analyze and manipulate the response data using Apidog’s features and tools. You can use the JSON Viewer, JSONPath, JavaScript, JSON Schema, and other features and tools to view, filter, modify, or validate the response data. You can also save your request and response and share them with others using a unique URL.
You have now tested your Django API that can send and receive JSON data using Apidog. You can also test other API endpoints and methods using the same steps. You can also use Apidog to test other APIs that you find online or create yourself. Apidog is a versatile and powerful tool that can help you with any API-related task. You can learn more about Apidog and its features and tools from the official website:
Conclusion
In this blog post, I have shown you how to create and test a Django API that can send and receive JSON data. You have learned how to:
- Set up a Django project and create a simple API app
- Define a model and a serializer for the JSON data
- Create a view and a URL for the API endpoint
- Test the API using Apidog, a web-based tool that lets you test and debug APIs with ease
- Analyze and manipulate the JSON data using Apidog’s features and tools
I hope you have found this blog post inspiring and useful. You can use the skills and knowledge that you have gained from this blog post to create and test your own Django APIs that can send and receive JSON data.
You can also use Apidog to test and debug any other APIs that you encounter or create. Apidog is a handy and helpful tool that can make your API development and testing easier and faster.


