Document processing has long been one of AI's most practical applications—yet most OCR solutions force an uncomfortable trade-off between accuracy and efficiency. Traditional systems like Tesseract require extensive preprocessing. Cloud APIs charge per page and add latency. Even modern vision-language models struggle with the token explosion that comes from high-resolution document images.
DeepSeek-OCR 2 changes this equation entirely. Building on the "Contexts Optical Compression" approach from version 1, the new release introduces "Visual Causal Flow"—an architecture that processes documents the way humans actually read them, understanding visual relationships and context rather than just recognizing characters. The result is a model that achieves 97% accuracy while compressing images to as few as 64 tokens, enabling throughput of 200,000+ pages per day on a single GPU.
This guide covers everything from basic setup to production deployment—with working code you can copy-paste and run immediately.
What is DeepSeek-OCR 2?
DeepSeek-OCR 2 is an open-source vision-language model specifically designed for document understanding and text extraction. Released by DeepSeek AI in January 2026, it builds upon the original DeepSeek-OCR with a new "Visual Causal Flow" architecture that models how visual elements in documents relate to each other causally—understanding that a table header determines how cells below it should be interpreted, or that a figure caption explains the chart above it.

The model consists of two main components:
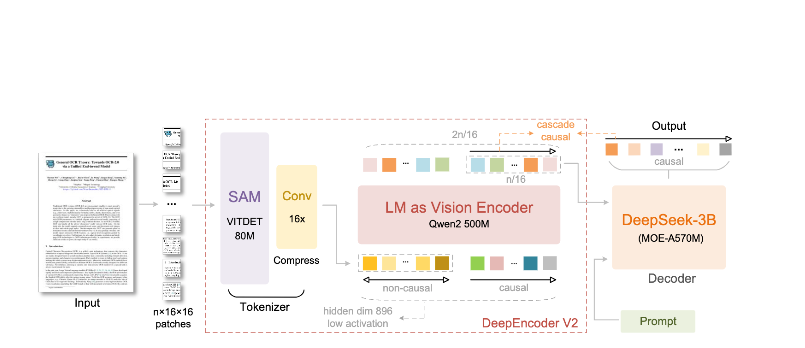
- DeepEncoder: A dual vision transformer that combines local detail extraction (SAM-based, 80M parameters) with global layout understanding (CLIP-based, 300M parameters)
- DeepSeek3B-MoE Decoder: A mixture-of-experts language model that generates structured output (Markdown, LaTeX, JSON) from the compressed visual representation
What makes DeepSeek-OCR 2 different:
- Extreme compression: Reduces a 1024×1024 image from 4,096 patches to just 256 tokens—a 16× reduction
- Structured output: Generates clean Markdown with proper tables, headers, and formatting
- Multi-format support: Handles PDFs, scanned documents, screenshots, handwritten notes, and more
- 100+ languages: Trained on 30 million pages covering approximately 100 languages
- Open weights: MIT-licensed, available on Hugging Face
Key Features and Architecture
Visual Causal Flow
The headline feature of version 2 is "Visual Causal Flow"—a new approach to understanding documents that goes beyond simple OCR. Instead of treating a page as a flat grid of characters, the model learns causal relationships between visual elements:
- Reading order inference: Automatically determines the correct sequence for multi-column layouts
- Table structure understanding: Recognizes headers, merged cells, and nested tables
- Figure-caption linking: Associates images with their descriptions
- Mathematical expression parsing: Handles inline and block LaTeX accurately
DeepEncoder Architecture
The DeepEncoder is where the magic happens. It processes high-resolution images while maintaining a manageable token count:
Input Image (1024×1024)
    ↓
SAM-base Block (80M params)
    - Windowed attention for local detail
    - Extracts fine-grained features
    ↓
CLIP-large Block (300M params)
    - Global attention for layout
    - Understands document structure
    ↓
Convolution Block
    - 16× token reduction
    - 4,096 patches → 256 tokens
    ↓
Output: Compressed Vision Tokens
Compression vs. Accuracy Trade-off
| Compression Ratio | Vision Tokens | Accuracy |
|---|---|---|
| 4× | 1,024 | 99%+ |
| 10× | 256 | 97% |
| 16× | 160 | 92% |
| 20× | 128 | ~60% |
The sweet spot for most applications is the 10× compression ratio, which maintains 97% accuracy while enabling the high throughput that makes production deployment practical.
Installation and Setup
Prerequisites
- Python 3.10+ (3.12.9 recommended)
- CUDA 11.8+ with compatible NVIDIA GPU
- At least 16GB GPU memory (A100-40G recommended for production)
Method 1: vLLM Installation (Recommended)
vLLM provides the best performance for production deployments:
# Create virtual environment
python -m venv deepseek-ocr-env
source deepseek-ocr-env/bin/activate

# Install vLLM with CUDA support
pip install vllm>=0.8.5

# Install flash attention for optimal performance
pip install flash-attn==2.7.3 --no-build-isolation
Method 2: Transformers Installation
For development and experimentation:
pip install transformers>=4.40.0
pip install torch>=2.6.0 torchvision>=0.21.0
pip install accelerate
pip install flash-attn==2.7.3 --no-build-isolation
Method 3: Docker (Production)
FROM nvidia/cuda:11.8-devel-ubuntu22.04

RUN pip install vllm>=0.8.5 flash-attn==2.7.3

# Pre-download model
RUN python -c "from vllm import LLM; LLM(model='deepseek-ai/DeepSeek-OCR-2')"

EXPOSE 8000
CMD ["vllm", "serve", "deepseek-ai/DeepSeek-OCR-2", "--port", "8000"]
Verify Installation
import torch
print(f"PyTorch version: {torch.__version__}")
print(f"CUDA available: {torch.cuda.is_available()}")
print(f"GPU: {torch.cuda.get_device_name(0)}")

import vllm
print(f"vLLM version: {vllm.__version__}")
Python Code Examples
Basic OCR with vLLM
Here's the simplest way to extract text from a document image:
from vllm import LLM, SamplingParams
from vllm.model_executor.models.deepseek_ocr import NGramPerReqLogitsProcessor
from PIL import Image

# Initialize the model
llm = LLM(
    model="deepseek-ai/DeepSeek-OCR-2",
    enable_prefix_caching=False,
    mm_processor_cache_gb=0,
    logits_processors=[NGramPerReqLogitsProcessor],
    trust_remote_code=True,
)

# Load your document image
image = Image.open("document.png").convert("RGB")

# Prepare the prompt - "Free OCR." triggers standard extraction
prompt = "<image>\nFree OCR."

model_input = [{
    "prompt": prompt,
    "multi_modal_data": {"image": image}
}]

# Configure sampling parameters
sampling_params = SamplingParams(
    temperature=0.0,  # Deterministic for OCR
    max_tokens=8192,
    extra_args={
        "ngram_size": 30,
        "window_size": 90,
        "whitelist_token_ids": {128821, 128822},  # <td>, </td> for tables
    },
    skip_special_tokens=False,
)

# Generate output
outputs = llm.generate(model_input, sampling_params)

# Extract the markdown text
markdown_text = outputs[0].outputs[0].text
print(markdown_text)
Batch Processing Multiple Documents
Process multiple documents efficiently in a single batch:
from vllm import LLM, SamplingParams
from vllm.model_executor.models.deepseek_ocr import NGramPerReqLogitsProcessor
from PIL import Image
from pathlib import Path

def batch_ocr(image_paths: list[str], llm: LLM) -> list[str]:
    """Process multiple images in a single batch."""

    # Load all images
    images = [Image.open(p).convert("RGB") for p in image_paths]

    # Prepare batch input
    prompt = "<image>\nFree OCR."
    model_inputs = [
        {"prompt": prompt, "multi_modal_data": {"image": img}}
        for img in images
    ]

    sampling_params = SamplingParams(
        temperature=0.0,
        max_tokens=8192,
        extra_args={
            "ngram_size": 30,
            "window_size": 90,
            "whitelist_token_ids": {128821, 128822},
        },
        skip_special_tokens=False,
    )

    # Generate all outputs in one call
    outputs = llm.generate(model_inputs, sampling_params)

    return [out.outputs[0].text for out in outputs]


# Usage
llm = LLM(
    model="deepseek-ai/DeepSeek-OCR-2",
    enable_prefix_caching=False,
    mm_processor_cache_gb=0,
    logits_processors=[NGramPerReqLogitsProcessor],
)

image_files = list(Path("documents/").glob("*.png"))
results = batch_ocr([str(f) for f in image_files], llm)

for path, text in zip(image_files, results):
    print(f"--- {path.name} ---")
    print(text[:500])  # First 500 chars
    print()
Using Transformers Directly
For more control over the inference process:
import torch
from transformers import AutoModel, AutoTokenizer
from PIL import Image

# Set GPU
device = "cuda:0"

# Load model and tokenizer
model_name = "deepseek-ai/DeepSeek-OCR-2"
tokenizer = AutoTokenizer.from_pretrained(model_name, trust_remote_code=True)
model = AutoModel.from_pretrained(
    model_name,
    _attn_implementation="flash_attention_2",
    trust_remote_code=True,
    use_safetensors=True,
)
model = model.eval().to(device).to(torch.bfloat16)

# Load and preprocess image
image = Image.open("document.png").convert("RGB")

# Different prompts for different tasks
prompts = {
    "ocr": "<image>\nFree OCR.",
    "markdown": "<image>\n<|grounding|>Convert the document to markdown.",
    "table": "<image>\nExtract all tables as markdown.",
    "math": "<image>\nExtract mathematical expressions as LaTeX.",
}

# Process with your chosen prompt
prompt = prompts["markdown"]
inputs = tokenizer(prompt, return_tensors="pt").to(device)

# Add image to inputs (model-specific preprocessing)
with torch.no_grad():
    outputs = model.generate(
        **inputs,
        images=[image],
        max_new_tokens=4096,
        do_sample=False,
    )

result = tokenizer.decode(outputs[0], skip_special_tokens=True)
print(result)
Async Processing for High Throughput
import asyncio
from vllm import AsyncLLMEngine, AsyncEngineArgs, SamplingParams
from vllm.model_executor.models.deepseek_ocr import NGramPerReqLogitsProcessor
from PIL import Image

async def process_document(engine, image_path: str, request_id: str):
    """Process a single document asynchronously."""
    image = Image.open(image_path).convert("RGB")

    prompt = "<image>\nFree OCR."
    sampling_params = SamplingParams(
        temperature=0.0,
        max_tokens=8192,
        extra_args={
            "ngram_size": 30,
            "window_size": 90,
            "whitelist_token_ids": {128821, 128822},
        },
    )

    results = []
    async for output in engine.generate(prompt, sampling_params, request_id):
        results.append(output)

    return results[-1].outputs[0].text

async def main():
    # Initialize async engine
    engine_args = AsyncEngineArgs(
        model="deepseek-ai/DeepSeek-OCR-2",
        enable_prefix_caching=False,
        mm_processor_cache_gb=0,
    )
    engine = AsyncLLMEngine.from_engine_args(engine_args)

    # Process multiple documents concurrently
    image_paths = ["doc1.png", "doc2.png", "doc3.png"]
    tasks = [
        process_document(engine, path, f"req_{i}")
        for i, path in enumerate(image_paths)
    ]

    results = await asyncio.gather(*tasks)

    for path, text in zip(image_paths, results):
        print(f"{path}: {len(text)} characters extracted")

asyncio.run(main())
Using vLLM for Production
Starting the OpenAI-Compatible Server
Deploy DeepSeek-OCR 2 as an API server:
vllm serve deepseek-ai/DeepSeek-OCR-2 \
    --host 0.0.0.0 \
    --port 8000 \
    --logits_processors vllm.model_executor.models.deepseek_ocr:NGramPerReqLogitsProcessor \
    --no-enable-prefix-caching \
    --mm-processor-cache-gb 0 \
    --max-model-len 16384 \
    --gpu-memory-utilization 0.9
Calling the Server with OpenAI SDK
from openai import OpenAI
import base64

# Initialize client pointing to local server
client = OpenAI(
    api_key="EMPTY",  # Not required for local server
    base_url="http://localhost:8000/v1",
    timeout=3600,
)

def encode_image(image_path: str) -> str:
    """Encode image to base64."""
    with open(image_path, "rb") as f:
        return base64.b64encode(f.read()).decode("utf-8")

def ocr_document(image_path: str) -> str:
    """Extract text from document using OCR API."""
    base64_image = encode_image(image_path)

    response = client.chat.completions.create(
        model="deepseek-ai/DeepSeek-OCR-2",
        messages=[
            {
                "role": "user",
                "content": [
                    {
                        "type": "image_url",
                        "image_url": {
                            "url": f"data:image/png;base64,{base64_image}"
                        }
                    },
                    {
                        "type": "text",
                        "text": "Free OCR."
                    }
                ]
            }
        ],
        max_tokens=8192,
        temperature=0.0,
        extra_body={
            "skip_special_tokens": False,
            "vllm_xargs": {
                "ngram_size": 30,
                "window_size": 90,
                "whitelist_token_ids": [128821, 128822],
            },
        },
    )

    return response.choices[0].message.content

# Usage
result = ocr_document("invoice.png")
print(result)
Using with URLs
response = client.chat.completions.create(
    model="deepseek-ai/DeepSeek-OCR-2",
    messages=[
        {
            "role": "user",
            "content": [
                {
                    "type": "image_url",
                    "image_url": {
                        "url": "https://example.com/document.png"
                    }
                },
                {
                    "type": "text",
                    "text": "Free OCR."
                }
            ]
        }
    ],
    max_tokens=8192,
    temperature=0.0,
)
Testing with Apidog
Testing OCR APIs effectively requires visualizing both the input documents and the extracted output. Apidog provides an intuitive interface for experimenting with DeepSeek-OCR 2.

Setting Up the OCR Endpoint
Step 1: Create a New Request
- Open Apidog and create a new project
- Add a POST request to
http://localhost:8000/v1/chat/completions
Step 2: Configure Headers
Content-Type: application/json
Step 3: Configure Request Body
{
  "model": "deepseek-ai/DeepSeek-OCR-2",
  "messages": [
    {
      "role": "user",
      "content": [
        {
          "type": "image_url",
          "image_url": {
            "url": "data:image/png;base64,{{base64_image}}"
          }
        },
        {
          "type": "text",
          "text": "Free OCR."
        }
      ]
    }
  ],
  "max_tokens": 8192,
  "temperature": 0,
  "extra_body": {
    "skip_special_tokens": false,
    "vllm_xargs": {
      "ngram_size": 30,
      "window_size": 90,
      "whitelist_token_ids": [128821, 128822]
    }
  }
}
Testing Different Document Types
Create saved requests for common document types:
- Invoice extraction - Test structured data extraction
- Academic paper - Test LaTeX math handling
- Handwritten notes - Test handwriting recognition
- Multi-column layout - Test reading order inference
Comparing Resolution Modes
Set up environment variables to quickly test different modes:
| Mode | Resolution | Tokens | Use Case |
|---|---|---|---|
tiny | 512×512 | 64 | Quick previews |
small | 640×640 | 100 | Simple documents |
base | 1024×1024 | 256 | Standard documents |
large | 1280×1280 | 400 | Dense text |
gundam | Dynamic | Variable | Complex layouts |
 deepseek-ai
Resolution Modes and Compression
DeepSeek-OCR 2 supports five resolution modes, each optimized for different use cases:
Tiny Mode (64 tokens)
Best for: Quick text detection, simple forms, low-resolution inputs
# Configure for tiny mode
os.environ["DEEPSEEK_OCR_MODE"] = "tiny"  # 512×512
Small Mode (100 tokens)
Best for: Clean digital documents, single-column text
Base Mode (256 tokens) - Default
Best for: Most standard documents, invoices, letters
Large Mode (400 tokens)
Best for: Dense academic papers, legal documents
Gundam Mode (Dynamic)
Best for: Complex multi-page documents with varying layouts
# Gundam mode combines multiple views
# - n × 640×640 local tiles for detail
# - 1 × 1024×1024 global view for structure
Choosing the Right Mode
def select_mode(document_type: str, page_count: int) -> str:
    """Select optimal resolution mode based on document characteristics."""

    if document_type == "simple_form":
        return "tiny"
    elif document_type == "digital_document" and page_count == 1:
        return "small"
    elif document_type == "academic_paper":
        return "large"
    elif document_type == "mixed_layout" or page_count > 1:
        return "gundam"
    else:
        return "base"  # Default
Processing PDFs and Documents
Converting PDFs to Images
import fitz  # PyMuPDF
from PIL import Image
import io

def pdf_to_images(pdf_path: str, dpi: int = 150) -> list[Image.Image]:
    """Convert PDF pages to PIL Images."""
    doc = fitz.open(pdf_path)
    images = []

    for page_num in range(len(doc)):
        page = doc[page_num]
        # Render at specified DPI
        mat = fitz.Matrix(dpi / 72, dpi / 72)
        pix = page.get_pixmap(matrix=mat)

        # Convert to PIL Image
        img_data = pix.tobytes("png")
        img = Image.open(io.BytesIO(img_data))
        images.append(img)

    doc.close()
    return images

# Usage
images = pdf_to_images("report.pdf", dpi=200)
print(f"Extracted {len(images)} pages")
Full PDF Processing Pipeline
from vllm import LLM, SamplingParams
from vllm.model_executor.models.deepseek_ocr import NGramPerReqLogitsProcessor
from pathlib import Path
import fitz
from PIL import Image
import io

class PDFProcessor:
    def __init__(self, model_name: str = "deepseek-ai/DeepSeek-OCR-2"):
        self.llm = LLM(
            model=model_name,
            enable_prefix_caching=False,
            mm_processor_cache_gb=0,
            logits_processors=[NGramPerReqLogitsProcessor],
        )
        self.sampling_params = SamplingParams(
            temperature=0.0,
            max_tokens=8192,
            extra_args={
                "ngram_size": 30,
                "window_size": 90,
                "whitelist_token_ids": {128821, 128822},
            },
            skip_special_tokens=False,
        )

    def process_pdf(self, pdf_path: str, dpi: int = 150) -> str:
        """Process entire PDF and return combined markdown."""
        doc = fitz.open(pdf_path)
        all_text = []

        for page_num in range(len(doc)):
            # Convert page to image
            page = doc[page_num]
            mat = fitz.Matrix(dpi / 72, dpi / 72)
            pix = page.get_pixmap(matrix=mat)
            img = Image.open(io.BytesIO(pix.tobytes("png")))

            # OCR the page
            prompt = "<image>\nFree OCR."
            model_input = [{
                "prompt": prompt,
                "multi_modal_data": {"image": img}
            }]

            output = self.llm.generate(model_input, self.sampling_params)
            page_text = output[0].outputs[0].text

            all_text.append(f"## Page {page_num + 1}\n\n{page_text}")

        doc.close()
        return "\n\n---\n\n".join(all_text)

# Usage
processor = PDFProcessor()
markdown = processor.process_pdf("annual_report.pdf")

# Save to file
Path("output.md").write_text(markdown)
Benchmark Performance
Accuracy Benchmarks
| Benchmark | DeepSeek-OCR 2 | GOT-OCR2.0 | MinerU2.0 |
|---|---|---|---|
| OmniDocBench | 94.2% | 91.8% | 89.5% |
| Tokens/page | 100-256 | 256 | 6,000+ |
| Fox (10× compression) | 97% | - | - |
| Fox (20× compression) | 60% | - | - |
Throughput Performance
| Hardware | Pages/Day | Pages/Hour |
|---|---|---|
| A100-40G (single) | 200,000+ | ~8,300 |
| A100-40G × 20 | 33M+ | ~1.4M |
| RTX 4090 | ~80,000 | ~3,300 |
| RTX 3090 | ~50,000 | ~2,100 |
Real-World Accuracy by Document Type
| Document Type | Accuracy | Notes |
|---|---|---|
| Digital PDFs | 98%+ | Best performance |
| Scanned documents | 95%+ | Good quality scans |
| Financial reports | 92% | Complex tables |
| Handwritten notes | 85% | Depends on legibility |
| Historical documents | 80% | Degraded quality |
Best Practices and Optimization
Image Preprocessing
from PIL import Image, ImageEnhance, ImageFilter

def preprocess_document(image: Image.Image) -> Image.Image:
    """Preprocess document image for optimal OCR."""

    # Convert to RGB if necessary
    if image.mode != "RGB":
        image = image.convert("RGB")

    # Resize if too small (minimum 512px on shortest side)
    min_dim = min(image.size)
    if min_dim < 512:
        scale = 512 / min_dim
        new_size = (int(image.width * scale), int(image.height * scale))
        image = image.resize(new_size, Image.Resampling.LANCZOS)

    # Enhance contrast for scanned documents
    enhancer = ImageEnhance.Contrast(image)
    image = enhancer.enhance(1.2)

    # Sharpen slightly
    image = image.filter(ImageFilter.SHARPEN)

    return image
Prompt Engineering
# Different prompts for different tasks
PROMPTS = {
    # Standard OCR - fastest, good for most cases
    "ocr": "<image>\nFree OCR.",

    # Markdown conversion - better structure preservation
    "markdown": "<image>\n<|grounding|>Convert the document to markdown.",

    # Table extraction - optimized for tabular data
    "table": "<image>\nExtract all tables in markdown format.",

    # Math extraction - for academic/scientific documents
    "math": "<image>\nExtract all text and mathematical expressions. Use LaTeX for math.",

    # Specific fields - for form extraction
    "fields": "<image>\nExtract the following fields: name, date, amount, signature.",
}
Memory Optimization
# For limited GPU memory
llm = LLM(
    model="deepseek-ai/DeepSeek-OCR-2",
    gpu_memory_utilization=0.8,  # Leave headroom
    max_model_len=8192,  # Reduce max context
    enable_chunked_prefill=True,  # Better memory efficiency
)
Batching Strategy
def optimal_batch_size(gpu_memory_gb: int, avg_image_size: tuple) -> int:
    """Calculate optimal batch size based on GPU memory."""

    # Approximate memory per image (in GB)
    pixels = avg_image_size[0] * avg_image_size[1]
    mem_per_image = (pixels * 4) / (1024**3)  # 4 bytes per pixel

    # Reserve 60% of GPU memory for model
    available = gpu_memory_gb * 0.4

    return max(1, int(available / mem_per_image))

# Example: A100-40G with 1024x1024 images
batch_size = optimal_batch_size(40, (1024, 1024))
print(f"Recommended batch size: {batch_size}")  # ~10
Troubleshooting Common Issues
Out of Memory Errors
Problem: CUDA out of memory
Solutions:
# 1. Reduce batch size
sampling_params = SamplingParams(max_tokens=4096)  # Reduce from 8192

# 2. Use smaller resolution mode
os.environ["DEEPSEEK_OCR_MODE"] = "small"

# 3. Enable memory optimization
llm = LLM(
    model="deepseek-ai/DeepSeek-OCR-2",
    gpu_memory_utilization=0.7,
    enforce_eager=True,  # Disable CUDA graphs
)
Poor Table Extraction
Problem: Tables are misaligned or missing cells
Solutions:
# Ensure whitelist tokens are set
sampling_params = SamplingParams(
    extra_args={
        "whitelist_token_ids": {128821, 128822},  # Critical for tables
    },
)

# Use higher resolution
os.environ["DEEPSEEK_OCR_MODE"] = "large"
Slow Inference
Problem: Processing takes too long
Solutions:
- Use vLLM instead of Transformers (2-3× faster)
- Enable Flash Attention 2
- Use batched processing instead of sequential
- Deploy on GPU with tensor cores (A100, H100)
Garbled Output
Problem: Output contains nonsense or repeated characters
Solutions:
# Ensure logits processor is enabled
from vllm.model_executor.models.deepseek_ocr import NGramPerReqLogitsProcessor

llm = LLM(
    model="deepseek-ai/DeepSeek-OCR-2",
    logits_processors=[NGramPerReqLogitsProcessor],  # Required!
)

# Use temperature=0 for deterministic output
sampling_params = SamplingParams(temperature=0.0)
Ready to extract text from your documents? Download Apidog to test DeepSeek-OCR 2 API calls with a visual interface, then deploy with confidence using the production patterns in this guide.