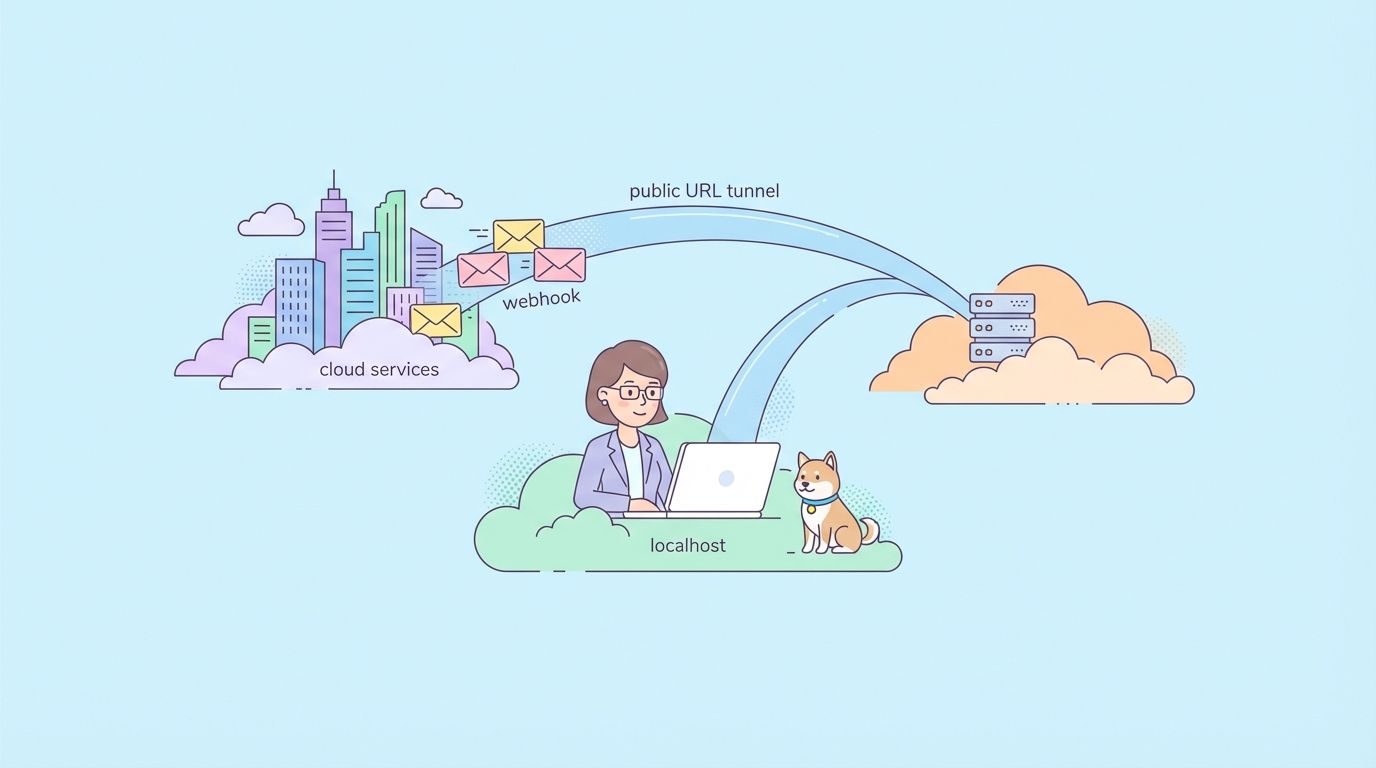
Testing localhost APIs that need to receive webhooks or callbacks from external services requires exposing your local development server to the internet temporarily. Tunneling services like ngrok, NPort, Cloudflare Tunnel, and others create secure connections that give your localhost a public URL.
Why You Need Localhost Tunneling
You're building an API that integrates with third-party services. Everything works on your laptop—endpoints respond correctly, data flows smoothly. Then you try to test webhook callbacks from Stripe, GitHub, Twilio, or any external service.
Problem: External services can't reach localhost:3000. Your development server isn't accessible from the internet.
Common scenarios where this breaks your workflow:
1. Webhook Testing
Services like Stripe send payment confirmations, GitHub sends repository events, Slack sends interaction events—all as POST requests to your API. During development, these services need a public URL to send webhooks to.
2. OAuth Callback URLs
When implementing "Sign in with Google," "Login with GitHub," or any OAuth flow, the authentication provider redirects users back to your application with an authorization code. The redirect URL must be publicly accessible and match what you registered with the provider.
3. Third-Party API Integration
Some APIs require callback URLs for asynchronous operations. For example, video transcoding services notify your API when processing completes, or payment processors confirm transactions.
4. Mobile App Development
Testing your API from a mobile device on the same network often fails because the mobile app can't resolve localhost. A tunnel gives you a URL that works from any device.
5. Client Demos
Sometimes you need to show in-progress work to clients or stakeholders. Deploying to staging for every small change slows iteration. A temporary public URL lets clients test your development environment.
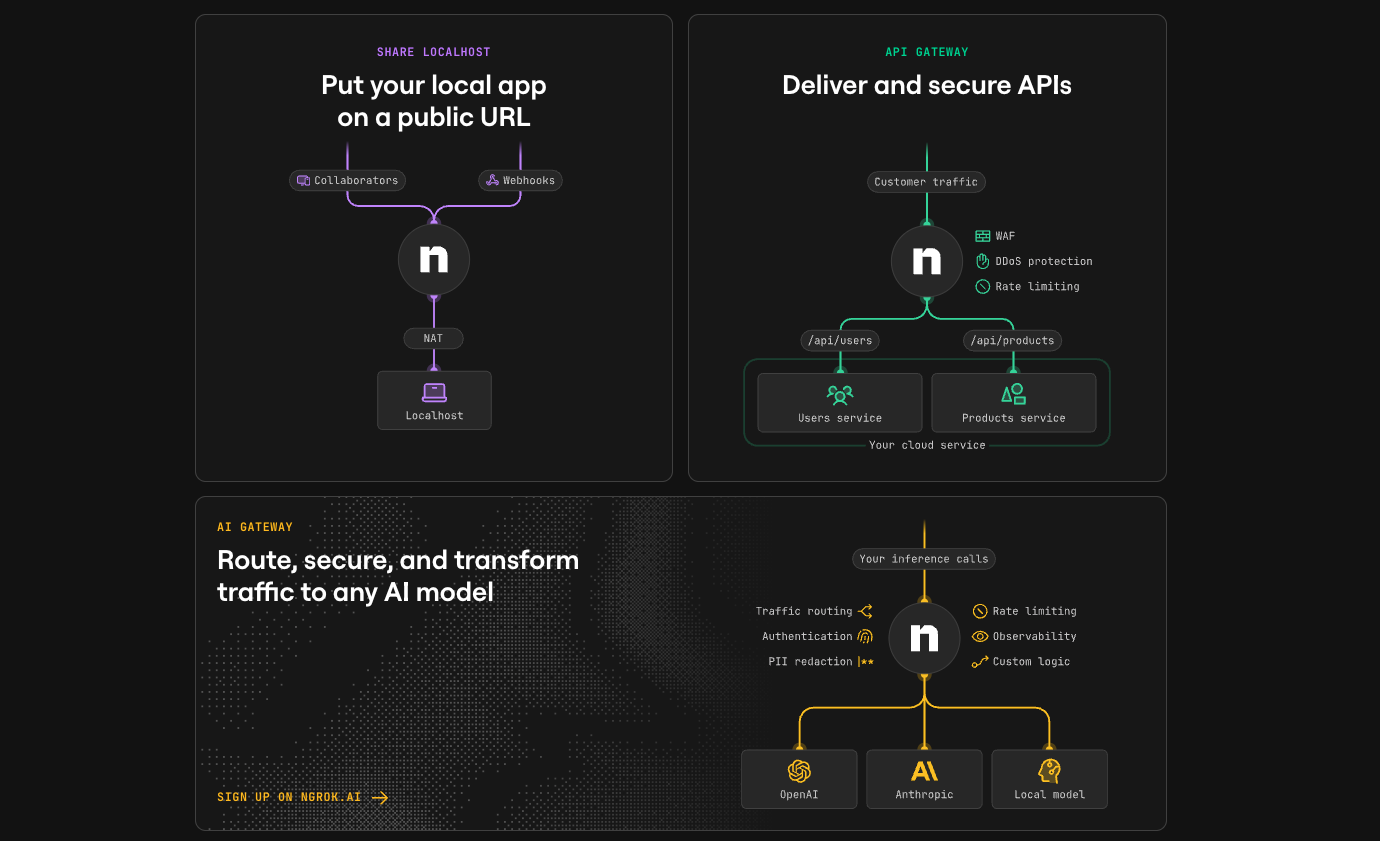
How Localhost Tunneling Works
Tunneling services create a secure connection between their cloud servers and your local machine:
External Service → Tunneling Service (public URL) → Secure Connection → Your Localhost:3000
The process:
- You start a tunnel client on your machine pointing to your local port
- The client connects to the tunneling service's cloud infrastructure
- The service assigns a public URL (e.g.,
https://abc123.ngrok.io) - Incoming requests to that public URL are forwarded through the encrypted connection to your localhost
- Your local server receives the request as if it came directly from the client
- Responses flow back through the tunnel to the requester
This happens transparently. Your local server doesn't need to know it's behind a tunnel.
Comparing Popular Tunneling Services
Here are the most popular options in 2026, with their strengths and limitations:
ngrok (Most Popular)
Best for: Established projects, teams wanting reliability
ngrok http 3000
Pros:
- Industry standard with extensive documentation
- Web inspector UI to see all requests
- Custom domains on paid plans
- Request replay functionality
- TLS termination
Cons:
- Free tier has 2-hour session limit
- Random URLs on free tier (changes each session)
- Pricing starts at $10/month for persistent URLs
Free Tier:
- 1 online agent
- 40 connections/minute
- Random URLs that expire
Paid Plans: $8-$20/month
NPort (Rising Free Alternative)
Best for: Developers avoiding subscription costs
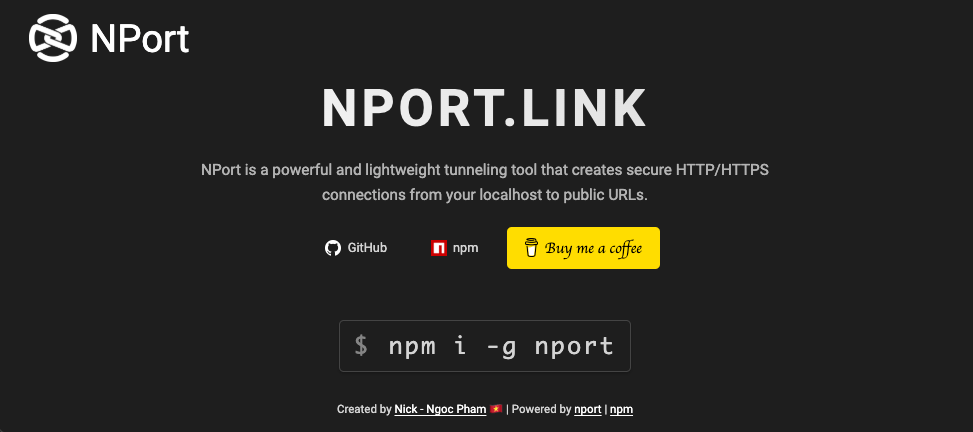
nport start 3000
Pros:
- Completely free and open-source
- No session time limits
- Custom subdomains available
- Self-hosted option
- Similar feature set to ngrok free tier
Cons:
- Smaller community (fewer tutorials)
- Less mature (launched 2025)
- No commercial support
Free Tier:
- Unlimited tunnels
- No time limits
- Custom subdomains
 tuanngocptn
This is the tool gaining traction on Dev.to as developers seek ngrok alternatives without ongoing costs.
Cloudflare Tunnel (Best for Production-Adjacent)
Best for: Teams already using Cloudflare, long-running tunnels
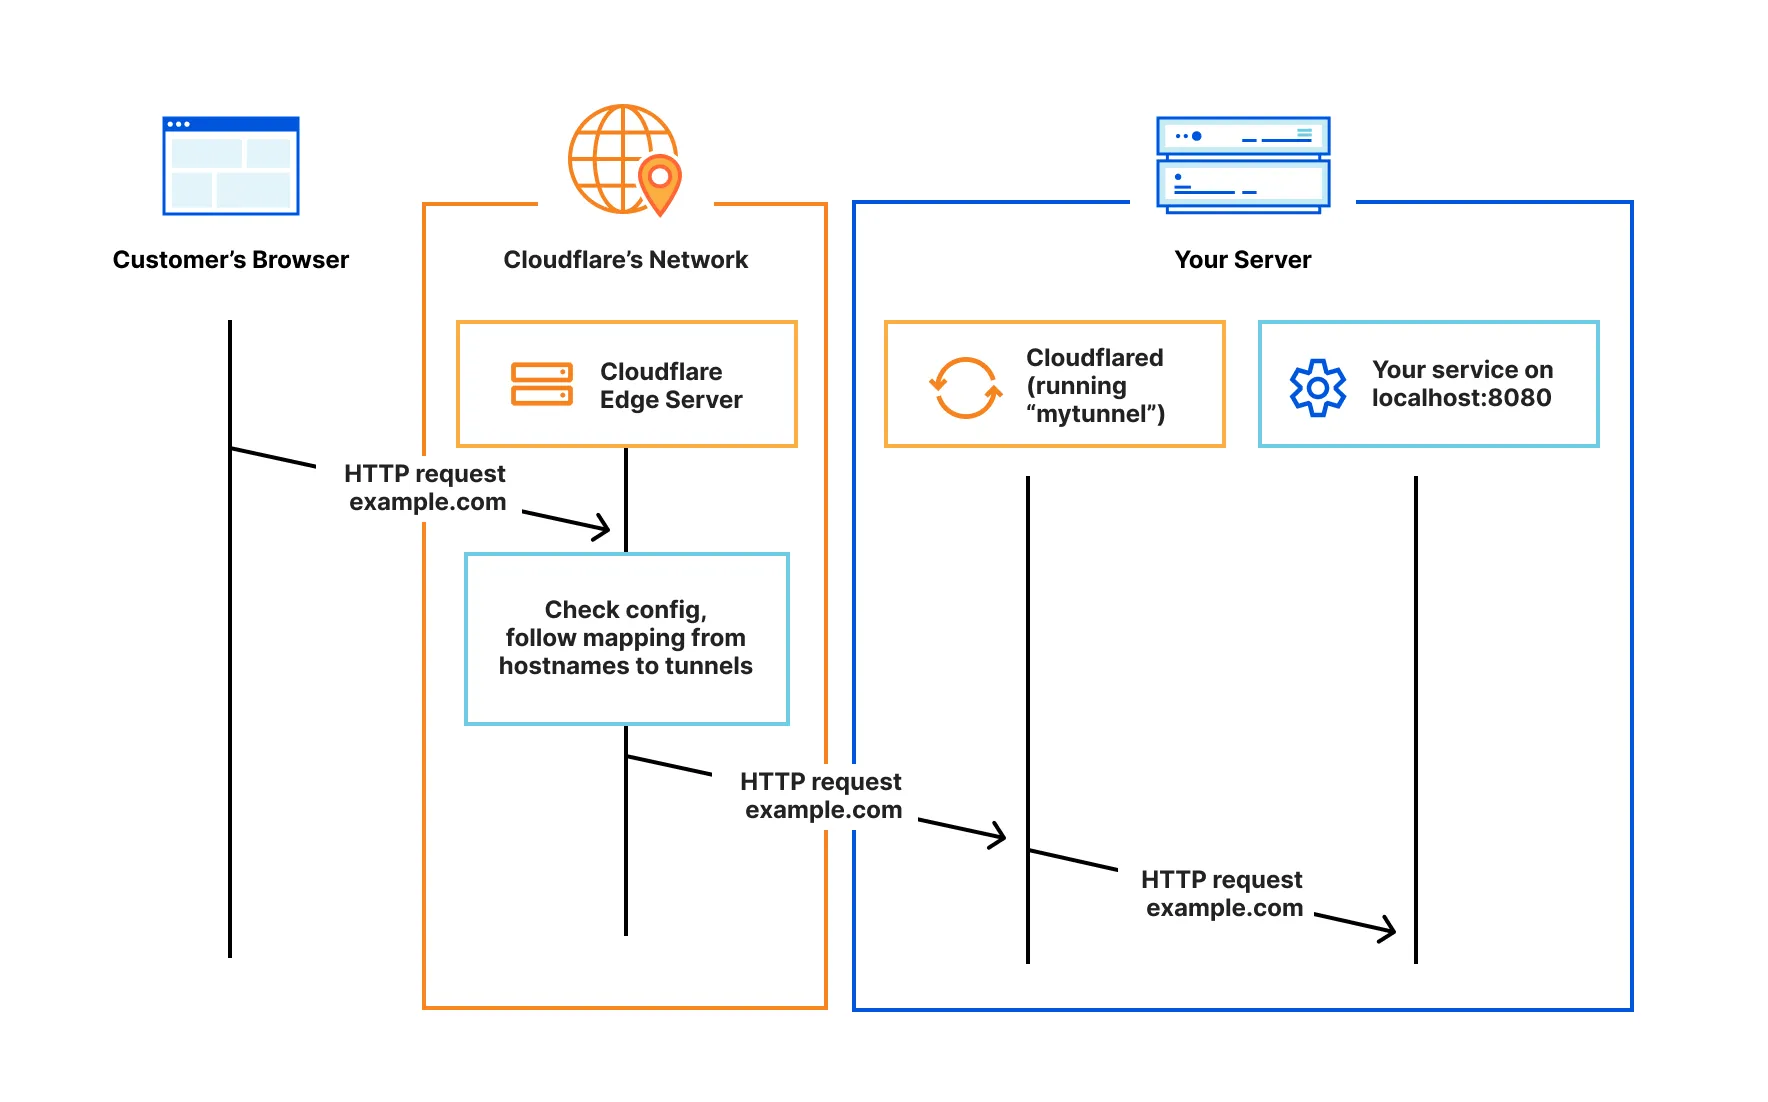
cloudflared tunnel --url http://localhost:3000
Pros:
- Enterprise-grade infrastructure
- DDoS protection included
- Integrates with Cloudflare Zero Trust
- No bandwidth limits
- Free for most use cases
Cons:
- More complex setup
- Requires Cloudflare account
- Overkill for simple webhook testing
Free Tier:
- Unlimited bandwidth
- Unlimited tunnels
- DDoS protection
Localtunnel (Simplest)
Best for: Quick one-off tests, no installation
npx localtunnel --port 3000
Pros:
- No signup required
- Zero configuration
- Install-free (runs via npx)
- Open-source
Cons:
- Unreliable (frequently down)
- No request inspection
- Random URLs only
- Minimal documentation


Free Tier:
- Everything is free
- No feature restrictions
Tailscale Funnel (Best for Teams)
Best for: Private team sharing, secure demos
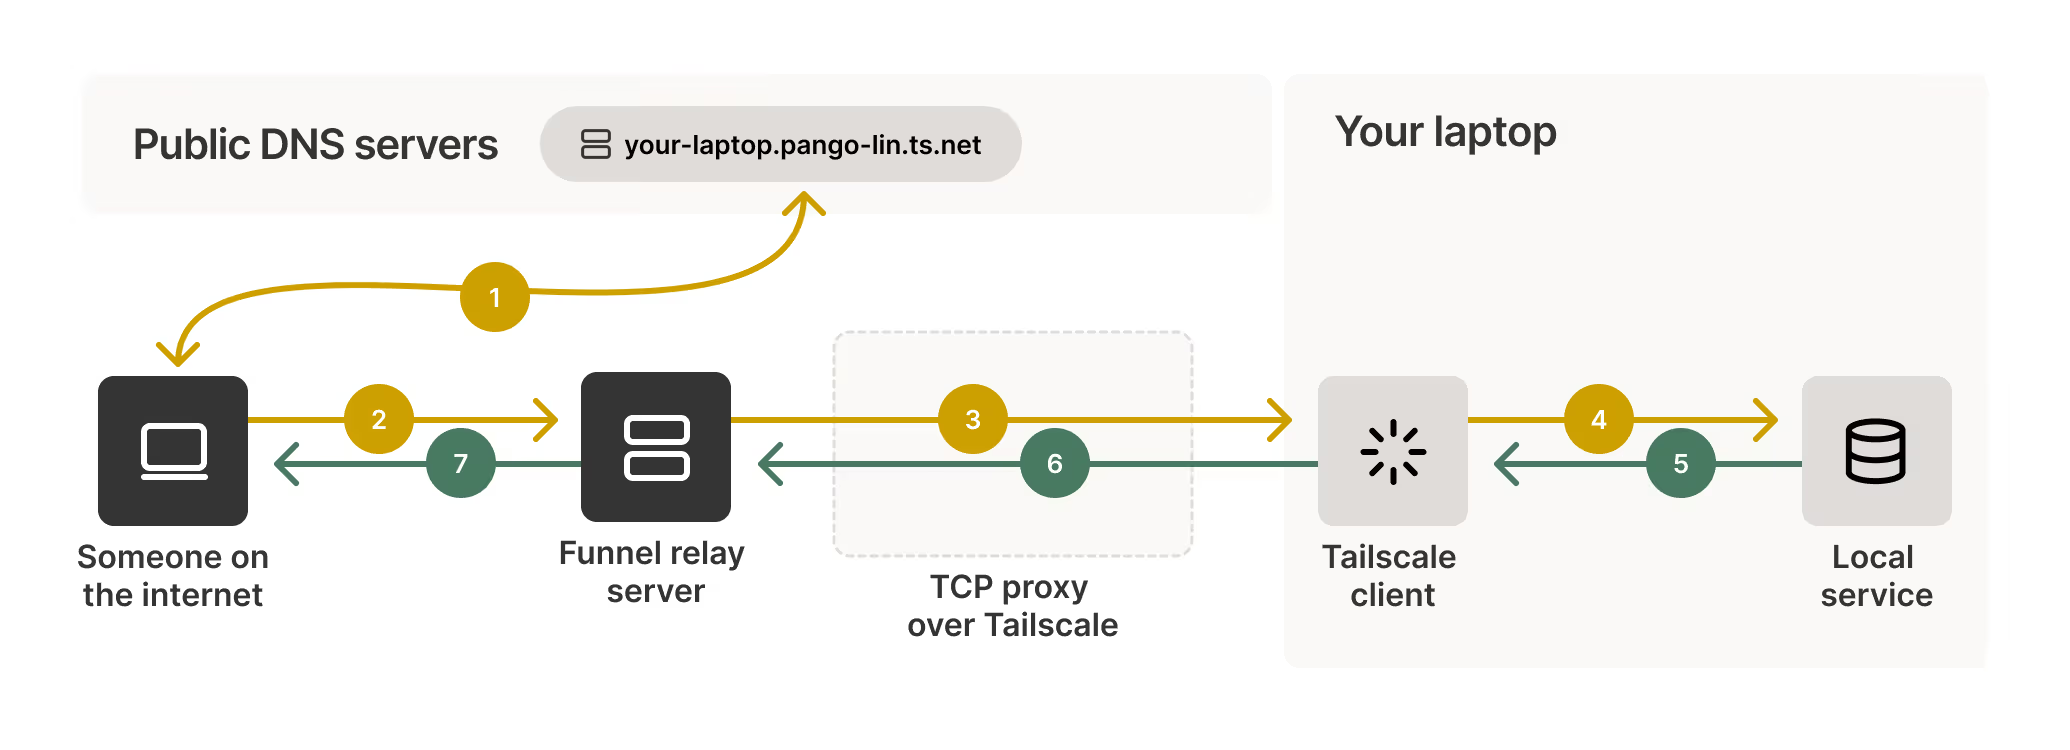
tailscale serve https / http://localhost:3000
tailscale funnel 443 on
Pros:
- Based on WireGuard (fast, secure)
- Private by default (only visible to your Tailscale network)
- Can expose publicly when needed
- Excellent for team collaboration
Cons:
- Requires Tailscale setup
- Steeper learning curve
- Primarily designed for private networking
Free Tier:
- Up to 100 devices
- Unlimited bandwidth

Comparison Table
| Feature | ngrok | NPort | Cloudflare Tunnel | Localtunnel | Tailscale |
|---|---|---|---|---|---|
| Price | Free/$10+ | Free | Free | Free | Free/Paid |
| Session Limit | 2 hours | None | None | None | None |
| Custom Domain | Paid | Free | Yes | No | Yes |
| Request Inspector | Yes | Basic | No | No | No |
| Setup Complexity | Low | Low | Medium | Very Low | Medium |
| Reliability | Excellent | Good | Excellent | Poor | Excellent |
| Best For | Production testing | Cost-conscious devs | Enterprise | Quick tests | Team sharing |
Setting Up Your First Localhost Tunnel
Let's walk through setup with the most common tools. We'll use a Node.js Express API as an example, but this works with any local server.
Example: Local API Server
// server.js
const express = require('express');
const app = express();

app.use(express.json());

app.post('/webhook', (req, res) => {
  console.log('Webhook received:', req.body);
  res.json({ received: true });
});

app.get('/health', (req, res) => {
  res.json({ status: 'healthy' });
});

app.listen(3000, () => {
  console.log('Server running on http://localhost:3000');
});
Option 1: Using ngrok
Step 1: Install ngrok
# macOS
brew install ngrok

# Windows (via Chocolatey)
choco install ngrok

# Linux
curl -s https://ngrok-agent.s3.amazonaws.com/ngrok.asc | \
  sudo tee /etc/apt/trusted.gpg.d/ngrok.asc >/dev/null && \
  echo "deb https://ngrok-agent.s3.amazonaws.com buster main" | \
  sudo tee /etc/apt/sources.list.d/ngrok.list && \
  sudo apt update && sudo apt install ngrok
Step 2: Authenticate (optional but recommended)
ngrok config add-authtoken YOUR_AUTH_TOKEN
Step 3: Start the tunnel
ngrok http 3000
Output:
Session Status                online
Account                       you@example.com (Plan: Free)
Version                       3.5.0
Region                        United States (us)
Forwarding                    https://abc123.ngrok.io -> http://localhost:3000
Your API is now accessible at https://abc123.ngrok.io.
Step 4: Test it
curl https://abc123.ngrok.io/health
# {"status":"healthy"}
Option 2: Using NPort (Free Alternative)
Step 1: Install NPort
npm install -g nport-cli
# or
curl -sSL https://nport.io/install.sh | bash
Step 2: Start the tunnel
nport start 3000 --subdomain myapi
Output:
✓ Tunnel started successfully
Public URL: https://myapi.nport.io
Local URL:  http://localhost:3000
Step 3: Test it
curl https://myapi.nport.io/health
# {"status":"healthy"}
Option 3: Using Cloudflare Tunnel
Step 1: Install cloudflared
# macOS
brew install cloudflare/cloudflare/cloudflared

# Linux
wget -q https://github.com/cloudflare/cloudflared/releases/latest/download/cloudflared-linux-amd64.deb
sudo dpkg -i cloudflared-linux-amd64.deb
Step 2: Quick tunnel (no signup needed)
cloudflared tunnel --url http://localhost:3000
Output:
2026-01-27T12:00:00Z INF Your quick tunnel is: https://xyz789.trycloudflare.com
For persistent tunnels (requires Cloudflare account):
# Login
cloudflared tunnel login

# Create tunnel
cloudflared tunnel create myapi

# Configure and run
cloudflared tunnel --config config.yml run myapi
Testing Webhooks with Apidog
Now that your localhost is publicly accessible, let's test webhooks systematically using Apidog.
Why Combine Tunneling + Apidog?
Tunneling solves access; Apidog solves verification:
- Tunneling service makes your localhost reachable
- Apidog tests your API responses, validates data, automates scenarios
Setting Up Webhook Testing in Apidog
Step 1: Import or Create Your API
- Open Apidog
2. Create a new project
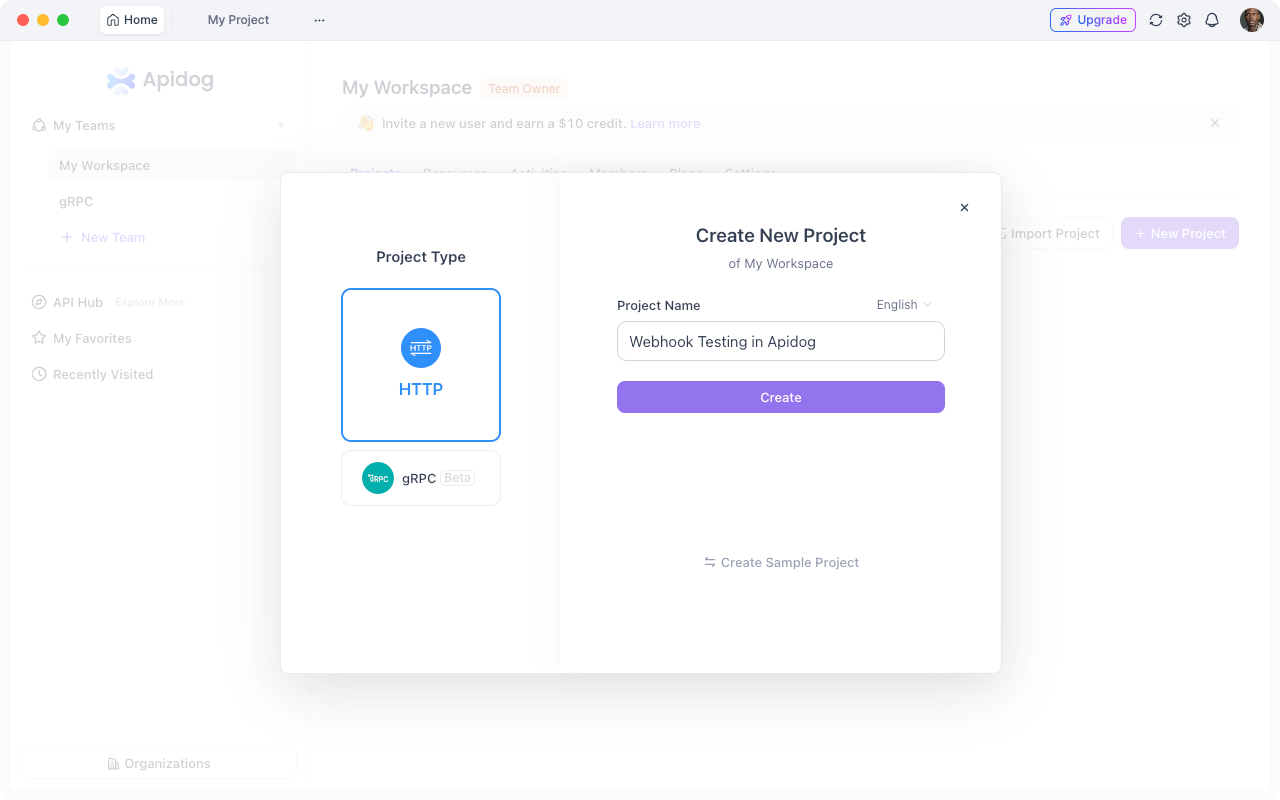
3. Add your webhook endpoint:

- Method: POST
- URL:
{{base_url}}/webhook - Headers:
Content-Type: application/json
Step 2: Configure Environment Variables
Set up two environments:
Development (Tunneled):
{
  "base_url": "https://abc123.ngrok.io"
}
Production:
{
  "base_url": "https://api.yourapp.com"
}
This lets you test the same endpoint locally and in production with one click.
Step 3: Create Test Scenarios
Test what happens when webhooks arrive:
Example: Stripe Payment Webhook Test
// Request Body
{
  "type": "payment_intent.succeeded",
  "data": {
    "object": {
      "id": "pi_test123",
      "amount": 2000,
      "currency": "usd",
      "status": "succeeded"
    }
  }
}
Assertions in Apidog:
- Status code equals 200
- Response contains
received: true - Response time < 1000ms
- Content-Type is
application/json
Step 4: Simulate Third-Party Services
Instead of triggering real webhooks from Stripe or GitHub, simulate them in Apidog:
- Copy webhook payload examples from service documentation
- Create test cases with various scenarios (success, failure, edge cases)
- Run all scenarios against your tunneled localhost
- Verify your API handles each case correctly
Testing OAuth Callbacks
Scenario: You're implementing "Sign in with Google"
Step 1: Start tunnel with custom subdomain
ngrok http 3000 --subdomain myapp
# URL: https://myapp.ngrok.io
Step 2: Configure OAuth redirect in Google Console
Set callback URL: https://myapp.ngrok.io/auth/google/callback
Step 3: Test the flow in Apidog
- Make request to
/auth/googleto get authorization URL - Follow redirect manually or programmatically
- Verify callback receives authorization code
- Assert token exchange works correctly
Step 4: Validate token storage
Use Apidog to:
- Verify tokens are stored securely
- Test token refresh flow
- Ensure expired tokens are handled
Common Use Cases
1. Testing Payment Webhooks (Stripe, PayPal)
Challenge: Payment providers send webhooks for events like successful charges, refunds, disputes.
Solution:
# Start tunnel
ngrok http 3000

# Configure webhook URL in Stripe dashboard
# https://abc123.ngrok.io/webhook/stripe

# Use Stripe CLI to forward test webhooks
stripe listen --forward-to localhost:3000/webhook/stripe

# Trigger test events
stripe trigger payment_intent.succeeded
Test with Apidog:
- Create test cases for each event type
- Verify idempotency (handling duplicate webhooks)
- Test signature verification
- Ensure database updates occur correctly
2. Testing Slack/Discord Bot Commands
Challenge: Chat platforms send interaction events when users click buttons or run commands.
Solution:
# Start tunnel
nport start 3000 --subdomain myslackbot

# Configure in Slack API:
# Interactivity URL: https://myslackbot.nport.io/slack/interactions
# Slash Commands: https://myslackbot.nport.io/slack/commands
Test with Apidog:
- Simulate button clicks
- Test slash command responses
- Verify response timing (Slack requires <3s responses)
- Test deferred responses with
response_url
3. Testing SMS/Voice Webhooks (Twilio)
Challenge: Twilio sends webhooks when SMS arrives or voice calls are received.
Solution:
cloudflared tunnel --url http://localhost:3000
Configure TwiML webhooks to point to your tunnel URL.
Test with Apidog:
- Mock incoming SMS payloads
- Test different message types (MMS, SMS)
- Verify Twilio signature validation
- Test response TwiML generation
4. Mobile App API Testing
Challenge: Testing your API from a physical device or emulator.
Problem with localhost:
// This fails from mobile device
fetch('http://localhost:3000/api/users')
Solution with tunnel:
// This works from anywhere
fetch('https://myapi.ngrok.io/api/users')
Test with Apidog:
- Generate API documentation with tunneled base URL
- Share with mobile team
- Mobile devs can test against your live development server
- Switch to staging/production URLs when ready
5. Testing GitHub/GitLab Webhooks
Challenge: Testing repository webhooks (push, pull request, issues) locally.
Solution:
# Start tunnel
ngrok http 4000

# Configure in GitHub repo settings:
# Webhook URL: https://abc123.ngrok.io/github/webhook
# Content type: application/json
# Events: Push, Pull requests
Test with Apidog:
- Simulate push events
- Test PR opened/closed events
- Verify signature validation (X-Hub-Signature)
- Test branch filtering logic
Security Best Practices
Exposing localhost to the internet creates security risks. Follow these practices:
1. Use HTTPS Only
All tunneling services provide HTTPS by default. Never use plain HTTP for tunnels:
# Good
ngrok http 3000
# Creates https://abc123.ngrok.io

# Bad (don't do this)
ngrok http --scheme=http 3000
2. Implement Webhook Signature Verification
Don't trust incoming webhooks blindly. Verify signatures:
const crypto = require('crypto');

function verifyStripeSignature(payload, signature, secret) {
  const expectedSignature = crypto
    .createHmac('sha256', secret)
    .update(payload)
    .digest('hex');

  return crypto.timingSafeEqual(
    Buffer.from(signature),
    Buffer.from(expectedSignature)
  );
}

app.post('/webhook/stripe', (req, res) => {
  const signature = req.headers['stripe-signature'];

  if (!verifyStripeSignature(req.body, signature, process.env.STRIPE_SECRET)) {
    return res.status(401).send('Invalid signature');
  }

  // Process webhook
});
3. Restrict Access with Basic Auth
Add authentication to your tunnel:
# ngrok with basic auth
ngrok http 3000 --auth="username:password"

# NPort with basic auth
nport start 3000 --auth username:password
Now requests need credentials:
curl -u username:password https://abc123.ngrok.io/webhook
4. Use Environment-Specific Secrets
Never commit webhook secrets or API keys:
// .env.development
STRIPE_WEBHOOK_SECRET=whsec_test_abc123
WEBHOOK_TUNNEL_URL=https://abc123.ngrok.io

// .env.production
STRIPE_WEBHOOK_SECRET=whsec_live_xyz789
WEBHOOK_URL=https://api.yourapp.com
5. Monitor Tunnel Access
Use the request inspector to watch for suspicious activity:
# ngrok provides a web interface at:
http://localhost:4040

# View all requests, responses, replay attacks
6. Limit Tunnel Duration
Don't leave tunnels running indefinitely:
# Auto-expire tunnel after 1 hour
ngrok http 3000 --session-duration 1h
7. Validate Request Sources
Check incoming IP addresses or use allowlists:
const allowedIPs = [
  '192.0.2.1',  // Stripe webhook IPs
  '198.51.100.0/24'
];

app.use('/webhook', (req, res, next) => {
  const clientIP = req.ip;

  if (!allowedIPs.includes(clientIP)) {
    return res.status(403).send('Forbidden');
  }

  next();
});
Troubleshooting Common Issues
Issue 1: Tunnel URL Changes Every Session
Problem: Free ngrok tunnels use random URLs that change each restart. Webhooks configured with the old URL break.
Solutions:
- Use paid plan for static URLs:
ngrok http 3000 --domain=myapp.ngrok.app
- Switch to NPort with free custom subdomains:
nport start 3000 --subdomain myapp
# Always https://myapp.nport.io
- Update webhooks programmatically via API when tunnel starts
Issue 2: Webhooks Timeout
Problem: Your local server takes too long to respond. Services like Slack require responses within 3 seconds.
Solution:
Process asynchronously:
app.post('/webhook', async (req, res) => {
  // Acknowledge immediately
  res.json({ received: true });

  // Process in background
  processWebhookAsync(req.body).catch(console.error);
});

async function processWebhookAsync(data) {
  // Do slow work here (database, external APIs, etc.)
  await heavyProcessing(data);
}
Test timeouts with Apidog by setting aggressive timeout limits in test scenarios.
Issue 3: CORS Errors from Browser
Problem: Frontend making requests to tunnel URL gets CORS errors.
Solution:
Configure CORS headers:
const cors = require('cors');

app.use(cors({
  origin: [
    'http://localhost:3001',  // Your frontend dev server
    'https://abc123.ngrok.io'  // Your tunnel URL
  ],
  credentials: true
}));
Issue 4: Rate Limiting on Free Tier
Problem: Free tunnels have connection limits (ngrok: 40/min).
Solutions:
- Batch test requests in Apidog instead of rapid-fire individual tests
- Use multiple tunnels for different services
- Upgrade to paid tier if testing heavily
- Switch to unlimited service like Cloudflare Tunnel or NPort
Issue 5: Tunnel Disconnects Frequently
Problem: Network instability causes tunnel drops.
Solution:
Use systemd/pm2 to auto-restart:
# Create systemd service
sudo nano /etc/systemd/system/ngrok.service
[Unit]
Description=ngrok tunnel
After=network.target

[Service]
Type=simple
User=youruser
WorkingDirectory=/home/youruser
ExecStart=/usr/local/bin/ngrok http 3000
Restart=always
RestartSec=10

[Install]
WantedBy=multi-user.target
sudo systemctl enable ngrok
sudo systemctl start ngrok
Issue 6: Cannot Reach Tunnel from Specific Network
Problem: Corporate firewalls or restrictive networks block tunnel traffic.
Solutions:
- Use Cloudflare Tunnel (rarely blocked)
- Switch tunnel region closer to you:
ngrok http 3000 --region eu
- Use Tailscale for private network instead of public tunnel
Advanced Patterns
Pattern 1: Multi-Port Tunneling
Expose multiple services simultaneously:
# Terminal 1: API server
ngrok http 3000

# Terminal 2: Frontend dev server
ngrok http 3001

# Terminal 3: Webhook worker
ngrok http 3002
Or use ngrok config file:
# ~/.ngrok2/ngrok.yml
tunnels:
  api:
    proto: http
    addr: 3000
  frontend:
    proto: http
    addr: 3001
  worker:
    proto: http
    addr: 3002
ngrok start --all
Pattern 2: Tunnel + Docker Compose
# docker-compose.yml
version: '3'
services:
  api:
    build: .
    ports:
      - "3000:3000"

  ngrok:
    image: ngrok/ngrok:latest
    command:
      - "http"
      - "api:3000"
    environment:
      NGROK_AUTHTOKEN: ${NGROK_AUTHTOKEN}
docker-compose up
Pattern 3: Dynamic Tunnel URL Injection
Automatically update your app with tunnel URL:
// start-tunnel.js
const ngrok = require('ngrok');
const fs = require('fs');

(async function() {
  const url = await ngrok.connect(3000);
  console.log(`Tunnel started: ${url}`);

  // Update .env file
  fs.appendFileSync('.env', `\nTUNNEL_URL=${url}\n`);

  // Update Stripe webhook
  await updateStripeWebhook(url);
})();
Pattern 4: Request Forwarding to Multiple Environments
Test the same webhook against dev, staging, and production:
// webhook-multiplexer.js
app.post('/webhook', async (req, res) => {
  const environments = [
    'http://localhost:3000',
    'https://staging.api.com',
    'https://api.yourapp.com'
  ];

  // Forward to all environments
  const results = await Promise.all(
    environments.map(env =>
      fetch(`${env}/webhook`, {
        method: 'POST',
        headers: req.headers,
        body: JSON.stringify(req.body)
      })
    )
  );

  res.json({ forwarded: results.length });
});
Conclusion
Testing localhost APIs that receive webhooks or callbacks doesn't require deploying to staging for every change. Tunneling services create temporary public URLs that let external services reach your development environment.
Start with the free tier of any tool. If webhook testing becomes a daily part of your workflow, consider paid plans for static URLs and additional features. But for most developers, free tunneling services combined with Apidog's API testing capabilities provide everything needed to test localhost APIs effectively.