Hey there, fellow developers! Have you ever found yourself in the middle of building an amazing web application, only to hit a wall because you’re waiting on an API to be ready? Frustrating, right? Well, that’s where mock APIs come to the rescue, especially when you’re working with JavaScript. And guess what? Tools like Apidog make this process even more seamless.
So, let’s dive into the world of mock APIs in JavaScript and explore how they can boost your development process!
What is a Mock API?
A mock API simulates the behavior of a real API by providing predefined responses to specific requests. It’s like a stand-in for the actual API, allowing developers to continue building and testing their applications without having to wait for the backend services to be completed.
Why Use Mock APIs?
Mock APIs are incredibly useful for several reasons:
- Speed Up Development: No more waiting for backend developers. Start integrating APIs as soon as you begin coding your frontend.
- Testing: They help in thoroughly testing your application by providing consistent responses.
- Isolation: You can isolate your frontend development from the backend, reducing dependencies.
- Collaboration: Teams can work in parallel without blocking each other.
Getting Started with Mock APIs in JavaScript
Now, let’s get hands-on. Here’s how you can set up a mock API in JavaScript.
Step 1: Setting Up Your Project
First, create a new JavaScript project. If you’re using Node.js, you can start with:
mkdir mock-api-demo
cd mock-api-demo
npm init -y
Install Express.js, a popular web framework for Node.js:
npm install express
Step 2: Creating Your Mock API
Create a file named server.js in your project directory. This file will contain the code for your mock API.
const express = require('express');
const app = express();
const port = 3000;

app.use(express.json());

app.get('/api/users', (req, res) => {
    res.json([
        { id: 1, name: 'John Doe' },
        { id: 2, name: 'Jane Smith' }
    ]);
});

app.listen(port, () => {
    console.log(`Mock API server running at http://localhost:${port}`);
});
Run the server with:
node server.js
You now have a mock API running at http://localhost:3000/api/users that returns a list of users.
Introducing Apidog
While writing your own mock APIs is great, tools like Apidog make it even easier and more powerful. Apidog is a comprehensive tool that helps you create, manage, and test APIs effortlessly.
Why Choose Apidog?
- User-Friendly Interface: No need to write code from scratch. Apidog provides a visual interface to define your APIs.
- Collaboration: Share your API definitions with your team easily.
- Testing: Built-in tools to test your APIs right from the interface.
- Documentation: Automatically generate API documentation.
Step 1. Create a New Project
Apidog uses projects to manage APIs. You can create multiple APIs under one project. Each API must belong to a project. To create a new project, click the "New Project" button on the right side of the Apidog app homepage.

Step 2. Create a New API
To demonstrate the creation of an API for user details, follow these steps:
- Request method: GET.
- URL: api/user/{id}, where {id} is the parameter representing the user ID.
- Response type: json.
- Response content:
{
id: number, // user id
name: string, // username
gender: 1 | 2, // gender: 1 for male, 2 for female
phone: string, // phone number
avatar: string, // avatar image address
}
To create a new interface, go to the homepage of the previously created project and click on the "+" button on the left side.

Fill in the corresponding interface information and save it.


With this, the user detail interface has been created. Meanwhile, Apidog has automatically generated a mock for us based on the format and type of the response fields. Click on the " Request" button under Mock to view the mock response.

Let's take a look at the mock response. Click on the "Request" button and then click "Send" on the page that opens.

Step 3. Set Mock Matching Rules
Have you noticed something magical? Apidog set the "name" field to string type, yet it returns names; set the "phone" field to string type, yet it returns phone numbers; set the "avatar" field to string type, yet it returns image addresses.
The reason is that Apidog supports setting matching rules for Mock. Apidog has built-in rules, and users can also customize their own rules. These rules can be found in Project Settings > Feature Settings > Mock Settings.
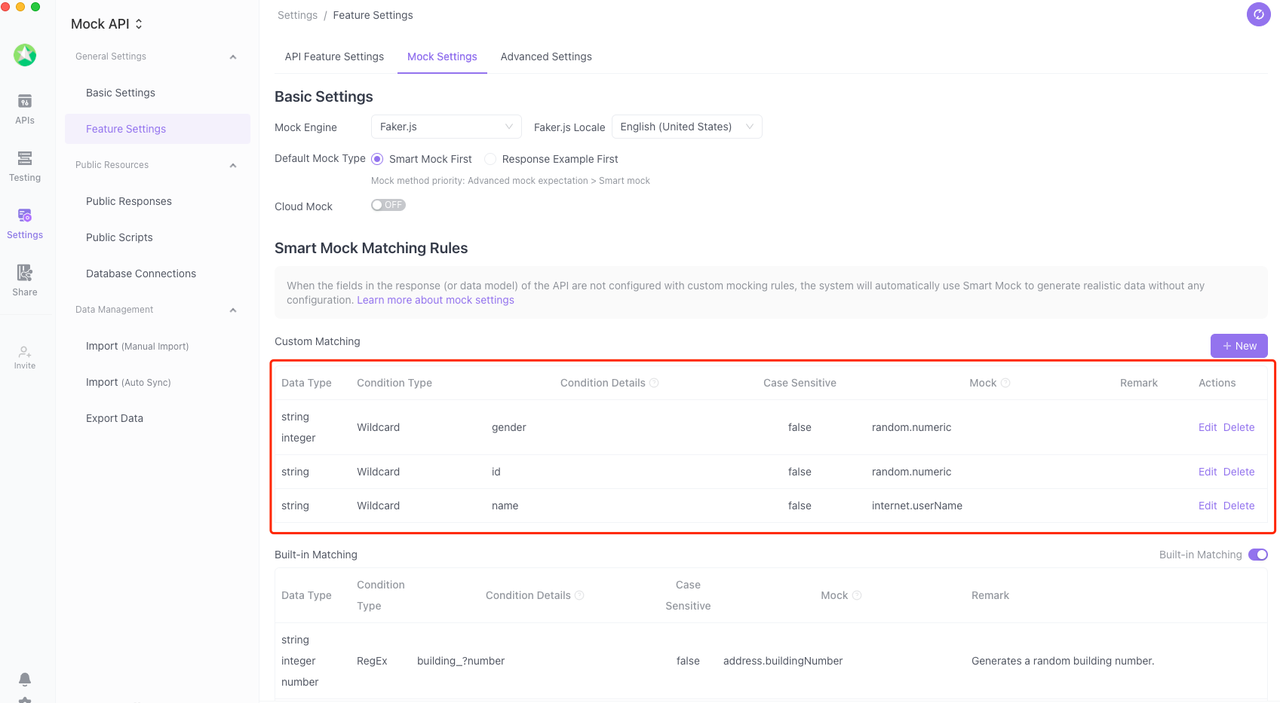
You can also set dedicated Mock rules for each field. Click on the "Mock" next to the field:
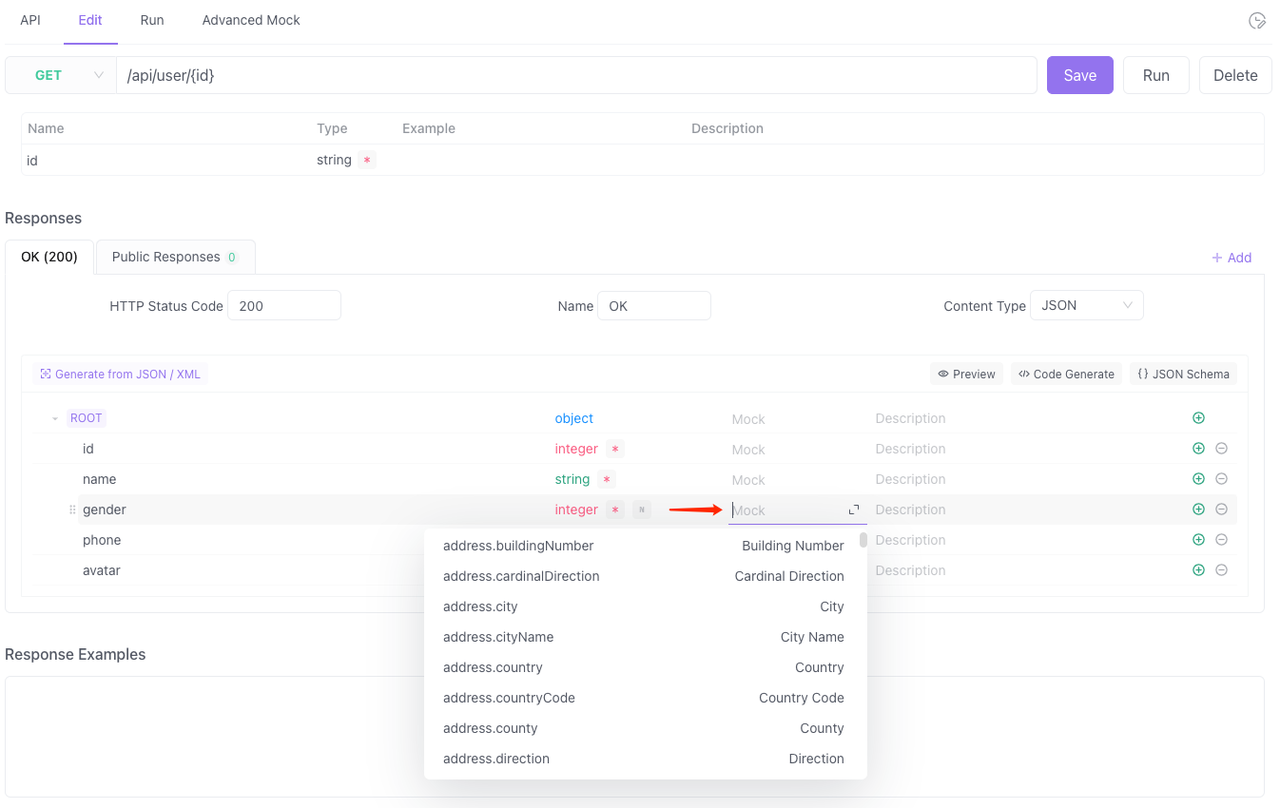
Apidog Mock matching rules are as follows:
- When a field meets a matching rule, the response will return a random value that satisfies the Mock rule.
- If a field does not meet any matching rule, the response will return a random value that meets the data type of the field.
There are three types of matching rules:
- Wildcards: * matches zero or more characters, and ? matches any single character. For example, *name can match user name, name, and so on.
- Regular expressions.
- Exact match.
Mock rules are fully compatible with Mock.js, and have extended some syntax that Mock.js does not have (such as domestic phone numbers "@phone"). Commonly used Mock rules include:
- @integer: integer. @integer(min, max).
- @string: string. @string(length): specifies the length of the string.
- @regexp(regexp): regular expression.
- @url: URL.
During development, we may encounter flexible and complex Mock scenarios, such as returning customized content based on different request parameters. For example, return normal user information when the ID is 1, and report an error when the ID is 2. Apidog also supports these scenarios, and those interested can check out the Advanced Mock document.
Advanced Mock API Techniques
Dynamic Responses
Sometimes, static responses aren’t enough. You might need your mock API to return different data based on the request. Let’s enhance our previous example.
app.get('/api/users/:id', (req, res) => {
    const users = [
        { id: 1, name: 'John Doe' },
        { id: 2, name: 'Jane Smith' }
    ];

    const user = users.find(u => u.id == req.params.id);
    if (user) {
        res.json(user);
    } else {
        res.status(404).send('User not found');
    }
});
Now, you can request a specific user by their ID, and the mock API will return the corresponding user or a 404 error if the user is not found.
Delay Responses
To simulate network latency, you can introduce delays in your responses. This can be useful for testing how your application handles slow networks.
app.get('/api/users', (req, res) => {
    setTimeout(() => {
        res.json([
            { id: 1, name: 'John Doe' },
            { id: 2, name: 'Jane Smith' }
        ]);
    }, 2000); // 2 seconds delay
});
How to Generate User-Friendly Mock Data Efficiently with Apidog?
- Apidog can generate mock rules based on data structure and data type in the API definition.
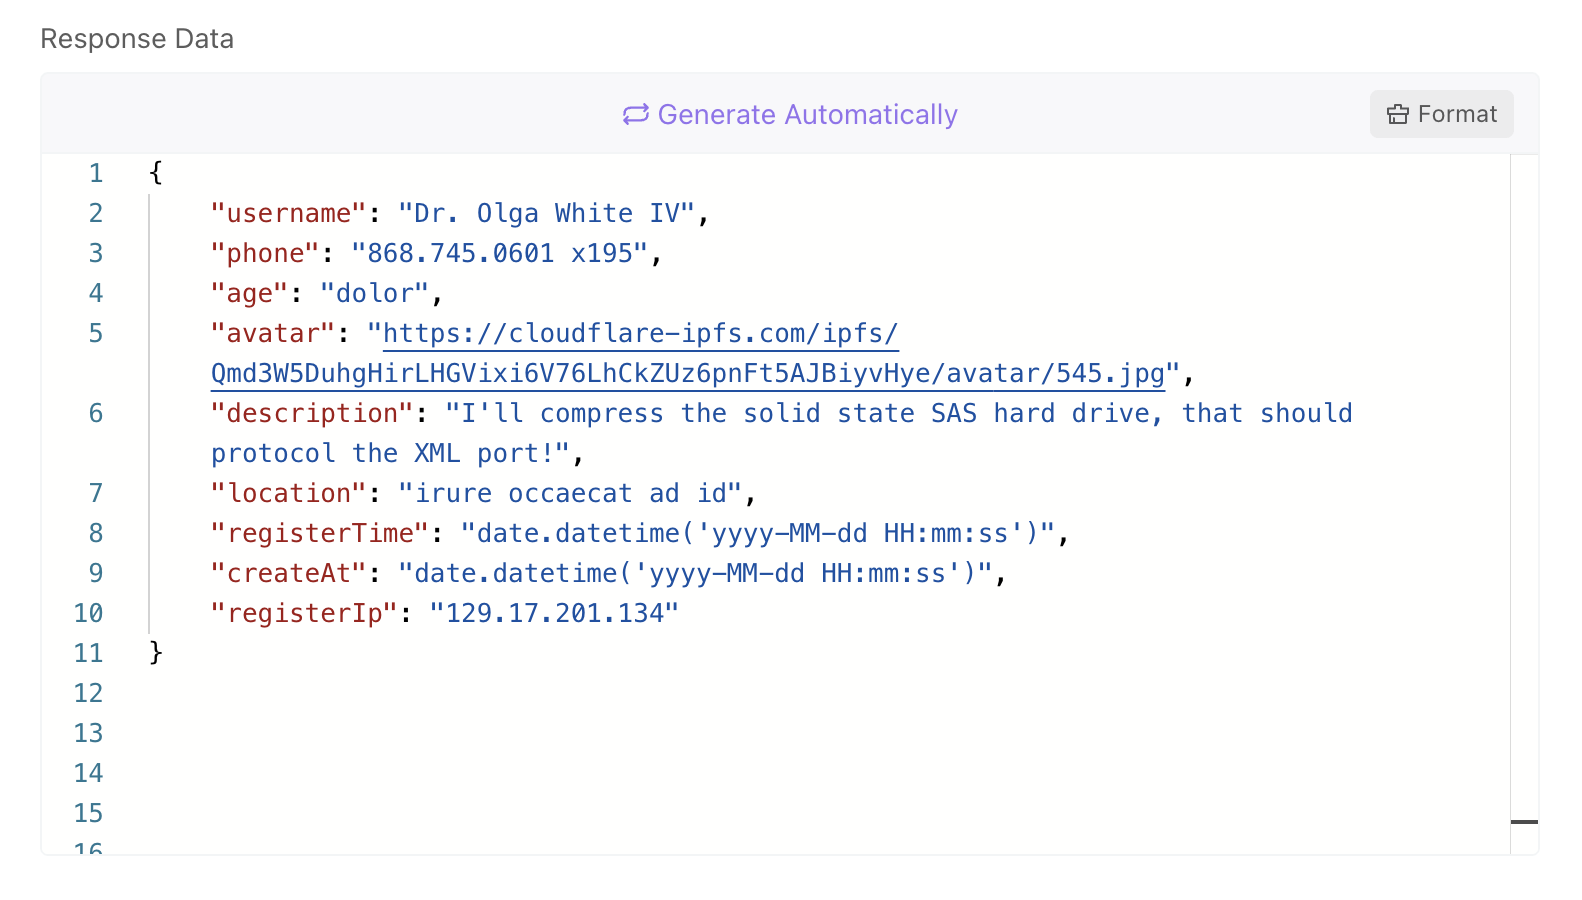
- Apidog has a built-in smart mock, which generates mock rules based on field name and field data type. For example, if a string field contains “image”, “time”, “city”, etc... in its name, Apidog will generate a url,string or name according to its field.
- Based on built-in mock rules, Apidog can automatically identify fields, such as image, avatar, username, cell phone number, URL, date, time, timestamp, email, province, city, address, and IP, to generate user-friendly dummy data.
- In addition to the built-in mock rules, users can also customize rules to meet various personalization needs. It supports string field matching using regular expressions or wildcards.
Below is an example of mock data generated by Apidog without any configuration:
Best Practices for Using Mock APIs
- Keep It Simple: Start with simple, static responses and gradually add complexity as needed.
- Document Your Mock APIs: Ensure your team knows the available endpoints and their responses.
- Regular Updates: Keep your mock APIs updated as the real APIs evolve.
- Test Thoroughly: Use the mock APIs to test different scenarios, including edge cases.
Real-World Use Cases
Frontend Development
When building a frontend application, you can use mock APIs to start working on features immediately, without waiting for the backend to be ready. This approach helps in parallel development and speeds up the overall process.
Automated Testing
Mock APIs are essential for automated testing. They provide consistent responses, making it easier to write reliable tests. Tools like Jest and Cypress can integrate with mock APIs to test various components and flows.
Prototyping
When creating prototypes or proofs of concept, mock APIs enable you to quickly set up the necessary backend interactions without investing time in building the actual backend services.
Conclusion
Mock APIs are a game-changer for developers, providing a way to speed up development, improve testing, and facilitate better collaboration. With tools like Apidog, creating and managing mock APIs becomes a breeze, allowing you to focus on building amazing applications.
So, the next time you find yourself waiting on an API, remember that mock APIs are your best friend. And don’t forget to check out Apidog for a hassle-free experience!
Call to Action: Ready to supercharge your development process? Download Apidog for free and start creating your mock APIs today!

