Have you ever wondered how some apps can update their data in real-time, without requiring you to refresh the page or click a button?
In this blog post, We will explain what WebSocket is, how it works, and how to use it with JavaScript. We will also show you how to use Apidog to test and debug your APIs.
Introduction to WebSockets
WebSockets are a powerful tool for real-time communication between a client and a server. They allow for bidirectional communication, which means that data can be sent and received simultaneously. This is in contrast to traditional HTTP requests, which are unidirectional and require a new request to be made for each piece of data.
WebSockets are faster and more efficient than traditional HTTP-based communication methods. They offer low latency, bidirectional communication, scalability, and support for real-time data streaming. WebSockets can handle multiple data streams over one connection, unlike HTTP/1.1, which only allows one stream of structured data at a time.
How WebSockets Work
WebSocket works by establishing a connection between the client and the server using a handshake. The handshake is done using HTTP, where the client sends an upgrade request and the server responds with an upgrade response. The upgrade request and response contain some special headers that indicate that the client and the server want to switch from HTTP to WebSocket.

Once the handshake is done, the connection is upgraded to WebSocket and the client and the server can exchange messages. The messages are sent and received using a binary format, which is more efficient and faster than HTTP. The messages can be text or binary, and they can have any size and content.
The connection is kept alive until either the client or the server closes it. The client or the server can close the connection by sending a close frame, which is a special type of message that indicates the end of the communication. The close frame can also contain a reason code and a message that explain why the connection is closed.
Benefits of Using WebSockets
WebSockets are a technology that enables continuous, bidirectional, and low-latency communication between web clients and web servers. Some of the benefits of using WebSockets are:
- They reduce the data transmission overhead compared to HTTP, which uses a request/response cycle and adds headers, cookies, etc. to each message.
- They are widely adopted and supported by many libraries, frameworks, and browsers, making them easy to use and integrate.
- They are flexible and allow for the implementation of application-level protocols and extensions, such as pub/sub messaging.
- They are event-driven and allow the server to push data to the client as soon as it becomes available, without the need for polling. This is useful for realtime applications that need to react quickly to events, such as chat rooms or stock updates.
- They are full-duplex and allow both the server and the client to send data at the same time, enabling two-way, multi-user communication.
How to use WebSocket with JavaScript
WebSocket with JavaScript is very easy to use with JavaScript, the most popular scripting language for the web. JavaScript has a built-in object called WebSocket that provides a simple and intuitive API to create and manage WebSocket connections.
To use WebSocket with JavaScript, you need to create a WebSocket object with the URL of the server, and then listen to events such as open, message, close, and error. You can also send data to the server using the send method. Here is a simple example of how to use WebSocket with JavaScript:
// Create a WebSocket object with the server URL
const socket = new WebSocket("ws://localhost:3000");

// Listen to the open event, which indicates the connection is established
socket.onopen = () => {
  console.log("WebSocket connection opened");
  // Send a message to the server
  socket.send("Hello from the browser!");
};

// Listen to the message event, which contains the data received from the server
socket.onmessage = (event) => {
  console.log("Message from the server:", event.data);
};

// Listen to the close event, which indicates the connection is closed
socket.onclose = (event) => {
  console.log("WebSocket connection closed");
};

// Listen to the error event, which indicates there is an error with the connection
socket.onerror = (error) => {
  console.error("WebSocket error:", error);
};
The code uses the WebSocket API to create and manage a WebSocket connection to a server, as well as to send and receive data on the connection. Here is a line-by-line breakdown of the code:
// Create a WebSocket object with the server URL
const socket = new WebSocket("ws://localhost:3000");
This line creates a new WebSocket object with the URL of the server that supports the WebSocket protocol. The URL starts with ws:// or wss:// for secure connections.
// Listen to the open event, which indicates the connection is established
socket.onopen = () => {
  console.log("WebSocket connection opened");
  // Send a message to the server
  socket.send("Hello from the browser!");
};
This block of code defines a function that will be executed when the open event is fired on the WebSocket object. The open event indicates that the connection between the browser and the server is successfully established. The function logs a message to the console and then sends a message to the server using the send method of the WebSocket object.
// Listen to the message event, which contains the data received from the server
socket.onmessage = (event) => {
  console.log("Message from the server:", event.data);
};
This block of code defines a function that will be executed when the message event is fired on the WebSocket object. The message event contains the data received from the server in the event.data property. The function logs the data to the console.
// Listen to the close event, which indicates the connection is closed
socket.onclose = (event) => {
  console.log("WebSocket connection closed");
};
This block of code defines a function that will be executed when the close event is fired on the WebSocket object. The close event indicates that the connection between the browser and the server is closed. The function logs a message to the console.
// Listen to the error event, which indicates there is an error with the connection
socket.onerror = (error) => {
  console.error("WebSocket error:", error);
};
This block of code defines a function that will be executed when the error event is fired on the WebSocket object. The error event indicates that there is an error with the connection, such as when some data couldn’t be sent or received. The function logs the error to the console.
How to use Apidog to debug JavaScript WebSocket?
Debugging WebSockets can be challenging because they use a persistent connection. However, there are several tools available that can help you debug your WebSocket code. One such tool is Apidog, an all-in-one collaborative API development platform. With Apidog, you can learn effective debugging techniques, set up your debugging environment, and leverage advanced tools for a seamless debugging experience.
Here’s how you can use Apidog to debug a WebSocket client:
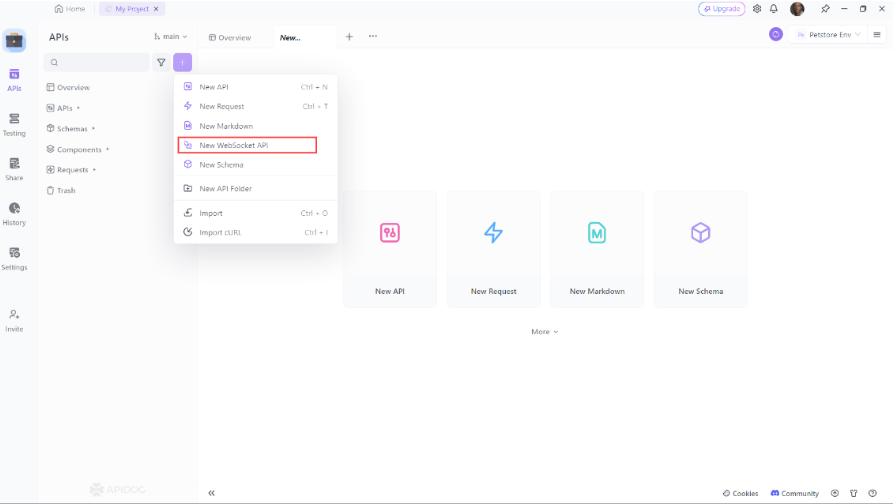
- Open Apidog: First, start the Apidog application and click on the "+" button on the left side, A new drop-down will be opened. From there choose "New WebSocket API":
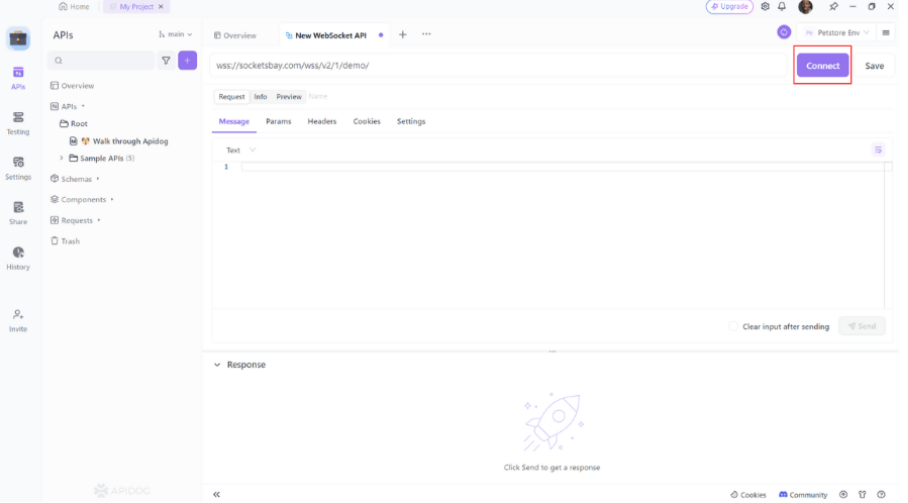
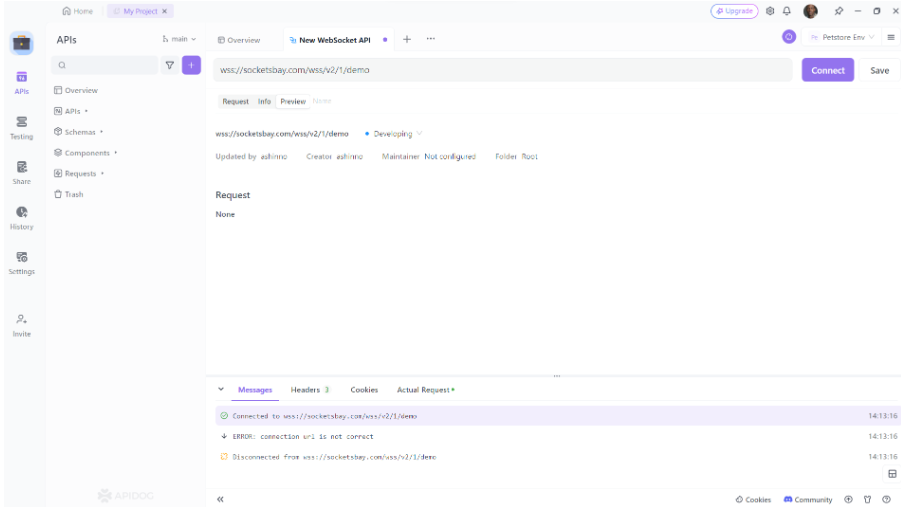
2. Establish a Connection: Begin by inputting the WebSocket API URL into Apidog's address bar. Then, click the "Connect" button to start the handshake process and create a connection. Apidog enables you to customize parameters such as Params, Headers, and Cookies during the handshake.
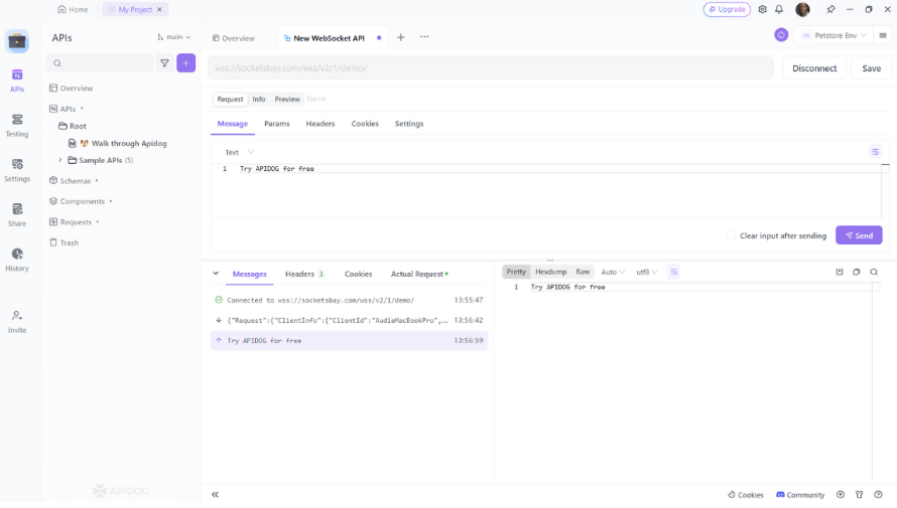
3. Send and Receive Messages: You can send and receive messages after the connection is established by accessing the "Message" tab. You have the option to compose text, JSON, XML, HTML, and other text format messages, as well as binary format messages using Base64 or Hexadecimal. Apidog's new timeline view displays the connection status, sent messages, and received messages in chronological order. Clicking on a message allows you to easily view its details.
4. API Documentation: Apidog inherits powerful API documentation functionality for WebSocket APIs, enabling effective documentation of your WebSocket interactions.
Apidog is a simple and powerful tool that allows you to test and debug WebSocket connections. Apidog has a web side and a client side. If you're using the web side and need to debug local services, you'll need to install the Google plugin for Apidog.
Download here: Apidog Browser Extension
Real-World Examples of Javascript WebSockets
WebSocket is awesome because it enables real-time communication between the browser and the server. It allows you to create interactive and engaging web applications that can update their content in real time, without reloading the page. WebSocket can be used for various purposes, such as:

- Chat: WebSocket can be used to create chat applications that allow users to send and receive messages, emojis, images, videos, or audio in real time. WebSocket can also be used to create group chat, video chat, or voice chat applications that allow users to communicate with multiple people at the same time.
- Notifications: WebSocket can be used to create notification systems that alert users about important events, such as new messages, new followers, new likes, new comments, or new orders. WebSocket can also be used to create push notifications that can reach users even when they are not on the website, using service workers and web push APIs.
- Live Data: WebSocket can be used to create live data applications that display dynamic and real-time data, such as stock prices, weather updates, sports scores, news headlines, or social media feeds. WebSocket can also be used to create live data visualization applications that display charts, graphs, maps, or dashboards that can update in real time.
- Gaming: WebSocket can be used to create gaming applications that allow users to play online games with other users, using real-time graphics, audio, or video. WebSocket can also be used to create multiplayer gaming applications that allow users to join rooms, chat with other players, or share their scores and achievements.
Best Practices for Using Javascript WebSockets
When using WebSockets, it is important to follow best practices to ensure that your code is secure and efficient. Here are some best practices to keep in mind:
Use a WebSocket Library: Leverage existing WebSocket libraries to simplify the development process and ensure compatibility across different browsers and devices.
- Secure Your WebSockets: Always prefer using
wss://(WebSocket Secure) overws://to encrypt data and prevent eavesdropping. This is similar to using HTTPS for secure HTTP connections. - Avoid Chatty Protocols: Minimize the number of messages sent over the WebSocket connection to reduce network traffic and improve performance.
- Consider Network Topology: Be mindful of the network topology of your application, including firewalls and proxy servers, which may affect WebSocket connections.
- Browser Limitations: Be aware of browser limitations and test your WebSocket implementation across different browsers to ensure consistent behavior.
- Avoid Blocking Operations: In JavaScript, avoid blocking operations that can freeze the browser’s main thread and disrupt the WebSocket communication.
- Monitor Memory Usage: Keep an eye on memory usage, as WebSocket connections can potentially lead to memory leaks if not managed properly.
- Use TLS to Secure Connections: Employ TLS (Transport Layer Security) to secure all connections, ensuring data integrity and privacy.
- Handle Broken Connections: Implement logic to detect and handle broken WebSocket connections, allowing for automatic reconnection when possible.
- Scalability: Design your WebSocket infrastructure for scalability, considering the number of open connections and message throughput.
By following these best practices, you can create robust and efficient WebSocket applications that provide real-time functionality with enhanced security and performance. Remember to always test your implementation thoroughly and keep up with the latest developments in WebSocket technology.
Conclusion
In conclusion, WebSockets are a powerful tool for real-time communication between a client and server. They allow for bidirectional communication, which is useful for real-time applications like chat rooms and online games.
By following best practices and using tools like Apidog, you can ensure that your WebSocket code is secure and efficient. So, what are you waiting for? Start using WebSockets in your web applications today!
Additional Resources
Here are some additional resources to help you learn more about WebSockets: