
HTTP headers are an essential part of any web application. They provide information about the request and the response, such as the content type, the encoding, the cache control, the authentication, and more. HTTP headers can also be used to customize the behavior of the web server, the browser, and the API.
In this blog post, I will show you how to master HTTP header format in 10 easy steps. You will learn the basics of HTTP headers, how to use them effectively, and how to test and debug them with Apidog, a powerful tool for API development and testing.
Step 1: Understand the Structure of HTTP Headers
The first step to master HTTP header format is to understand the structure of HTTP headers. HTTP headers are key-value pairs that are separated by a colon and a space. For example:
Content-Type: text/html; charset=UTF-8
The key is the name of the header, and the value is the data associated with the header. Some headers can have multiple values, which are separated by commas. For example:
Accept: text/html, application/xhtml+xml, application/xml
Some headers can also have parameters, which are additional information that modify the value of the header. Parameters are separated by semicolons and can have their own key-value pairs. For example:
Content-Disposition: attachment; filename="report.pdf"
HTTP headers are case-insensitive, which means that Content-Type and content-type are equivalent.
HTTP headers can be divided into two categories: request headers and response headers. Request headers are sent by the client to the server, and provide information about the request, such as the method, the URL, the body, and the preferences. Response headers are sent by the server to the client, and provide information about the response, such as the status code, the body, and the metadata.
Step 2: Know the Common HTTP Headers
The second step to master HTTP header format is to know the common HTTP headers. There are many HTTP headers defined by the HTTP specification and other standards, but some of them are more widely used and important than others. Here are some of the common HTTP headers that you should know:
Accept: This request header indicates the media types that the client can accept from the server, such astext/html,application/json, orimage/png. The server can use this header to negotiate the content type of the response, and send the most appropriate representation of the resource.Content-Type: This response header indicates the media type of the body of the response, such astext/html,application/json, orimage/png. The client can use this header to parse and render the body of the response correctly. This header can also be used as a request header, to indicate the media type of the body of the request, such as when sending a form or a file.Authorization: This request header provides the credentials for the client to authenticate with the server, such as a username and password, a token, or a certificate. The server can use this header to verify the identity and the permissions of the client, and grant or deny access to the resource.Cache-Control: This response header controls how the client and intermediate caches can store and reuse the response. This header can have various directives, such asmax-age,no-cache,no-store, ormust-revalidate, that specify the freshness, the validity, and the revalidation of the response. This header can also be used as a request header, to indicate the caching preferences of the client, such asmax-age,no-cache, oronly-if-cached.Cookie: This request header contains the cookies that the client has received from the server, and sends them back to the server with each request. Cookies are small pieces of data that the server can use to store and retrieve information about the client, such as the session, the preferences, or the state.Location: This response header indicates the URL of the resource that the client should redirect to, such as when the server has moved the resource, or when the client has created a new resource. The server usually sends this header with a3xxstatus code, such as301(Moved Permanently),302(Found), or201(Created), to instruct the client to follow the redirection.
These are just some of the common HTTP headers that you should know, but there are many more that you can explore and use for your web application. You can find a comprehensive list of HTTP headers on MDN Web Docs.
Step 3: Use HTTP Headers for Content Negotiation
The third step to master HTTP header format is to use HTTP headers for content negotiation. Content negotiation is the process of selecting the best representation of a resource for the client, based on the preferences and capabilities of the client and the server. Content negotiation can be done on various aspects of the resource, such as the content type, the language, the encoding, or the charset.
Accept: As mentioned before, this request header indicates the media types that the client can accept from the server, such astext/html,application/json, orimage/png. The client can also specify the relative quality of each media type with aqparameter, such asAccept: text/html;q=0.8, application/json;q=0.9, image/png;q=0.7. The server can use this header to select the most suitable media type for the response, and indicate it with theContent-Typeresponse header.Accept-Language: This request header indicates the languages that the client can understand, such asen-US,fr-FR, orzh-CN. The client can also specify the relative quality of each language with aqparameter, such asAccept-Language: en-US;q=0.8, fr-FR;q=0.9, zh-CN;q=0.7. The server can use this header to select the most suitable language for the response, and indicate it with theContent-Languageresponse header.Accept-Encoding: This request header indicates the encodings that the client can decode, such asgzip,deflate, orbr. The client can also specify the relative quality of each encoding with aqparameter, such asAccept-Encoding: gzip;q=0.8, deflate;q=0.9, br;q=0.7. The server can use this header to select the most suitable encoding for the response, and indicate it with theContent-Encodingresponse header. Encoding can reduce the size of the response and improve the performance of the web application.Accept-Charset: This request header indicates the charsets that the client can interpret, such asUTF-8,ISO-8859-1, orGB2312. The client can also specify the relative quality of each charset with aqparameter, such asAccept-Charset: UTF-8;q=0.8, ISO-8859-1;q=0.9, GB2312;q=0.7. The server can use this header to select the most suitable charset for the response, and indicate it with theContent-Typeresponse header. Charset can affect the readability and the compatibility of the response.
By using HTTP headers for content negotiation, you can make your web application more flexible, adaptable, and user-friendly. You can also improve the performance, security, and usability of your web application by using HTTP headers for other purposes, such as caching, authentication, redirection, and more.
Step 4: Use HTTP Headers to Customize the API Behavior
The fourth step to master HTTP header format is to use HTTP headers to customize the API behavior. API behavior is the way the API responds to the requests and the events, such as the logic, the rules, and the actions of the API. API behavior can be customized to suit the needs and the preferences of the clients and the users of the API, by applying various options and settings.
HTTP headers are an important part of customizing the API behavior, as they provide information and functionality for the API. Some of the HTTP headers that are used to customize the API behavior are:
Prefer: This request header indicates the preferences of the client for the response, such as the return value, the wait time, or the handling mode. The server can use this header to adjust the response according to the preferences of the client, and indicate it with thePreference-Appliedresponse header.Expect: This request header indicates the expectations of the client for the request, such as the continuation, the confirmation, or the condition. The server can use this header to check the expectations of the client before processing the request, and indicate it with a100(Continue), a417(Expectation Failed), or a412(Precondition Failed) status code.Retry-After: This response header indicates the time or the date when the client can retry the request, such as when the server is busy, unavailable, or rate-limited. The client can use this header to delay or schedule the retry of the request, and avoid overwhelming or spamming the server.
Step 5: Use HTTP Headers for API Documentation
The fifth step to master HTTP header format is to use HTTP headers for API documentation. API documentation is the process of describing the features and the functionality of the API, such as the endpoints, the methods, the parameters, the responses, and the errors. API documentation is important for the developers and the users of the API, as it helps them to understand how the API works, how to use it, and how to troubleshoot it.
Some of the ways to use HTTP headers for API documentation are:
- Use standard HTTP headers whenever possible, and avoid using custom or proprietary headers. Standard HTTP headers are well-defined, widely supported, and easy to understand. Custom or proprietary headers can cause confusion, inconsistency, and compatibility issues.
- Use descriptive and meaningful names for your headers, and avoid using abbreviations or acronyms. Descriptive and meaningful names can help the developers and the users of the API to understand the purpose and the value of the headers. Abbreviations or acronyms can cause ambiguity, misunderstanding, and typos.
- Use consistent casing and formatting for your headers, and follow the conventions of the media type you are using. Consistent casing and formatting can help the developers and the users of the API to read and write the headers easily. Conventions of the media type can help the developers and the users of the API to follow the best practices and the standards of the media type.
- Document the headers that are required, optional, or conditional for each endpoint, method, parameter, response, and error. Document the values, the parameters, the directives, and the attributes of each header, and explain their meaning and their effect. Document the examples, the scenarios, and the edge cases of using each header, and show the expected results and the possible errors.
By using HTTP headers for API documentation, you can make your API more clear, consistent, and comprehensive.
Step 6: Use HTTP Headers for API Testing
The sixth step to master HTTP header format is to use HTTP headers for API testing. API testing is the process of verifying the functionality, performance, security, and quality of the API, by sending requests and checking the responses. API testing is important for the developers and the users of the API, as it helps them to find and fix the bugs, errors, and vulnerabilities of the API.
- Use a tool that can send and receive HTTP headers. Apidog can help you to create, edit, save, and execute HTTP requests, and view, analyze, and compare HTTP responses. Apidog can also help you to generate and validate HTTP headers, and check their values and effects.
- Use a tool that can mock and stub HTTP headers, such as Apidog, a powerful tool for API development and testing. apidog can help you to create, edit, save, and run mock and stub servers, and simulate HTTP requests and responses.
- Use a tool that can monitor and debug HTTP headers.Apidog can also help you to monitor and debug HTTP headers, and identify and resolve the issues and the anomalies.
By using HTTP headers for API testing, you can make your API more robust, efficient, secure, and high-quality.
Step 7: Use HTTP Headers for API Security
The seventh step to master HTTP header format is to use HTTP headers for API security. API security is the process of protecting the API from unauthorized access, modification, or abuse, by applying various measures and techniques. API security is important for the developers and the users of the API, as it helps them to prevent and mitigate the risks, threats, and attacks of the API.
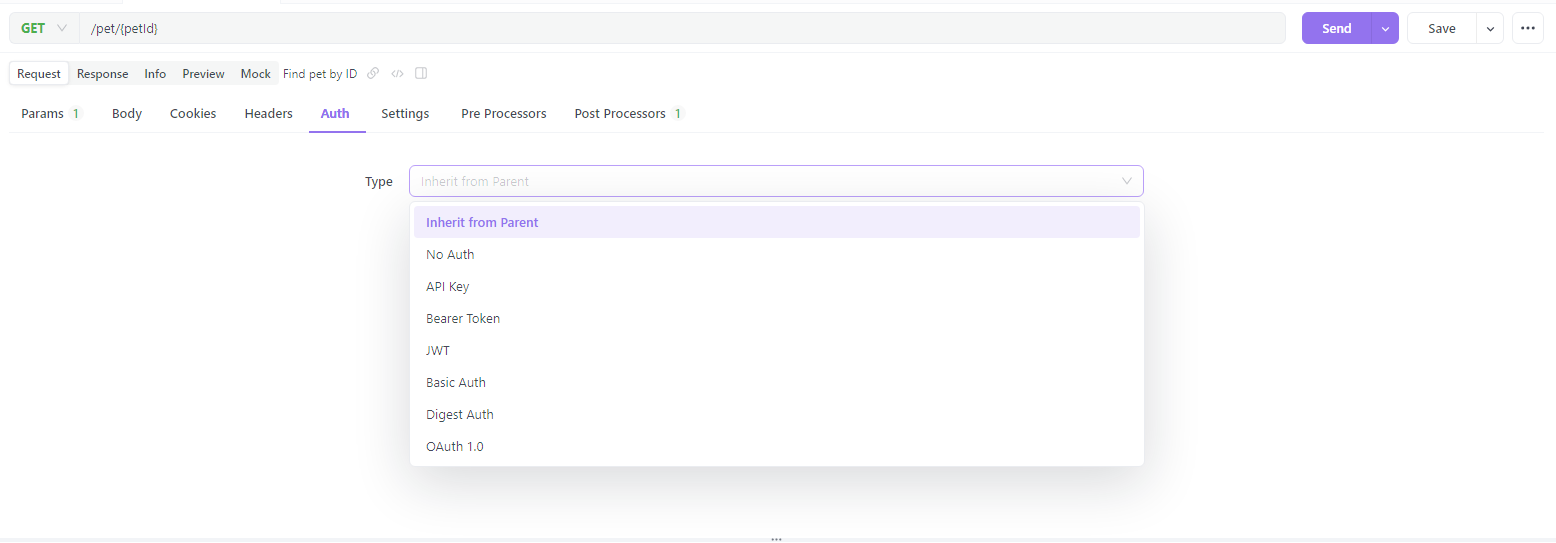
- Use HTTP headers to authenticate and authorize the clients and the users of the API, such as the
Authorization, theWWW-Authenticate, and theProxy-Authenticateheaders. These headers can help you to verify the identity and the permissions of the clients and the users of the API, and grant or deny access to the resources. You can use various schemes and methods for authentication and authorization, such as Basic, Bearer, Digest, OAuth, or JWT. - Use HTTP headers to encrypt and decrypt the data of the API, such as the
Content-Security-Policy, theStrict-Transport-Security, and thePublic-Key-Pinsheaders. These headers can help you to enforce the use of HTTPS and SSL/TLS protocols, and prevent the interception, modification, or tampering of the data of the API. You can also use various algorithms and certificates for encryption and decryption, such as AES, RSA, or SHA. - Use HTTP headers to protect and defend the API from common attacks, such as the
X-Frame-Options, theX-XSS-Protection, and theX-Content-Type-Optionsheaders. These headers can help you to prevent the API from being embedded, injected, or exploited by malicious scripts, frames, or requests. You can also use various techniques and tools to protect and defend the API from other attacks, such as CSRF, DDoS, or SQL injection.
By using HTTP headers for API security, you can make your API more safe, reliable, and trustworthy.
Step 8: Use HTTP Headers for API Performance
The eighth step to master HTTP header format is to use HTTP headers for API performance. API performance is the process of measuring and improving the speed, efficiency, and scalability of the API, by optimizing various factors and resources. API performance is important for the developers and the users of the API, as it helps them to enhance the user experience, satisfaction, and retention of the API.
- Use HTTP headers to compress and decompress the data of the API, such as the
Accept-Encoding, theContent-Encoding, and theTransfer-Encodingheaders. These headers can help you to reduce the size and the bandwidth of the data of the API, and improve the speed and the efficiency of the API. - Use HTTP headers to cache and reuse the data of the API, such as the
Cache-Control, theETag, and theLast-Modifiedheaders. These headers can help you to store and retrieve the data of the API from the client or intermediate caches, and improve the speed and the efficiency of the API. - Use HTTP headers to paginate and filter the data of the API, such as the
Link, theRange, and theIf-Rangeheaders. These headers can help you to divide and select the data of the API into smaller and more manageable chunks, and improve the speed and the efficiency of the API.
By using HTTP headers for API performance, you can make your API more fast, responsive, and scalable.
Step 9: Use HTTP Headers to Communicate the API Changes
The ninth step to master HTTP header format is to use HTTP headers to communicate the API changes. API changes are the modifications and the updates of the features and the functionality of the API, such as the addition, the removal, or the alteration of the API. API changes can affect the compatibility and the functionality of the API, and require the adaptation and the migration of the clients and the users of the API.
Deprecation: This response header indicates that the API or a part of the API is deprecated, which means that it is no longer supported or maintained, and will be removed or replaced in the future. The client can use this header to identify and avoid using the deprecated API or the part of the API, and prepare for the removal or the replacement of the API.Sunset: This response header indicates the date or the time when the API or a part of the API will be removed or replaced, which means that it will no longer be available or functional. The client can use this header to plan and execute the migration or the transition of the API or the part of the API, and avoid the disruption or the failure of the API.Warning: This response header indicates the additional information or the advice about the API or the part of the API, such as the potential problems, the limitations, or the recommendations of the API. The client can use this header to understand and improve the usage and the quality of the API or the part of the API, and avoid the errors or the issues of the API.
Step 10: Use HTTP Headers for API Best Practices
The tenth and final step to master HTTP header format is to use HTTP headers for API best practices. API best practices are the guidelines and recommendations for designing, developing, and maintaining high-quality APIs. API best practices are important for the developers and the users of the API, as they help them to achieve the goals, expectations, and standards of the API.
- Use HTTP headers to follow the REST principles, such as the
Accept, theContent-Type, and theAllowheaders. These headers can help you to use the HTTP methods, the media types, and the status codes to represent the resources, the actions, and the outcomes of the API. REST stands for Representational State Transfer, and it is a popular architectural style for designing and implementing APIs. - Use HTTP headers to follow the HATEOAS principles, such as the
Link, theLocation, and theVaryheaders. These headers can help you to provide the links, the URLs, and the parameters to navigate and discover the resources and the relationships of the API. HATEOAS stands for Hypermedia as the Engine of Application State, and it is an advanced concept for enhancing the usability and the evolvability of the API. - Use HTTP headers to follow the CORS principles, such as the
Access-Control-Allow-Origin, theAccess-Control-Allow-Methods, and theAccess-Control-Allow-Headersheaders. These headers can help you to enable and control the cross-origin requests and responses of the API, and prevent the security and the privacy issues of the API. CORS stands for Cross-Origin Resource Sharing, and it is a mechanism for allowing the communication between different domains and origins.
How to test and debug HTTP header format with Apidog
Apidog is a powerful tool for API development and testing, that allows you to create, edit, save, and execute HTTP requests, and view, analyze, and compare HTTP responses.
To test and debug HTTP headers with Apidog, you can follow these steps:
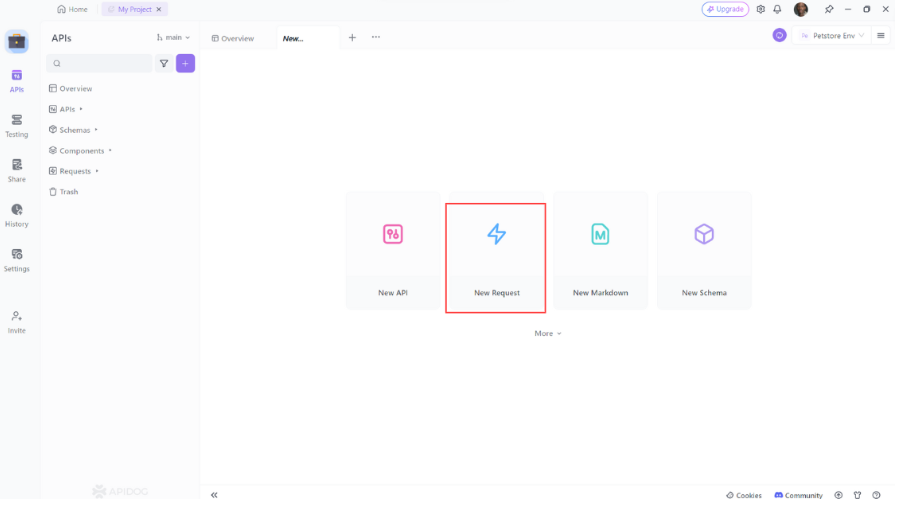
- Launch Apidog and create a new project or open an existing one.
- In the project dashboard, create a new request
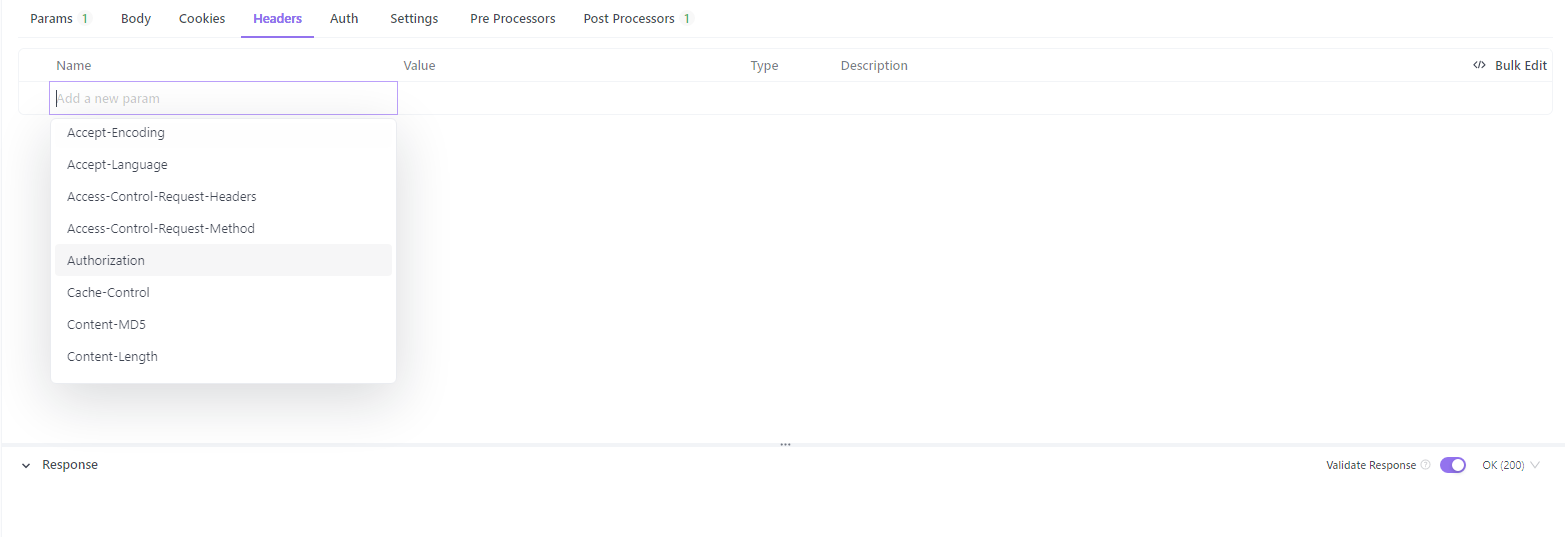
- In the API editor, enter the URL, the method, the parameters, the body, and the headers of your HTTP request. You can also use variables, environments, and presets to customize your request.

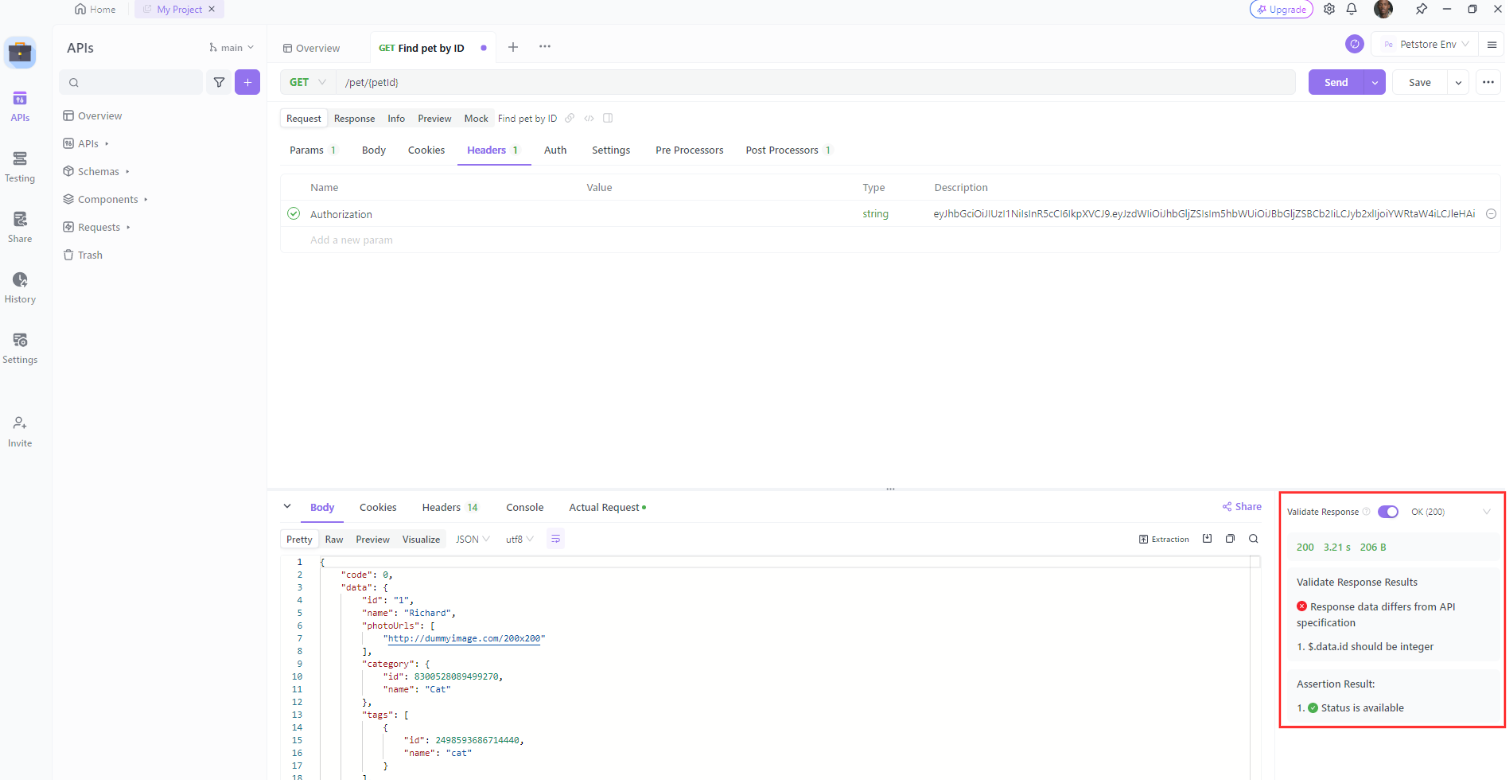
- Click on the Run button to send the request and receive the response. You can see the status code, the time, the size, the headers, and the body of the response in the Run tab.
- To analyze and compare the response, you can use the tools in the toolbar, such as the format, the beautify, the validate, the diff, the copy, and the export buttons.
To monitor and debug the headers, you can use the tools in the sidebar, such as the headers, the cookies, the redirects, and the history tabs. You can also use the filter, the search, and the sort options to find and inspect the headers you are interested in.
By following these steps, you can test and debug HTTP headers with Apidog easily and effectively. You can also use Apidog to test and debug other aspects of your API, such as the content, the performance, the security, and the quality.
Conclusion
That’s it! You have learned how to master HTTP header format in 10 easy steps. You have learned the basics of HTTP headers, how to use them effectively, and how to test and debug them with Apidog, a powerful tool for API development and testing.
I hope you enjoyed this blog post and found it useful and informative. Thank you for reading, and happy coding! 🚀


