
Have you ever considered how much time developers spend building RESTful APIs on top of PostgreSQL databases? It often involves writing boilerplate code for CRUD operations, handling queries, and ensuring security—tasks that can slow down your project momentum. This is where the PostgREST API enters the picture, offering a streamlined alternative that turns your database into a ready-to-use API with minimal effort. In this comprehensive guide, we will explore the PostgREST API in depth, from its foundational concepts to hands-on implementation. Whether you are a backend engineer looking to accelerate development or a full-stack developer seeking efficiency, mastering the PostgREST API can transform your workflow.
As we navigate this topic together, I will share insights drawn from practical experience, ensuring each section builds logically on the last. By the conclusion, you will feel equipped to integrate the PostgREST API into your next project. Let us commence with the essentials.
Want an integrated, All-in-One platform for your Developer Team to work together with maximum productivity?
Apidog delivers all your demands, and replaces Postman at a much more affordable price!
What is the PostgREST API? An Overview
The PostgREST API is a standalone tool that automatically exposes your PostgreSQL database as a fully functional RESTful web service. Developed by Beowulf, it leverages the power of PostgreSQL's query language (SQL) to generate HTTP endpoints dynamically, eliminating the need for custom server-side logic in many cases. At its heart, the PostgREST API interprets database schemas, tables, views, and stored procedures as API resources, allowing you to perform create, read, update, and delete (CRUD) operations via standard HTTP methods like GET, POST, PUT, and DELETE.
What makes the PostgREST API particularly compelling is its adherence to REST principles while incorporating advanced PostgreSQL features such as Row-Level Security (RLS) for fine-grained access control. For instance, you can query data with filters, sorting, and pagination using URL parameters—no additional middleware required. This approach not only reduces code complexity but also ensures your API remains in sync with database changes automatically.
In a landscape dominated by ORMs and API frameworks, the PostgREST API stands out for its "database-first" philosophy. It supports OpenAPI (Swagger) documentation out of the box, making it developer-friendly for integration with tools like Apidog or Swagger UI. If you manage data-intensive applications—think analytics dashboards, mobile backends, or microservices—the PostgREST API provides a lightweight, performant solution that scales with PostgreSQL's robustness. As we proceed, you will see how this API bridges the gap between your data layer and client applications seamlessly.
Getting Started with the PostgREST API: Installation and Setup
Initiating your work with the PostgREST API requires a PostgreSQL instance, as it serves as the foundation. Fortunately, the setup is straightforward, especially when using containerization tools like Docker, which isolate dependencies and simplify deployment. Begin by ensuring Docker Desktop is installed on your machine—download it from the official website for your operating system (macOS, Windows, or Linux).
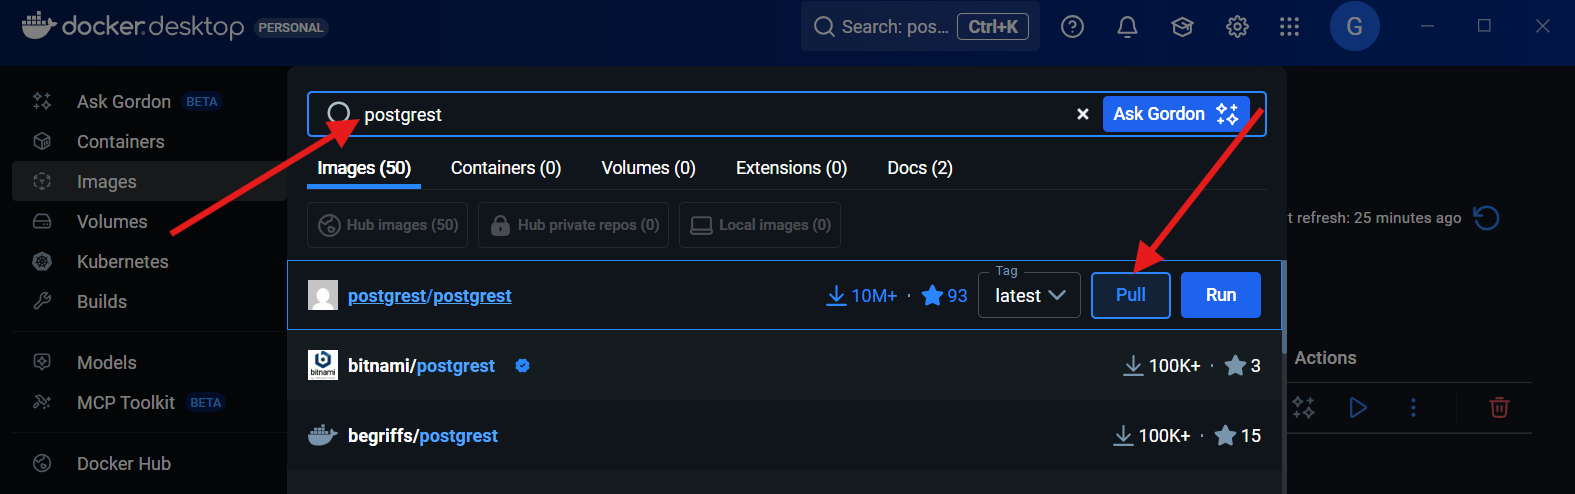
Once Docker is ready, pull the necessary images. Open Docker Desktop, navigate to the search bar, and install the "postgrest/postgrest" image for the API server itself. Similarly,
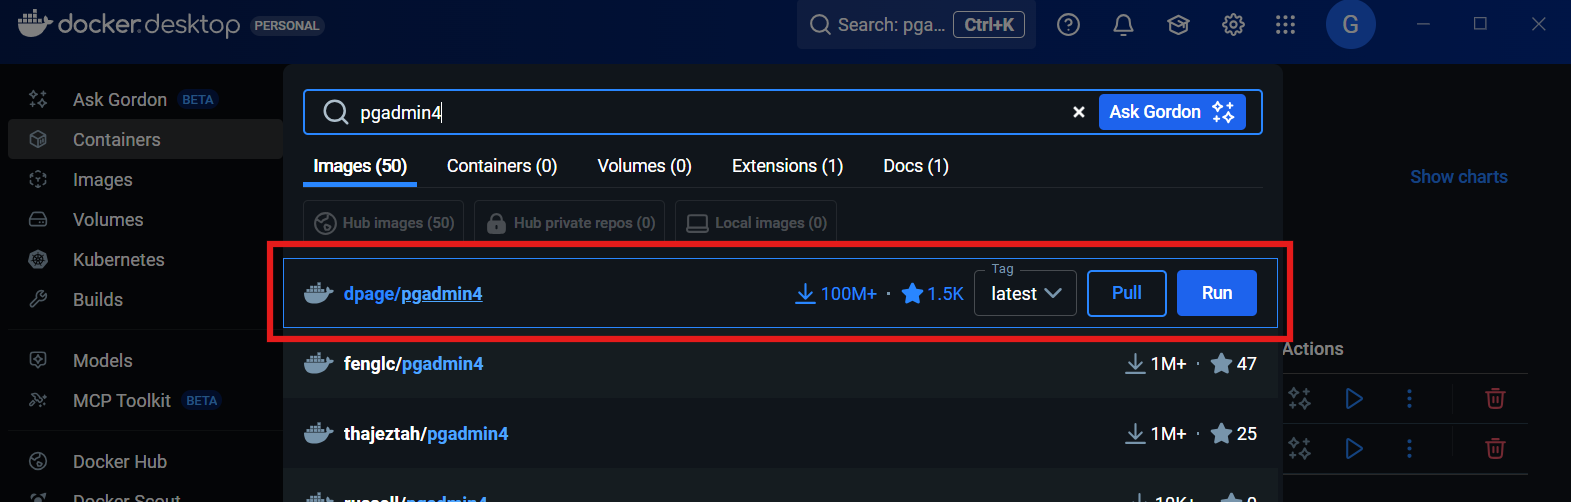
search for and install "dpage/pgadmin4" to manage your PostgreSQL database visually.
and "postgres:alpine" for a lightweight PostgreSQL container. These components form the ecosystem around the PostgREST API.
For a manual PostgreSQL setup via terminal (Recommended), execute the following command to run a container:
docker run --name postgres-1 -e POSTGRES_PASSWORD=password -d -p 5431:5432 postgres:alpine
Here, replace "password" with a secure value. The command launches PostgreSQL on port 5431, mapping to the internal 5432. Upon success, Docker returns a container ID (a long alphanumeric string)—note it for verification. Run docker ps to confirm the container's status.

To verify user roles, which are crucial for PostgREST API configuration, enter the container shell:
docker exec -it <container_id> sh
Substitute <container_id> with your ID or container name. Inside the shell, connect to PostgreSQL:
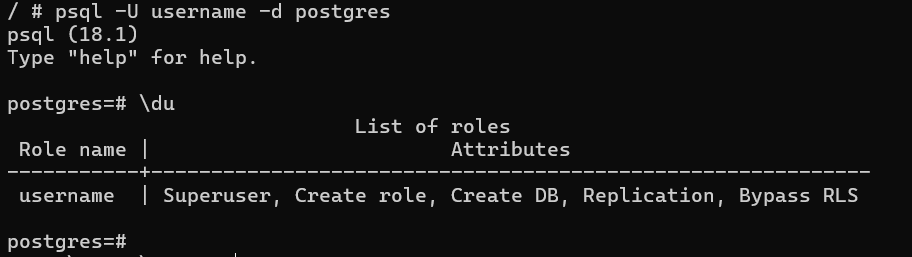
psql -U postgres -d postgres
(Assuming "postgres" as the default user; adjust if customized. Like mine which was changed to username) Then, list roles with \du. This output, including role names like "postgres" or custom ones, will be referenced later. You can create additional users here and assign permissions, such as granting SELECT, INSERT, UPDATE, or DELETE on schemas.
With these prerequisites in place, you are primed to orchestrate your environment using Docker Compose—a YAML file that defines multi-container applications. Create a docker-compose.yaml in your project directory:
version: "3.9"
services:
  postgres_host:
    image: postgres:alpine
    environment:
      POSTGRES_USER: username
      POSTGRES_PASSWORD: password
      POSTGRES_DB: postgres
    volumes:
      - pgdata:/var/lib/postgresql/data
    ports:
      - "5431:5432"
  pgadmin:
    image: dpage/pgadmin4
    ports:
      - "5050:80"
    depends_on:
      - postgres_host
    environment:
      PGADMIN_DEFAULT_EMAIL: postgres@pgadmin.com
      PGADMIN_DEFAULT_PASSWORD: postgres
  postgrest:
    image: postgrest/postgrest
    depends_on:
      - postgres_host
    ports:
      - "3000:3000"
    environment:
      PGRST_DB_URI: "postgres://username:password@postgres_host:5432/postgres"
      PGRST_DB_SCHEMA: "public"
      PGRST_DB_ANON_ROLE: "username"
volumes:
  pgdata:
Customize "username" and "password" to match your setup, and set PGRST_DB_ANON_ROLE to a role from your \du output for anonymous access. This configuration links PostgreSQL, pgAdmin, and the PostgREST API server. Save the file, then in your terminal (e.g., VS Code's integrated one, after installing the Docker extension), run:
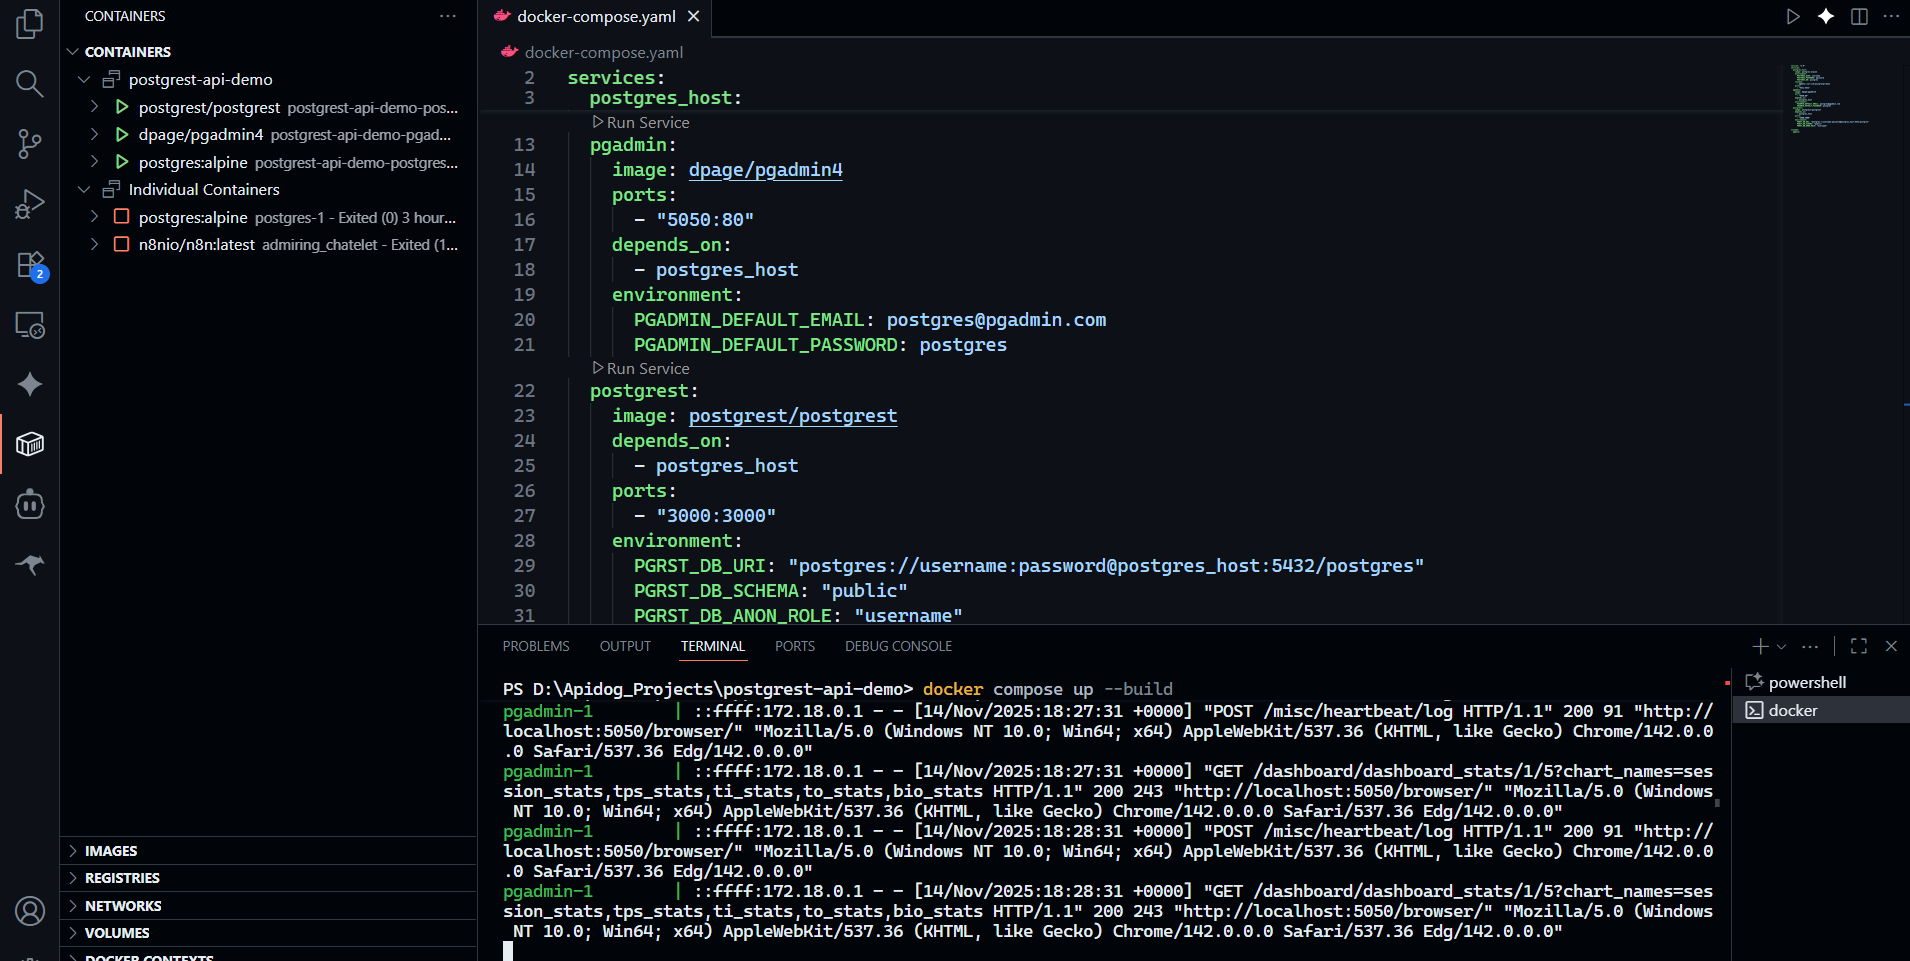
docker compose up --build
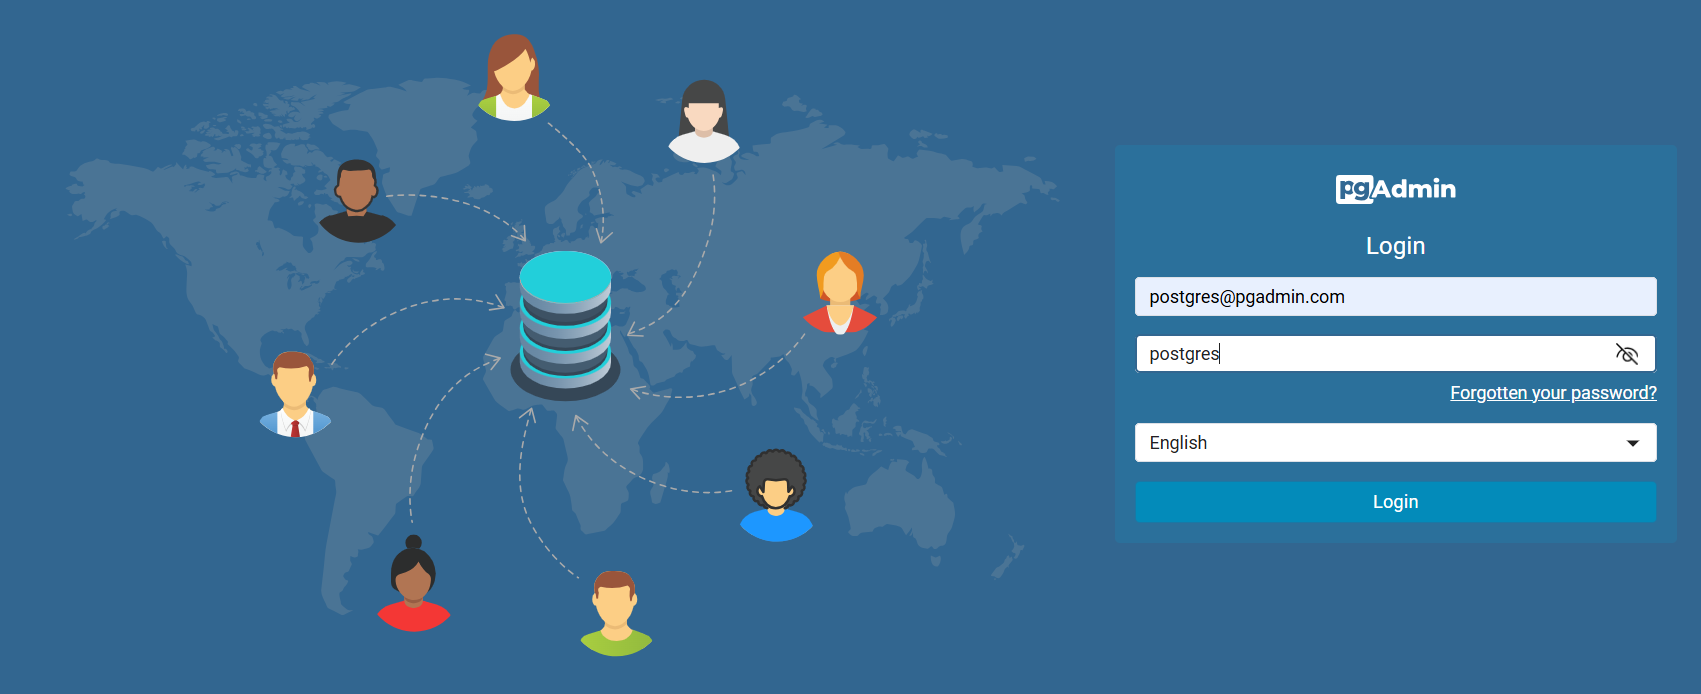
This builds and starts the services. Access pgAdmin at http://localhost:5050 using the YAML credentials, add a server named "postgres_host" with connection details (Hostname: postgres_host, Port: 5432, Username: username, Password: password), and save. You now have a running PostgREST API at http://localhost:3000, ready for database interactions.
Building a Sample Project: Step-by-Step Testing of the PostgREST API
To truly appreciate the PostgREST API, let us construct a hands-on project: a simple human resources database API for managing employee records. This example demonstrates CRUD operations on a "humans" table, using Docker for orchestration and Apidog for API testing.
Step 1: Prepare Your Environment
With Docker Desktop installed and images pulled (PostgREST, pgAdmin4, postgres:alpine), run the initial PostgreSQL container as outlined earlier. Verify with docker ps and note the user roles via \du.
Step 2: Compose Your Stack
In a code editor like VS Code (enhanced with the Docker extension for seamless container management), craft the docker-compose.yaml file above. Ensure image names align precisely—mismatches can halt startup. Adjust ports if needed, but keep PostgreSQL's external port (5431) consistent with your manual setup. Launch with docker compose up --build. Monitor logs for errors; successful startup shows services binding to ports 5431 (DB), 5050 (pgAdmin), and 3000 (PostgREST).
Step 3: Configure pgAdmin and Create the Table
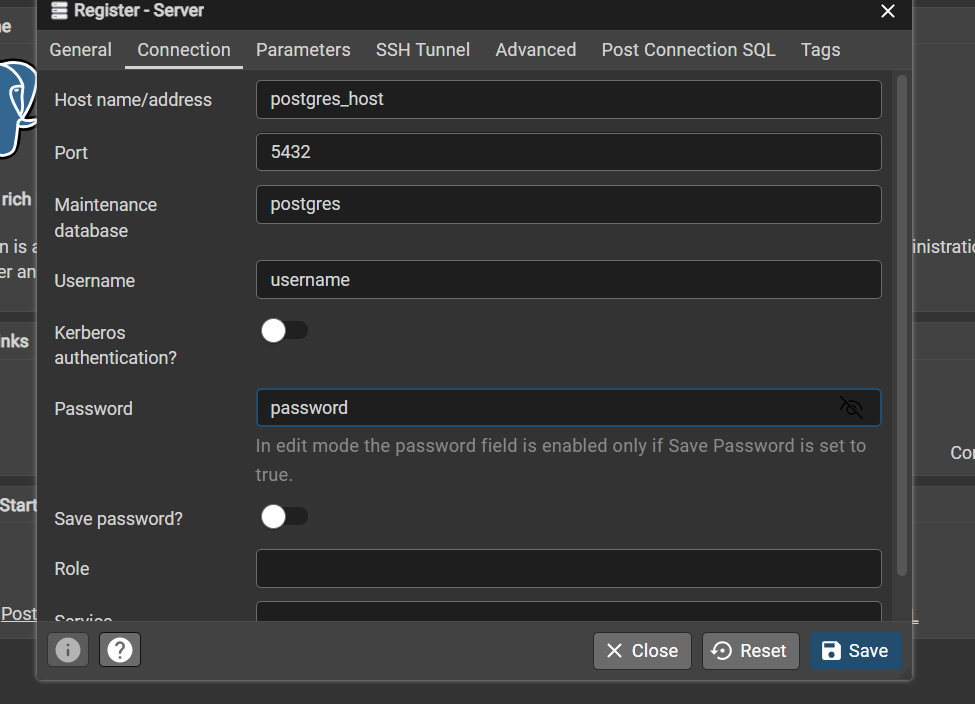
Navigate to http://localhost:5050, log in with PGADMIN_DEFAULT_EMAIL and PASSWORD from the YAML.
Under the dashboard,

add a new server: Name it "postgres_host",
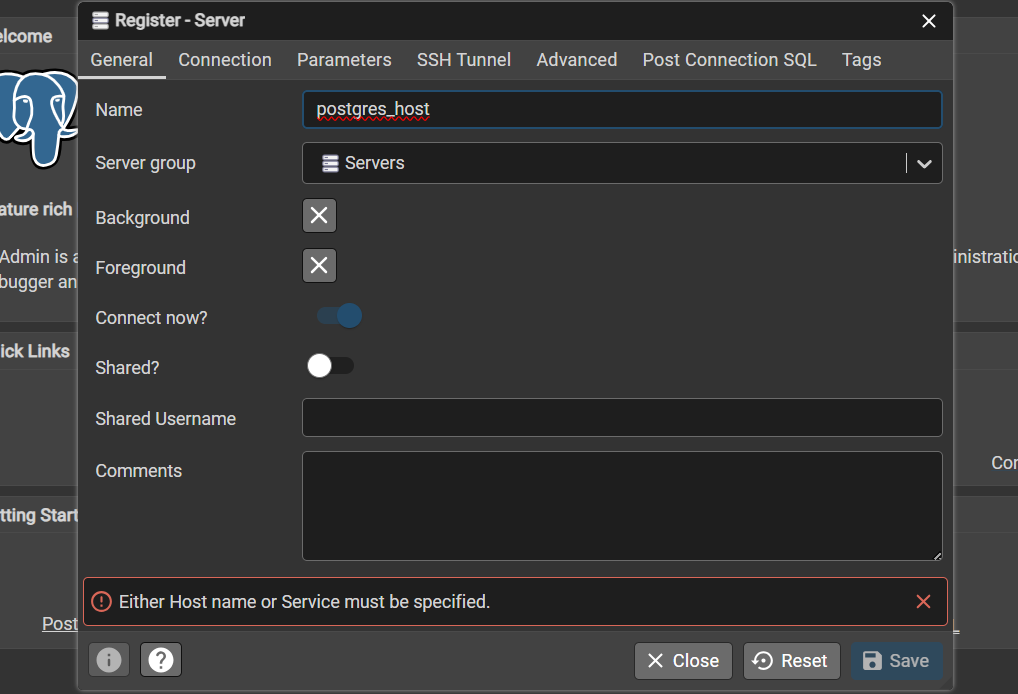
then in the Connection tab, input Hostname: postgres_host, Port: 5432, Username: username, Password: password. Save to access the interface.
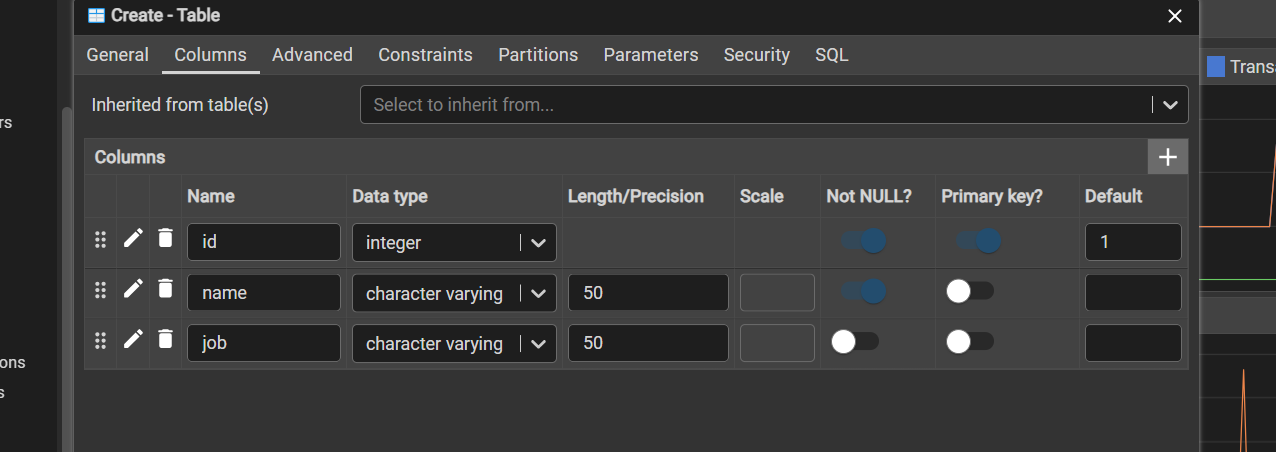
Create a table: Go to Databases > postgres > Schemas > public > Tables, right-click Tables, and select Create > Table. Name it "humans". In Columns, add:
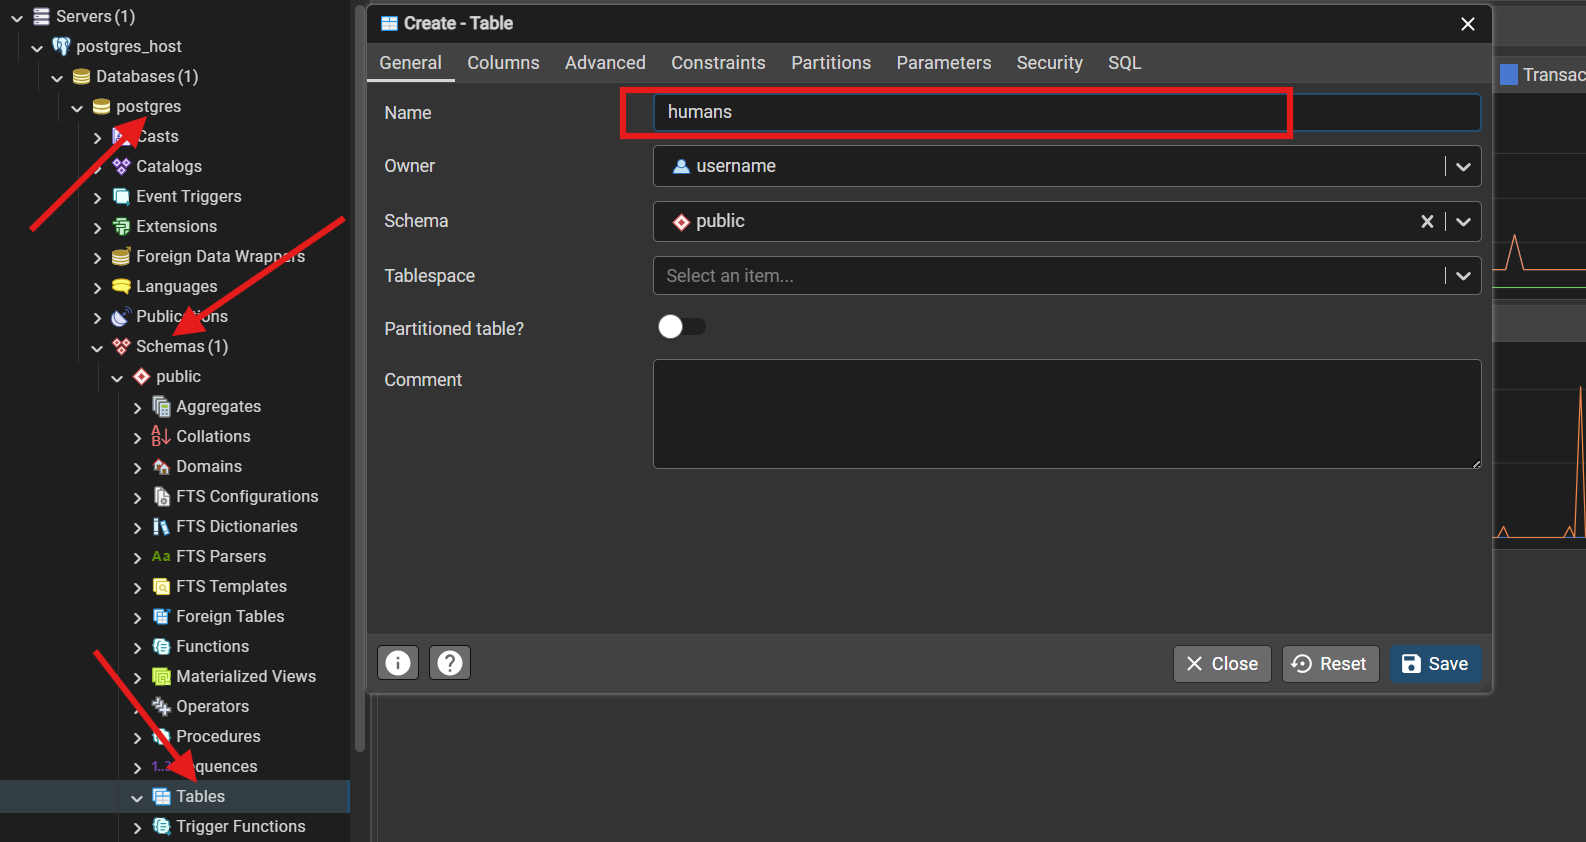
- id: INTEGER, Not Null, Primary Key
- name: VARCHAR(50), Not Null
- job: VARCHAR(50)
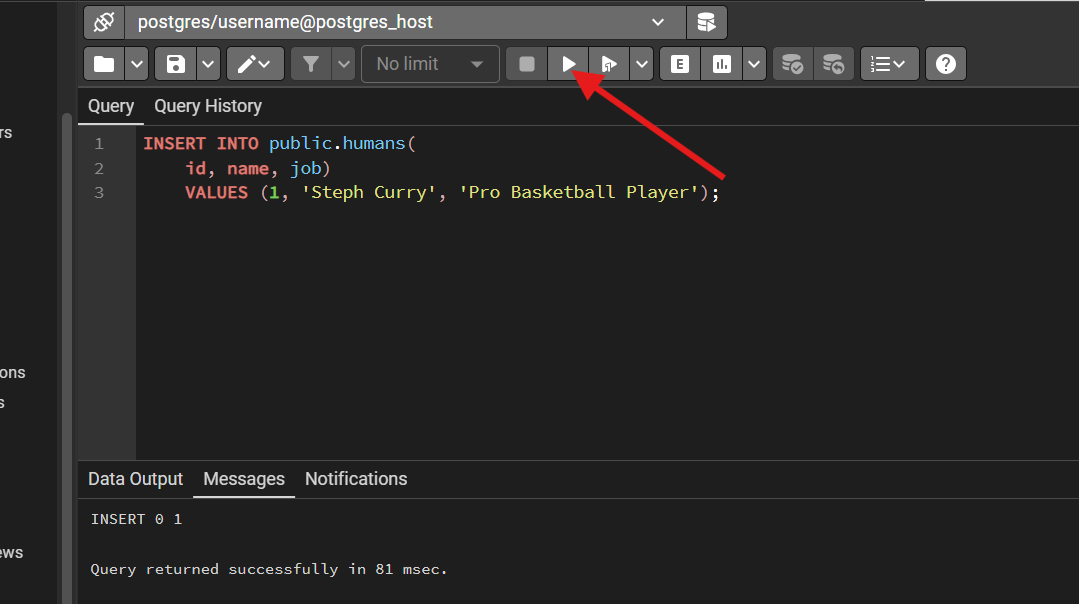
Click Save. To insert data, right-click the "humans" table > Scripts > INSERT Script. Modify with sample SQL, e.g.:
INSERT INTO public.humans (id, name, job) VALUES (1, 'Steph Curry', 'Pro Basketball Player');
Execute to persist the record.
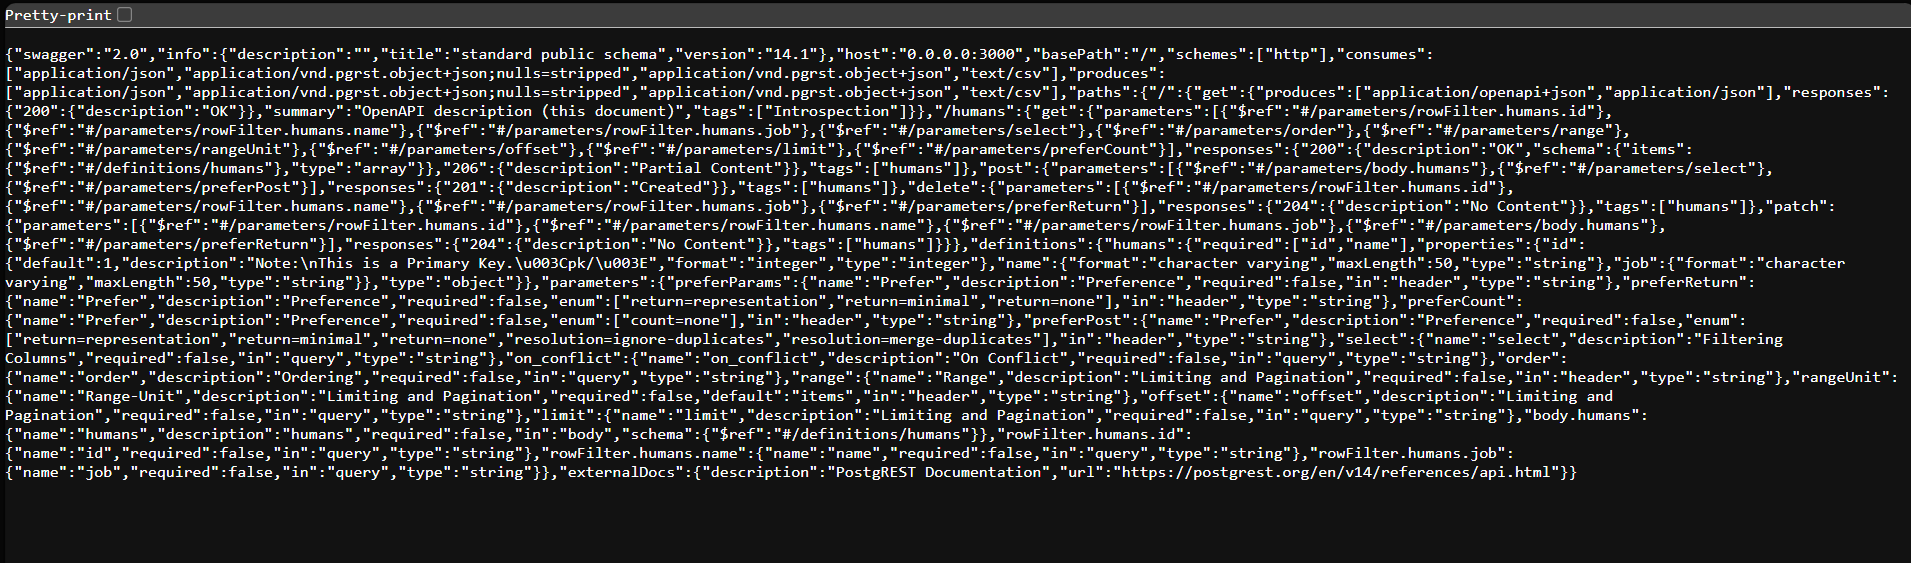
Step 4: Verify PostgREST API Availability
Open http://localhost:3000 in your browser. You should see a Swagger 2.0 spec document listing resources like /humans—confirmation that the PostgREST API is operational and schema-aware.
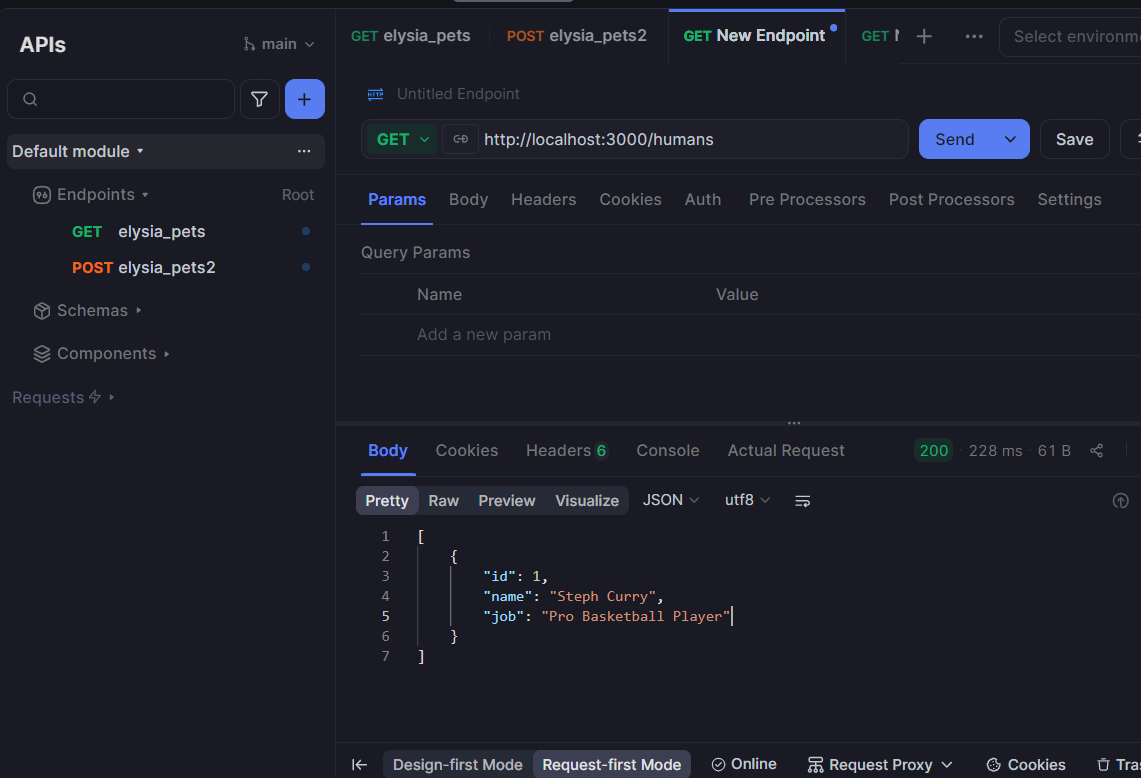
Step 5: Test with Apidog
Launch Apidog, create a new project, and add a GET request to http://localhost:3000/humans (replace "humans" with your table name). Send the request; it returns JSON like:
[
  {
    "id": 1,
    "name": "Steph Curry",
    "job": "Pro Basketball Player"
  }
]
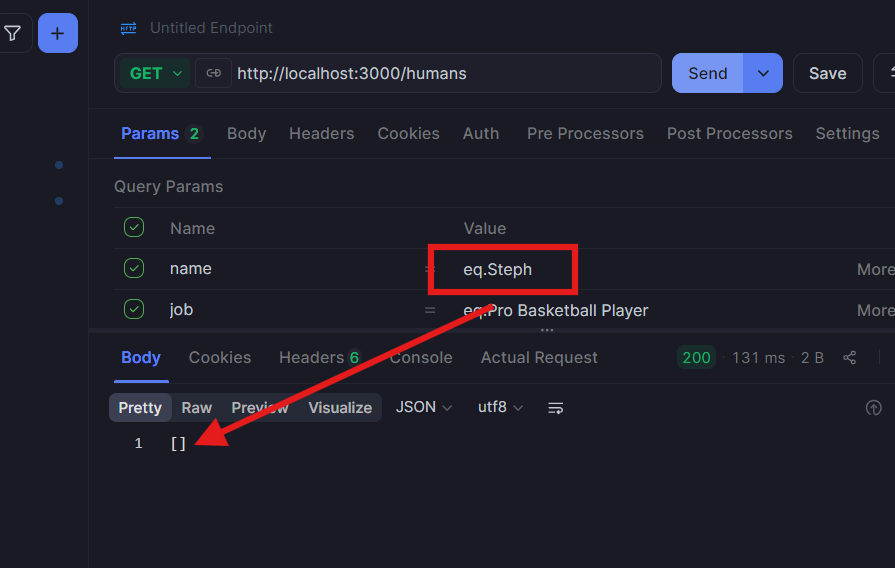
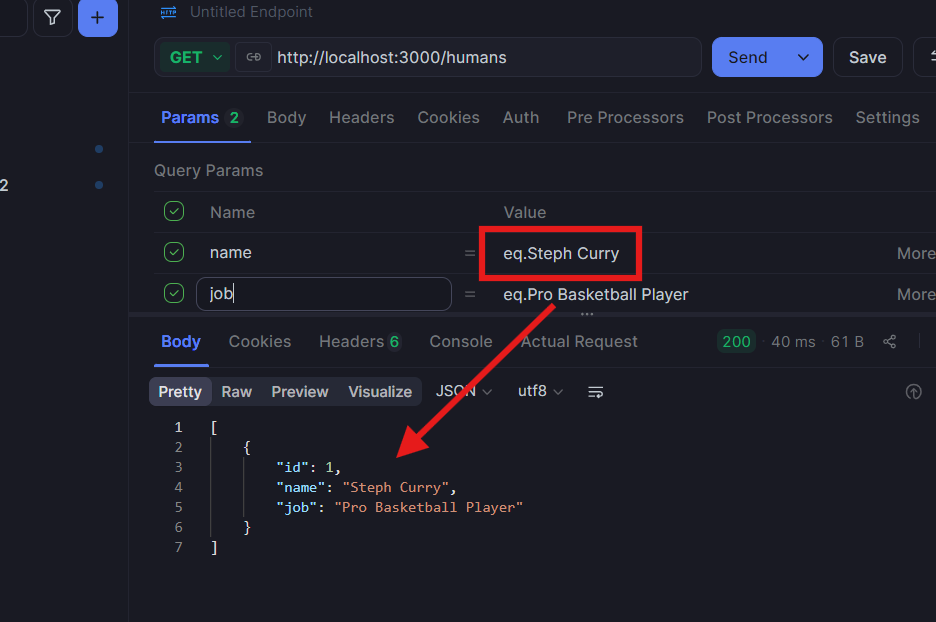
For querying, add a Query Parameter: Key "name", Value "eq.Steph Curry" (where "eq" denotes equality). This filters to matching records; non-matches yield empty arrays.
Step 6: Explore CRUD Operations
The PostgREST API shines in full CRUD. For POST (create), use Apidog's body as JSON: {"name": "New Employee", "job": "Developer"} to http://localhost:3000/humans. PUT updates via http://localhost:3000/humans?id=eq.1 with patched data. DELETE uses http://localhost:3000/humans?id=eq.1. Advanced filters like sorting (order=name.asc) or limits (limit=5) enhance usability. For exhaustive examples, consult the official documentation at https://docs.postgrest.org/en/v14/references/api/tables_views.html.
This project, spanning under an hour, illustrates the PostgREST API's prowess in rapid prototyping. Scale it by adding RLS policies in PostgreSQL for secure, role-based access.
Frequently Asked Questions
Q1. What are the system requirements for running the PostgREST API?
Ans: The PostgREST API requires PostgreSQL 9.4 or later, with Docker recommended for containerized setups. It runs efficiently on modest hardware, needing at least 512MB RAM for basic operations.
Q2. Can the PostgREST API handle complex queries beyond basic CRUD?
Ans: Yes, it supports PostgreSQL's full SQL capabilities via embedded RPC calls and views, allowing joins, aggregations, and custom functions exposed as endpoints.
Q3. How does the PostgREST API ensure data security?
Ans: It integrates natively with PostgreSQL's Row-Level Security and role-based permissions, enforcing access controls at the database level without API-side vulnerabilities.
Q4. Is the PostgREST API suitable for production environments?
Ans: Absolutely, with features like JWT authentication, schema isolation, and horizontal scaling via multiple instances. Monitor performance and apply RLS for compliance.
Q5. How do I integrate the PostgREST API with frontend frameworks?
Ans: Use HTTP clients like Axios or Fetch; generate TypeScript types from OpenAPI specs for type safety in React, Vue, or Angular applications.
Conclusion
In reflecting on our exploration, the PostgREST API emerges as a elegant solution for database-driven development, converting PostgreSQL's strengths into accessible web services. From effortless setup to sophisticated querying, it empowers you to deliver robust APIs with less overhead. I encourage you to replicate the sample project and experiment further—perhaps extending it with authentication. As your applications evolve, the PostgREST API will prove an indispensable ally in maintaining agility and reliability.
Want an integrated, All-in-One platform for your Developer Team to work together with maximum productivity?
Apidog delivers all your demands, and replaces Postman at a much more affordable price!


