
Moonshot AI created Kimi CLI to handle terminal operations and development tasks with precision. This tool operates in a technical preview stage, yet it already offers substantial capabilities for macOS and Linux users. Windows support follows soon, expanding its accessibility.
Kimi CLI integrates seamlessly with existing environments, providing a shell-like user interface and direct command execution. Engineers appreciate its ability to execute raw shell commands without exiting the interface. Furthermore, it supports advanced protocols like Agent Client Protocol (ACP) and Model Context Protocol (MCP), which extend its functionality to connect with code editors and external systems.
This guide explains every aspect of using Kimi CLI in detail. You start with installation, move to configuration, explore basic and advanced usage, and examine integrations. Each section builds on the previous one, offering technical insights and examples. By the end, you possess the knowledge to deploy Kimi CLI effectively in your projects.
Installing Kimi CLI: Step-by-Step Instructions
Installation forms the foundation of using Kimi CLI effectively. Developers install it via Python's package manager, ensuring compatibility with their systems. Kimi CLI requires Python 3.13 and relies on uv, a high-performance tool for managing Python environments. If you lack uv, install it first from its official documentation.
Begin by confirming your operating system. Kimi CLI supports macOS and Linux natively. For macOS users, anticipate potential security checks that delay the first execution by up to 10 seconds. Linux users experience smoother initial runs.
First, install uv if absent. Execute the installation command provided in uv's getting-started guide. Once uv runs, proceed to install Kimi CLI. Run the following command in your terminal:
uv tool install --python 3.13 kimi-cli
This command fetches Kimi CLI from PyPI and sets it up in your environment. Verify the installation by executing kimi --help. The output displays available options and confirms successful setup.
Upgrading Kimi CLI ensures access to the latest features and bug fixes. Use this command for upgrades:
uv tool upgrade kimi-cli --no-cache
The --no-cache flag prevents reusing outdated packages, guaranteeing a fresh installation.
Dependencies play a crucial role here. Kimi CLI depends on Python 3.13, but uv handles most requirements automatically. Avoid manual pip installations, as uv optimizes the process for speed and reliability.
Common issues during installation include Python version mismatches. If your system defaults to an older Python, specify version 3.13 explicitly. Additionally, network problems might interrupt downloads; retry in a stable connection.
Once installed, Kimi CLI resides in your PATH, ready for invocation. This step unlocks the tool's potential, allowing you to configure it next. Configuration tailors Kimi CLI to your specific needs, such as integrating with shells or editors.
Installation demands attention to prerequisites like uv and Python. Developers who follow these steps encounter fewer hurdles later. Moreover, pairing this with Apidog during API-heavy projects amplifies efficiency, as Apidog handles testing while Kimi CLI manages agent-driven tasks.
Configuring Kimi CLI for Optimal Performance
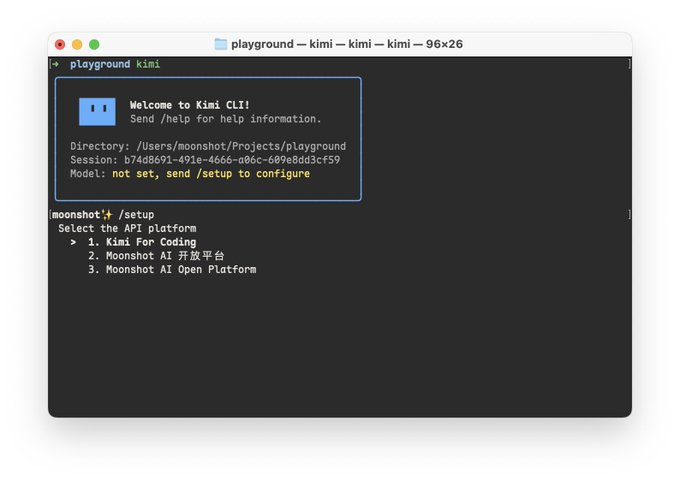
Configuration refines Kimi CLI's behavior to match your workflow. After installation, launch Kimi CLI by typing kimi in the terminal within your project directory. The tool prompts for setup upon first use. Send the /setup command to initialize it.
During setup, Kimi CLI establishes necessary connections and verifies your environment. This process includes checking for compatible shells and protocols. Users often capture this visually, but text-based confirmation suffices.
For enhanced integration, configure Zsh support. Zsh, a popular shell, benefits from the zsh-kimi-cli plugin. Clone the plugin repository:
git clone https://github.com/MoonshotAI/zsh-kimi-cli.git ${ZSH_CUSTOM:-~/.oh-my-zsh/custom}/plugins/kimi-cli
Edit your ~/.zshrc file to include kimi-cli in the plugins list:
plugins=(... kimi-cli)
Restart Zsh to apply changes. Now, press Ctrl-X to switch to agent mode seamlessly.
ACP configuration targets code editors like Zed. Modify ~/.config/zed/settings.json to add Kimi CLI as an agent server:
{
  "agent_servers": {
    "Kimi CLI": {
      "command": "kimi",
      "args": ["--acp"],
      "env": {}
    }
  }
}
This setup allows Zed to communicate with Kimi CLI via ACP, enabling AI-driven code modifications directly in the editor.
MCP configuration involves a JSON file for connecting to external servers. Create a file, say mcp.json, with server details:
{
  "mcpServers": {
    "context7": {
      "url": "https://mcp.context7.com/mcp",
      "headers": {
        "CONTEXT7_API_KEY": "YOUR_API_KEY"
      }
    },
    "chrome-devtools": {
      "command": "npx",
      "args": ["-y", "chrome-devtools-mcp@latest"]
    }
  }
}
Invoke Kimi CLI with:
kimi --mcp-config-file /path/to/mcp.json
This connects Kimi CLI to MCP servers, expanding its access to tools and data.
Configuration also involves environment variables for custom behaviors. For example, set API keys for MCP headers securely.
Troubleshooting configuration errors requires checking logs. Kimi CLI outputs verbose messages; redirect them to files for analysis.
In addition, developers integrate Apidog here. When configuring Kimi CLI for API tasks, use Apidog to mock endpoints that Kimi CLI queries via MCP. This combination ensures reliable testing.
Proper configuration transforms Kimi CLI from a basic tool into a powerhouse. Next, explore basic usage to apply these settings.
Basic Usage of Kimi CLI: Getting Started with Commands
Basic usage introduces you to Kimi CLI's core functionalities. Launch the tool with kimi, then interact via commands. Send /help to list available options and get guidance.
Kimi CLI operates in a conversational mode. You input queries or tasks, and it responds with actions or suggestions. For development tasks, describe a problem, and Kimi CLI proposes code changes.
Switch to shell mode with Ctrl-X. In this mode, execute shell commands directly. Note that built-in commands like cd lack support currently, so use full paths or external tools.
Examples illustrate this. To list files, type ls in shell mode. Kimi CLI executes it and returns output inline.
Transitioning between modes enhances productivity. Return to agent mode with another Ctrl-X.
Users often start with simple tasks. For instance, request code snippets: "Generate a Python function for sorting." Kimi CLI provides the code, which you copy or apply.
Moreover, Kimi CLI handles multi-step operations. Describe a workflow, and it breaks it down.
Basic usage also includes error handling. If a command fails, Kimi CLI suggests fixes.
Combining with Apidog, test API calls generated by Kimi CLI. Apidog's debugging tools verify responses quickly.
Mastering basics sets the stage for advanced features. Consequently, practice these commands daily to build familiarity.
Exploring Shell Mode in Kimi CLI
Shell mode represents a key feature of Kimi CLI. Developers activate it with Ctrl-X, turning the interface into a command executor.
In shell mode, run any external command. For example, git status displays repository state without switching terminals.
However, limitations exist. Internal shell commands require workarounds. Use pwd to get directories instead of relying on cd.
Kimi CLI preserves state across modes. Execute a shell command, then query the agent about its output.
Performance in shell mode depends on system resources. Heavy commands might lag, so monitor usage.
Additionally, integrate shell mode with development. Compile code via make, then ask Kimi CLI to analyze errors.
Shell mode bridges traditional CLI with AI agents. Therefore, use it for hybrid workflows.
Integrating Kimi CLI with Zsh for Enhanced Workflow
Zsh integration elevates Kimi CLI's usability. After plugin installation, Ctrl-X toggles modes effortlessly.
In Zsh, Kimi CLI feels native. Completions and history sync across sessions.
Customize the plugin for specific keys or behaviors. Edit the plugin files if needed.
Developers with Oh My Zsh find this straightforward. Others adapt using their managers.
Furthermore, Zsh integration supports themes. Match Kimi CLI's output to your shell aesthetics.
Troubleshoot by reloading Zsh. If issues persist, check plugin logs.
Pairing with Apidog, use Zsh scripts to automate API tests while Kimi CLI handles AI logic.
This integration streamlines daily tasks. Next, delve into ACP support.
Leveraging Agent Client Protocol (ACP) with Kimi CLI
ACP connects editors to agents like Kimi CLI. It standardizes communication for AI-assisted coding.
In Zed, configure as shown earlier. Create threads in the agent panel to interact.
Kimi CLI, with --acp, listens for requests. Editors send code contexts, and Kimi CLI responds with modifications.
This protocol fosters ecosystem growth. Developers contribute via GitHub issues.
Examples include auto-completing functions. Select code, invoke agent, and apply suggestions.
Security considerations: Ensure trusted connections.
Apidog aids by documenting APIs used in ACP extensions.
ACP empowers editor-agent synergy. Consequently, it boosts coding efficiency.
Utilizing Model Context Protocol (MCP) in Kimi CLI
MCP links AI to external systems, acting as a universal connector.
Kimi CLI supports MCP via config files. Define servers for tools like Chrome DevTools.
Launch with --mcp-config-file to enable.
MCP expands capabilities: Access databases, browsers, or custom tools.
For instance, query a web page via MCP server, then process with Kimi CLI.
Developers build custom MCP servers for niche needs.
Integration with Apidog: Mock MCP endpoints for testing.
MCP's openness encourages innovation. Therefore, explore its potential fully.
Advanced Usage Examples and Best Practices for Kimi CLI
Advanced usage involves complex scenarios. Automate deployments: Describe steps, and Kimi CLI generates scripts.
Use MCP for real-time data: Fetch stock prices, analyze with AI.
Best practices: Version configs, document workflows.
Examples: Build a web scraper using MCP browser tools.
Combine with Apidog: Generate API specs in Kimi CLI, import to Apidog.
Troubleshoot advanced issues: Monitor MCP connections.
These examples demonstrate Kimi CLI's versatility.
Troubleshooting Common Issues in Kimi CLI
Troubleshooting maintains smooth operation. Installation failures: Check Python version.
Configuration errors: Validate JSON syntax in MCP files.
Usage issues: Restart sessions for mode switches.
Seek community help on GitHub.
Apidog assists in debugging API-related problems.
Address issues promptly to sustain productivity.
Conclusion: Maximizing Productivity with Kimi CLI
Kimi CLI revolutionizes development with its agent capabilities. From installation to advanced integrations, this guide equips you thoroughly.
Continue exploring features, and integrate tools like Apidog for comprehensive workflows.
Embrace Kimi CLI to elevate your technical prowess.


