
HTTPie is a command-line tool that lets you interact with HTTP servers in a human-friendly way. It has a simple and expressive syntax, supports JSON and form data, handles authentication and headers, and displays colorized and formatted output. It also has some advanced features, such as sessions, plugins, and proxies, that make it even more powerful and versatile.
In this blog post, I will show you how to install and use HTTPie, and how it can help you test and debug your APIs with ease and efficiency. I will also share some tips and tricks that I learned along the way, and some resources that you can use to learn more about HTTPie.
How to Install HTTPie
The first step to use HTTPie is to install it on your system. HTTPie is written in Python, and you can install it using pip, the Python package manager. To do so, open your terminal and run the following command:
pip install --upgrade httpie
This will install the latest version of HTTPie on your system, and also upgrade any existing version if you have one. You can check the version of HTTPie by running:
http --version
You should see something like this:
http 2.5.0
HTTPie - a CLI, cURL-like tool for humans.
https://httpie.io
If you see this output, congratulations! You have successfully installed HTTPie and you are ready to use it.
How to Send HTTP Requests with HTTPie
The basic syntax of HTTPie is:
http [flags] [METHOD] URL [ITEM [ITEM]]
Where:
flagsare optional arguments that modify the behavior of HTTPie, such as-vfor verbose mode,-hfor help, or-ffor follow redirects.METHODis the HTTP method to use, such as GET, POST, PUT, PATCH, DELETE, etc. If omitted, HTTPie defaults to GET.URLis the URL of the HTTP server to interact with, such ashttps://example.com/api/users.ITEMis an optional key-value pair that specifies the request data, such asname=Johnfor form data, orname:=Johnfor JSON data. You can also useITEMto specify headers, such asUser-Agent:HTTPie.
For example, to send a GET request to https://example.com/api/users, you can simply run:
http https://example.com/api/users
This will send a GET request to the URL, and display the response in a colorized and formatted way. You will see something like this:
HTTP/1.1 200 OK
Connection: keep-alive
Content-Length: 326
Content-Type: application/json; charset=utf-8
Date: Thu, 08 Feb 2024 05:43:25 GMT
ETag: W/"146-8a9e8c9f"
Server: nginx/1.19.6
X-Powered-By: Express

[
    {
        "id": 1,
        "name": "John",
        "email": "john@example.com"
    },
    {
        "id": 2,
        "name": "Jane",
        "email": "jane@example.com"
    },
    {
        "id": 3,
        "name": "Bob",
        "email": "bob@example.com"
    }
]
As you can see, HTTPie displays the response status line, headers, and body in a clear and readable way. It also uses colors to highlight different parts of the response, such as green for headers, blue for JSON keys, and yellow for JSON values.

You can also send other HTTP methods with HTTPie, such as POST, PUT, PATCH, or DELETE, by specifying the method before the URL. For example, to send a POST request to https://example.com/api/users with some JSON data, you can run:
http POST https://example.com/api/users name=John email=john@example.com
This will send a POST request to the URL, with the following JSON data in the request body:
{
    "name": "John",
    "email": "john@example.com"
}
You can also use the := operator to specify JSON values, such as name:="John" or age:=25. This is useful when you want to send non-string values, such as numbers, booleans, arrays, or objects.
HTTPie will display the response in the same way as before, but with a different status code and body. You will see something like this:
HTTP/1.1 201 Created
Connection: keep-alive
Content-Length: 110
Content-Type: application/json; charset=utf-8
Date: Thu, 08 Feb 2024 05:43:25 GMT
ETag: W/"6e-8a9e8c9f"
Location: /api/users/4
Server: nginx/1.19.6
X-Powered-By: Express

{
    "id": 4,
    "name": "John",
    "email": "john@example.com"
}
As you can see, HTTPie displays the response status code as 201 Created, indicating that a new resource was created on the server. It also displays the Location header, which points to the URL of the newly created resource. The response body contains the JSON representation of the new user.
You can use the same syntax to send other HTTP methods, such as PUT, PATCH, or DELETE, by replacing the method name. For example, to update the name of the user with id 4, you can run:
http PATCH https://example.com/api/users/4 name=Jack
This will send a PATCH request to the URL, with the following JSON data in the request body:
{
    "name": "Jack"
}
HTTPie will display the response in the same way as before, but with a different status code and body. You will see something like this:
HTTP/1.1 200 OK
Connection: keep-alive
Content-Length: 110
Content-Type: application/json; charset=utf-8
Date: Thu, 08 Feb 2024 05:43:25 GMT
ETag: W/"6e-8a9e8c9f"
Server: nginx/1.19.6
X-Powered-By: Express

{
    "id": 4,
    "name": "Jack",
    "email": "john@example.com"
}
As you can see, HTTPie displays the response status code as 200 OK, indicating that the resource was updated successfully. The response body contains the JSON representation of the updated user.
You can also use HTTPie to send form data, by using the = operator instead of the := operator. For example, to send a POST request to https://example.com/api/login with some form data, you can run:
http POST https://example.com/api/login username=John password=secret
This will send a POST request to the URL, with the following form data in the request body:
username=John&password=secret
HTTPie will display the response in the same way as before, but with a different content type and body. You will see something like this:
HTTP/1.1 200 OK
Connection: keep-alive
Content-Length: 32
Content-Type: text/plain; charset=utf-8
Date: Thu, 08 Feb 2024 05:43:25 GMT
ETag: W/"20-8a9e8c9f"
Server: nginx/1.19.6
X-Powered-By: Express

Login successful. Welcome, John!
As you can see, HTTPie displays the response content type as text/plain, indicating that the response body is plain text. The response body contains a simple message confirming the login.
How to Inspect the Response Body and Headers with HTTPie
One of the great features of HTTPie is that it automatically parses and formats the response body and headers, depending on the content type. For example, if the response is JSON, HTTPie will display it in a pretty and colorized way, as we saw before. If the response is HTML, HTTPie will display it as raw text, but with syntax highlighting. If the response is an image, HTTPie will display it as binary data, but with a hint of the image type and size.
You can also use some flags to modify how HTTPie displays the response. For example, you can use the -b or --body flag to only show the response body, without the headers. You can use the -h or --headers flag to only show the response headers, without the body. You can use the -p or --print flag to specify what parts of the request and response to print, using the following characters:
H: Request headersB: Request bodyh: Response headersb: Response body
For example, to only show the request headers and the response body, you can run:
http -p HB https://example.com/api/users
This will display something like this:
GET /api/users HTTP/1.1
Accept: application/json, */*
Accept-Encoding: gzip, deflate
Connection: keep-alive
Host: example.com
User-Agent: HTTPie/2.5.0

[
    {
        "id": 1,
        "name": "John",
        "email": "john@example.com"
    },
    {
        "id": 2,
        "name": "Jane",
        "email": "jane@example.com"
    },
    {
        "id": 3,
        "name": "Bob",
        "email": "bob@example.com"
    }
]
As you can see, HTTPie displays the request headers and the response body, but not the response headers or the request body.
You can also use the -j or --json flag to force HTTPie to treat the response as JSON, even if the content type is not application/json. This is useful when the server does not send the correct content type, or when you want to parse a non-JSON response as JSON. For example, to parse a plain text response as JSON, you can run:
http -j https://example.com/api/hello
This will display something like this:
HTTP/1.1 200 OK
Connection: keep-alive
Content-Length: 13
Content-Type: text/plain; charset=utf-8
Date: Thu, 08 Feb 2024 05:43:25 GMT
ETag: W/"d-8a9e8c9f"
Server: nginx/1.19.6
X-Powered-By: Express

{
    "hello": "world"
}
As you can see, HTTPie parses the plain text response as JSON, and displays it in a pretty and colorized way.
You can also use the -o or --output flag to save the response body to a file, instead of displaying it on the terminal. This is useful when you want to download a file from the server, such as an image, a PDF, or a ZIP file. For example, to download an image from https://example.com/api/image, you can run:
http -o image.jpg https://example.com/api/image
This will save the image to a file named image.jpg in your current directory. You can also use the -d or --download flag to automatically generate a file name based on the URL and the content type. For example, to download the same image, you can run:
http -d https://example.com/api/image
This will save the image to a file named image-20240208-054325.jpg in your current directory, using the date and time as a suffix.
As you can see, HTTPie gives you a lot of options to inspect the response body and headers, and to save the response to a file. You can use these options to test and debug your APIs, and to check the content and format of the response.
Limitation of HTTPie
HTTPie is a powerful and user-friendly command-line tool for interacting with HTTP servers and APIs. However, it also has some limitations, such as:
- It does not support GraphQL, WebSocket, or gRPC protocols, which are becoming more popular for modern web development.
- It does not have a graphical user interface (GUI) or a web version, which may be preferred by some users who are not comfortable with the terminal.
- It does not have built-in features for API design, documentation, mocking, or testing, which are essential for API development and collaboration.
Why should you use Apidog
Apidog is an integrated platform for API design, debugging, development, mock, and testing. It combines the functionalities of Postman, Swagger, Mock, and JMeter in one tool. You may want to use Apidog if you are looking for:
- A comprehensive and collaborative solution for the entire API lifecycle, from design to testing, mocking, and documentation.
- A tool that supports multiple protocols, such as HTTP, GraphQL, WebSocket, and gRPC.
- A tool that has both a desktop app and a web version, as well as a command-line interface (CLI).
- A tool that implements API design-first, facilitating the effortless synchronization of API, specifications and modifications across the entire API lifecycle.
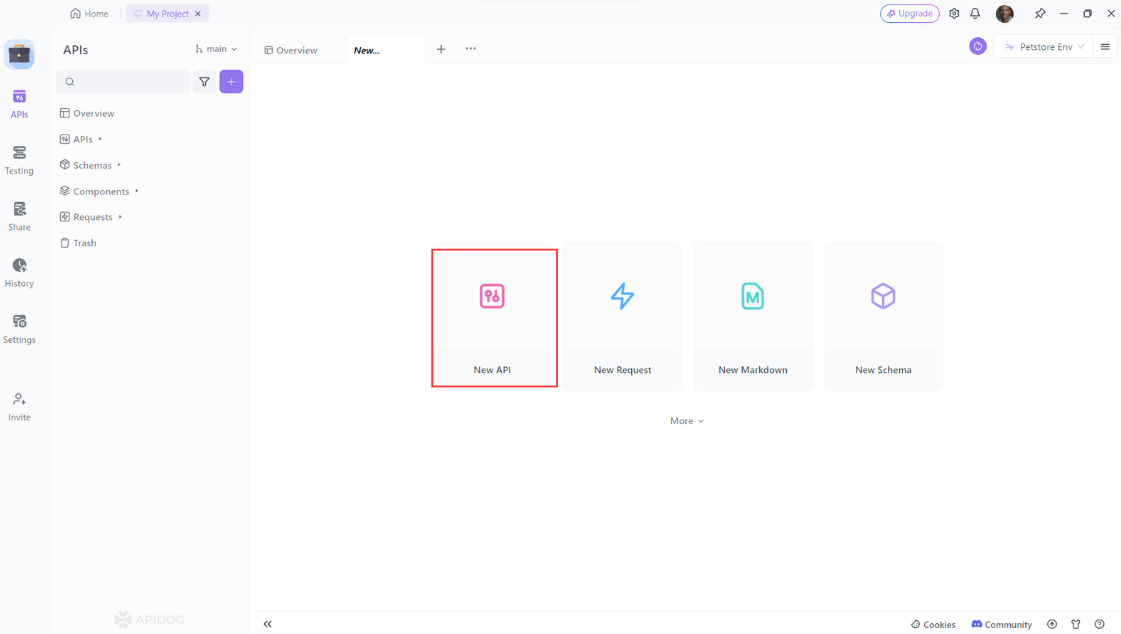
Step 1. Open Apidog and click “New API” to create a new API to test.
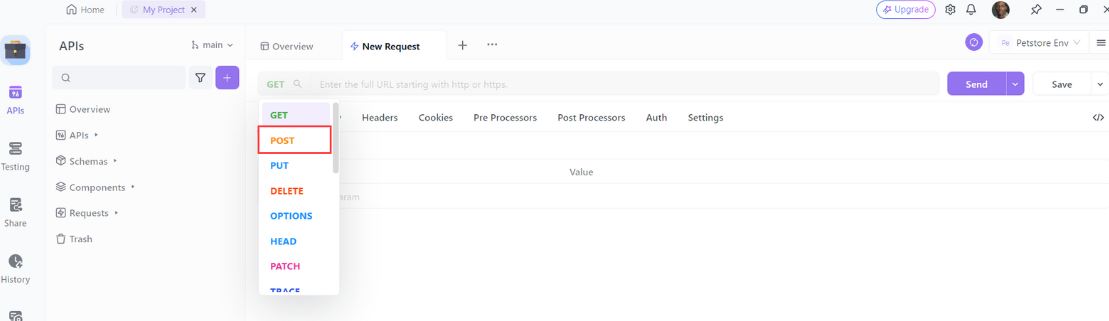
Step 2. Select the HTTP method to use for the API and enter the endpoint URL.
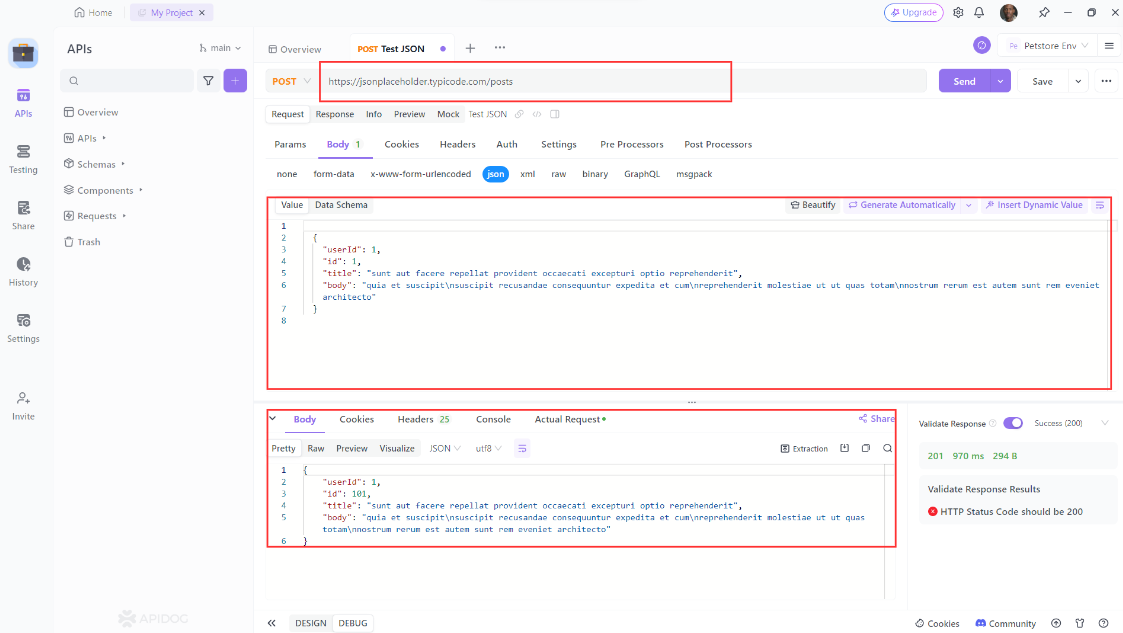
Step 3. Enter the necessary information such as parameters according to the API specification and click the “Send” button to send the API request and get the response.
conclusion
HTTPie is a powerful and user-friendly tool that lets you communicate with HTTP servers and APIs from your terminal. It has many features and options that make it easy to customize and format your requests and responses. You can use HTTPie to test, debug, and explore APIs, as well as automate tasks and workflows.
If you want to use a more integrated platform for API design, debugging, development, mock, and testing, you can also try Apidog. Apidog is a tool that connects the entire API lifecycle, from design to testing, mocking, and documentation.


