If you’ve been paying attention to AI developments in 2025, you’ve probably heard a ton of buzz around Google Gemini 3, the next-generation multimodal AI model designed to compete with (and sometimes outperform) GPT-5. Whether you're a software engineer, a startup founder, an AI hobbyist, or just someone curious about what Gemini 3 can do, learning how to work with the Google Gemini 3 API opens the door to building far smarter and more dynamic applications.
But let’s be honest; Google’s documentation can be a little dense if you're just getting started. So in this guide, we’re going to break everything down in a clear, friendly, and beginner-friendly way.
Now, let's unlock the power of Google's most advanced AI model!
What Is Google Gemini 3?
Google Gemini 3 is the latest model in Google’s multimodal AI family. Unlike earlier models, Gemini 3 is optimized for:
- reasoning and problem-solving
- multimodal input/output (text, images, audio, video embeddings)
- tool use and agentic workflows
- fast inference with low-latency endpoints
- dynamic model switching depending on your task
But the biggest highlight is this:
Gemini 3 introduces two major “thinking modes”:
The thinking_level parameter controls the maximum depth of the model's internal reasoning process before it produces a response. Gemini 3 treats these levels as relative allowances for thinking rather than strict token guarantees. If thinking_level is not specified, Gemini 3 Pro will default to high.
- High/Dynamic Thinking: Maximizes reasoning depth. The model may take significantly longer to reach a first token, but the output will be more carefully reasoned.
- Low Thinking: Minimizes latency and cost. Best for simple instruction following, chat, or high-throughput applications
Many beginners don’t know this yet, but choosing the correct mode drastically improves output quality and helps you control your costs.
We’ll get into how to choose a mode using the API shortly.
Why Use Gemini 3 API Instead of a UI Tool?
Sure, you could use Gemini inside Google AI Studio. But if you want to:
- build applications
- automate tasks
- integrate the model into workflows
- create chatbots
- process data
- train agents
- execute multimodal tasks
you’ll need the Gemini 3 API.
This guide focuses on the REST API because:
- it’s easier for beginners
- no client libraries are needed
- you can test it quickly in Apidog or Postman
- it works in any backend environment
How the Gemini 3 API Works (Simple Overview)
Even though Gemini has advanced capabilities, the API itself is pretty straightforward.
You send a POST request to…
<https://generativelanguage.googleapis.com/v1beta/models/{MODEL_ID}:generateContent?key=YOUR_API_KEY>
You include JSON like:
- the text prompt
- a list of messages (optional)
- model settings
- safety settings
You receive…
- model output text
- reasoning structure (for High/Dynamic thinking)
- citations
- metadata
- multimodal objects (if applicable)
Once you understand this structure, everything else becomes easier.
Getting Started: Your First Steps with Gemini API
Step 1: Get Your API Key
Think of your API key as a special password that tells Google, "Yes, I'm allowed to use Gemini." Here's how to get one:
- Go to Google AI Studio
- Sign in with your Google account
- Click "Create API Key" in the left sidebar
- Give your key a name and create it
- Copy and save this key somewhere safe! You won't be able to see it again.
Important: Never share your API key or commit it to public code repositories. Treat it like your password.
Step 2: Choose Your Approach
You can interact with Gemini in two main ways:
- REST API: The universal approach. Works with any programming language that can make HTTP requests. We'll focus on this method.
- Official SDKs: Google provides convenient libraries for Python, Node.js, and other languages that handle the HTTP details for you.
Since we're focusing on fundamentals, we'll use the REST API approach, it works everywhere and helps you understand what's happening under the hood.
Understanding Gemini's Thinking Modes
One of Gemini's most powerful features is its ability to operate in different "thinking modes." This isn't just marketing it fundamentally changes how the model processes your requests.
Low Thinking (The Speed Demon)
When to use it: For simple tasks, quick responses, and when you're optimizing for speed and cost.
- Speed: Very fast responses
- Cost: More affordable
- Use Cases: Simple Q&A, text classification, basic summarization, straightforward translations
For example:
gemini-3-flash
gemini-3-mini
Think of Low Thinking mode as having a quick conversation with a knowledgeable friend who gives you immediate answers.
High/Dynamic Thinking (The Thoughtful Analyst)
When to use it: For complex reasoning, multi-step problems, and tasks requiring deep analysis.
- Speed: Slower (it "thinks" more before responding)
- Cost: More expensive
- Use Cases: Complex math problems, logical reasoning, code debugging, creative writing, strategic planning
High/Dynamic Thinking is like consulting with an expert who takes their time to consider all angles before giving you a well-reasoned answer.
For example:
gemini-3-pro
gemini-3-pro-thinking
These models offer deeper reasoning, longer attention windows, and better planning capabilities.
The beauty is you can choose both models: High/Dynamic Thinking and Low Thinking depending on your specific needs. For most simple applications, Low Thinking is perfect. When you need deeper reasoning, switch to High Thinking.
As a rule of thumb:
| Task Type | Model Mode |
|---|---|
| Research | High/Dynamic Thinking |
| Math/Logic | High/Dynamic Thinking |
| Code Generation | High/Dynamic Thinking |
| Customer chat | Low Thinking |
| Basic text generation | Low Thinking |
| UI assistants | Low Thinking |
| Real-time apps | Low Thinking |
We’ll show you how to select each model in the REST API.
Build Your First Gemini 3 REST API Call
Let’s start with the simplest possible example.
Endpoint
POST <https://generativelanguage.googleapis.com/v1beta/models/gemini-3-pro:generateContent?key=YOUR_API_KEY>
Request Body Example (JSON)
{
  "contents": [
    { "role": "user",
      "parts": [{ "text": "Explain how airplanes fly." }]
    }
  ]
}
Sample Curl Command
curl -X POST \\
  -H "Content-Type: application/json" \\
  -d '{
    "contents": [
      {
        "role": "user",
        "parts": [{ "text": "Explain how airplanes fly." }]
      }
    ]
  }' \\
"<https://generativelanguage.googleapis.com/v1beta/models/gemini-3-pro:generateContent?key=YOUR_API_KEY>"
Using High/Dynamic Thinking Mode
To activate reasoning mode, you must use a model that supports it like gemini-3-pro-thinking.
REST API Example
curl "https://generativelanguage.googleapis.com/v1beta/models/gemini-3-pro-preview:generateContent" \
  -H "x-goog-api-key: $GEMINI_API_KEY" \
  -H 'Content-Type: application/json' \
  -X POST \
  -d '{
    "contents": [{
      "parts": [{"text": "Find the race condition in this multi-threaded C++ snippet: [code here]"}]
    }]
  }'
When using High/Dynamic Thinking mode, you'll often receive:
- chain-of-thought structures (hidden unless requested)
- more coherent answers
- slower response times
- more expensive inference costs
I recommend only using this mode when it truly matters like longform reasoning or code planning.
Using Low Thinking Mode
Low Thinking models are optimized for speed and are perfect for:
- autocomplete
- short messages
- UI responses
- small assistants
- chatbot side-features
REST API Example Using “Flash”
curl "https://generativelanguage.googleapis.com/v1beta/models/gemini-3-pro-preview:generateContent" \
  -H "x-goog-api-key: $GEMINI_API_KEY" \
  -H 'Content-Type: application/json' \
  -X POST \
  -d '{
    "contents": [{
      "parts": [{"text": "How does AI work?"}]
    }],
    "generationConfig": {
        thinkingConfig: {
          thinkingLevel: "low"
      }
    }
  }'
Low Thinking models cost much less and return near-instant responses.
Handling Multimodal Inputs (Images, PDFs, Audio, Video)
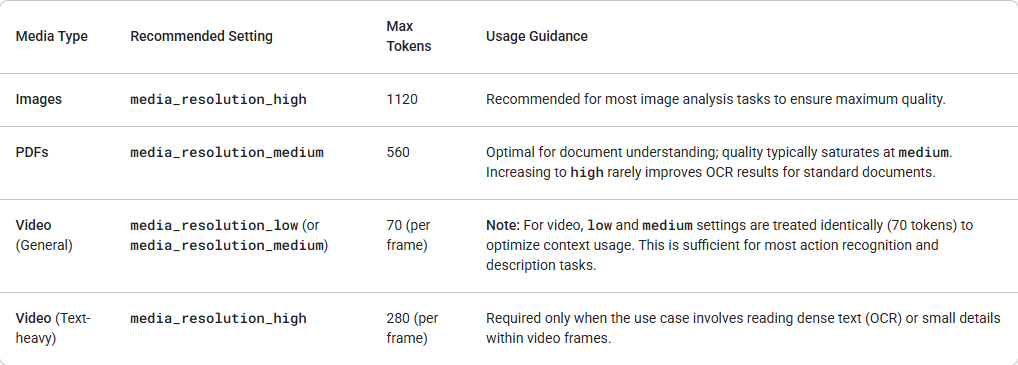
Gemini 3 introduces granular control over multimodal vision processing via the media_resolution parameter. Higher resolutions improve the model's ability to read fine text or identify small details, but increase token usage and latency. The media_resolution parameter determines the maximum number of tokens allocated per input image or video frame.
You can now set the resolution to media_resolution_low, media_resolution_medium, or media_resolution_high per individual media part or globally (via generation_config). If unspecified, the model uses optimal defaults based on the media type.
Gemini 3 supports multimodal embeddings across:
- images
- audio
- video frames
- documents
Example for uploading an image (base64):
curl "https://generativelanguage.googleapis.com/v1alpha/models/gemini-3-pro-preview:generateContent" \
  -H "x-goog-api-key: $GEMINI_API_KEY" \
  -H 'Content-Type: application/json' \
  -X POST \
  -d '{
    "contents": [{
      "parts": [
        { "text": "What is in this image?" },
        {
          "inlineData": {
            "mimeType": "image/jpeg",
            "data": "..."
          },
          "mediaResolution": {
            "level": "media_resolution_high"
          }
        }
      ]
    }]
  }'
Testing and Debugging with Apidog
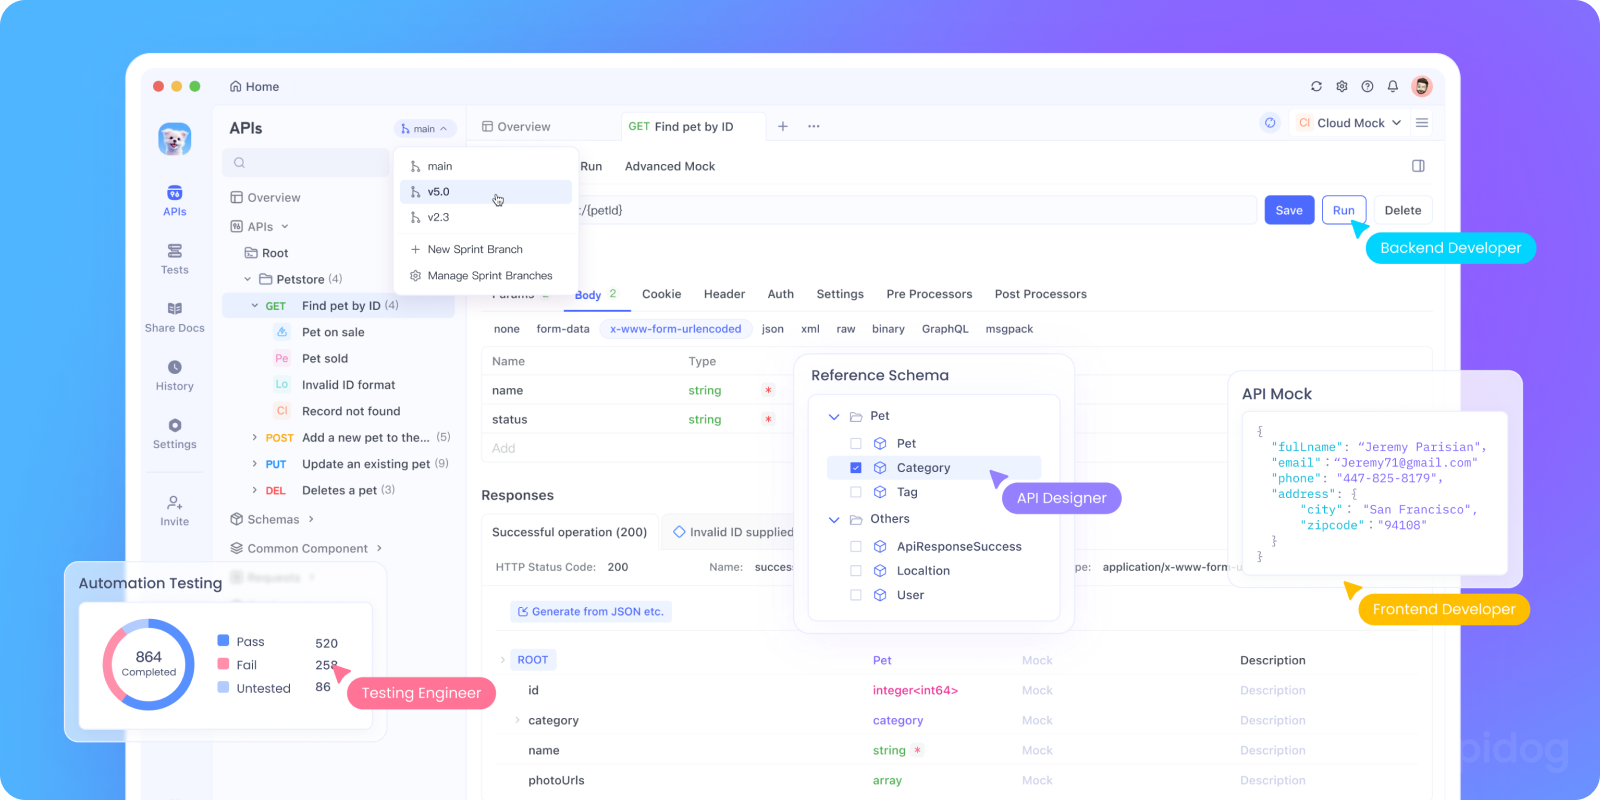
While curl commands are great for quick tests, they become cumbersome when you're developing a real application. This is where Apidog shines.
With Apidog, you can:
- Save Your API Configuration: Set up your Gemini endpoint and API key once, then reuse it across all your tests.
- Create Request Templates: Save different types of prompts (conversation starters, analysis requests, creative writing) as templates.
- Test Thinking Modes Side-by-Side: Easily switch between Low and High Thinking modes to compare responses and performance.
- Manage Conversation History: Use Apidog's environment variables to maintain conversation context across multiple requests.
- Automate Testing: Create test suites that verify your Gemini integration is working correctly.
Here's how you might set up a Gemini request in Apidog:
- Create a new POST request to:
https://generativelanguage.googleapis.com/v1beta/models/gemini-1.5-flash:generateContent?key={{api_key}} - Set up an environment variable
api_keywith your actual API key - In the body, use JSON:
{
  "contents": [{
    "parts": [{
      "text": "{{prompt}}"
    }]
  }],
  "generationConfig": {
    "temperature": 0.7,
    "maxOutputTokens": 800
  }
}
4. Set another environment variable prompt with whatever you want to ask Gemini
This approach makes experimentation much faster and more organized.
Best Practices for Gemini API
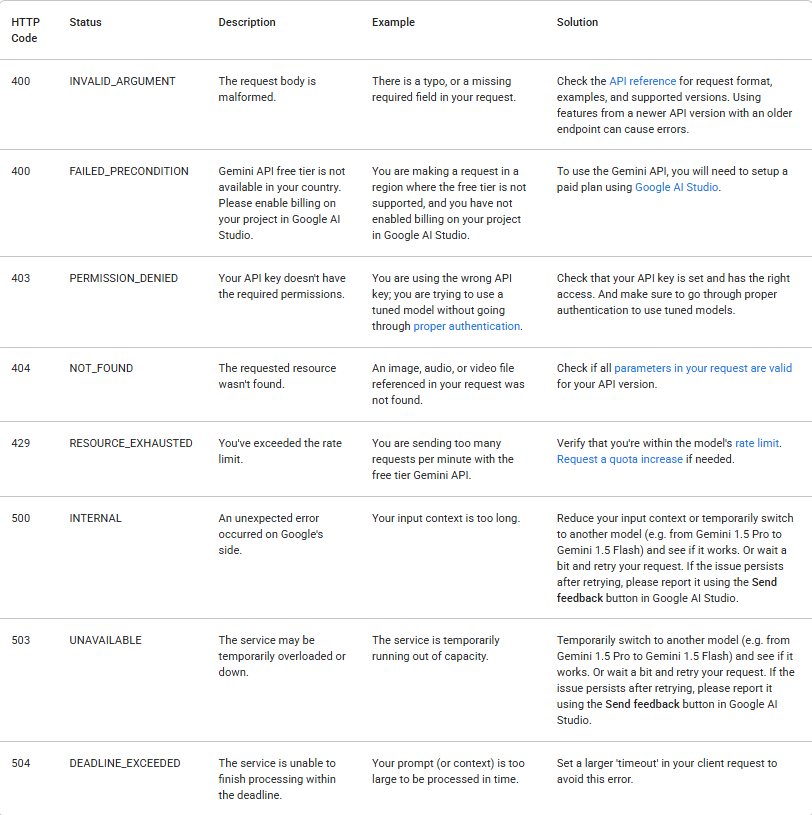
1. Handle Errors Gracefully
API calls can fail for many reasons. Always check the response status and handle errors appropriately. The following table lists common backend error codes you may encounter, along with explanations for their causes and troubleshooting steps:
2. Manage Your Costs
Gemini API usage is metered and costs money (after free tier limits). Keep these tips in mind:
- Start with the free tier to experiment
- Use Low Thinking mode when possible for simple tasks
- Set reasonable
maxOutputTokenslimits - Monitor your usage in Google AI Studio
Tokens can be single characters like z or whole words like cat. Long words are broken up into several tokens. The set of all tokens used by the model is called the vocabulary, and the process of splitting text into tokens is called tokenization.
When billing is enabled, the cost of a call to the Gemini API is determined in part by the number of input and output tokens, so knowing how to count tokens can be helpful.
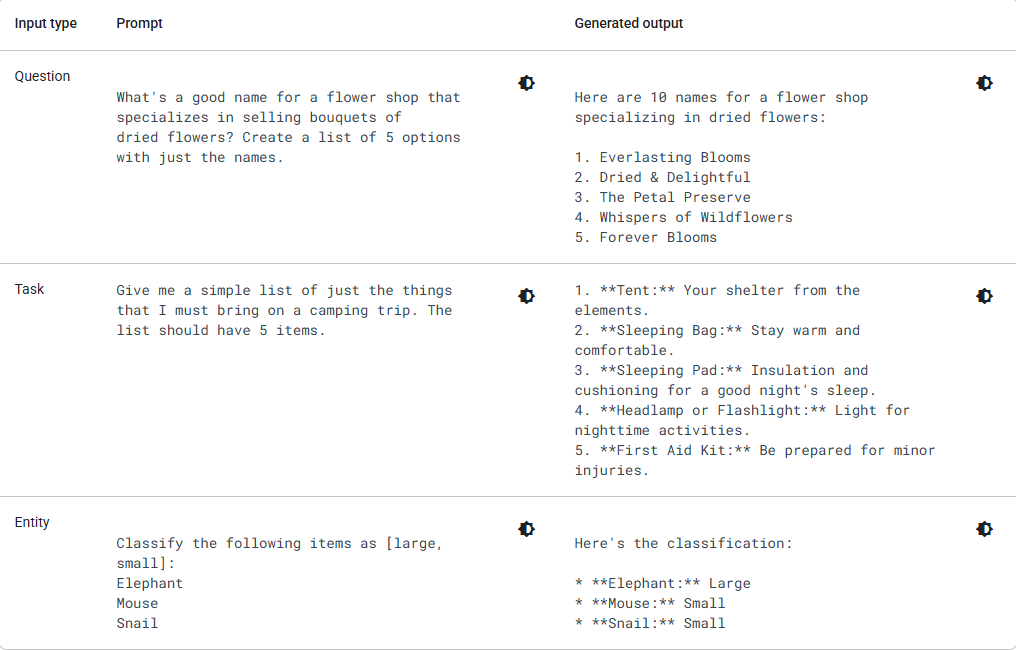
3. Craft Better Prompts
The quality of your output depends heavily on your input. Here are some prompt engineering tips:
Instead of: "Write about dogs"
Try: "Write a 200-word educational blog post about the benefits of adopting rescue dogs, written in a friendly and encouraging tone for potential pet owners."
Instead of: "Fix this code"
Try: "Please debug this Python function that should calculate factorial but returns incorrect results for input 5. Explain what's wrong and provide the corrected code."
4. Choose the Right Model
Google offers several Gemini models, each with different strengths. Verify that your model parameters are within the following values:
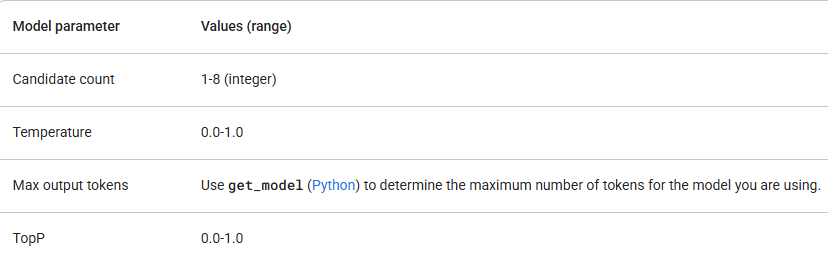
Start with gemini-1.5-flash and only upgrade if you need more reasoning capability. In addition to checking parameter values, make sure you're using the correct API version (e.g., /v1 or /v1beta) and model that supports the features you need. For example, if a feature is in Beta release, it will only be available in the /v1beta API version.
Conclusion: Your AI Journey Begins
You now have everything you need to start building with Google Gemini API. You've learned how to get an API key, make basic requests, understand the different thinking modes, and even seen some advanced examples.
Remember that working with AI APIs is an iterative process. You'll get better at crafting prompts and choosing the right settings with practice. Don't be afraid to experiment, that's how you'll discover the full potential of what you can build.
The most important next step is to start experimenting. Take the examples in this guide, modify them, break them, and see what happens. The best way to learn is by doing.
For beginners, I strongly recommend using Apidog as your REST API testing tool. It helps you:
- debug requests
- store environment variables
- run collections
- quickly compare model outputs
- share your API test cases with teammates
And because it’s free, there’s zero downside.