
In the world of artificial intelligence , providing AI models with real-time, up-to-date information is crucial. To facilitate this, AI assistants like Claude can use the Model Context Protocol (MCP) server to access external tools and APIs, allowing them to search the web in real-time and retrieve structured results. This article walks you through the installation and usage of the Exa MCP server, which connects Claude Desktop to Exa’s powerful AI search API, enabling AI assistants to perform sophisticated web searches with ease.

What is the Model Context Protocol (MCP)?
The Model Context Protocol (MCP) is a framework designed to enable AI applications to interact with external data sources or services. It allows AI assistants, such as Claude, to communicate with local services or APIs, ensuring that the information used by these models is up-to-date and accurate. MCP provides a safe and standardized way to relay context, meaning that AI models can retrieve data from multiple sources without compromising privacy or security.
The MCP protocol allows AI models like Claude to integrate with tools that can perform tasks like web searches, data scraping, and even specific service requests in a standardized manner. For example, an MCP server can be configured to connect Claude to an API like Exa’s, which enables web searches, web scraping, and much more. With real-time web search abilities, Claude can assist users by providing the latest information directly from the web.
What Does the Exa MCP Server Do?
The Exa MCP server acts as a bridge between AI assistants (such as Claude) and Exa’s AI-powered web search capabilities. By setting up the Exa MCP server, you enable your AI assistant to:
- Perform Real-Time Web Searches: Claude can query Exa’s powerful search API to retrieve up-to-date, relevant information from the web.
- Provide Structured Search Results: The server returns search results with content snippets, titles, and URLs, ensuring that the information presented is both relevant and actionable.
- Cache Recent Searches: The server caches recent search results, which can be used for future queries, saving time and enhancing performance.
- Handle Rate Limiting: The server is equipped with mechanisms to handle rate limits and error cases, ensuring that searches are not blocked and errors are dealt with gracefully.
- Support Real-Time Crawling: For fresh content, the server can crawl the web in real-time to provide up-to-the-minute information.
By configuring this server, you open up new possibilities for your AI assistant, giving it access to real-time data that can be used for anything from answering user queries to performing research and analysis.
Prerequisites
Before you get started, there are a few things you need to ensure are in place. These prerequisites will help you avoid potential issues during installation and setup:
Node.js (v18 or higher): Make sure you have Node.js installed on your machine. You can check the version by running:
node --version
If you don’t have Node.js installed, visit the official Node.js website to download the latest version.
Claude Desktop Installed: Ensure that you have Claude Desktop set up and ready to go. Claude is an AI assistant that can be used for various tasks, including web searches, through integration with external servers like Exa MCP.
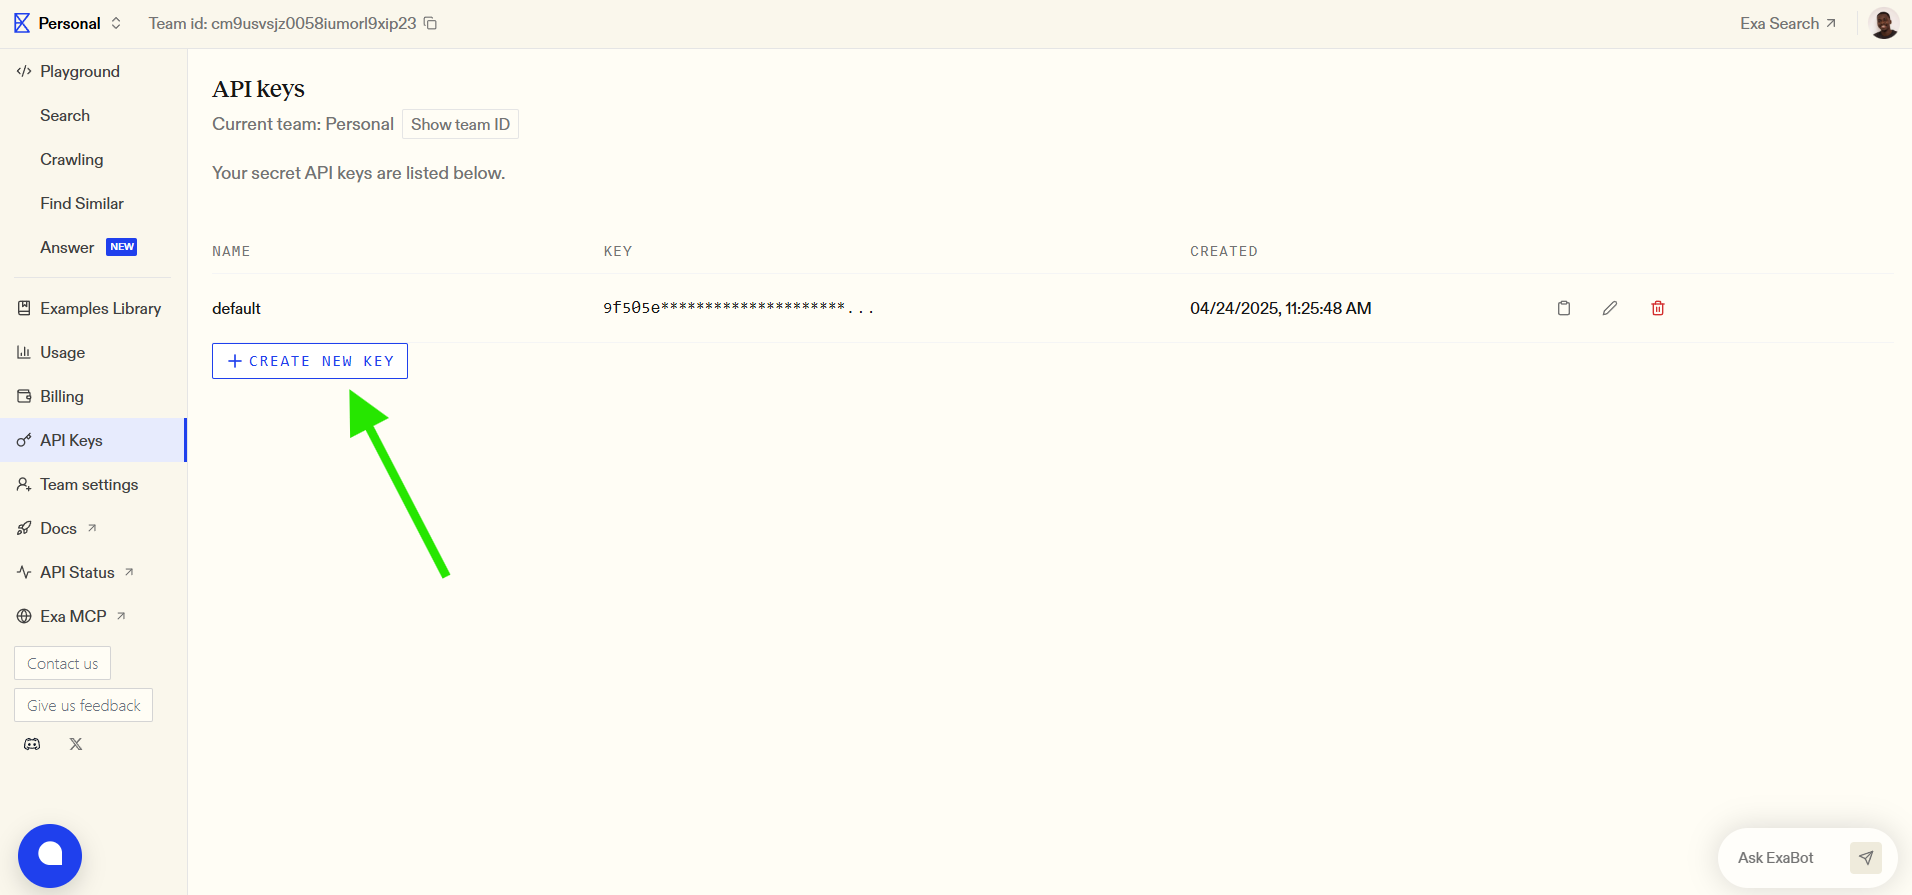
Exa API Key: You’ll need an API key from Exa to authenticate your requests. If you don’t have one, sign up on Exa’s dashboard to get your key.
Git Installed: Git will be required for cloning repositories during the manual installation process. You can verify if Git is installed by running:
git --version
Installation
Once the prerequisites are met, you can start installing the Exa MCP server. There are two main ways to install the server: via NPM or using Smithery. Let’s explore both methods.
1. NPM Installation
For a quick and easy setup, you can install the Exa MCP server globally using NPM. Run the following command:
npm install -g exa-mcp-server
This will install the Exa MCP server globally on your system, making it executable from any directory.
2. Using Smithery
Smithery is a tool that automates the installation of the Exa MCP server, making it even easier to set up. To install the server using Smithery, run the following command:
npx -y @smithery/cli install exa --client claude
This command automatically installs the necessary dependencies and configures the server for use with Claude.
3. Manual Installation
If you prefer to install the server manually or need more control over the installation process, you can follow these steps:
Clone the repository:
git clone https://github.com/exa-labs/exa-mcp-server.git
Navigate to the project directory:
cd exa-mcp-server
Install the dependencies:
npm install
Build the project:
npm run build
Create a global link to make the server executable from anywhere:
npm link
Configuration
Once the Exa MCP server is installed, you need to configure Claude Desktop to recognize the server and start using it. Here’s how to do it:
1. Configure Claude Desktop
First, enable Developer Mode in Claude Desktop:
- Open Claude Desktop.
- In the top-left menu bar, enable Developer Mode.
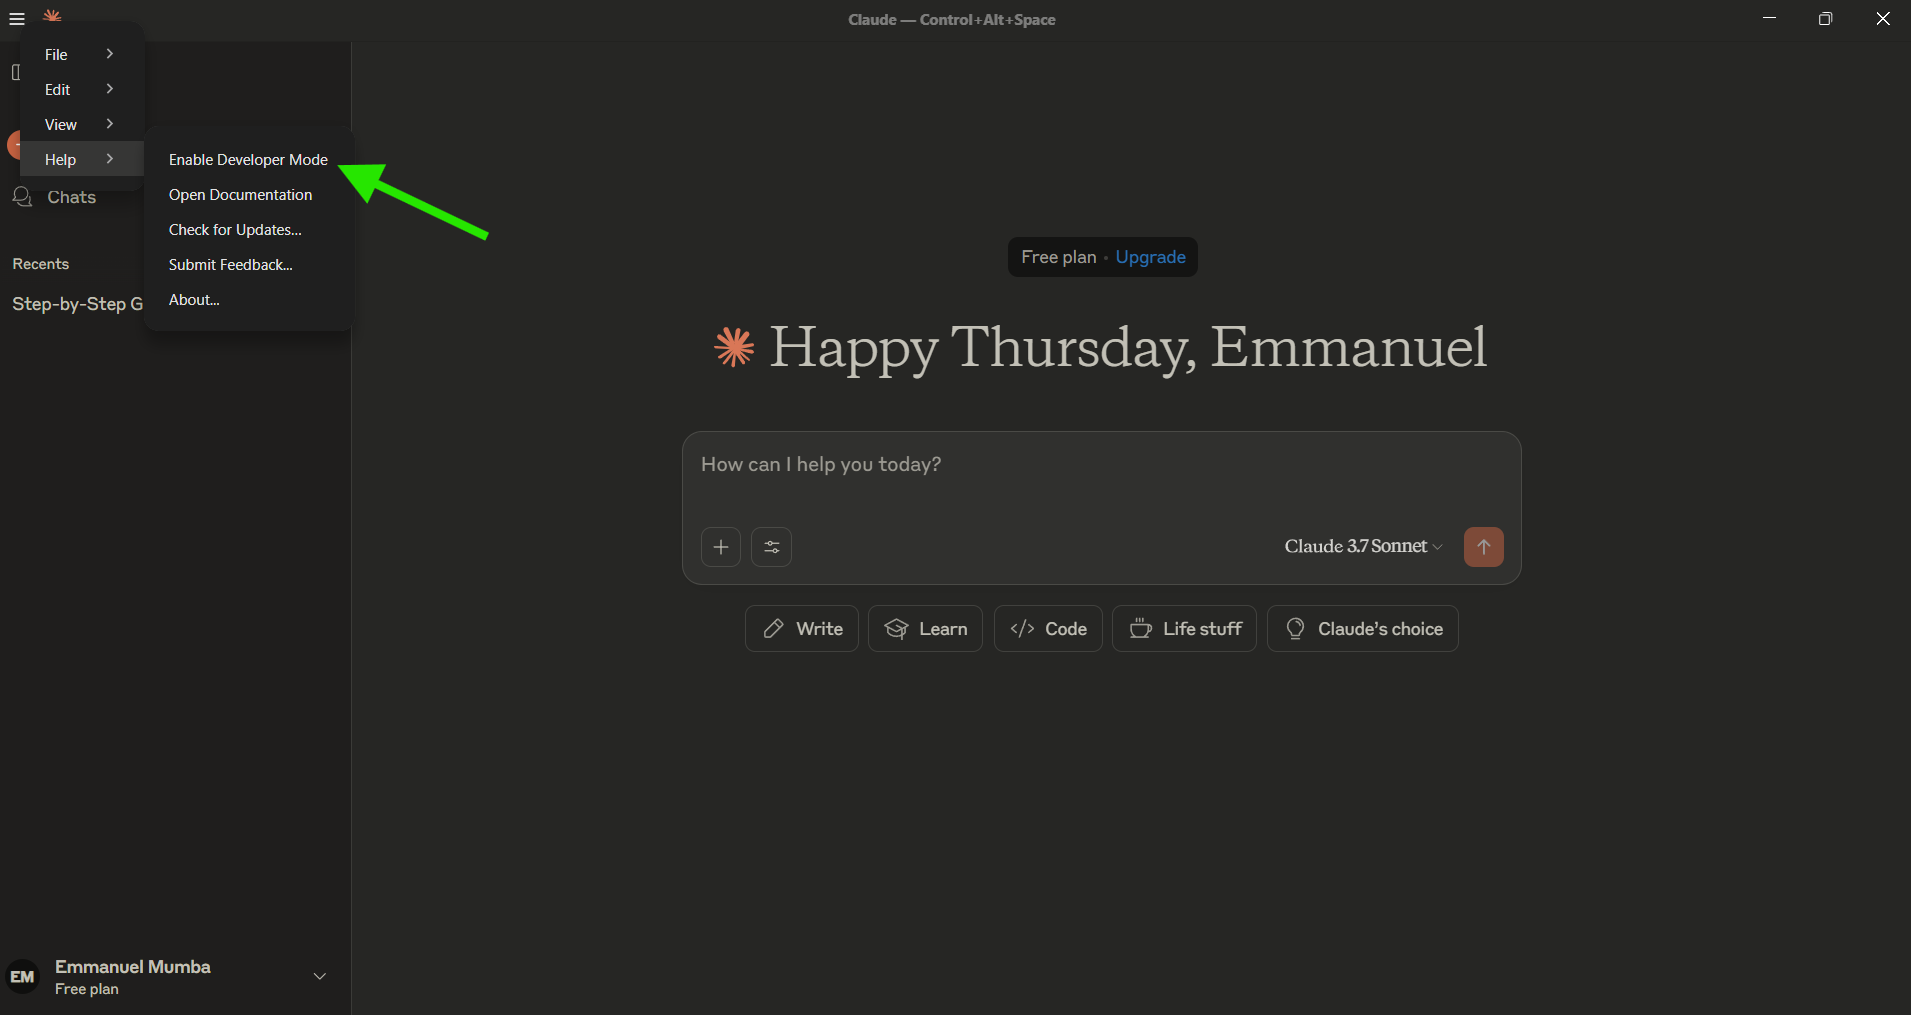
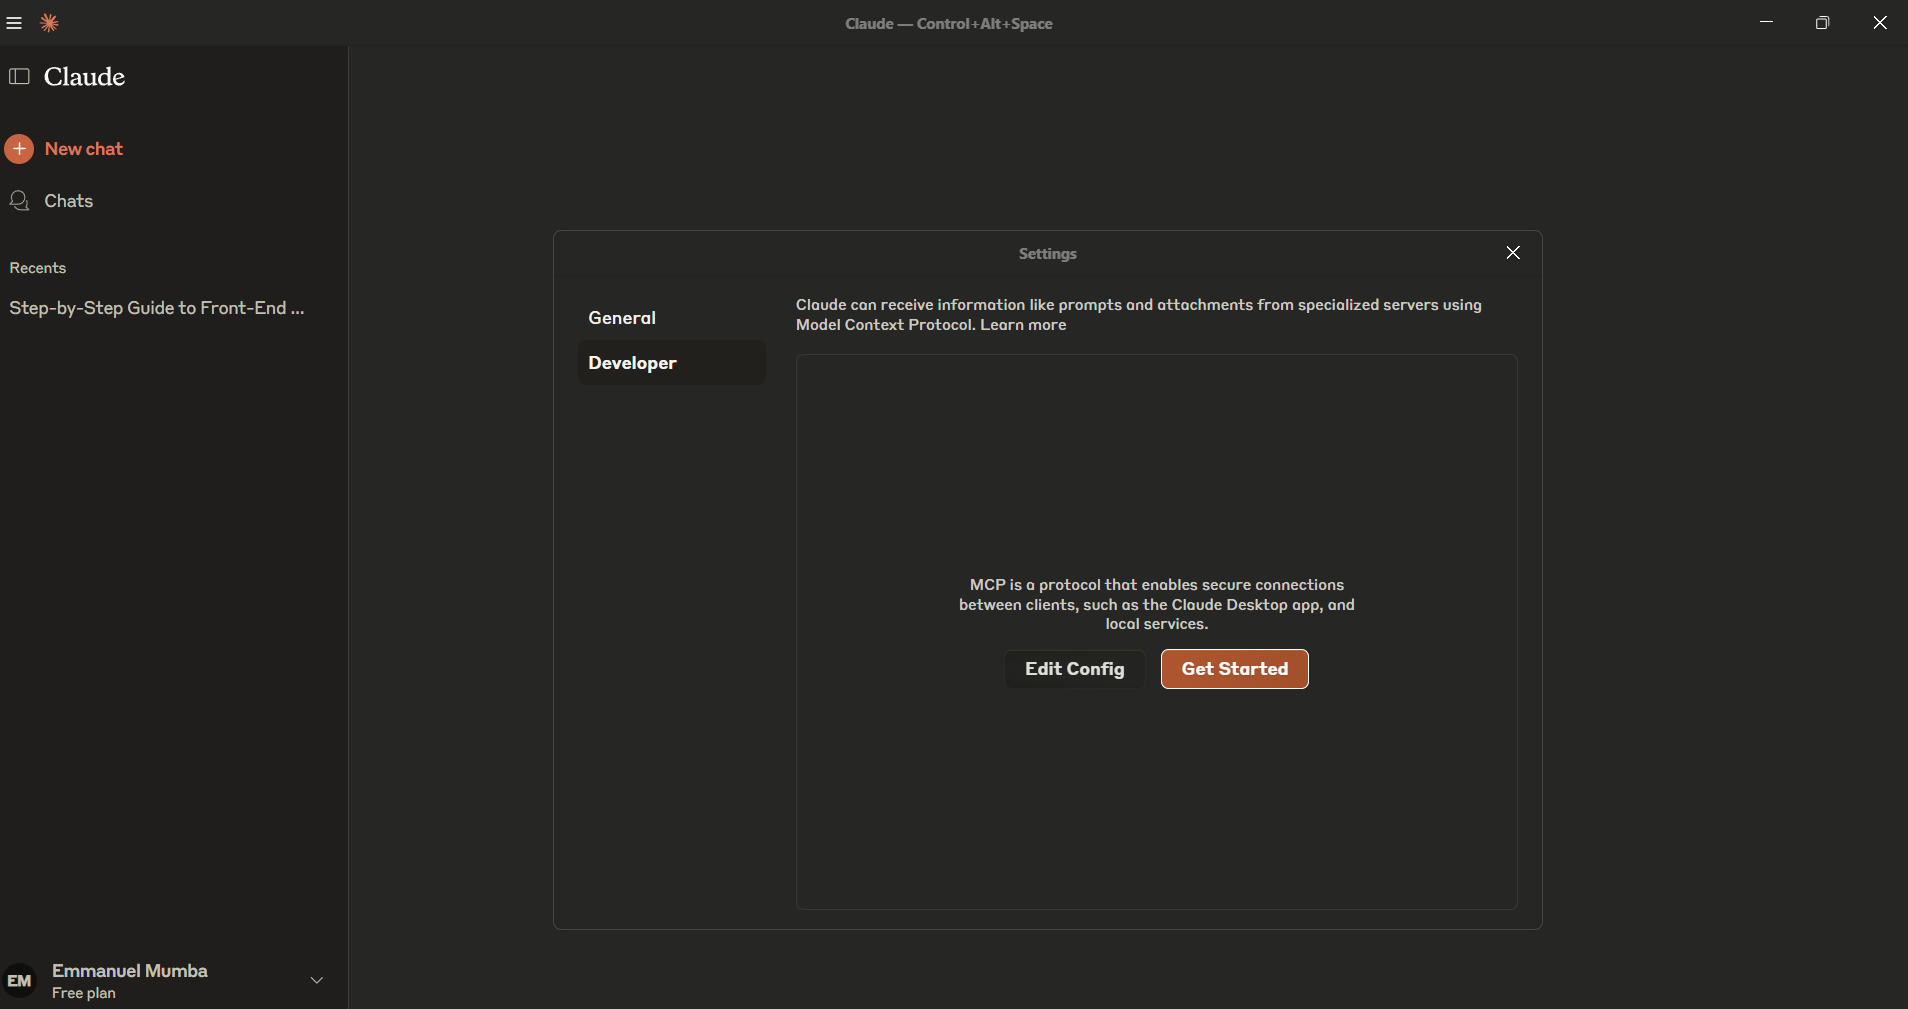
- Go to Settings, then navigate to the Developer Option and click Edit Config. This opens the
claude_desktop_config.jsonfile.
Alternatively, you can open the configuration file directly via the terminal.
For macOS:
code ~/Library/Application\ Support/Claude/claude_desktop_config.json
For Windows:
code %APPDATA%\Claude\claude_desktop_config.json
2. Add the Exa Server Configuration
In the claude_desktop_config.json file, add the following configuration to tell Claude Desktop to use the Exa MCP server:
{
  "mcpServers": {
    "exa": {
      "command": "npx",
      "args": ["/path/to/exa-mcp-server/build/index.js"],
      "env": {
        "EXA_API_KEY": "your-api-key-here"
      }
    }
  }
}
Make sure to replace your-api-key-here with your actual Exa API key from the Exa dashboard.
3. Choose Tools to Enable
The Exa MCP server includes several tools that you can enable based on your needs. For example, if you want to use web searches, research paper searches, Twitter searches, and company research tools, you would modify the configuration like so:
{
  "mcpServers": {
    "exa": {
      "command": "npx",
      "args": [
        "/path/to/exa-mcp-server/build/index.js",
        "--tools=web_search,research_paper_search,twitter_search,company_research,crawling,competitor_finder"
      ],
      "env": {
        "EXA_API_KEY": "your-api-key-here"
      }
    }
  }
}
This setup will enable all available tools for the server.
4. Restart Claude Desktop
For the changes to take effect, you need to restart Claude Desktop:
- Completely quit Claude Desktop (don’t just close the window).
- Open it again.
- You should see a 🔌 icon indicating that the Exa server is connected.
Once the Exa MCP server is configured and connected, you can start using it for web searches. Here are some example prompts you can use with Claude:
- “Can you search for the latest trends in AI-driven healthcare technology?”
- “Find and summarize recent innovations in renewable energy solutions.”
- “Search for and analyze the newest research papers on blockchain technology.”
- “Look for recent news on electric vehicle advancements in the automotive industry.”
- “Find insights on the economic impact of digital transformation in developing countries.”
- “Research the company Tesla and provide an update on its latest products and developments.”
- “Extract content from this research paper: https://arxiv.org/pdf/1706.03762”
- “Find competitors for a company providing web search APIs, excluding exa.ai.”
Testing with MCP Inspector
You can test the server’s functionality using the MCP Inspector. This tool allows you to interactively explore the server and execute search queries.
Run the following command to start the MCP Inspector:
npx @modelcontextprotocol/inspector node ./build/index.js
This will open an interactive interface where you can test different search queries, inspect the results, and explore the available tools.
Enhance Your AI Automation with Apidog MCP Server Integration
Take your AI-driven workflows even further by integrating with the Apidog MCP Server.
This powerful connection allows your AI assistant to interact directly with API specifications from Apidog projects, enabling seamless API exploration, code generation, and structured model creation.
Troubleshooting
While setting up the Exa MCP server is generally straightforward, you might run into some common issues. Here are some tips to resolve them:
1. Server Not Found
If the server isn’t found, ensure that the npm link is correctly set up and that the configuration in Claude Desktop is correct. Double-check the paths in your configuration file.
2. API Key Issues
If there’s an issue with the Exa API key, confirm that the key is valid and correctly set in the claude_desktop_config.json file. Ensure that there are no extra spaces or quotes around the API key.
3. Connection Issues
If you’re experiencing connection issues, try restarting Claude Desktop completely. Check the logs for any errors:
For macOS:
tail -n 20 -f ~/Library/Logs/Claude/mcp*.log
For Windows:
type "%APPDATA%\Claude\logs\mcp*.log"
Conclusion
Setting up the Exa MCP server opens up powerful new possibilities for your AI assistant, enabling it to perform real-time web searches using Exa’s search API. With an easy-to-follow installation process, clear configuration steps, and robust functionality, the Exa MCP server makes it simple for AI models like Claude to access the latest information and provide users with relevant, up-to-date results. Whether you're researching academic papers, performing company analysis, or keeping up with the latest news, the Exa MCP server ensures that your AI assistant is always equipped with fresh, actionable data.


