As a collaborative tool for API design, documentation, debugging, mocking, and testing, Apidog has a highly praised feature: supporting database operations when sending/receiving requests. This feature greatly facilitates users who need to prepare request data when calling an endpoint or insert data into a database upon receiving a response, making it a favorite among users.
However, as many users make extensive use of this feature daily, some areas for improvement have been identified. One of the most frequently raised points is:
Can the database connection configuration be set up by the team admin and then used collaboratively by other team members? It's really troublesome for everyone to re-enter the connection details.
From the initial design of this feature, we have already considered whether to allow database configurations to be used collaboratively. However, allowing users to save sensitive information such as database usernames and passwords on a cloud server is a matter that requires careful consideration. Therefore, data security was the core reason why the collaborative use of database connection configurations was not implemented at that time.
Today, Apidog has become the primary API collaboration and management tool for millions of developers, and Apidog's own foundational capabilities have become more powerful. Therefore, we have reconsidered this optimization requirement for collaborative use of database connection configurations, striving to balance data security and development efficiency to satisfy our users.
Storing Database Connection Configurations in the Cloud
Step 1: Create New Database Connection
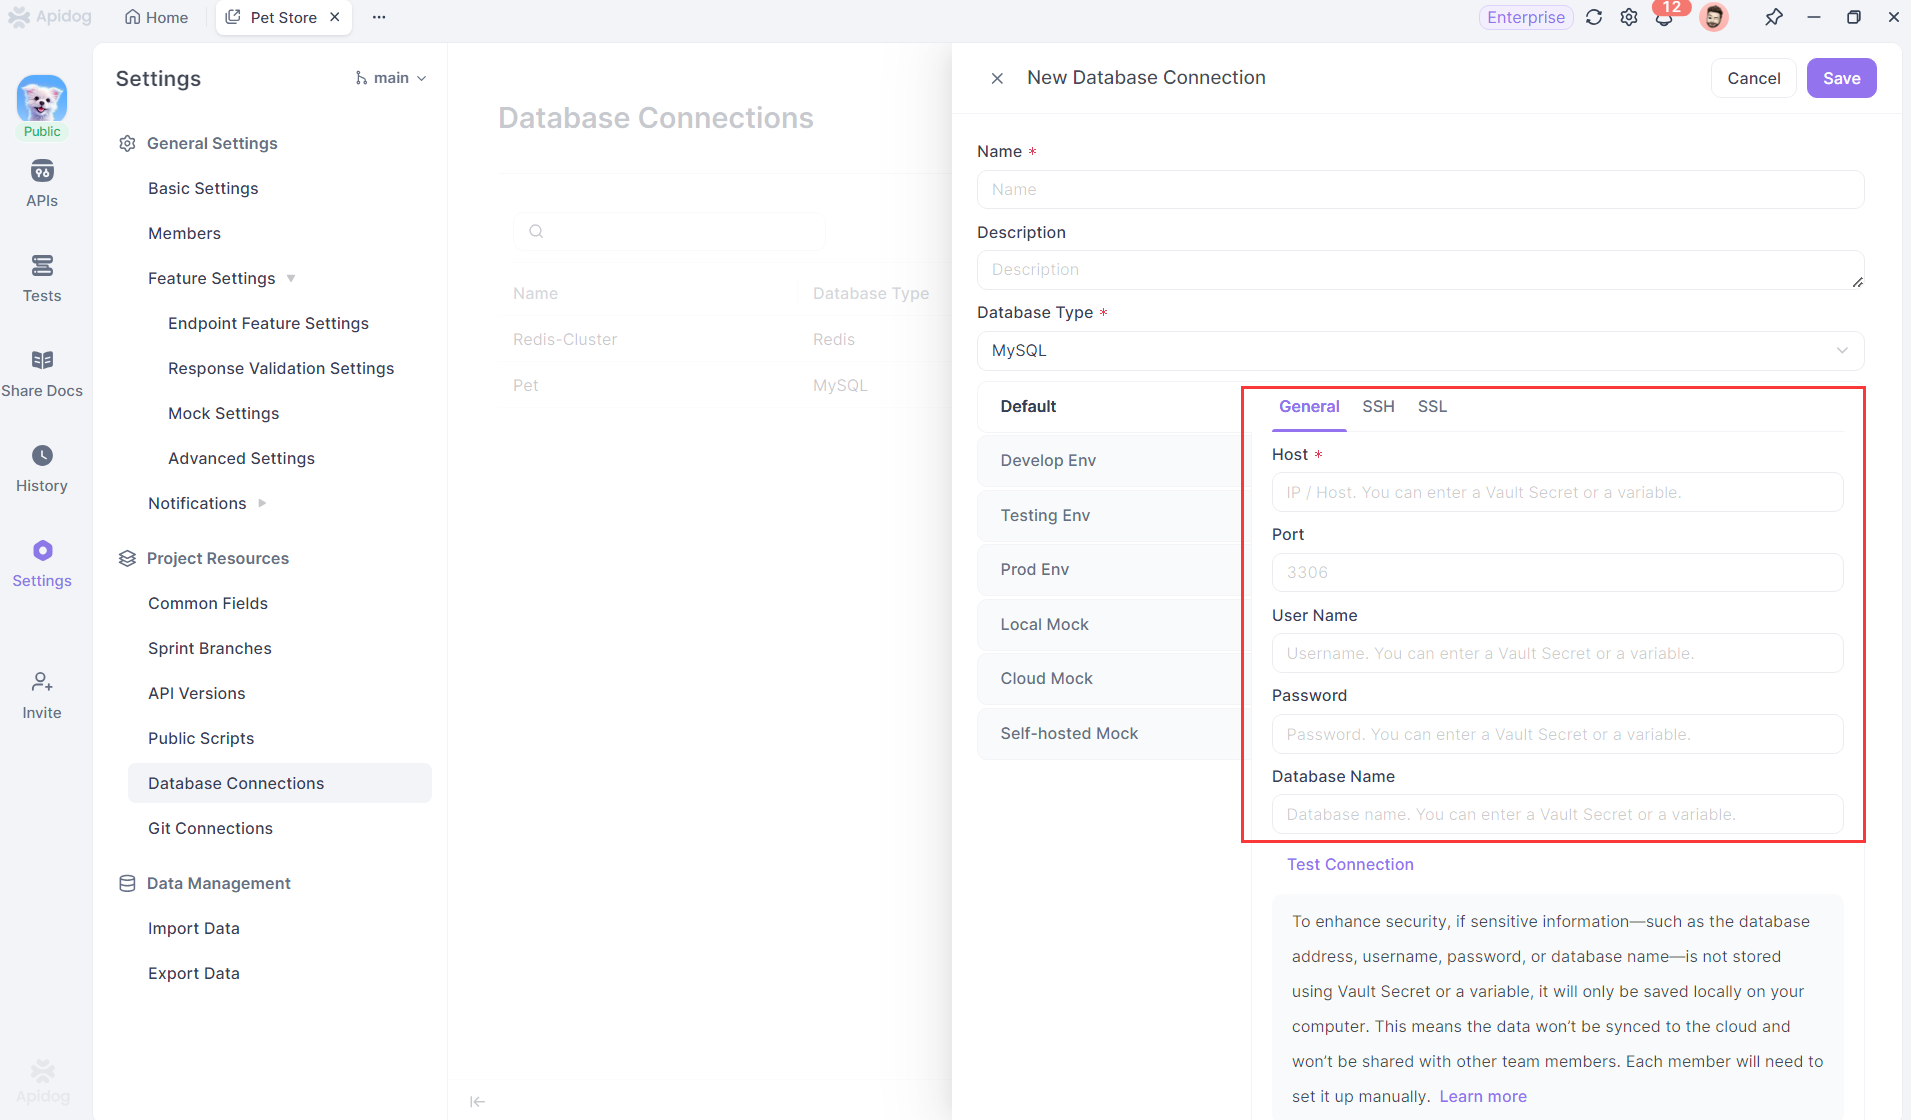
When your Apidog version is updated to 2.6.50 or above, go to "Project Settings -> Database Connection" and click to create a new database connection. You will find that all connection fields guide you to use variable to fill in the field values.
Step 2: Set up Variables in Different Environments
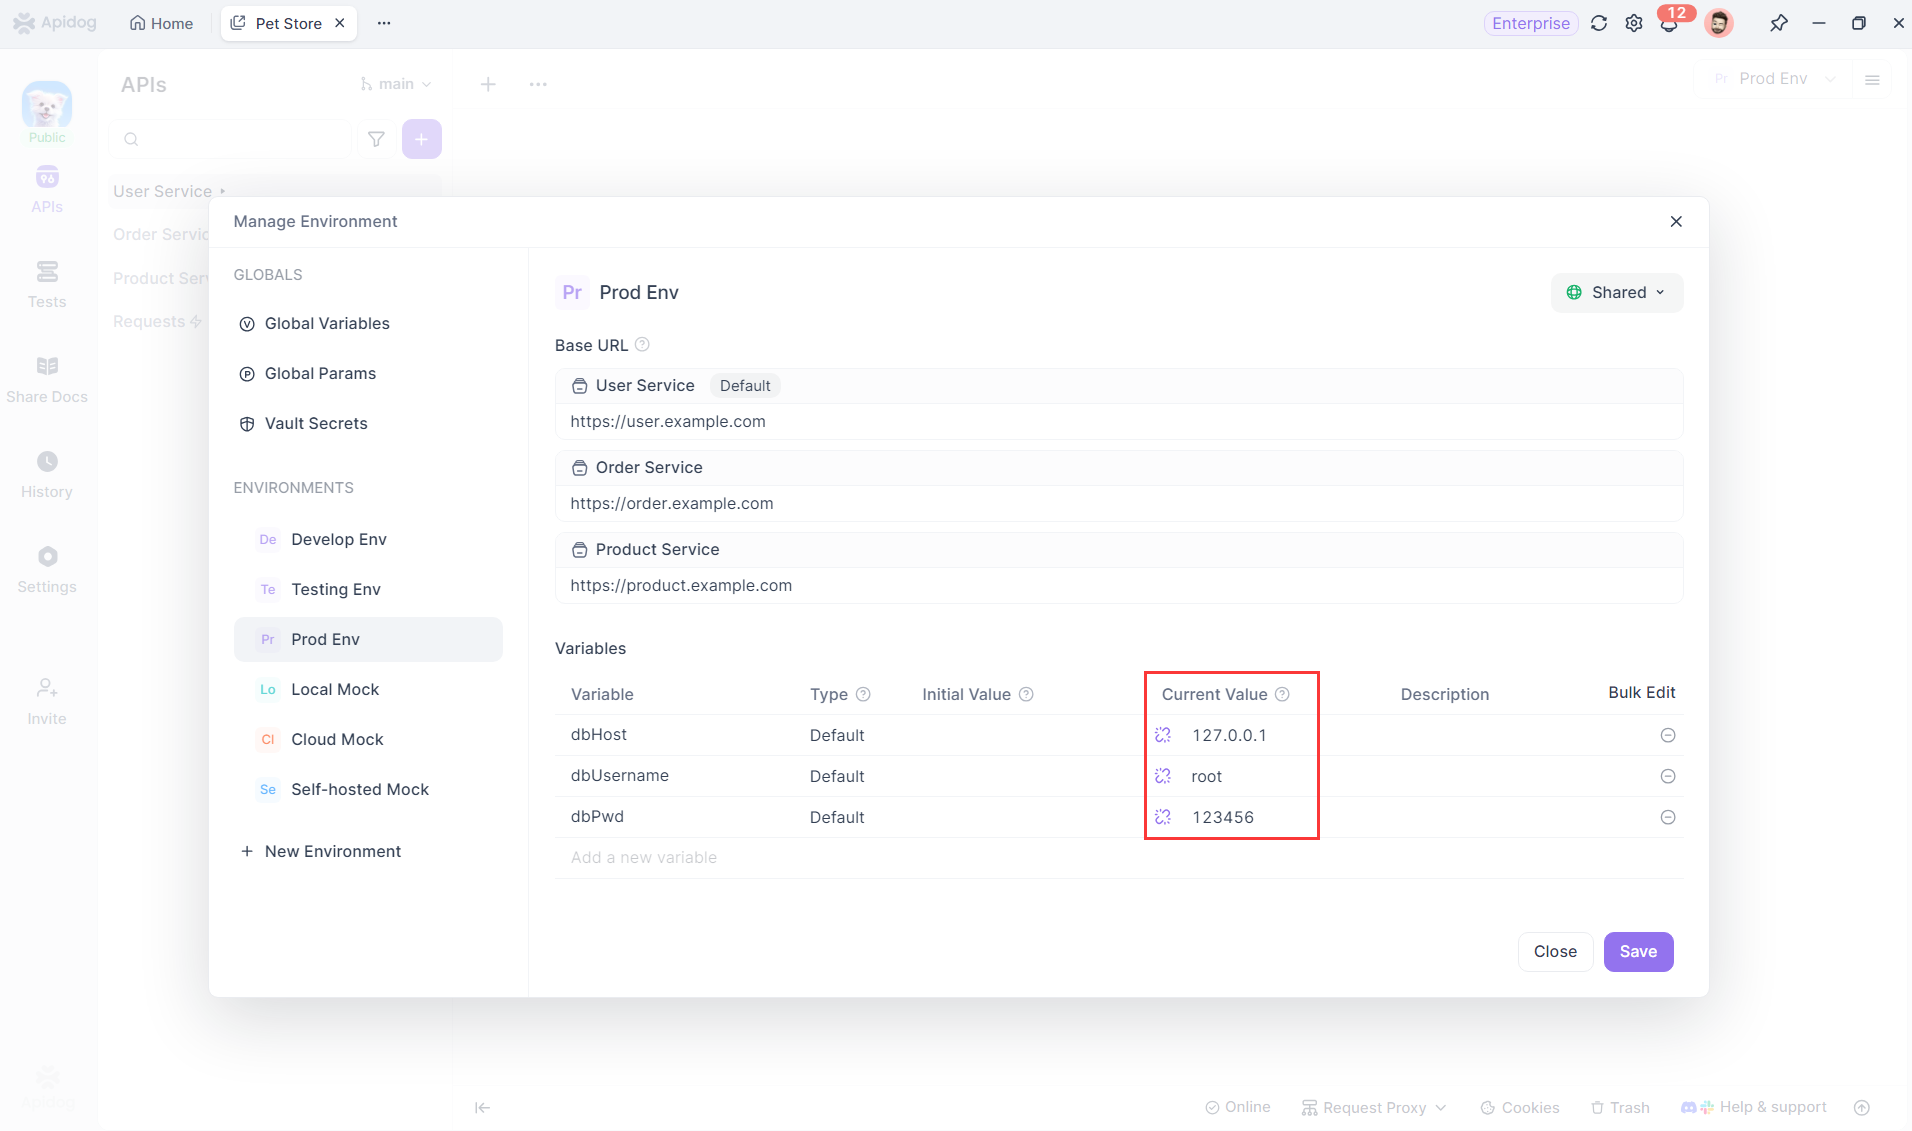
In environment management, set up variables for database connections to be used in different environments. This way, these variables can be applied in database connection configurations.
Step 3: Configure Database Connections Using Variables
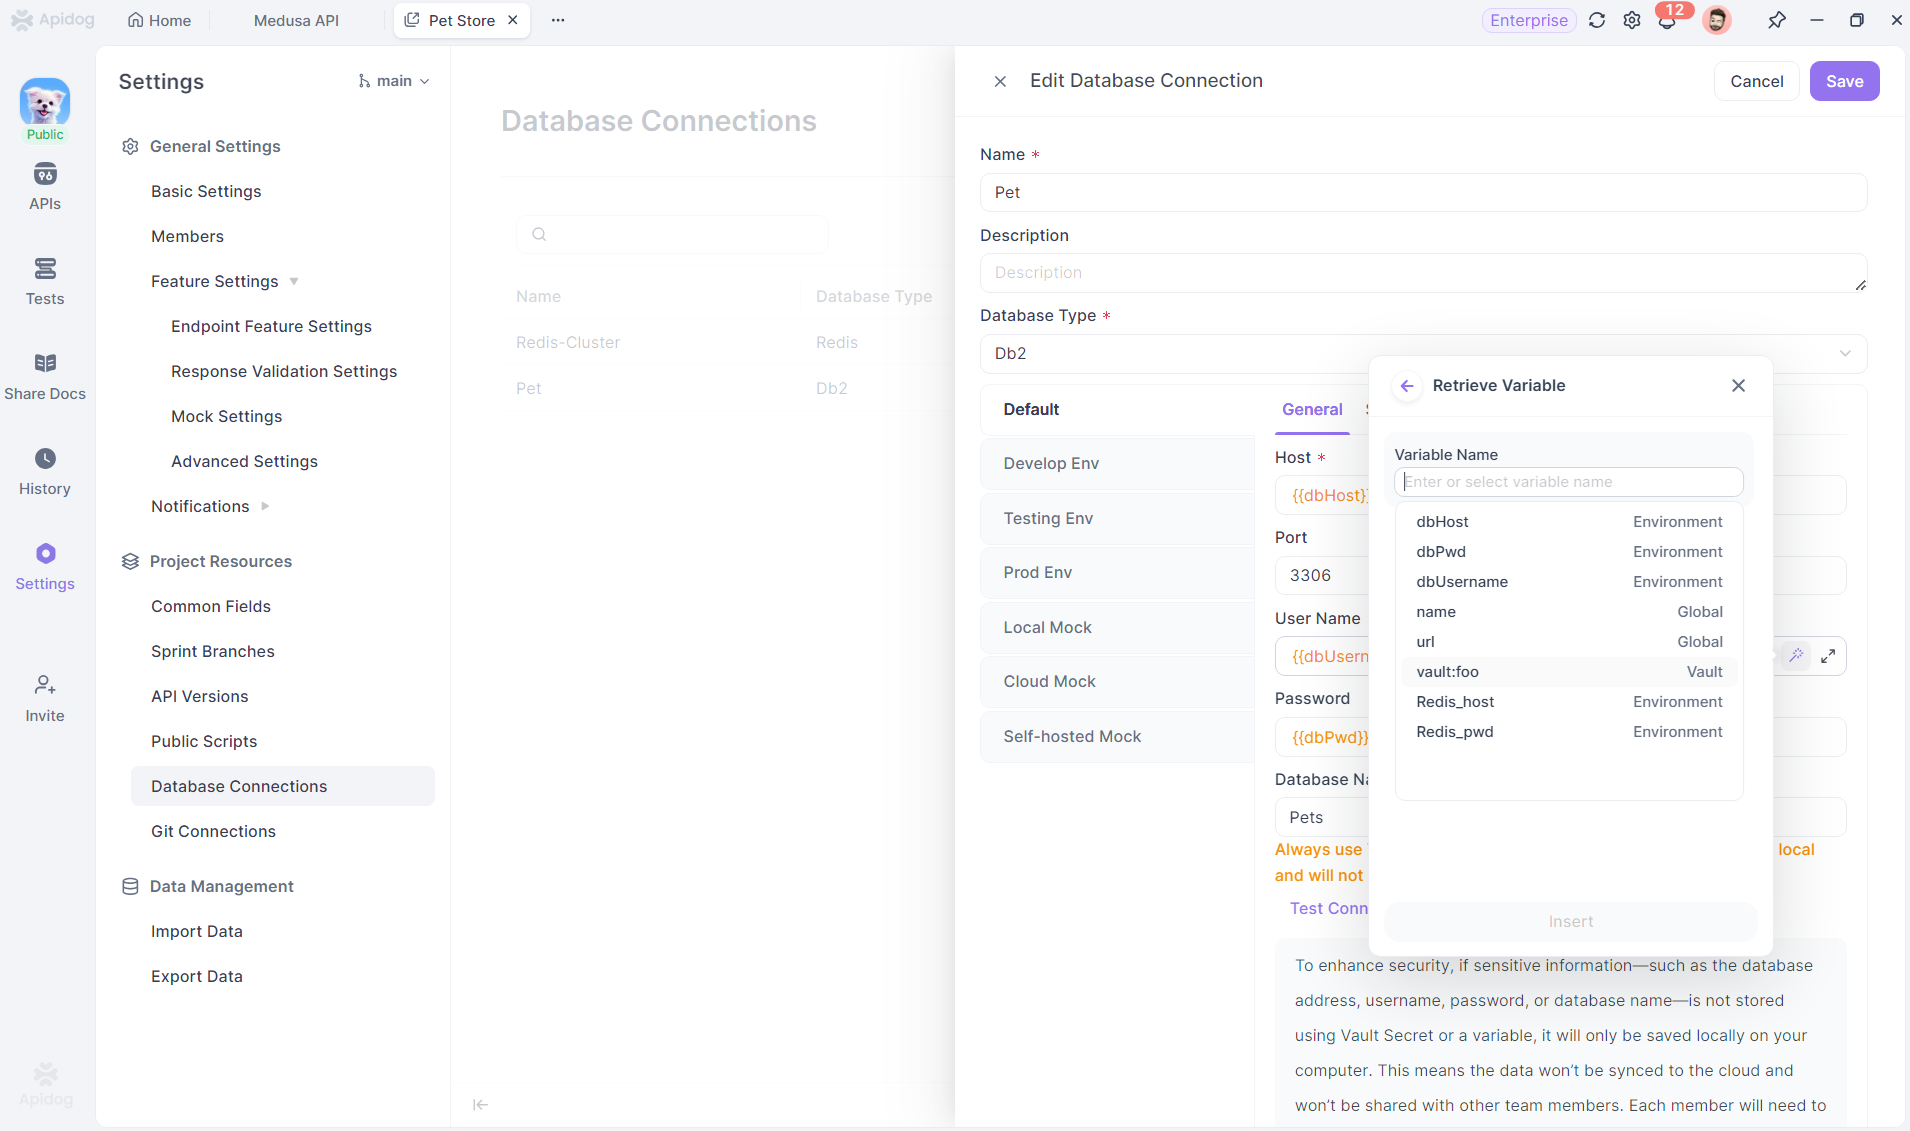
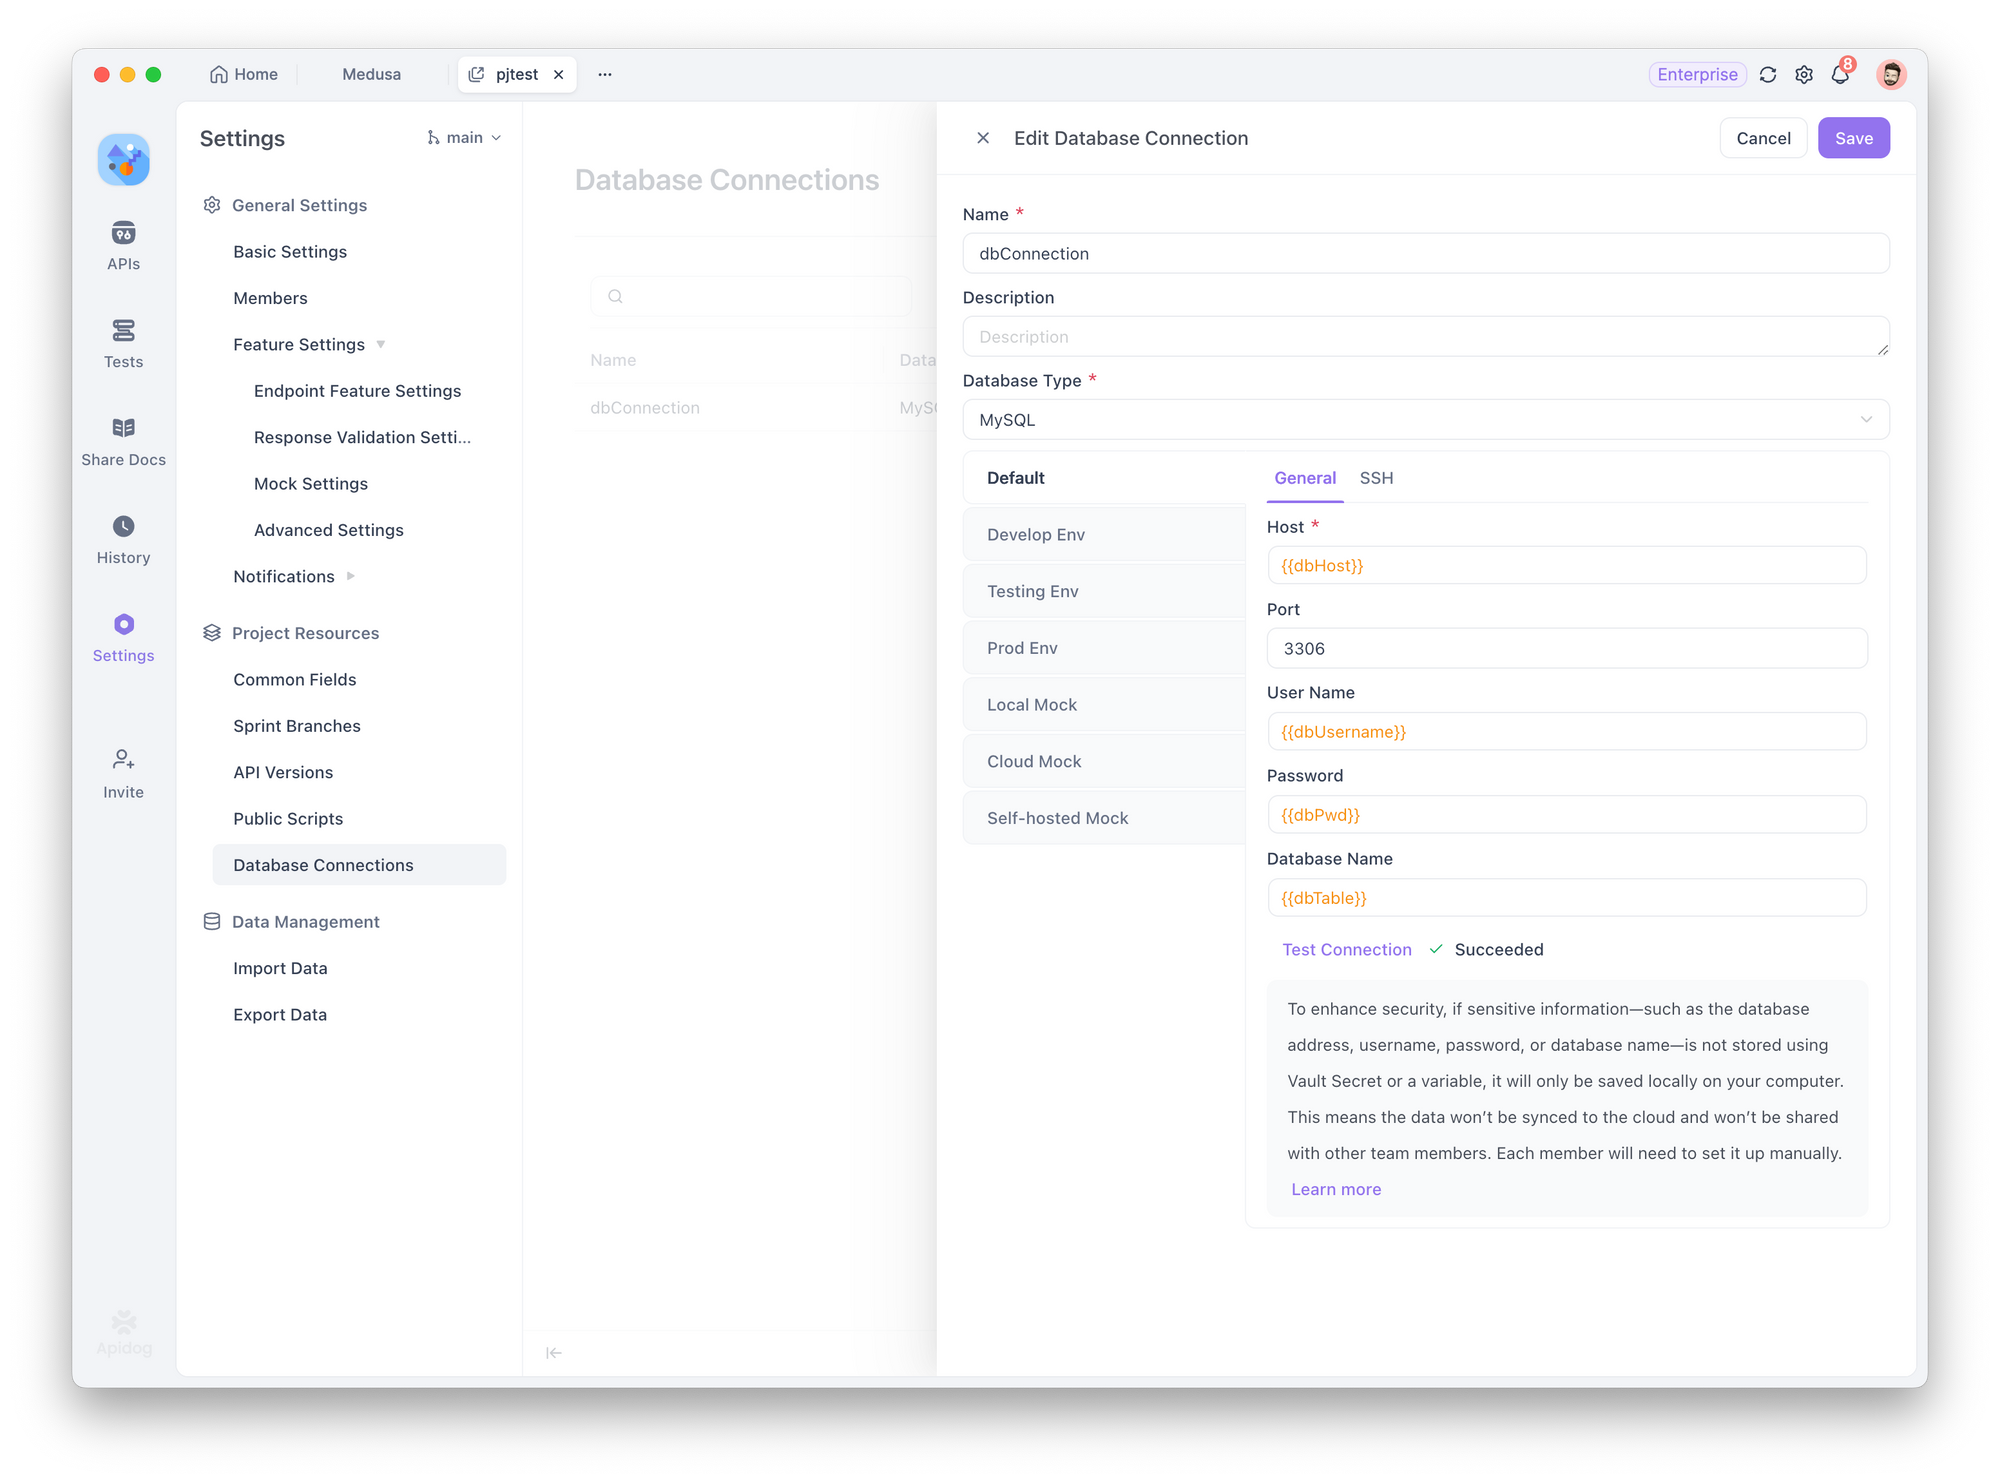
Back to the database connection configuration page, you can manually fill in variables using variable format, or directly reference these variables through the dynamic value feature. We recommend using environment variables here so that the configuration automatically switches with the context of different environments. Except for the port number, all other fields are best filled in using variables.
Step 4: Save and Use Database Connections
Save the database connection configuration that uses variables, and it can be used in database operations in API management, automated test, and other areas.
When in use, the actual usage mechanism for database connection configurations saved locally versus those saved in the cloud is as follows:
| Locally Saved Configuration (Without Using Variables) | Cloud-Saved Configuration (Using Variables) |
| 1. When an endpoint request triggers a database operation, the specified database configuration is read. | 1. When an endpoint request triggers a database operation, the specified database configuration is read. |
| 2. The system reads the configuration details from a local file, using actual values directly. | 2. The configuration is fetched from the cloud and contains variables. The system resolves these variables based on their names and priority. |
| 3. These values (e.g., host, username, password) are used to build a full database connection and initiate the connection. | 3. The variables are replaced with their actual values to form a complete database connection configuration, and the connection is initiated. |
| 4. Once the connection is successful, the SQL statements defined in the database operation are executed, along with any operations like saving results to variables. | 4. Once the connection is successful, the SQL statements defined in the database operation are executed, along with any operations like saving results to variables. |
PRO TIP: For other project members who need to use this database connection configuration, they now only need to go to environment management, find the corresponding variables and fill in local values, without having to configure in project management like before.
These are the detailed steps for configuring cloud database connections. Since using local values is recommended, and the actual configuration is still stored locally, so there’s no need to worry about data security risks. Variables simply make the process more convenient and manageable.
Apidog also continues to support entering actual values directly into the database connection settings. This ensures compatibility with existing configurations and supports users who prefer working with local data. However, a clear reminder will be shown, encouraging users to switch to variables and save them to the cloud for a better and more streamlined experience.

Precautions for Using Cloud Database Connections:
In database connection configurations, when variables are used, what is actually saved in the cloud is the variable name. When executing database connections, the complete connection configuration will be assembled according to variable usage rules to initiate the connection.
✅ Recommended Actions:
- Use "Current Value" or "Vault Variable" for variable values.
- The port number can be entered directly, no need to use a variable, for convenience & no risk.
❌ Not Recommended Actions:
- Using "Initial Value" for variable values.
- Mixing plaintext and variables, which still requires everyone to configure separately in project settings.
Using Vault Variables to Save Database Connection Configurations
For database connection settings, we recommend using Vault variables. These variables are fetched from an external secrets management service and stored in encrypted form on your local machine. This approach offers the best of both worlds—secure data protection and efficient team collaboration through cloud storage.
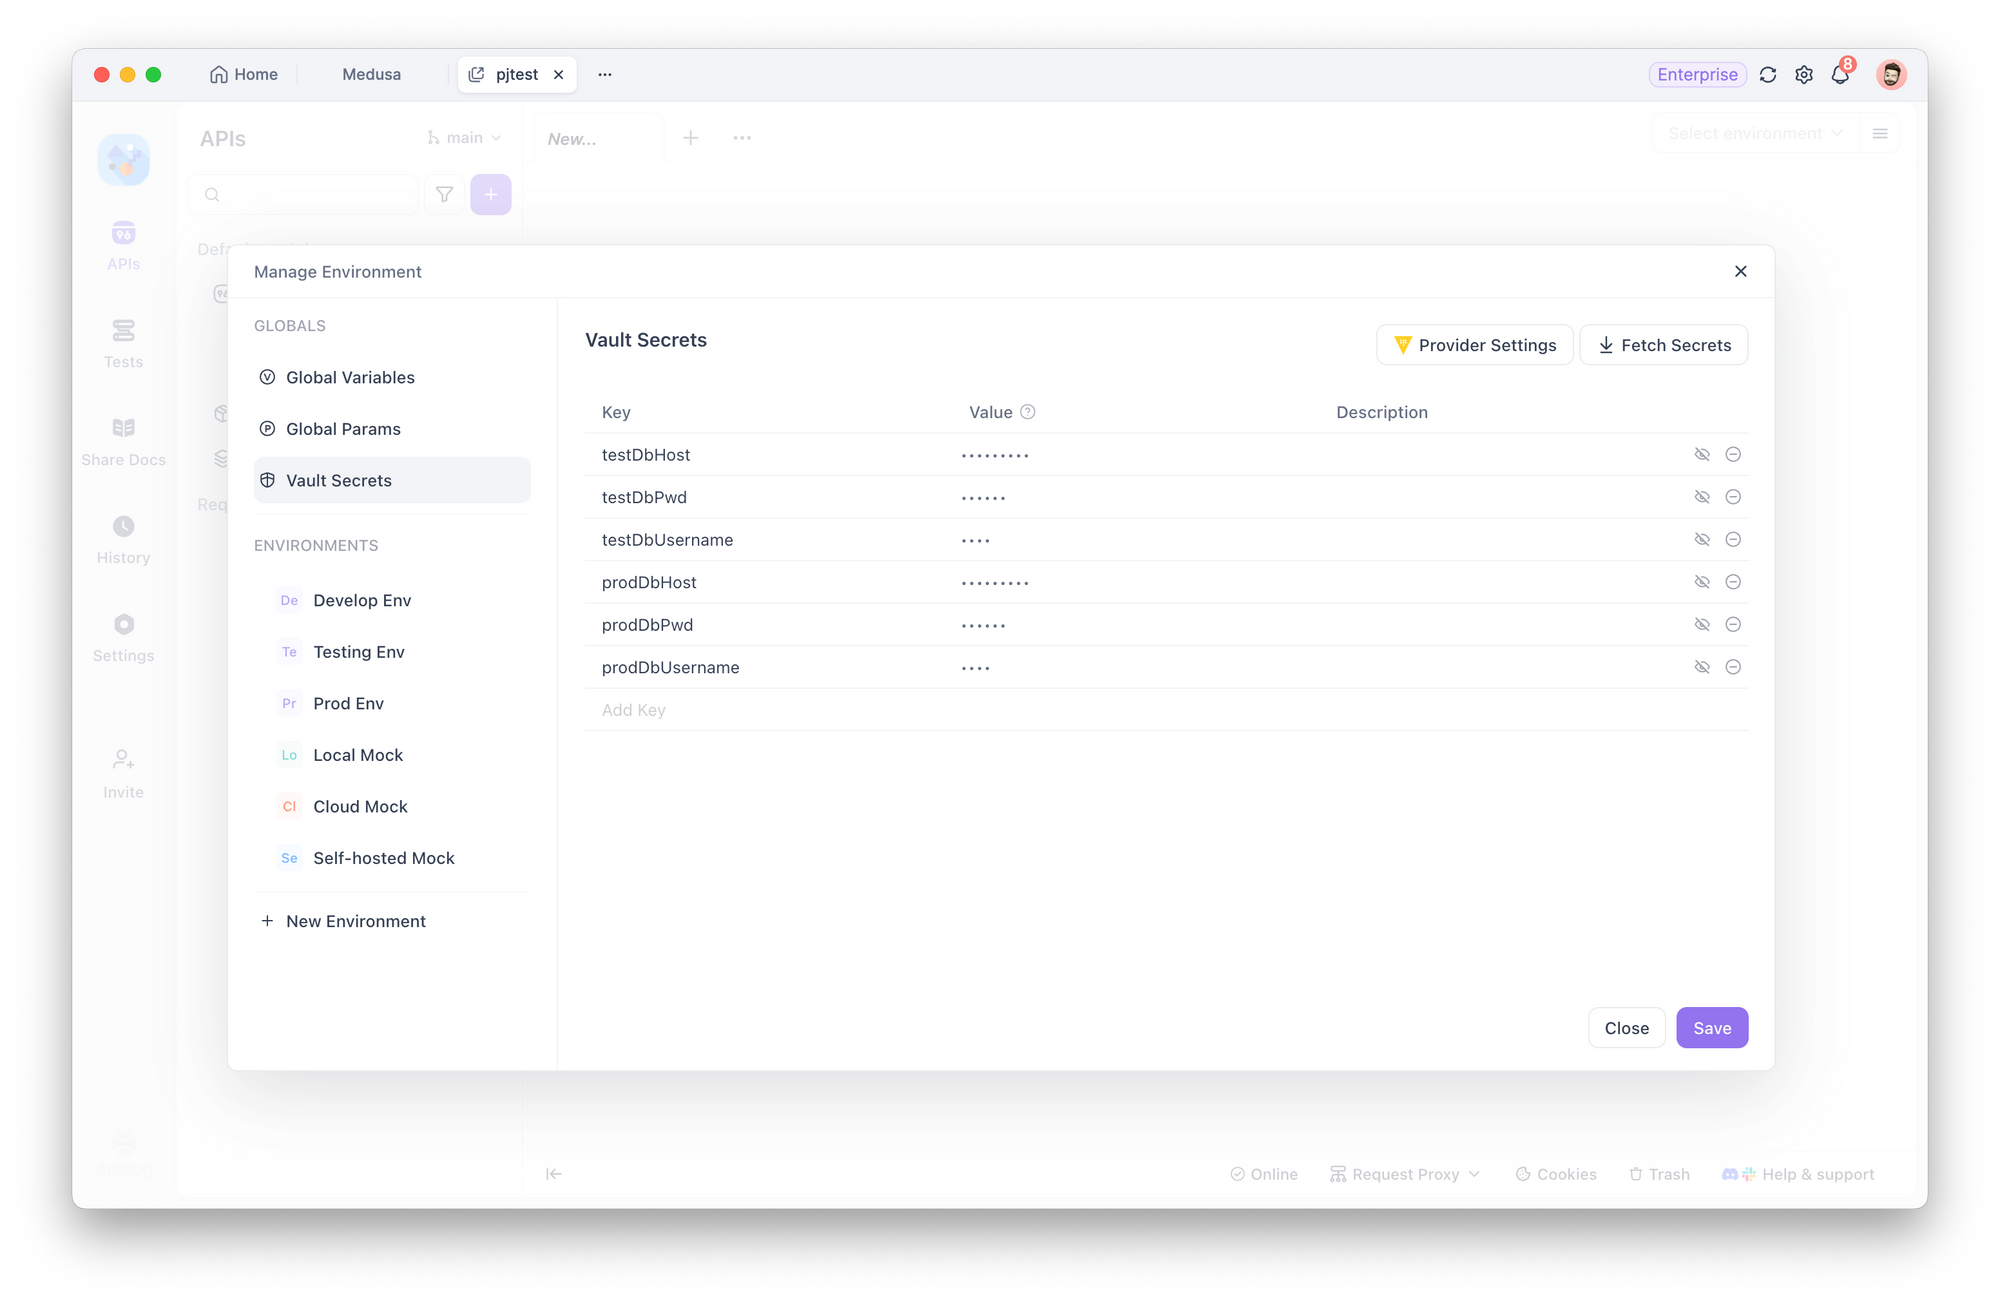
Step 1: Configure Vault Variables
Set up a Vault provider and store the plaintext of the database connection credentials in it. For database connection configurations in different environments, you need to create different Vault Keys in your provider. For specific methods, refer to the help documentation.
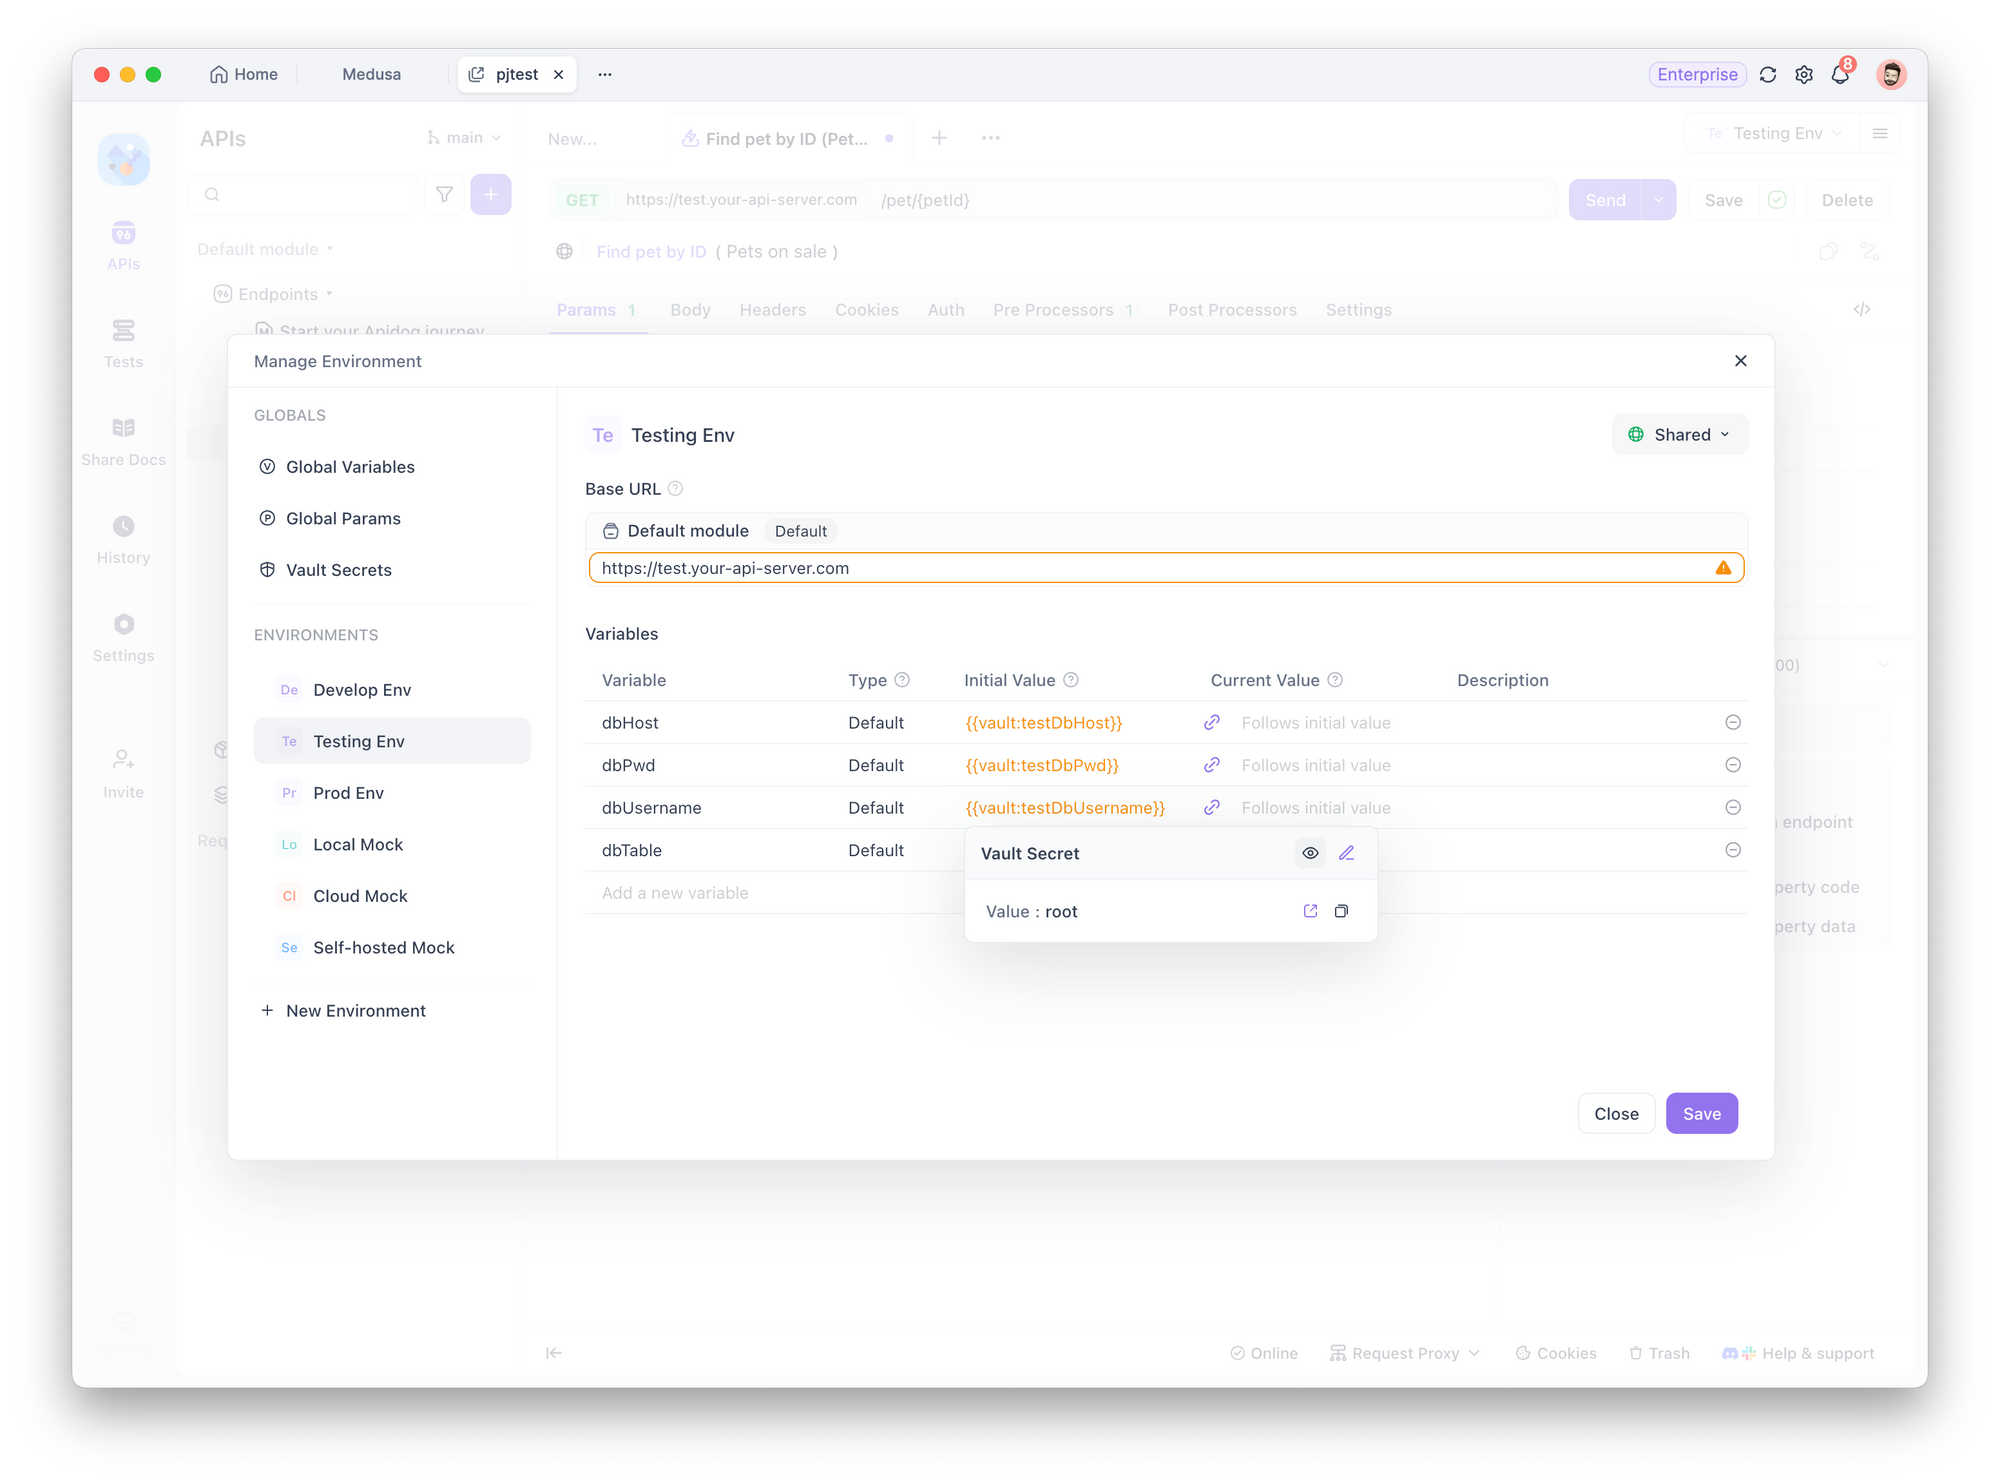
Step 2: Create Environment Variables
For each environment, create environment variables with the same name—such as dbHost. Then, set the Initial Value to reference the appropriate Vault variable for that environment, and let the Current Value follow the initial one.
Why do this?
- It wraps the Vault variable in an environment variable. So when you configure the database connection later, you just need to select the environment variable. Apidog will automatically use the correct value based on the current environment.
- Storing the data in an initial value ensures all project members can use it without manually setting it up again—boosting team efficiency.
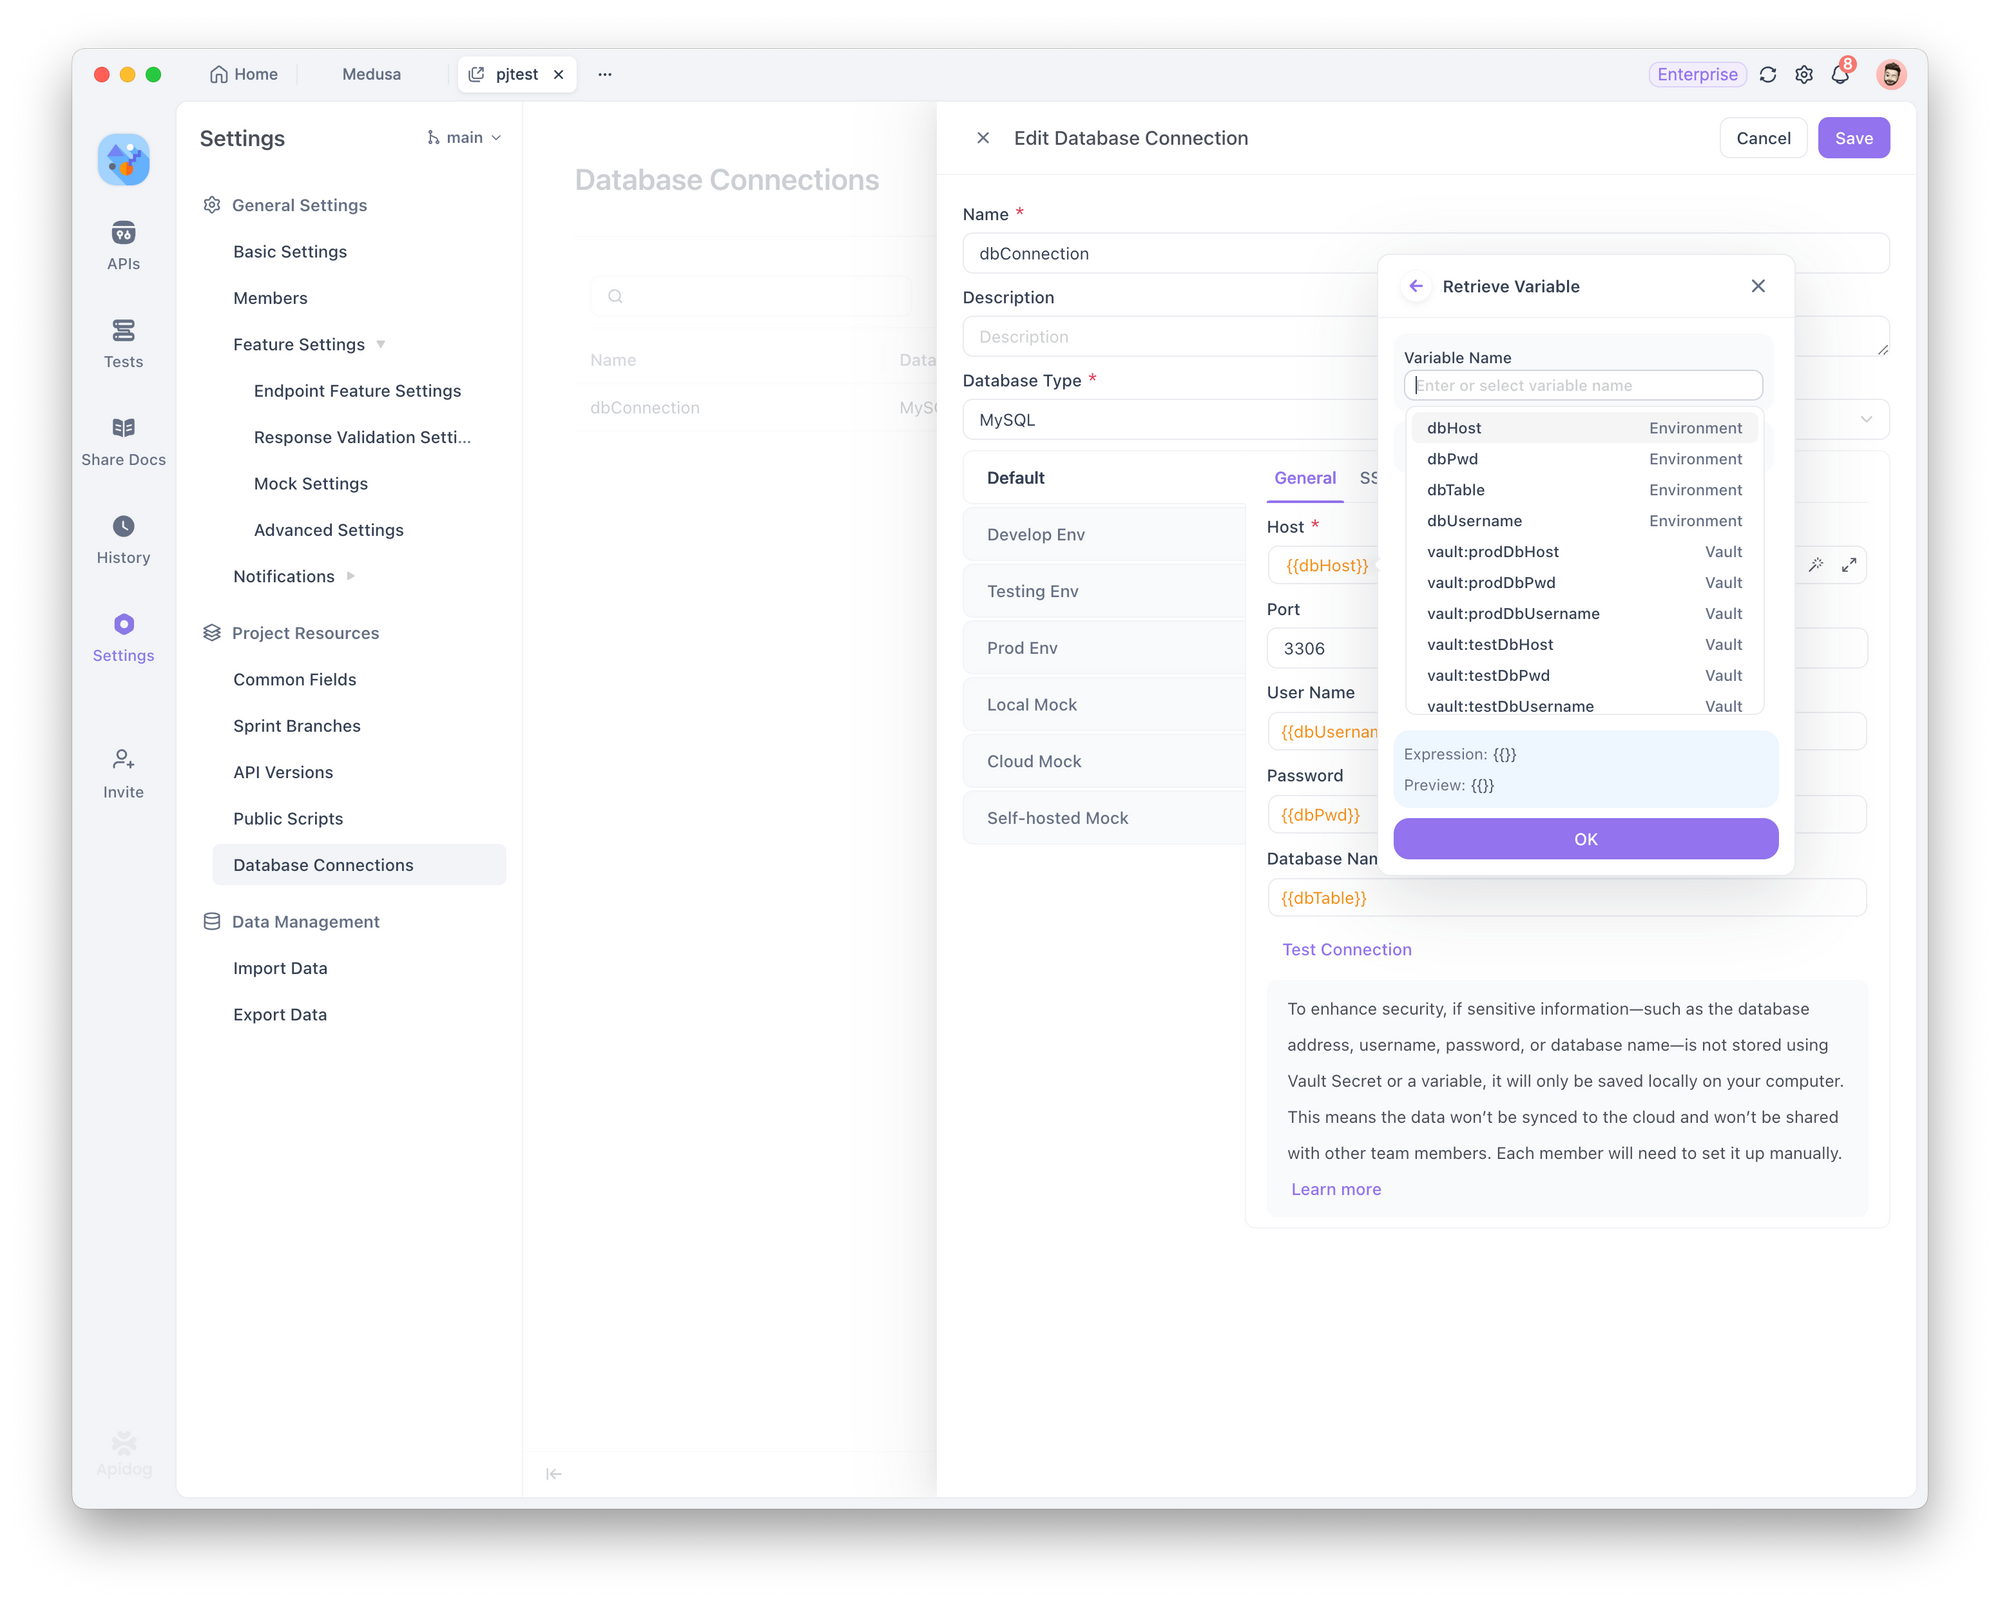
Step 3: Set up Database Connections Using Vault Secret
When setting up a database connection, use the environment variables you've defined in Environment Management (e.g., dbHost, dbUser, dbPassword). To reference these variables quickly, use the dynamic value feature.
Step 4: Test the Database Connection
Click "Test Connection". You'll be prompted to choose an environment for the test.
Make sure the variables used in the connection (like host, port, username, etc.) are properly configured for that environment. Once confirmed, the system will test the connection:
- ✅ If successful, you're good to go.
- ❌ If it fails, check the error message for specific troubleshooting steps.
Step 5: Use Database Operations in Endpoint Requests
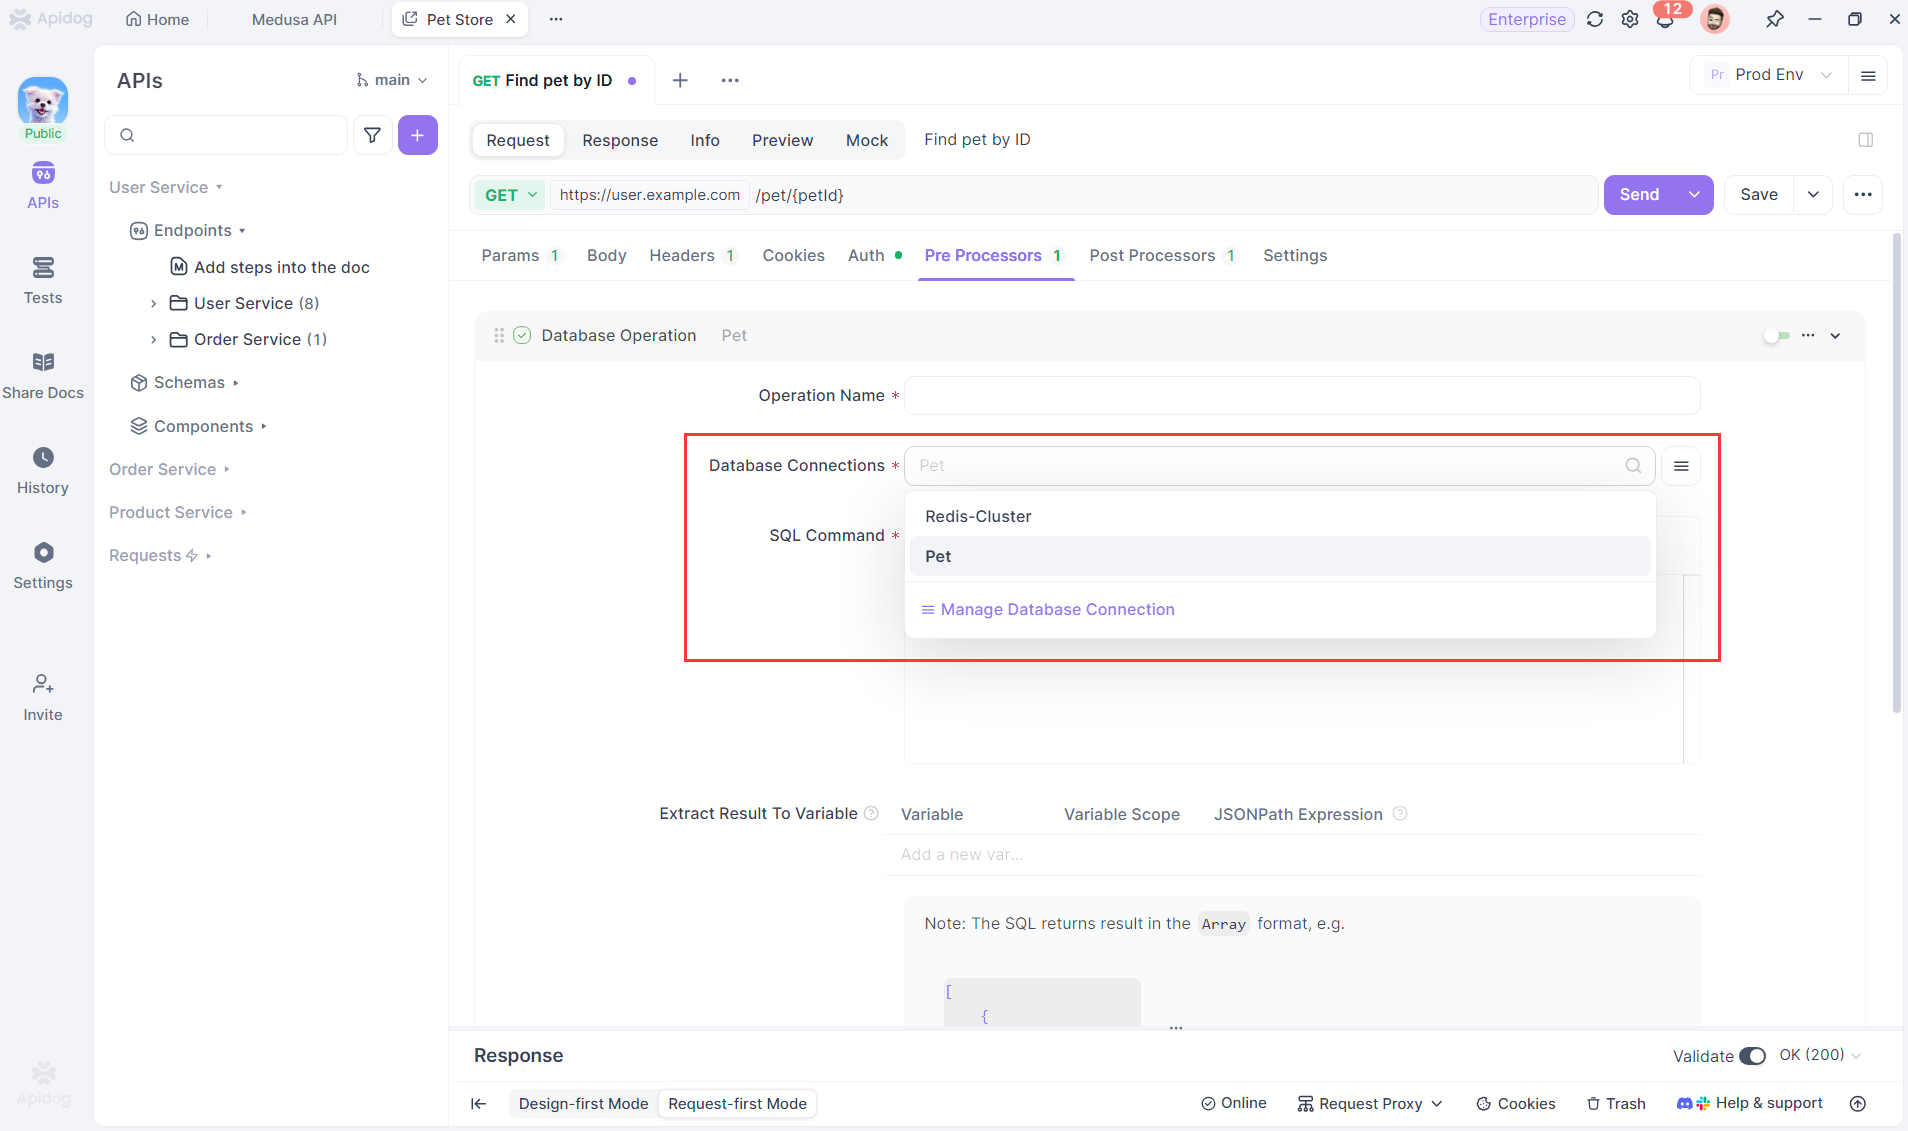
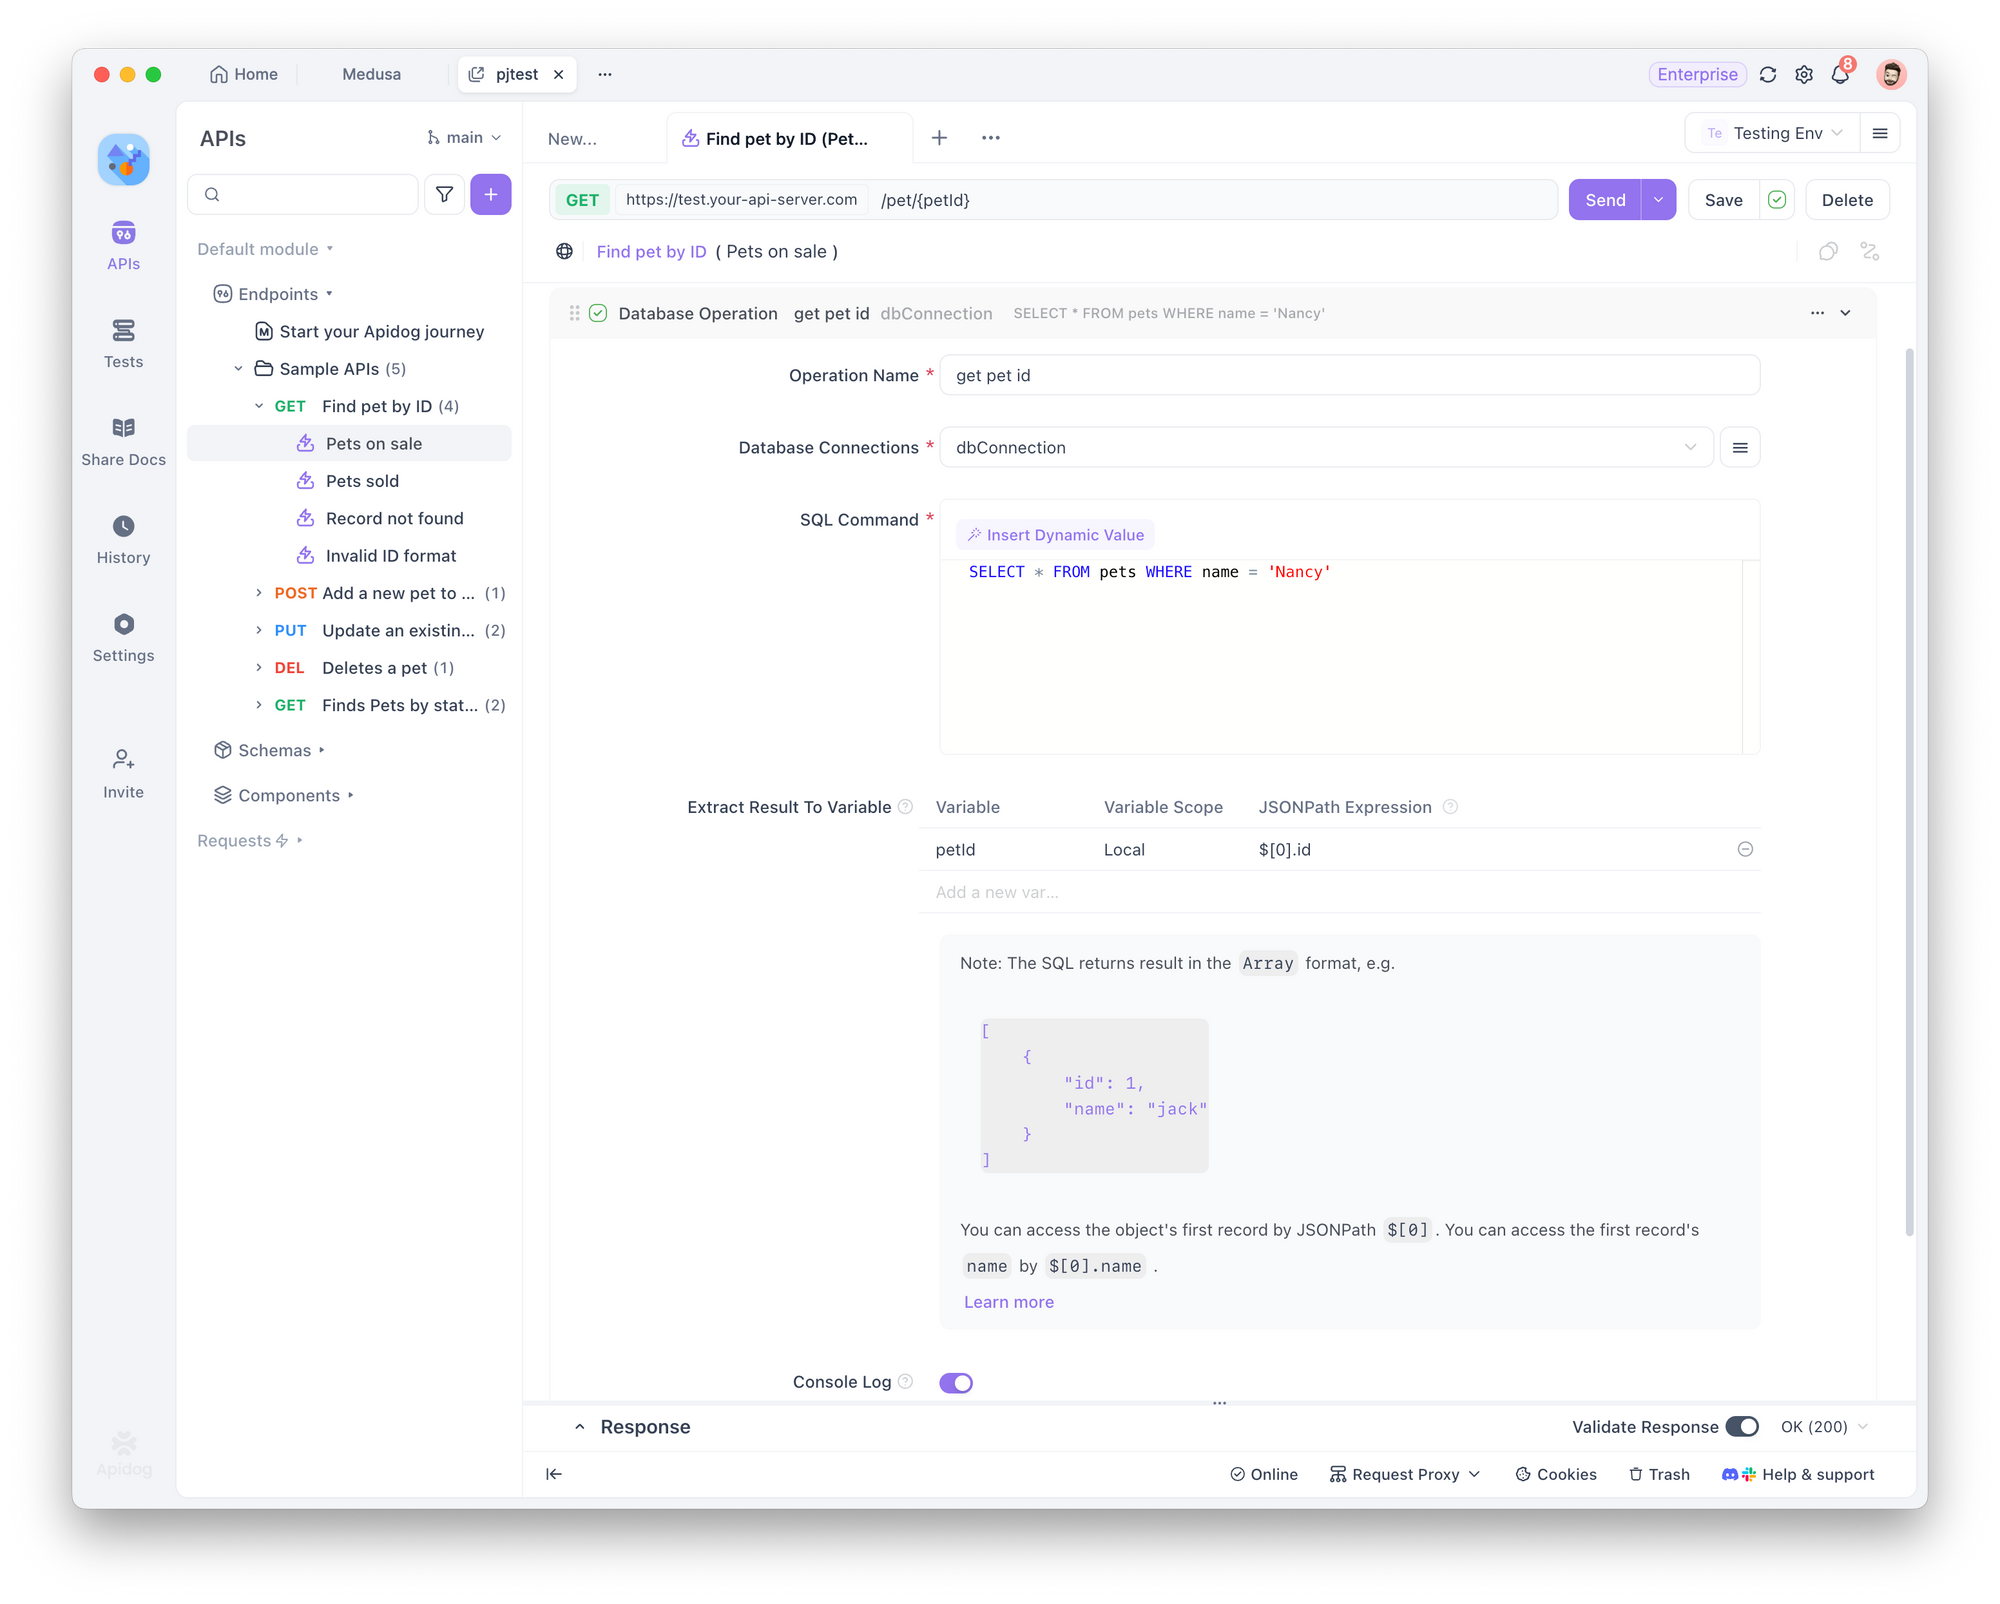
In the Pre Processors or Post Processors of an endpoint request, you can add a database operation using the saved cloud database configuration.
Example:
Let’s say you want to:
- Look up the
idof a pet named "Nancy" from the database. - Use that ID to fetch detailed info through an endpoint request.
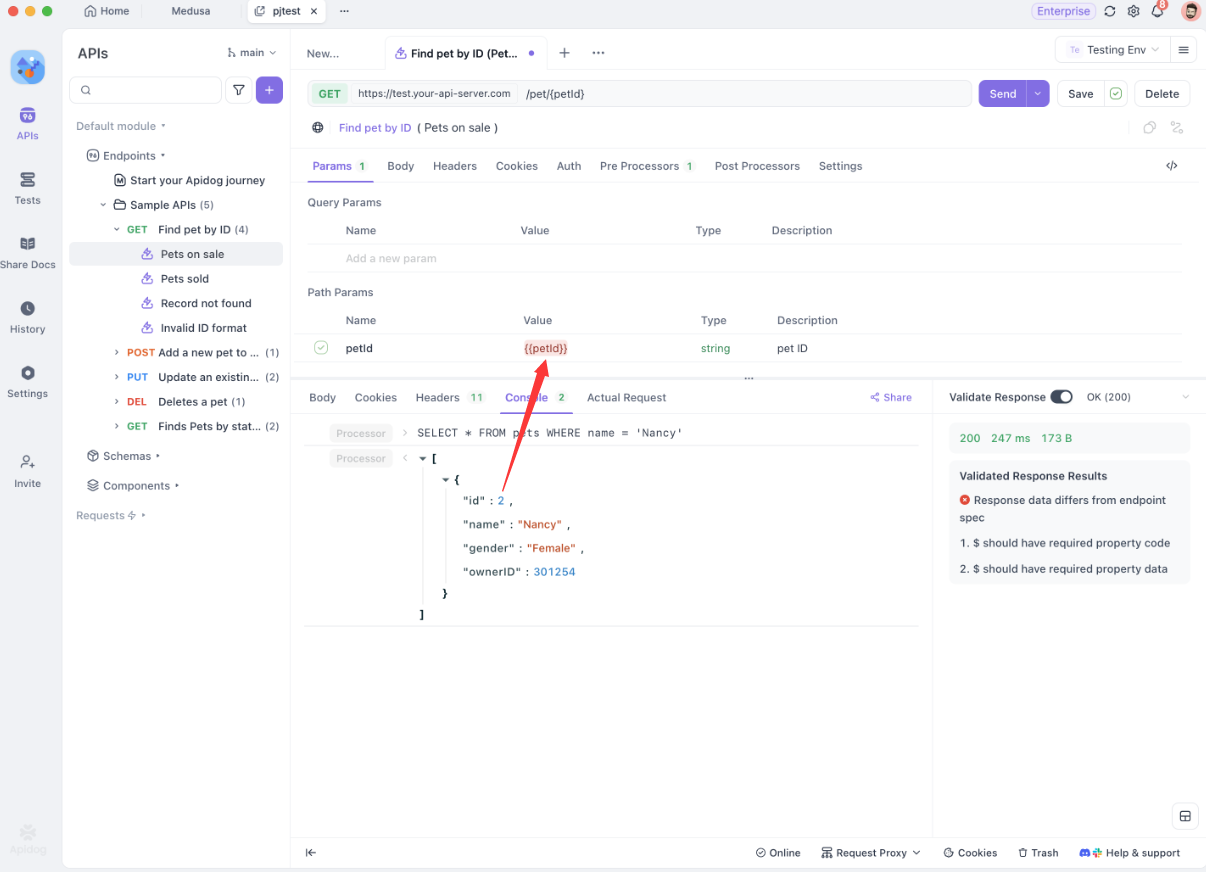
Apidog will then:
- Execute the database operation
- Fetch the value (e.g.,
petID) - Save it as a variable (e.g.,
petId) - Use that variable in the endpoint request
Once the database configuration is set up in the cloud as described above:
- Other team members can reuse it in their own database operations.
- No need for each person to configure it manually.
- Saves time and ensures consistency across your project.
Final Takeaway
The above practice shows how to use Vault variables to securely store and apply database connection configurations. Here’s a quick summary of the steps:
- Create separate Vault variables for each database setting in different environments (e.g.,
testDBHostfor testing,prodDBHostfor production). You can skip the port as it usually stays the same. - Define environment variables with the same name across all environments. For each environment, set the initial value of the environment variable to reference its corresponding Vault variable.
The table below illustrates how to set up these environment variables for both testing and production. You can set the current value to match the initial value.
| Environment | Environment Variable Name | Initial Value | Description |
| Test Environment | dbHost | {{vault:testDbHost}} | References the Vault variable for the database address in test environment |
| dbUsername | {{vault:testDbUsername}} | References the Vault variable for the database username in test environment | |
| dbPwd | {{vault:testDbPwd}} | References the Vault variable for the database password in test environment | |
| dbTable | store | No data security concerns, so it's entered directly. Vault variable is optional | |
| Production Environment | dbHost | {{vault:prodDbHost}} | References the Vault variable for the database address in production environment |
| dbUsername | {{vault:prodDbUsername}} | References the Vault variable for the database username in production environment | |
| dbPwd | {{vault:prodDbPwd}} | References the Vault variable for the database password in production environment | |
| dbTable | store | No data security concerns, so it's entered directly. Vault variable is optional |