
Developers constantly seek efficient ways to construct modern web applications, and React remains a top choice for its component-based architecture and flexibility. When you combine React with Claude Code—an AI-powered coding assistant from Anthropic—you unlock faster prototyping, cleaner code generation, and smarter debugging. This approach transforms how teams build interactive user interfaces, reducing manual effort while maintaining high standards.
Throughout this article, you will explore practical steps to harness Claude Code for React development. First, understand the fundamentals, then move to hands-on implementation, and finally, refine your apps with optimization techniques. Each section builds on the previous one, providing a clear path forward.
Understanding Claude Code in React Development
Claude Code represents a sophisticated AI model designed specifically for generating and refining code snippets. Engineers use it to produce React components, hooks, and even entire application structures based on natural language prompts. Unlike traditional code editors, Claude Code interprets requirements contextually, offering suggestions that align with React's best practices.
You start by providing a detailed description of your desired functionality. For instance, specify a form component with validation, and Claude Code generates the JSX, state management, and event handlers. This method saves time, especially for repetitive tasks.
However, Claude Code excels when you iterate on its outputs. Review the generated code, test it in your environment, and refine prompts for better results. Consequently, your workflow becomes more iterative and efficient.
Next, consider how Claude Code integrates with React's ecosystem. It supports libraries like Redux for state or React Router for navigation, ensuring compatibility. Developers report up to 50% faster initial setups when using such AI tools, as they handle boilerplate code automatically.
To maximize benefits, familiarize yourself with Claude's prompt engineering. Craft prompts that include specifics like React version, TypeScript usage, or styling preferences. This precision leads to outputs that require minimal adjustments.
In summary, Claude Code acts as a virtual pair programmer, enhancing your React skills without replacing them. With this foundation, you can now set up your development environment effectively.

Setting Up Your React Environment with Claude Code
You begin by installing Node.js and npm, the prerequisites for any React project. Download the latest LTS version from the official Node.js website, then verify installation with node -v and npm -v in your terminal.
Once ready, create a new React app using Create React App. Run npx create-react-app my-react-app --template typescript for a TypeScript setup, which adds type safety beneficial when working with Claude Code outputs.
After setup, integrate Claude Code via its API or web interface. Sign up for an Anthropic account, obtain an API key, and install the necessary SDK with npm install @anthropic/sdk. This allows you to call Claude Code directly from scripts or your IDE.
Configure your editor—VS Code works well—with extensions like the Anthropic plugin for seamless prompt interactions. Now, generate your first component: Prompt Claude Code with "Create a simple React functional component for a header with a logo and navigation links."
Claude Code responds with code like:
import React from 'react';

const Header: React.FC = () => {
  return (
    <header>
      <img src="logo.png" alt="Logo" />
      <nav>
        <a href="/">Home</a>
        <a href="/about">About</a>
      </nav>
    </header>
  );
};

export default Header;
Paste this into your src/components folder, import it in App.tsx, and run npm start to see it live. If issues arise, refine the prompt to include styling or props.
Furthermore, set up version control with Git. Initialize a repository with git init, add files, and commit. This safeguards your progress as you incorporate more Claude Code-generated elements.
By establishing this environment, you position yourself for efficient development. The next step involves generating core React components using Claude Code.
Generating React Components with Claude Code
You generate components by crafting targeted prompts. For a user profile card, prompt: "Build a React component for displaying user profiles, including name, avatar, bio, and a follow button. Use hooks for state management."
Claude Code produces something similar to:
import React, { useState } from 'react';

interface UserProfileProps {
  name: string;
  avatar: string;
  bio: string;
}

const UserProfile: React.FC<UserProfileProps> = ({ name, avatar, bio }) => {
  const [followed, setFollowed] = useState(false);

  const handleFollow = () => {
    setFollowed(!followed);
  };

  return (
    <div className="profile-card">
      <img src={avatar} alt={name} />
      <h2>{name}</h2>
      <p>{bio}</p>
      <button onClick={handleFollow}>
        {followed ? 'Unfollow' : 'Follow'}
      </button>
    </div>
  );
};

export default UserProfile;
Integrate this by importing it into your main app and passing props. Test functionality in the browser, ensuring the button toggles correctly.
Moreover, Claude Code handles complex components. For a data table, specify sorting and pagination: "Generate a React table component with sortable columns and pagination using React hooks."
The output might include useState for page tracking and useEffect for data updates. Customize it further by adding CSS-in-JS with styled-components—install via npm install styled-components and prompt Claude Code to incorporate it.
As you build, maintain consistency. Use Claude Code to generate a style guide component, ensuring uniform design across your app.
Transitioning smoothly, consider how these components interact with external data. This leads to API integration, where Apidog plays a crucial role.
Integrating APIs in React Apps Using Apidog
You integrate APIs to fetch dynamic data, enhancing your React app's interactivity. Start by identifying endpoints—perhaps a RESTful API for user data.
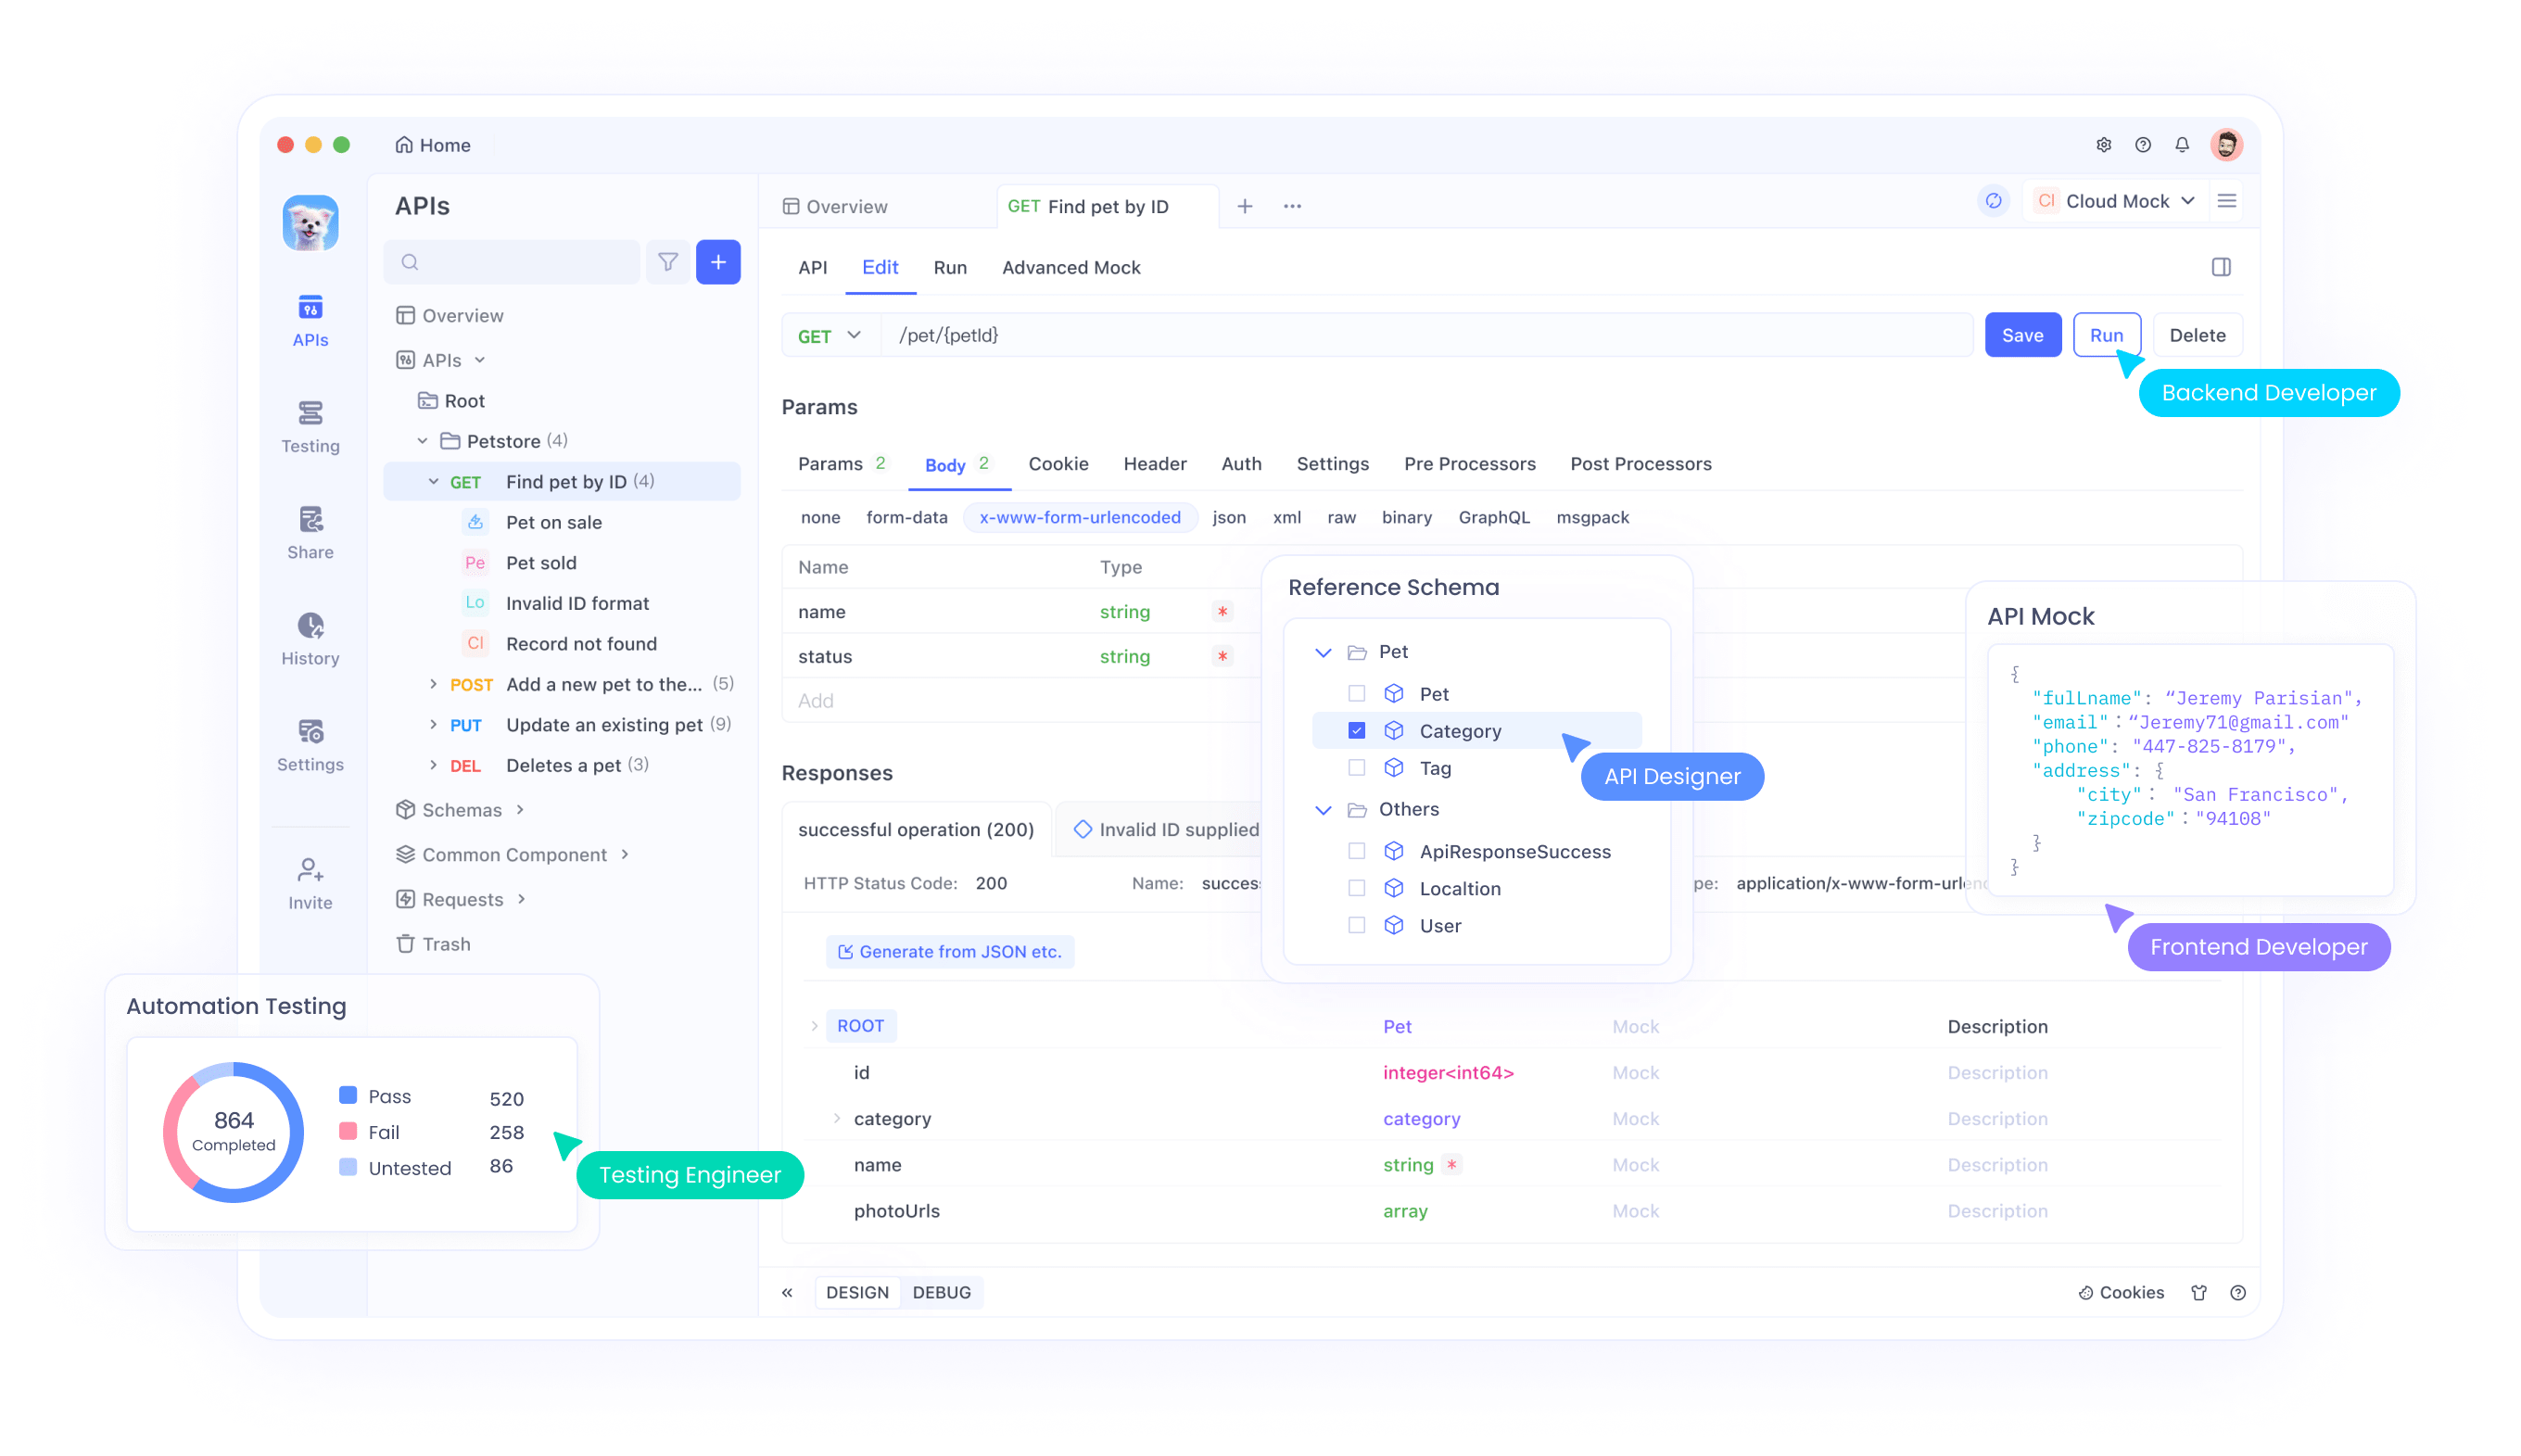
Apidog simplifies this process. After downloading Apidog for free, import your API specs via OpenAPI or Swagger files. Design requests, test them, and generate client code.
For example, mock a users endpoint in Apidog, then generate fetch code. Prompt Claude Code: "Create a React hook to fetch user data from an API endpoint using fetch, with error handling."
Claude Code generates:
import { useState, useEffect } from 'react';

const useFetchUsers = (url: string) => {
  const [data, setData] = useState(null);
  const [loading, setLoading] = useState(true);
  const [error, setError] = useState(null);

  useEffect(() => {
    fetch(url)
      .then(response => {
        if (!response.ok) {
          throw new Error('Network response was not ok');
        }
        return response.json();
      })
      .then(data => {
        setData(data);
        setLoading(false);
      })
      .catch(error => {
        setError(error);
        setLoading(false);
      });
  }, [url]);

  return { data, loading, error };
};

export default useFetchUsers;
Use this hook in your component: const { data, loading, error } = useFetchUsers('/api/users');
With Apidog, validate responses before coding. Simulate errors, check schemas, and ensure your React code handles edge cases.
Additionally, for authentication, use Apidog to test JWT tokens. Generate secure fetch wrappers with Claude Code, incorporating headers.
This integration ensures reliable data flow. Now, manage that data effectively with state management techniques.
Implementing State Management in React with Claude Code
You manage state to handle user interactions and data persistence. React's built-in hooks suffice for simple apps, but complex ones benefit from libraries.
Prompt Claude Code for a context provider: "Build a React context for global state management, including user authentication status."
It outputs:
import React, { createContext, useState, ReactNode } from 'react';

interface AuthContextType {
  isAuthenticated: boolean;
  login: () => void;
  logout: () => void;
}

export const AuthContext = createContext<AuthContextType | undefined>(undefined);

export const AuthProvider: React.FC<{ children: ReactNode }> = ({ children }) => {
  const [isAuthenticated, setIsAuthenticated] = useState(false);

  const login = () => setIsAuthenticated(true);
  const logout = () => setIsAuthenticated(false);

  return (
    <AuthContext.Provider value={{ isAuthenticated, login, logout }}>
      {children}
    </AuthContext.Provider>
  );
};
Wrap your app in AuthProvider, then consume the context in components.
For larger scales, integrate Redux. Install npm install redux react-redux, then prompt: "Generate a Redux store setup for a todo app in React."
Claude Code provides actions, reducers, and store configuration. Connect components using useSelector and useDispatch.
Furthermore, combine with APIs: Use effects to dispatch actions on data fetch, tested via Apidog.
By centralizing state, you improve app predictability. Next, add navigation with routing.
Adding Routing to Your React App
You add routing to enable multi-page experiences in single-page apps. Install React Router with npm install react-router-dom.
Prompt Claude Code: "Create a basic routing setup for a React app with home, about, and contact pages."
The response includes:
import React from 'react';
import { BrowserRouter as Router, Route, Routes } from 'react-router-dom';
import Home from './pages/Home';
import About from './pages/About';
import Contact from './pages/Contact';

const AppRoutes: React.FC = () => {
  return (
    <Router>
      <Routes>
        <Route path="/" element={<Home />} />
        <Route path="/about" element={<About />} />
        <Route path="/contact" element={<Contact />} />
      </Routes>
    </Router>
  );
};

export default AppRoutes;
Generate page components similarly. Add protected routes using your auth context: Wrap routes in a PrivateRoute component that checks authentication.
Moreover, handle dynamic routes for user profiles, like /user/:id. Fetch data in the component using your API hook, verified with Apidog.
This setup enhances user navigation. Proceed to styling for a polished look.
Styling React Components Effectively
You style components to create visually appealing interfaces. Options include CSS modules, styled-components, or Tailwind CSS.
For Tailwind, install npm install tailwindcss postcss autoprefixer, configure, and prompt Claude Code: "Style a React button component using Tailwind CSS classes for hover effects."
Output:
import React from 'react';

const StyledButton: React.FC<{ onClick: () => void; children: React.ReactNode }> = ({ onClick, children }) => {
  return (
    <button
      onClick={onClick}
      className="bg-blue-500 hover:bg-blue-700 text-white font-bold py-2 px-4 rounded"
    >
      {children}
    </button>
  );
};

export default StyledButton;
Apply consistently across components. For themes, use context to toggle dark/light modes.
Integrate with Claude Code-generated code by including styling in prompts.
With styles in place, focus on performance optimization.
Optimizing Performance in React Apps
You optimize to ensure fast load times and smooth interactions. Use React.memo for pure components: Wrap exports in memo to prevent unnecessary re-renders.
Prompt Claude Code: "Optimize a React list component with virtualization for large datasets."
It suggests using react-window: Install, then generate:
import React from 'react';
import { FixedSizeList as List } from 'react-window';

const Row = ({ index, style }) => (
  <div style={style}>Row {index}</div>
);

const VirtualizedList: React.FC = () => {
  return (
    <List
      height={150}
      itemCount={1000}
      itemSize={35}
      width={300}
    >
      {Row}
    </List>
  );
};

export default VirtualizedList;
Analyze bundles with webpack-bundle-analyzer, split code with lazy loading: const LazyComponent = React.lazy(() => import('./Component'));
Test API calls with Apidog to minimize latency impacts.
These techniques boost efficiency. Now, implement testing.
Testing Your React App with Claude Code
You test to catch bugs early. Use Jest and React Testing Library, installed via Create React App.
Prompt: "Write unit tests for a React counter component using Jest."
Claude Code provides:
import React from 'react';
import { render, fireEvent } from '@testing-library/react';
import Counter from './Counter';

test('increments counter', () => {
  const { getByText } = render(<Counter />);
  const button = getByText('Increment');
  fireEvent.click(button);
  expect(getByText('Count: 1')).toBeInTheDocument();
});
Add integration tests for API interactions, mocking responses with Apidog's mock server.
Cover edge cases like loading states and errors.
Robust testing builds confidence. Move to deployment.
Deploying React Apps Built with Claude Code
You deploy to make your app accessible. Use platforms like Vercel or Netlify.
Build with npm run build, then upload to Vercel via CLI: vercel --prod.
Configure environment variables for API keys, tested in Apidog.
Monitor post-deployment with tools like Sentry.
Finally, update via CI/CD pipelines.
Best Practices for Using Claude Code in React
Follow these: Use descriptive prompts, review code security, combine with human oversight.
Integrate Apidog for API reliability.
Stay updated with React and Claude advancements.
Conclusion
Building React apps with Claude Code streamlines development, from setup to deployment. Incorporate Apidog for API excellence. Apply these methods to elevate your projects.