Developers often seek efficient ways to integrate financial services into their applications, and the Brex API stands out as a robust solution for managing spend limits, transactions, and team resources. This article guides you through the process of accessing and using the Brex API. You will learn how to set up authentication, explore endpoints, and incorporate the API into your systems.
As you proceed, remember that small adjustments in your approach, such as choosing the right scopes during token generation, can significantly impact integration success. Therefore, pay close attention to each step to ensure seamless connectivity.
What Is the Brex API?
The Brex API provides a RESTful interface that enables developers to automate and customize financial workflows within the Brex platform. Brex, a financial technology company, offers services like corporate cards, spend management, and expense tracking. Consequently, the Brex API allows you to interact with these features programmatically.

The Brex API includes several specialized APIs, such as the Team API for managing users and cards, the Transactions API for fetching settled transactions, and the Onboarding API for handling referrals. Each of these caters to different aspects of financial management, allowing you to build custom reports, automate user invitations, or track expenditures in real time.
In addition, Brex emphasizes security and compliance, ensuring that API interactions align with industry standards. Therefore, when you use the Brex API, you gain access to tools that support scalable financial operations without compromising data integrity.
Why Should You Use the Brex API?
You should use the Brex API if your application requires integration with corporate financial tools. For example, finance teams often need to synchronize transaction data with accounting software, and the Brex API facilitates this by providing endpoints for listing transactions and accounts.
Moreover, the API reduces manual efforts in managing spend limits and user access. You can automate card creation, set monthly limits, and monitor activities, which streamlines operations for growing businesses. Additionally, partners in accounting or HR can leverage the Onboarding API to create personalized referral links, enhancing client acquisition processes.
However, the true value lies in its flexibility. You integrate the Brex API with existing systems to create custom dashboards or alerts, ensuring that financial data flows efficiently across platforms. As a result, developers save time and reduce errors compared to manual data entry.

How Do You Get Started with Brex API Access?
To get started with Brex API access, you first sign up for a Brex account if you do not have one. Visit brex.com and create an account as an administrator, since only account admins or card admins can generate API tokens.
Next, log in to the Brex dashboard.
Navigate to the Developer section under Settings. Here, you click on Create Token to begin the process. You provide a name for the token, which helps in identifying its purpose later, such as "Integration Token for App."
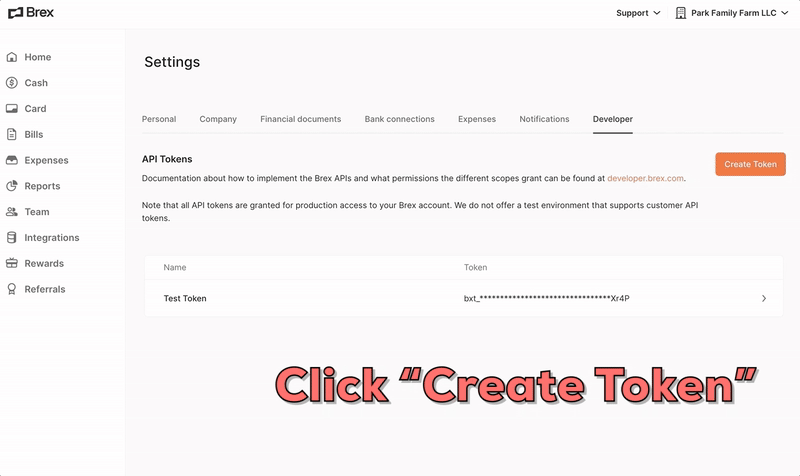
Furthermore, you select the appropriate scopes during this step. Scopes define the data access levels, such as read access to transactions or write permissions for user management. After confirming your selections, you click Allow Access, and the system generates the token.
Importantly, you copy and store this token securely immediately, as Brex obfuscates it after creation for security reasons. If you lose it, you simply create a new one. Tokens expire after 90 days of inactivity, so you monitor usage to avoid disruptions.
Once you have the token, you test basic connectivity. For example, you use a tool like curl to make a simple GET request to an endpoint, including the token in the Authorization header. This verifies that your setup works correctly.
How to Authenticate with the Brex API?
You authenticate with the Brex API using bearer tokens. Specifically, you include the token in the Authorization header of each request, formatted as "Bearer {your_token}".
For instance, consider this curl example:
curl -X GET https://platform.brexapis.com/v2/users/me \
-H "Authorization: Bearer bxt_jBWQLZXtu1f4sVT6UjaWPp7Gh9nVGjzEZgRX"
This request fetches the current user's details. If successful, it returns JSON data about the user.
Moreover, Brex supports user tokens, which tie to specific admin privileges. You generate these tokens as described earlier, ensuring you choose scopes that match your needs. For example, if you plan to manage cards, select scopes for read and write on card endpoints.
However, if a token becomes compromised, you revoke it immediately from the Developer page in the dashboard. Revoked tokens cause subsequent API calls to fail with a 401 error, protecting your account.
In practice, you implement token management in your application code. Libraries like Python's requests module simplify this:
import requests

headers = {
    'Authorization': 'Bearer your_token_here'
}

response = requests.get('https://platform.brexapis.com/v2/users/me', headers=headers)
print(response.json())
This code snippet demonstrates active authentication in a script.
What Are the Key Brex API Endpoints?
The Brex API offers various endpoints across multiple APIs. You start by exploring the Team API, which handles users, departments, locations, cards, and more.
- For users, you list all users with GET /v2/users, filtering by email or ID. Parameters include cursor for pagination and limit to control response size. Similarly, you invite a new user via POST /v2/users, providing first_name, last_name, email, and optional manager_id.
Furthermore, you update users with PUT /v2/users/{id}, changing status to ACTIVE or DISABLED. You also set monthly limits using POST /v2/users/{id}/limit, specifying the amount in the body.
- For departments, you create one with POST /v2/departments, requiring a name. You list them via GET /v2/departments, and retrieve specifics with GET /v2/departments/{id}.
- Locations follow a similar pattern: POST /v2/locations for creation, GET /v2/locations for listing.
- Titles, which represent job roles, use endpoints like POST /v2/titles and GET /v2/titles/{id}.
- Cards form a core part. You list cards with GET /v2/cards, filtered by user_id. To create a card, POST /v2/cards with details like owner, card_type (VIRTUAL or PHYSICAL), and spend_controls. Spend_controls include limit_type and amounts.
Moreover, you update cards via PUT /v2/cards/{id}, lock them with POST /v2/cards/{id}/lock (providing a reason like FRAUD), or terminate with POST /v2/cards/{id}/terminate.
- Sensitive operations include GET /v2/cards/{id}/pan for card numbers and POST /v2/cards/{id}/secure_email to send details securely.
- Legal entities and companies have read-only endpoints like GET /v2/legal_entities and GET /v2/company.
- Shifting to the Transactions API, you fetch settled card transactions with GET /v2/transactions/card/primary, using parameters like posted_at_start for date filtering. For cash accounts, GET /v2/transactions/cash/{id} lists transactions.
- Account endpoints include GET /v2/accounts/card for card accounts and GET /v2/accounts/cash for cash ones. You retrieve statements with GET /v2/accounts/card/primary/statements.
- The Onboarding API focuses on referrals. You create referrals with POST /v1/referrals, providing referral_code and applicant details. List them via GET /v1/referrals, and get specifics with GET /v1/referrals/{id}. Document uploads use POST /v1/referrals/{id}/document_upload.
Other APIs include Payments for transfers (GET /v2/transfers), Webhooks for notifications, and Fields API for managing custom fields.
All list endpoints support pagination with cursor and limit, ensuring efficient data retrieval.

How to Use Brex API for Transactions?
You use the Brex API for transactions by calling endpoints in the Transactions API. First, you identify the account type—card or cash.
For card transactions, you send GET /v2/transactions/card/primary. This returns settled purchases, refunds, and chargebacks. You filter by user_ids or posted_at_start, like "2025-01-01T00:00:00Z".
The response includes details such as amount, description, merchant, and expense_id if expanded.
For cash transactions, you specify the account ID in GET /v2/transactions/cash/{id}. This lists all activities for that cash account.
To manage accounts, you list card accounts with GET /v2/accounts/card, which returns IDs and statuses. Similarly, GET /v2/accounts/cash provides cash account details.
Furthermore, you fetch statements for auditing. Use GET /v2/accounts/card/primary/statements to get finalized card statements, paginated as needed.
In code, you implement this as follows (Python example):
import requests

headers = {
    'Authorization': 'Bearer your_token_here'
}

params = {
    'posted_at_start': '2025-12-01T00:00:00Z',
    'limit': 50
}

response = requests.get('https://platform.brexapis.com/v2/transactions/card/primary', headers=headers, params=params)
transactions = response.json()['items']
for tx in transactions:
    print(f"Amount: {tx['amount']['amount']}, Description: {tx['description']}")
This script fetches and prints recent transactions, demonstrating practical usage.
Additionally, you handle errors like 404 for invalid IDs by checking response.status_code.
How to Manage Teams with Brex Team API?
You manage teams using the Team API endpoints. Start by listing users with GET /v2/users. This helps you audit current team members.
To add a user, POST /v2/users with required fields:
{
  "first_name": "John",
  "last_name": "Doe",
  "email": "john.doe@example.com",
  "department_id": "dept_123"
}
The system sends an invitation email automatically.
You update user details, such as assigning a new manager, via PUT /v2/users/{id}.
For spend control, POST /v2/users/{id}/limit sets monthly budgets.
Departments and locations enhance organization. You create a department with POST /v2/departments:
{
  "name": "Engineering",
  "description": "Software development team"
}
Then, assign users to it during invitation or update.
Cards tie to users. You create a virtual card for a user:
{
  "owner": {
    "user_id": "user_456"
  },
  "card_name": "Project Card",
  "card_type": "VIRTUAL",
  "limit_type": "CARD",
  "spend_controls": {
    "limit": {
      "amount": 5000,
      "currency": "USD"
    }
  }
}
POST this to /v2/cards.
Later, you lock a card if needed: POST /v2/cards/{id}/lock with reason "OTHER".
This approach ensures secure team management.
Integrating Brex API with Your Application: Code Examples
You integrate the Brex API by incorporating API calls into your codebase. Use libraries like requests in Python or axios in JavaScript.
For a Node.js example, install axios:
npm install axios
Then, fetch users:
const axios = require('axios');

const headers = {
  Authorization: 'Bearer your_token_here'
};

axios.get('https://platform.brexapis.com/v2/users', { headers })
  .then(response => {
    console.log(response.data.items);
  })
  .catch(error => {
    console.error(error.response.data);
  });
This logs user data.
For more complex integrations, you use webhooks. Subscribe to events via the Webhooks API, setting up endpoints to receive notifications on transaction updates.
In Python, handle pagination for large datasets:
def fetch_all_users(headers, cursor=None):
    users = []
    while True:
        params = {'limit': 100, 'cursor': cursor}
        response = requests.get('https://platform.brexapis.com/v2/users', headers=headers, params=params)
        data = response.json()
        users.extend(data['items'])
        cursor = data['next_cursor']
        if not cursor:
            break
    return users
This function retrieves all users iteratively.
You also secure sensitive data, like card numbers, by using GET /v2/cards/{id}/pan only when necessary and storing nothing locally.
How Can You Test Brex API with Apidog?
You test the Brex API effectively using Apidog, an all-in-one platform for API development. Apidog allows you to design, debug, mock, test, and document APIs intuitively.

Next, set up authentication by adding your bearer token in the global variables or environment settings. This applies to all requests.
You then send requests, such as GET /v2/users/me, and view responses in a user-friendly interface. Apidog highlights JSON structures and errors.
Moreover, you create test scenarios with assertions. For example, assert that a transaction response has a 200 status and contains 'amount'.
Apidog's mocking feature simulates responses for unavailable endpoints, aiding development.

Additionally, generate documentation with code samples in multiple languages, sharing it with your team.
By using Apidog, you streamline Brex API testing, catching issues early.
What Are Best Practices for Using Brex API?
You follow best practices to optimize Brex API usage. Always use HTTPS and store tokens securely, perhaps in environment variables or vaults.
Implement rate limiting handling, as Brex enforces limits—retry with exponential backoff on 429 errors.
- Paginate requests to avoid timeouts; use cursor and limit consistently.
- Monitor token expiration and automate renewal.
- Validate inputs before sending to prevent 400 errors.
- Log API calls for debugging, but anonymize sensitive data.
- Use idempotency keys for POST/PUT to avoid duplicates.
- Integrate error handling: Map HTTP codes to actions, like refreshing tokens on 401.
- Test in staging environments before production.
- Stay updated with Brex changelog for changes.
These practices ensure reliable integrations.
Common Issues and How to Troubleshoot Brex API Problems?
You encounter issues like authentication failures. If you get 401, check token validity—regenerate if expired.
- For 403 Forbidden, verify scopes match the endpoint.
- 404 Not Found often means invalid IDs; double-check paths.
- Rate limit exceeds yield 429; implement backoff.
- Network errors require retry logic.
Use Brex Postman collections for initial testing, forking from their workspace.
If issues persist, consult docs or contact support.
Conclusion
You now understand how to access and use the Brex API comprehensively. From authentication to endpoint usage and testing with Apidog, these steps enable robust integrations. Apply them to enhance your financial workflows efficiently.