
Zig is a modern, general-purpose programming language designed to be robust, optimal, and maintainable. With a focus on simplicity and clarity, Zig provides low-level control while avoiding hidden control flow and allocations. This tutorial will guide you through the installation process, creating your first Zig program, and running tests. By the end, you'll have a solid foundation for exploring this powerful language further.
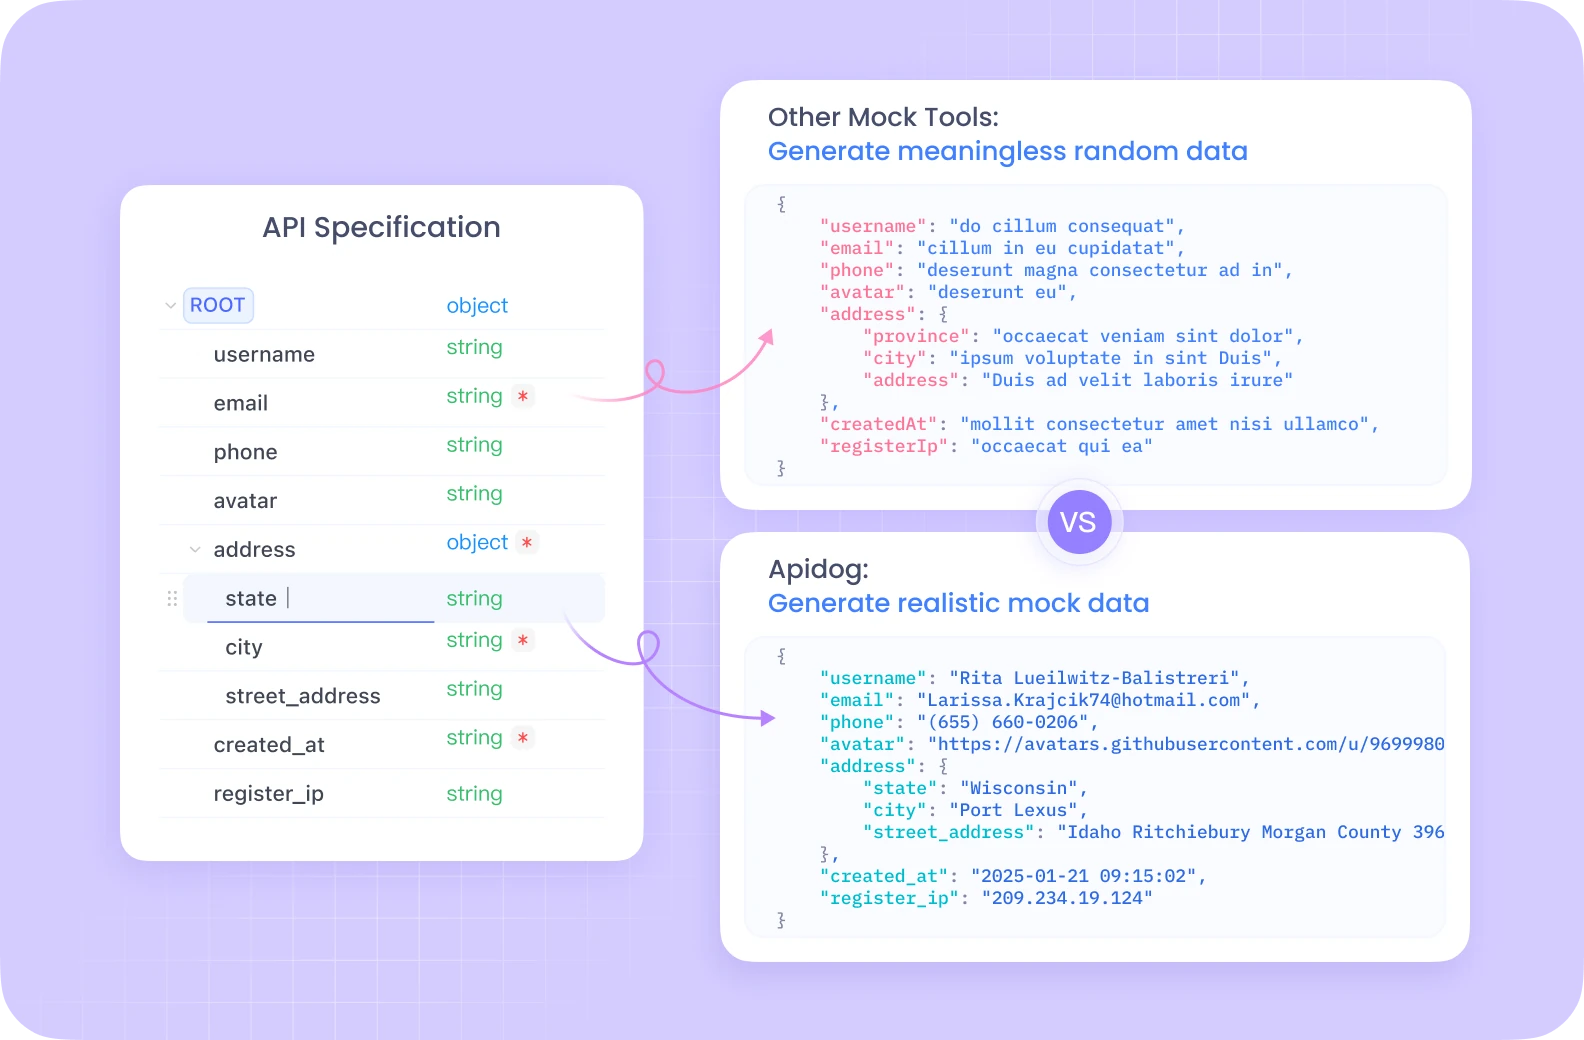
While we're exploring powerful developer tools, it's worth mentioning Apidog – the ultimate alternative to Postman for API development and testing. Apidog combines API documentation, design, mock, testing, and debugging into a single, streamlined platform.

With its intuitive interface, collaborative features, and seamless version control integration, Apidog drastically improves workflow efficiency for developers working with APIs. Its comprehensive feature set includes automated testing, environment management, request chaining, and intelligent response validation, making it an essential tool for modern development teams.
Before diving into Zig programming, consider adding Apidog to your developer toolkit to enhance your overall productivity when working with APIs and web services.
Part 1: Installing Zig
Before you can start programming in Zig, you need to install the compiler and tools. The installation process varies depending on your operating system.
Installing on Linux
You have two main options for installing Zig on Linux:
Option 1: Using your distribution's package manager
Most major Linux distributions package the latest Zig release. This is often the easiest approach:
# For Debian/Ubuntu
sudo apt install zig

# For Fedora
sudo dnf install zig

# For Arch Linux
sudo pacman -S zig
Option 2: Installing manually
If your distribution doesn't have Zig or you need a specific version:
Download a prebuilt version of Zig from the official website that matches your CPU architecture
To check your architecture, use:
uname -m
Extract the archive using tar:
tar xf zig-linux-x86_64-0.13.0.tar.xz
Add the Zig binary to your PATH:
echo 'export PATH="$HOME/zig-linux-x86_64-0.13.0:$PATH"' >> ~/.bashrc
Apply the changes:
source ~/.bashrc
Installing on Windows
Windows users have several options:
Option 1: Using package managers
# Using Chocolatey
choco install zig

# Using Winget
winget install zig.zig

# Using Scoop
scoop install zig
Option 2: Manual installation
Download a prebuilt version of Zig for Windows that matches your CPU architecture (most Windows systems use x86_64/AMD64)
Check your architecture with:
$Env:PROCESSOR_ARCHITECTURE
Extract the ZIP file
Add Zig to your PATH:
For Current User:
[Environment]::SetEnvironmentVariable(
    "Path",
    [Environment]::GetEnvironmentVariable("Path", "User") + ";C:\\\\path\\\\to\\\\zig-windows-x86_64",
    "User"
)
For System Wide:
[Environment]::SetEnvironmentVariable(
    "Path",
    [Environment]::GetEnvironmentVariable("Path", "Machine") + ";C:\\\\path\\\\to\\\\zig-windows-x86_64",
    "Machine"
)
Close and reopen your terminal
Installing on macOS
The simplest way to install Zig on macOS is using Homebrew:
brew install zig
Verifying Your Installation
After installation, verify that Zig is correctly installed by running:
zig version
You should see output like:
0.13.0
Part 2: Hello, World! in Zig
Now that Zig is installed, let's create your first Zig program: the traditional "Hello, World!" example.
Creating the Program File
- Create a new file named
main.zig - Open it in your preferred text editor
- Add the following code:
const std = @import("std");

pub fn main() void {
    std.debug.print("Hello, {s}!\\\\n", .{"World"});
}
Let's break down what this code does:
const std = @import("std");imports Zig's standard librarypub fn main() void {declares the main function that acts as the entry point of your programstd.debug.print("Hello, {s}!\\\\n", .{"World"});prints "Hello, World!" to the standard error stream (stderr)- The
{s}is a format specifier for strings, and.{"World"}is how Zig passes arguments to format specifiers
Running the Program
To build and run your program, use the following command:
zig run main.zig
This compiles your code and executes it immediately. You should see the output:
Hello, World!
Important Note on File Encoding
Zig requires UTF-8 encoding for source files. If you encounter an error like invalid bytes, your file might have a different encoding. To fix this:
zig fmt main.zig
This will re-encode your file as UTF-8. Then reopen the file in your editor.
Part 3: Running Tests in Zig
Zig has a built-in testing framework that makes it easy to write and run tests. Understanding how to use tests is crucial as you learn Zig, especially since many examples in the Zig documentation are provided as tests.
Creating a Simple Test That Passes
Let's create a basic test file:
- Create a new file named
test_pass.zig - Add the following code:
const std = @import("std");
const expect = std.testing.expect;

test "always succeeds" {
    try expect(true);
}
This code imports the testing module, then defines a test named "always succeeds" that expects true to be true (which it always is).
To run this test:
zig test test_pass.zig
You should see output similar to:
All 1 tests passed.
Creating a Test That Fails
Now, let's create a test that fails to understand how Zig handles test failures:
- Create a file named
test_fail.zig - Add the following code:
const std = @import("std");
const expect = std.testing.expect;

test "always fails" {
    try expect(false);
}
This test expects false to be true, which obviously fails.
When you run:
zig test test_fail.zig
You'll see an error output like:
Test [1/1] test.always fails... FAIL (TestUnexpectedResult)
/usr/lib/zig/std/testing.zig:515:14: 0x2241ef in expect (test)
if (!ok) return error.TestUnexpectedResult;
^
[...]/test_fail:5:5: 0x224305 in test.always fails (test)
try expect(false);
^
0 passed; 0 skipped; 1 failed.
Understanding Error Handling in Tests
The try keyword is crucial in Zig tests. It attempts to execute a function that may return an error. If an error is returned, it propagates that error to the caller.
Try running the same test without the try keyword:
test "will not compile correctly" {
    expect(false);
}
You'll get a compiler error because you're not handling the potential error that expect() might return.
Part 4: Zig Basics for Beginners
Variables and Constants
In Zig, you define variables and constants as follows:
const std = @import("std");

pub fn main() void {
    // Constant (cannot be changed)
    const fixed_value = 42;

    // Variable (can be changed)
    var changeable_value = 10;
    changeable_value = 20; // This is allowed

    // You can specify types explicitly
    const explicit_integer: i32 = 1234;
    var explicit_float: f64 = 3.14159;

    std.debug.print("Fixed: {d}, Changeable: {d}\\\\n",
        .{fixed_value, changeable_value});
}
Basic Data Types
Zig has several built-in data types:
const std = @import("std");

pub fn main() void {
    // Integers
    const i: i32 = -42;       // Signed 32-bit integer
    const u: u32 = 42;        // Unsigned 32-bit integer

    // Floats
    const f: f32 = 3.14;      // 32-bit float
    const d: f64 = 2.71828;   // 64-bit float

    // Boolean
    const b: bool = true;

    // Characters and strings
    const c: u8 = 'A';                    // Character (as integer)
    const s: []const u8 = "Hello, Zig!";  // String (a slice of u8)

    // Arrays with fixed size known at compile time
    const arr = [5]u8{1, 2, 3, 4, 5};

    std.debug.print("Integer: {d}, Float: {d}\\\\n", .{i, f});
    std.debug.print("String: {s}\\\\n", .{s});
}
Functions
Functions in Zig are defined using the fn keyword:
const std = @import("std");

// Basic function with parameters and return value
fn add(a: i32, b: i32) i32 {
    return a + b;
}

// Function that may return an error
fn divide(a: f32, b: f32) !f32 {
    if (b == 0) {
        return error.DivisionByZero;
    }
    return a / b;
}

pub fn main() void {
    // Call a simple function
    const sum = add(5, 3);
    std.debug.print("5 + 3 = {d}\\\\n", .{sum});

    // Call a function that may return an error
    if (divide(10, 2)) |result| {
        std.debug.print("10 / 2 = {d}\\\\n", .{result});
    } else |err| {
        std.debug.print("Error: {}\\\\n", .{err});
    }

    // Another way to handle errors
    const division_result = divide(10, 0) catch |err| {
        std.debug.print("Division failed: {}\\\\n", .{err});
        0; // Default value in case of error
    };
    std.debug.print("Result (or default): {d}\\\\n", .{division_result});
}
Conclusion
This tutorial has covered the essentials of getting started with Zig - installation across different operating systems, creating and running your first program, and working with Zig's testing framework. We've also introduced some fundamental concepts like variables, data types, and functions.
Zig is a powerful language that offers low-level control while emphasizing safety, clarity, and maintainability. Its approach to error handling and memory management makes it an interesting alternative to languages like C, C++, and Rust.
To continue your Zig journey, consider:
- Exploring the official Zig documentation
- Joining the Zig community on Discord or the Ziggit forum
- Installing the Zig Language Server for better IDE integration
- Trying to build small projects to get hands-on experience
Remember that Zig is still evolving, so some features may change as the language matures towards version 1.0. Happy coding!


