
Flasgger is a valuable tool for streamlining the development process of Flask APIs. This Python library simplifies two crucial tasks: creating API documentation and crafting a user interface (UI) for interacting with the API. By automating these processes, Flasgger empowers developers to save significant time and effort while ensuring their APIs are well-documented and user-friendly.
Now that is no longer a problem to worry about! Apidog, an all-in-one API tool, provides a simple and intuitive user interface for building, testing, mocking, and documenting APIs.
If you are searching for an API tool to test out your brand-new Flask API, click the button below to start! 👇
What is Flasgger?

Flasgger is a powerful Python library specifically designed to enhance the development experience for Flask APIs. It provides developers a user interface for creating API documentation and other necessary tools needed for a better Flask API development experience.
Flasgger Key Komponents
Automatic OpenAPI Documentation Generation
This component analyzes your Flask application code and extracts information about the API endpoints, data formats, parameters, and responses. It then uses this information to generate comprehensive documentation in the OpenAPI Specification (OAS) format. OAS is an industry-standard that allows developers and tools to easily understand how your API works.
Swagger UI Integration
Flasgger integrates Swagger UI, a popular interactive interface for exploring and testing APIs. This UI leverages the generated OAS documentation to display:
- API Endpoints: Users can browse through all available API routes and their functionalities.
- Live Testing: Swagger UI allows users to directly test your API endpoints within the browser. They can submit data in the expected format and see the corresponding response.
Benefits of Using Flasgger
- Reduced Development Time: Flasgger automates the creation of API documentation and integrates Swagger UI, freeing up developers to focus on the core functionalities of the API itself. This can significantly speed up the development process.
- Improved API Quality: By automatically generating documentation based on your code, Flasgger helps to ensure that your API is well-defined and consistent. The interactive testing capabilities of Swagger UI also allow for easier identification and rectification of bugs or issues with the API.
- Enhanced Collaboration: Flasgger's clear documentation and user-friendly UI bridge the gap between API developers and consumers. Consumers can easily understand how to use the API, and developers can share their work more effectively.
- Simplified Maintenance: As your Flask API evolves, Flasgger ensures that the documentation and UI remain up-to-date. Any changes made to the code are reflected in the documentation automatically, reducing the need for manual updates. This saves time and effort in the long run.
- Additional Advantages: Flasgger offers further benefits like customization options for documentation, security features for restricting access to the Swagger UI, and extensibility for creating custom functionalities tailored to your specific needs.
How to Install Flasgger?
Here is a step-by-step guide on how to use Flasgger to start developing Flask APIs.
Installation
First, use the terminal (or Bash) to install Flasgger.
pip install flasggerInitialization
Within your Flask application, initialize Flasgger with the app object.
from flasgger import Swagger

app = Flask(__name__)
Swagger(app)
Defining API Specifications
There are a few ways to define API specification:
Docstrings
@app.route("/users/<int:user_id>")
def get_user(user_id):
    """Get a specific user by ID.

    Args:
        user_id (int): The ID of the user to retrieve.

    Returns:
        JSON: User details in JSON format.
    """
    # Your logic to retrieve user data
    return jsonify(user_data)
You can immediately document your API endpoints using docstrings within your core functions. Flasgger will automatically raise these docstrings to generate specifications.
YAML Files
For more complex specifications, you can define them in separate YAML files by using the @swag_from decorator to reference these YAML files for specific endpoints.
Marshmallow Schemas
You can us Marshmallow for data validation and leverage your existing schemas for API specifications.
Running Swagger UI
Once you have defined your API specifications, you can access the Swagger UI by visiting the following URL in your browser (assuming the Flask app is already running on localhost):
https://localhost:5000/apidocsIs Flasgger Free to Use?
Yes! Flasgger is an open-source library that can be found on GitHub.
 flasgger
All you have to do is follow the section above to get started with Flask API development!
Apidog - Test Your Flask APIs Confidently!
Once you have finished designing your Flask API with Flasgger, you have to ensure that it can perform as intended. This requires API tools that can interact with and modify APIs. For this specific occasion, the API tool Apidog can be considered.

This article will outline how you can individually or collectively test your Flask APIs using Apidog's various features!
Testing Individual API Endpoints Using Apidog
Testing every single API endpoint can be useful to check for any faulty ones. This ensures that consumers will experience no problems when interacting with the API.
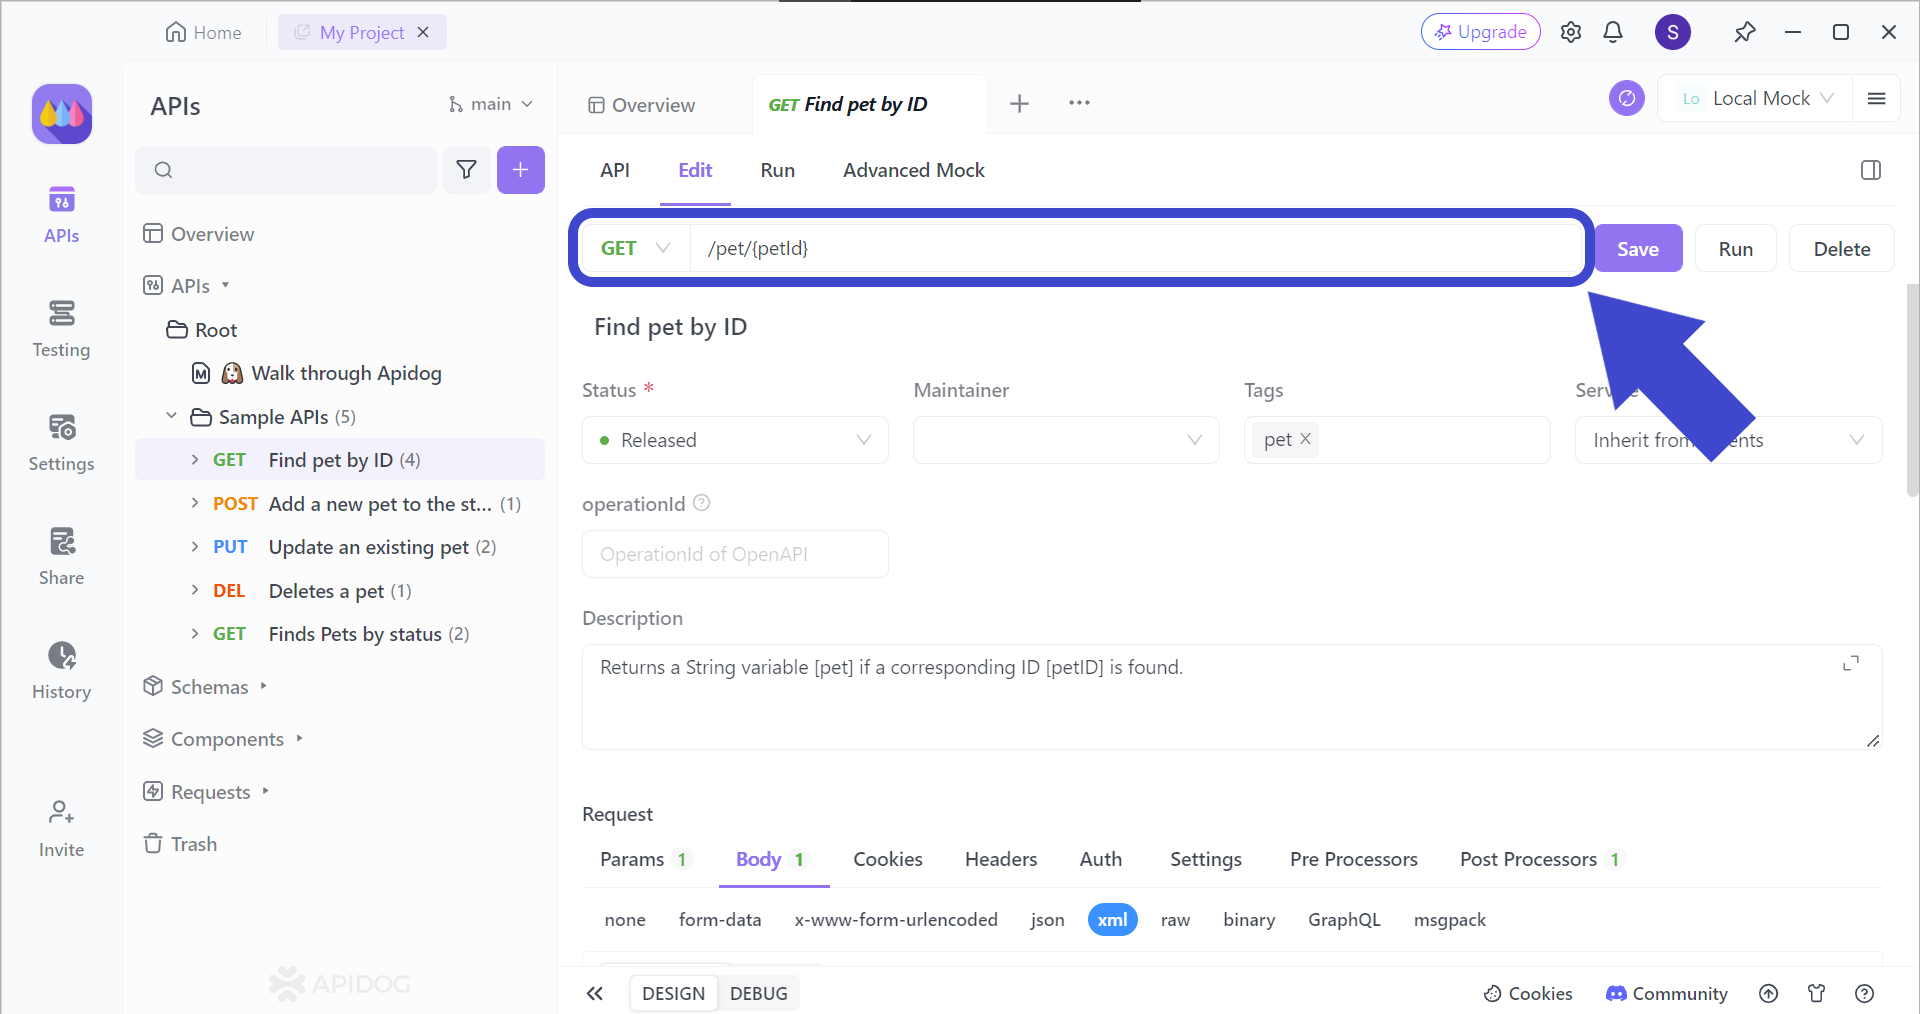
To target the correct API endpoint, you first have to insert the corresponding API endpoint that you want to test. Once you have included the intended API URL, include the parameters that you want to use for the endpoint (if relevant).
In case you are unfamiliar with passing multiple parameters in an API URL, check out this article to find out how you can specifically target a resource inside a rich collection of data!
Create Multiple-Step Testing Scenarios for Your Flask API Using Apidog
Ensure that your Flask APIs can run through various kinds of scenarios! There are countless different types of conditions an API can encounter, which can be impossible for developers to think of. Therefore, you can rely on Apidog to help you cover the testing phase using testing scenarios!
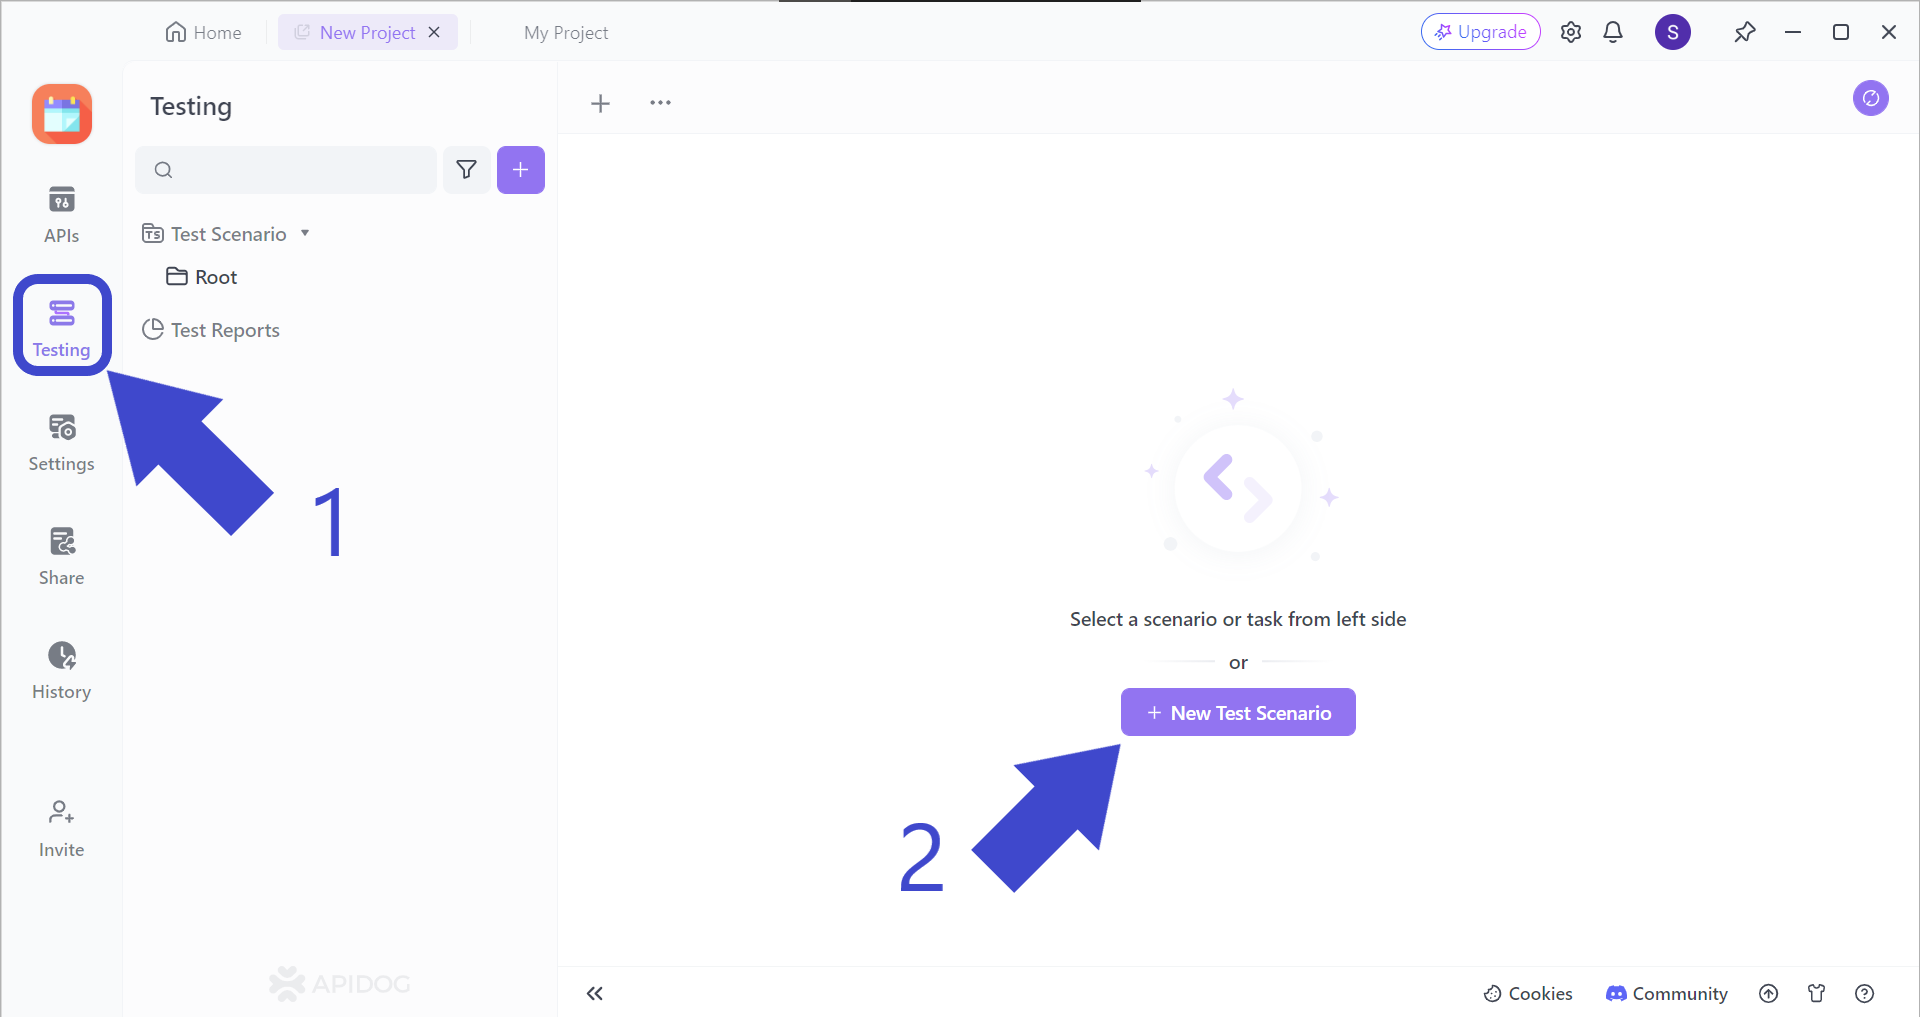
Firstly, hit the Testing button, followed by the + New Test Scenario button.
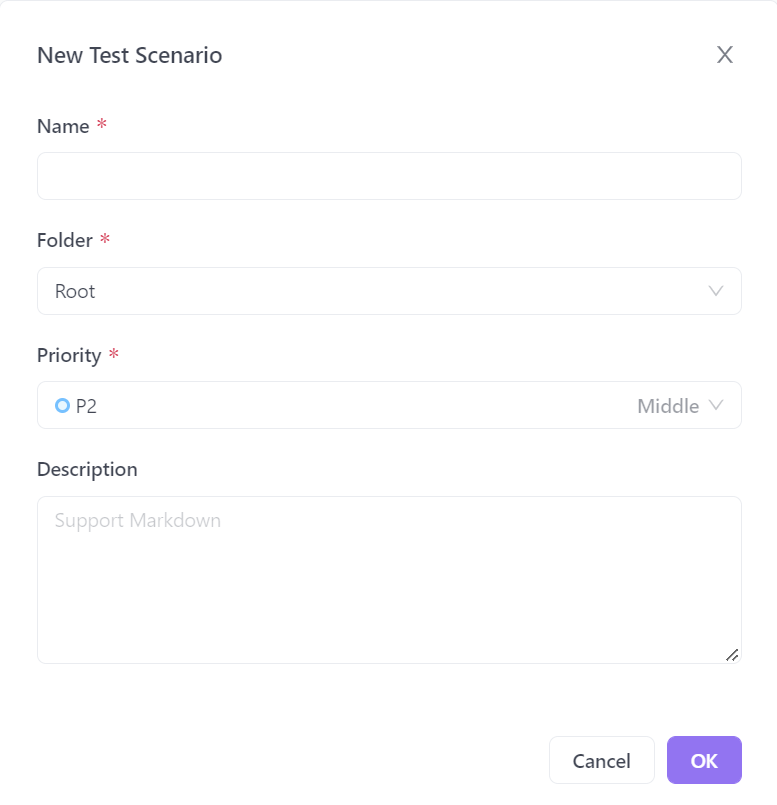
Apidog will prompt you to fill in the details for your new test scenario. Make sure to give it a proper name so its function is predictable.
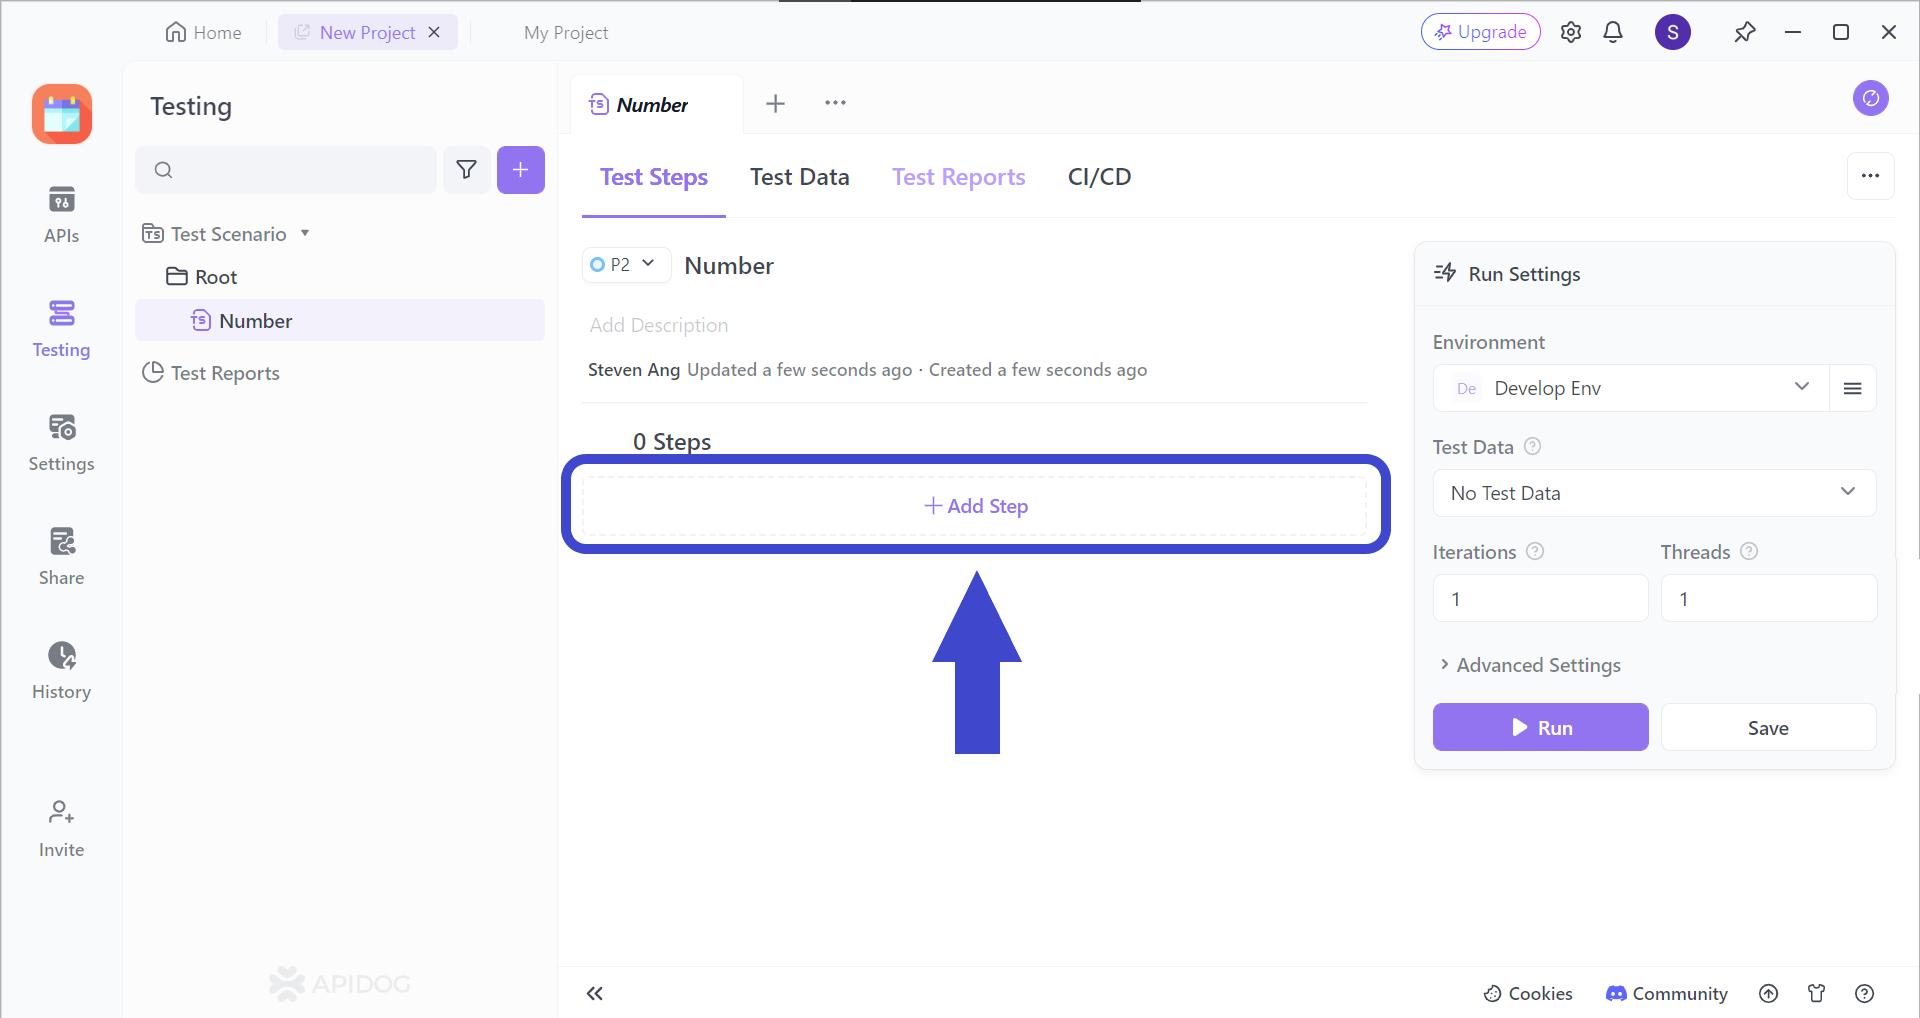
Continue by adding a step (or many more steps) to your test scenarios by clicking on the Add Step section. You should be able to see the image below.
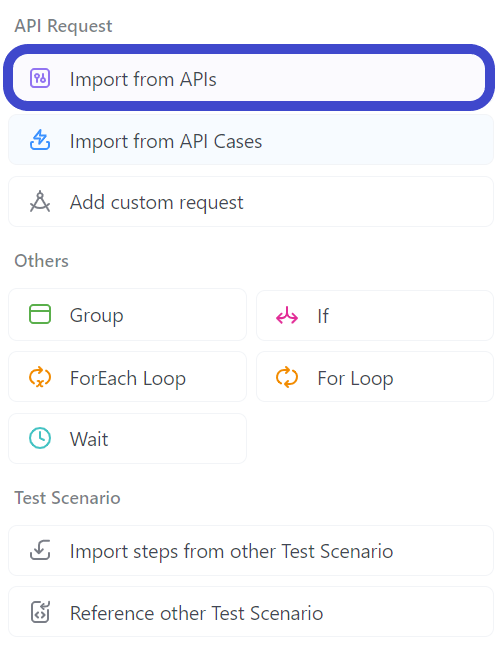
Select "Import from API" from the drop-down menu.

Next, select all the APIs you would like to include in your test scenario. In the example above, the API called NumberConversionSOAP has been included.
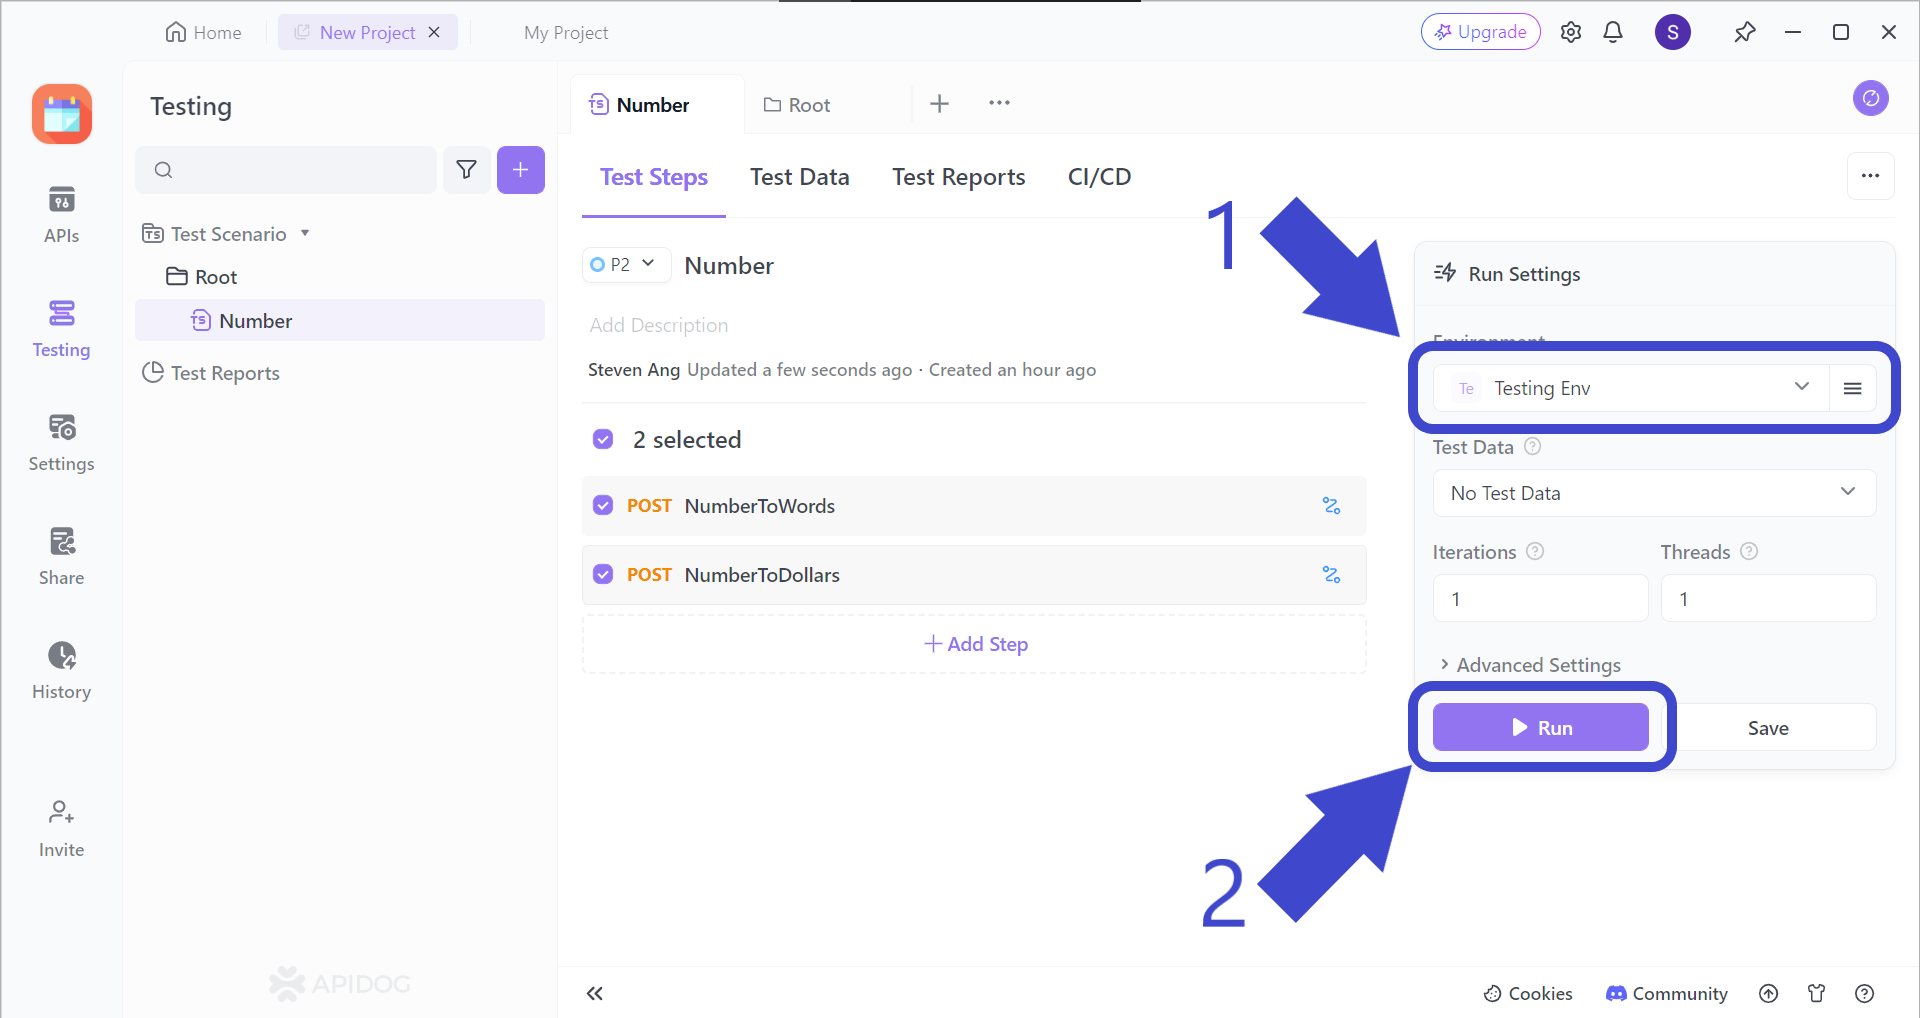
Before hitting the Run button to start your test scenario, make sure to change the test scenario environment, which should be Testing Env, as pointed out by Arrow 1.
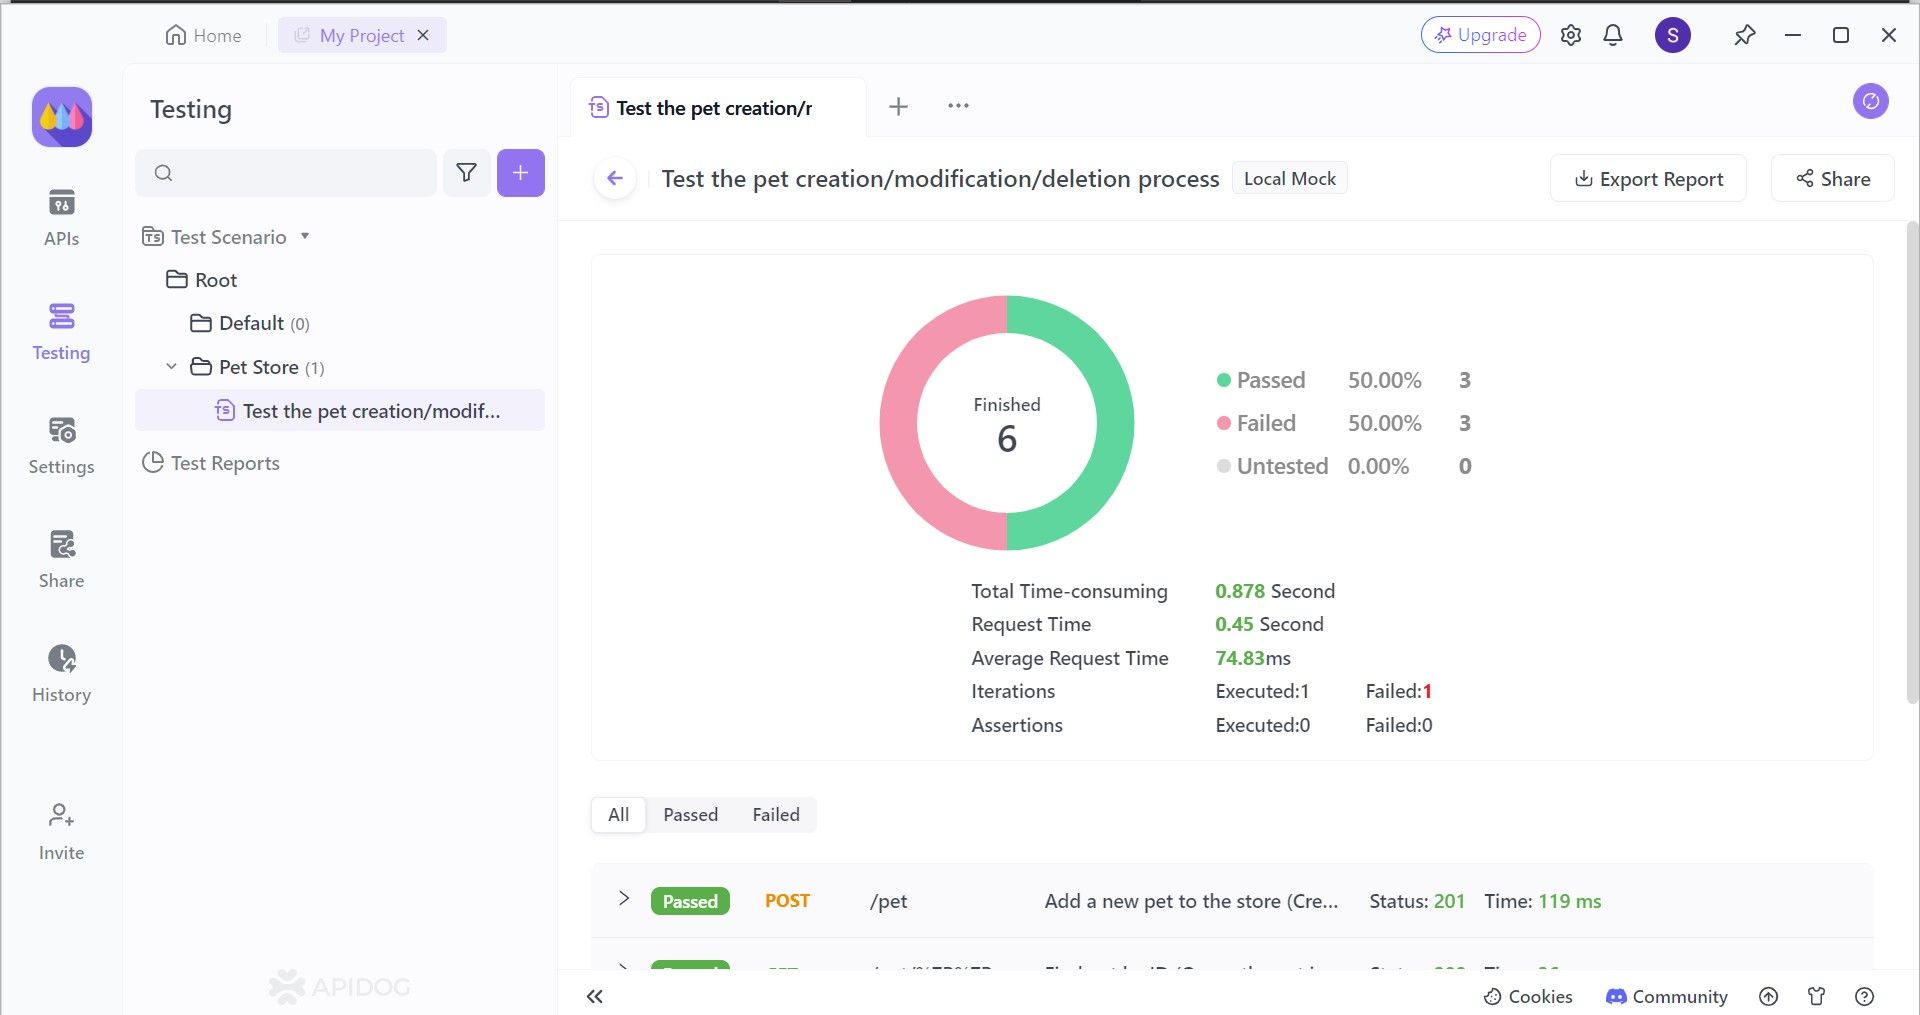
You can get a detailed analysis regarding your API(s) performance, seeing where they lack or excel. By knowing your APIs better, you can therefore assess what you need to do next in your next phase of API development.
Conclusion
Flasgger emerges as a powerful tool for streamlining Flask API development. By automating API documentation generation and integrating the user-friendly Swagger UI, Flasgger empowers developers to save significant time and effort. This translates to faster development cycles, improved API quality, and enhanced collaboration between developers and API consumers.
For Flask developers seeking to streamline their workflow and create well-documented, interactive APIs, Flasgger is a valuable asset. Its open-source nature and growing community further solidify its position as a must-have tool in the Flask API development toolkit.
To ensure that your Flask APIs are industry-level and publish-ready, make sure to run it through Apidog. Apidog can provide you with essential statistics regarding your API, so ensure that you understand your Flask API thoroughly to provide the best Flask API for your consumers!


