
Heard about Agent Mode in Visual Studio Code? If you're an API developer, backend engineer, or part of a technical team looking to boost productivity, this feature could transform your workflow. VS Code Agent Mode acts as your AI-powered coding assistant—capable of editing files, running commands, and fixing errors automatically, so you can focus on designing robust solutions instead of repetitive tasks.
Whether you're building APIs, testing endpoints, or integrating tools like Apidog to streamline your API lifecycle, leveraging Agent Mode can help you work smarter—not harder.
What Is VS Code Agent Mode? Explained for Developers
VS Code Agent Mode is an advanced feature powered by GitHub Copilot. Unlike traditional code suggestion tools, Agent Mode takes a proactive role: you describe a high-level objective (like “Build a to-do app”), and it automatically plans, edits, runs commands, and corrects mistakes across your project.
Think of it as pair programming with an AI that understands context, manages files, and integrates with tools—making it ideal for both rapid prototyping and iterative improvements.

As of April 10th, 2025, Agent Mode is in active development, introducing capabilities like Model Context Protocol (MCP) support. This allows integration with external tools and data sources, making it a valuable asset for both new and experienced developers.
Why Developers Should Use VS Code Agent Mode
VS Code Agent Mode can help you:
- Automate Multi-Step Tasks: Describe what you need—Agent Mode handles the details.
- Catch and Fix Errors: Instantly identifies and resolves syntax or test failures.
- Leverage Powerful Tools: Integrates with MCP servers, extensions, and built-in VS Code utilities.
- Maintain Full Control: You review and approve every change before it’s applied.
For teams building and testing APIs—especially when using tools like Apidog, a comprehensive Postman alternative—Agent Mode accelerates routine development and frees you to focus on architectural decisions.
Want to go deeper into MCP? Check out our VSCode MCP Server tutorial for setup and advanced troubleshooting.
Apidog Blog
Ashley Goolam

How to Set Up VS Code Agent Mode: Quick Start
Getting Agent Mode running in your VS Code environment is straightforward. Here’s how:
1. Update VS Code
Ensure you're using the latest VS Code version that supports Agent Mode.
- Download the latest Stable or Insiders build from code.visualstudio.com.
2. Enable Agent Mode
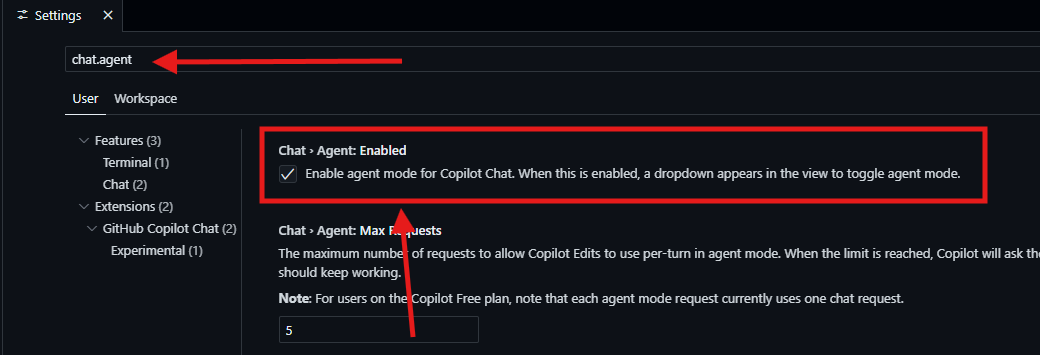
Agent Mode might not be enabled by default.
- Open VS Code.
- Press
Ctrl + ,(orCmd + ,on Mac) to open Settings. - Search for
chat.agent.enabledand enable it.
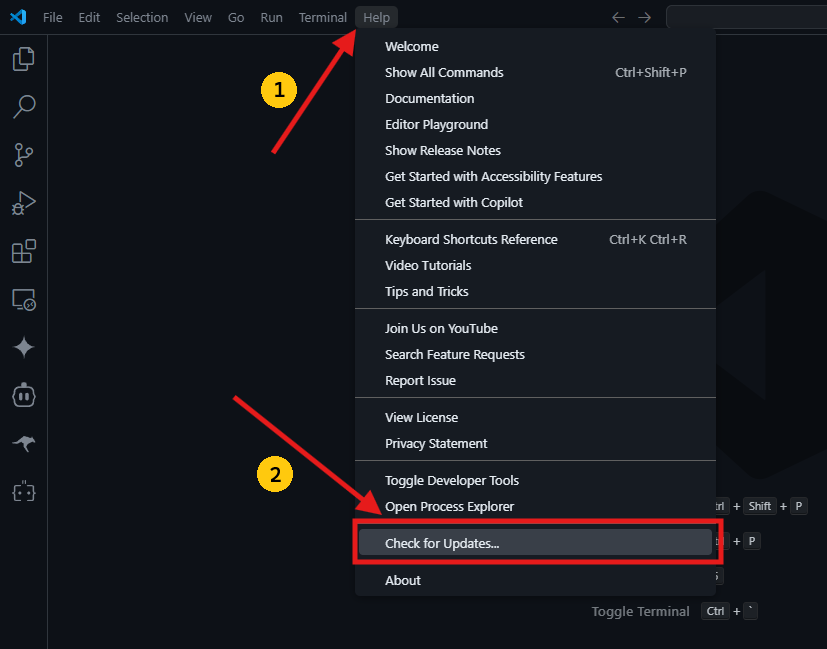
If you don’t see the option, update VS Code and reload. You can also check for updates via Help > Check for Updates.
Tip: As Agent Mode becomes widely available, this toggle may disappear or be on by default.
3. Sign In to GitHub
Agent Mode is powered by GitHub Copilot, requiring a Copilot subscription.
- Click the Copilot icon in the sidebar or use
Ctrl+Shift+I(Cmd+Shift+Ion Mac). - Sign in with your GitHub account.
- Subscribe to Copilot if you haven’t already.
4. Open Chat View & Select Agent Mode
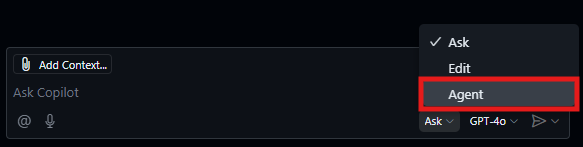
- Open the Copilot Chat view (
Ctrl+Shift+I/Cmd+Shift+I). - Locate the mode dropdown at the bottom of the chat input—it may show “Ask,” “Edit,” or “Agent.”
- Select “Agent” to activate Agent Mode.

You’re now ready to use Agent Mode in VS Code!
Practical Example: Building a React To-Do App with Agent Mode
Let’s see how Agent Mode works with a simple React to-do app.
1. Give Agent Mode a Task
In the Chat view (Agent Mode selected), enter:
Create a simple React to-do application. It should have an input field to add tasks and display the list of tasks.
Hit Enter—Agent Mode determines which files to create and modify.
2. Review the Agent’s Plan
Agent Mode outlines its steps, such as:
- Setting up the React project structure
- Creating
App.jsfor state management - Adding
TodoForm.jsfor input - Creating
TodoList.jsfor display
It may propose commands like npm init react-app if starting from scratch.
3. Approve Tool Operations
When Agent Mode needs to run terminal commands (e.g., npm install react react-dom), you’ll get prompts:
- Click “Continue” to approve or adjust commands.
- Optionally, auto-approve tools for the session via a dropdown.
0
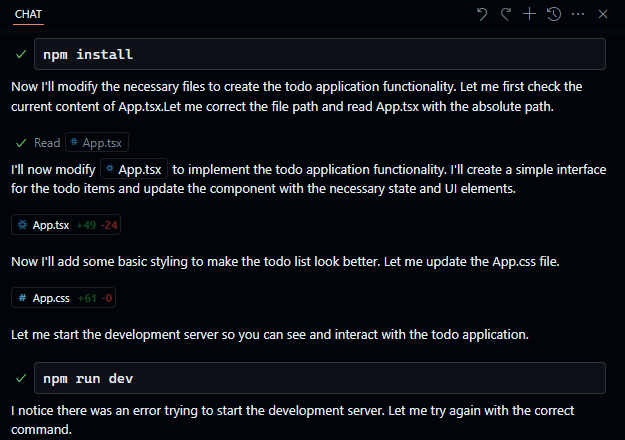
4. Review and Accept Edits
Agent Mode streams code changes into your editor, showing overlays with diffs:
- Updated
App.jswith React state - New
TodoForm.jsandTodoList.jscomponents
Navigate changes, then “Accept” or “Discard” as needed. The Chat view summarizes file changes for easy tracking.
1
5. Iterate and Refine
Need more functionality? Type, for example:
Add functionality to mark tasks as complete when clicked and change the font color to black for tasks added to the todo list.
2
Agent Mode analyzes your request, proposes code changes, runs tests (if set up), and applies updates—continuing until you’re satisfied.
Mastering Agent Mode: Pro Tips for Developers
- Be Specific: Clear prompts yield better results. Instead of “Make an app,” try “Add a dark mode toggle using Context API.”
- Use Tool Syntax: Guide Agent Mode with
#terminal,#codebase, or#fetchtags. - Control the Process: Pause or cancel Agent Mode if it’s off-target; accept only the changes you want.
- Undo/Redo: Use “Undo Last Edit” to roll back, or “Redo Last Edit” to restore.
- Customize Settings: Adjust options like
chat.agent.maxRequestsorgithub.copilot.chat.agent.runTasksin Settings for finer control.
3
4
5
Agent Mode vs. Edit Mode: Which Should Developers Use?
- Agent Mode: Ideal for complex or multi-step tasks—like building features, refactoring modules, or managing files.
- Edit Mode (Inline Chat): Best for targeted changes within a single file or function.
If you’re unsure of all the files or steps required, let Agent Mode handle it. For precise, localized edits, use Edit Mode.
Explore more MCP server integrations at HiMCP.ai.
Conclusion: Supercharge Your Workflow with Agent Mode
VS Code Agent Mode is a breakthrough for developers—especially those building and testing APIs. By delegating multi-step coding tasks to Copilot, you can focus on architecture, problem-solving, and reviewing code quality.
If you're working with API-based applications, integrating tools like Apidog ensures your testing and development process stays seamless as you automate more with Agent Mode.
Ready to try it? Update VS Code, activate Copilot, switch to Agent Mode, and put it to work on your next project.


