
Claude Code represents the future of AI-assisted development. Unlike traditional AI tools that work with isolated code snippets, Claude Code integrates directly into your development environment—seeing your entire codebase, understanding your project structure, and making suggestions that actually fit your existing patterns.
While Claude Code typically requires a paid subscription, there's a proven way to access this powerful tool without spending a dime. This guide will show you exactly how to claim $100+ in free Claude Code credits.
Get $100+ Free Claude Code Credits from Anyrouter (No Credit Card Needed)
Looking to explore Claude Code’s advanced AI coding features without spending a dime? Now’s your chance. Anyrouter is running a limited-time promotion that lets you claim $100+ in free credits—perfect for testing, building, and scaling your projects.
Here’s how the Anyrouter offer works:
Step 1: Get $50 Instantly Upon Signing Up
Go to the official Anyrouter registration page and sign up using your GitHub account. No credit card required—just a quick sign-up and you’ll receive $50 in free credits instantly.

Step 2: Invite Friends to Earn More
After signing up, visit the Wallet page on Anyrouter and copy your personal referral link. For every friend you invite who signs up, both you and your friend will receive an extra $50 in credits.

There’s no limit to how many friends you can invite—keep sharing and keep earning!
Pro Tip: You can use a second email to create another account and refer yourself to easily collect the full $100!
Important: This free credit promotion is time-limited and may end at any moment. It’s first come, first served—register now to claim your credits.
Step-by-Step: How to Use Claude Code for Free
Let’s break down the process so you can get started in minutes.
Step 1. Install Node.js (Version 18+)
Claude Code runs on Node.js. If you don’t have it yet, you need to download first:
For Ubuntu/Debian:
curl -fsSL https://deb.nodesource.com/setup_lts.x | sudo bash -
sudo apt-get install -y nodejs
node --version
For macOS:
sudo xcode-select --install
/bin/bash -c "$(curl -fsSL https://raw.githubusercontent.com/Homebrew/install/HEAD/install.sh)"
brew install node
node --version
Step 2. Install Claude Code Globally
npm install -g @anthropic-ai/claude-code
claude --version
Step 3. Get Your Free Auth Token
- Register with your GitHub account (see above for the $50 credit link).
- Go to the
API Tokenpage and click AddAdd Tokento generate yourANTHROPIC_AUTH_TOKEN(starts withsk-).

Step 4. Run Command in Your Project Folder
cd your-project-folder
export ANTHROPIC_AUTH_TOKEN=sk-...
export ANTHROPIC_BASE_URL=https://anyrouter.top
claude
Follow the prompts to choose your theme, confirm safety, and trust your working directory. You’re now ready to code with Claude—completely free.

Step 5. Configure Environment Variables (Recommended)
To avoid repeating input each time, you can write environment variables to bash_profile and bashrc:
echo -e '\n export ANTHROPIC_AUTH_TOKEN=sk-...' >> ~/.bash_profile
echo -e '\n export ANTHROPIC_BASE_URL=https://anyrouter.top' >> ~/.bash_profile
echo -e '\n export ANTHROPIC_AUTH_TOKEN=sk-...' >> ~/.bashrc
echo -e '\n export ANTHROPIC_BASE_URL=https://anyrouter.top' >> ~/.bashrc
echo -e '\n export ANTHROPIC_AUTH_TOKEN=sk-...' >> ~/.zshrc
echo -e '\n export ANTHROPIC_BASE_URL=https://anyrouter.top' >> ~/.zshrc
Step 6. Restart Claude Code
Restart the terminal and start Claude:
cd your-project-folder
claude
And the Claude Code is now ready to use for free.
Troubleshooting: Common Issues & Solutions
- Invalid API Key: Double-check your environment variables.
- Offline Status: Claude Code checks Google for connectivity. Use a VPN or proxy if needed.
- Fetch Failures: Ensure you have a stable international connection and try the backup endpoint:
export ANTHROPIC_BASE_URL=https://pmpjfbhq.cn-nb1.rainapp.topThis guide is for educational purposes. Always respect platform terms and use community resources responsibly.
Supercharge AI-coding Workflow: Integrate Apidog MCP Server
While Claude Code is a powerful AI assistant, you can take your workflow to the next level by connecting it to your API specifications using Apidog MCP Server.
What is Apidog MCP Server?
Apidog MCP Server is the bridge between your API specifications and your AI assistant. It allows tools like Claude Code to:
- Generate or modify code based on your API specs
- Search and analyze API documentation
- Create DTOs, models, and even full MVC code automatically
- Add detailed comments and documentation to your code
Why Apidog?
Apidog is the all-in-one API development platform—design, test, document, and mock APIs in one place. The MCP Server makes your API data accessible to AI, boosting productivity and code quality.
Step-by-Step: Setting Up Apidog MCP Server
Prerequisites
- Node.js 18+ installed
- API specifications
- IDE that supports MCP (Cursor, VS Code with Cline plugin)
Step 1: Prepare Your OpenAPI File
You'll need access to your API definition:
- A URL (e.g.,
https://petstore.swagger.io/v2/swagger.json) - Or a local file path (e.g.,
~/projects/api-docs/openapi.yaml) - Supported formats:
.jsonor.yaml(OpenAPI 3.x recommended)
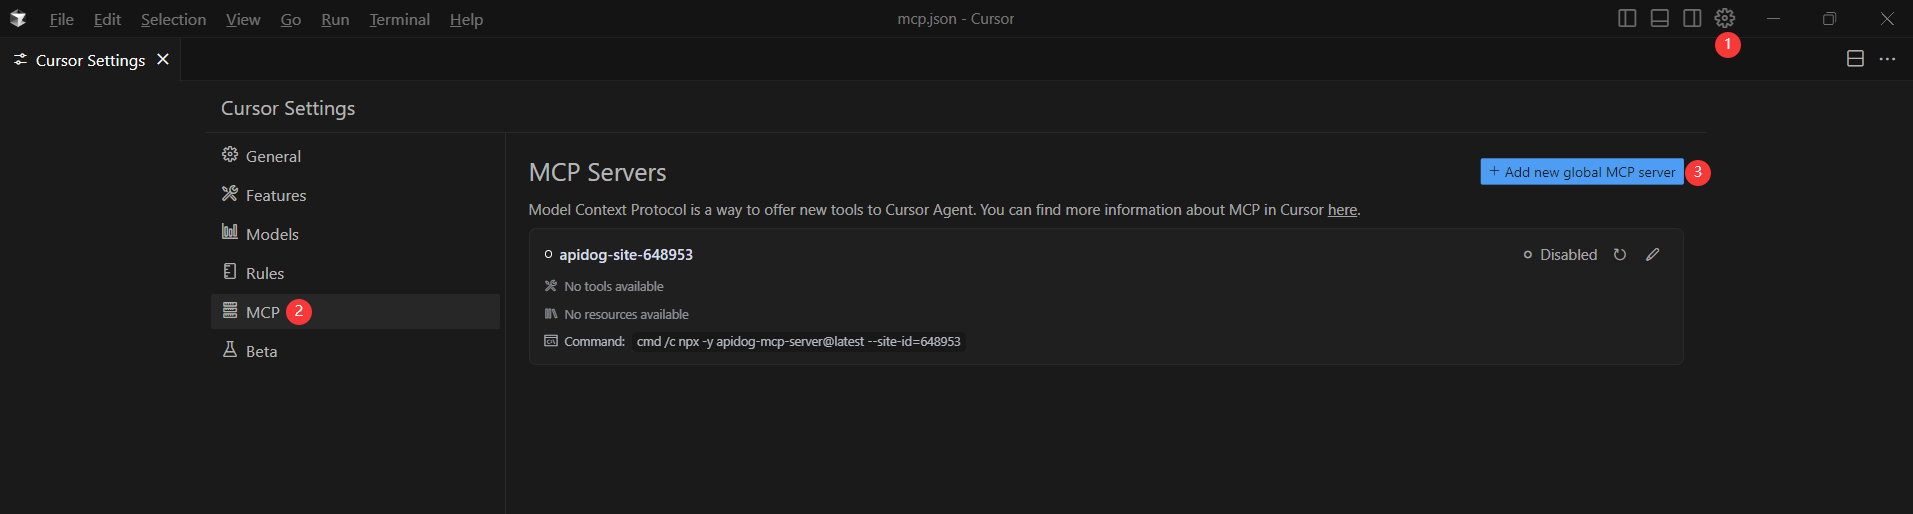
Step 2: Add MCP Configuration to Cursor
You'll now add the configuration to Cursor's mcp.json file.
Remember to Replace <oas-url-or-path> with your actual OpenAPI URL or local path.
- For MacOS/Linux:
{
  "mcpServers": {
    "API specification": {
      "command": "npx",
      "args": [
        "-y",
        "apidog-mcp-server@latest",
        "--oas=https://petstore.swagger.io/v2/swagger.json"
      ]
    }
  }
}
For Windows:
{
  "mcpServers": {
    "API specification": {
      "command": "npx",
      "args": [
        "-y",
        "apidog-mcp-server@latest",
        "--project=YOUR_PROJECT_ID"
      ],
      "env": {
        "APIDOG_ACCESS_TOKEN": "YOUR_ACCESS_TOKEN"
      }
    }
  }
}
Step 3: Test the Connection
Ask your AI assistant:
Please fetch API specification via MCP and tell me how many endpoints exist in the projectIf you get a valid response, you’re connected!
Real-World Use Cases:
- Rapid API Client Generation:
"Use Apidog MCP Server to fetch the API specification and generate Python client code for all endpoints." - Automated Code Updates:
"Based on the API specification, update the User DTO with the new fields." - Instant Documentation:
"Add detailed comments for each field in the Product class based on the API specification."
Conclusion: Don’t Miss Out on Free Claude Code + Apidog Power
In the rapidly changing landscape of AI development, opportunities like this don’t last. With more than $100 in free Claude Code credits and the seamless integration of Apidog MCP Server, you can indulge in a truly modern, efficient, and intelligent development workflow—at zero cost.
Why wait?
- Claim your free credits now
- Set up Claude Code and Apidog MCP Server
- Experience the future of API development today
Ready to build smarter? Sign up for Apidog now and unlock the full potential of AI-powered coding.


