If you've ever stared at a 200-line OpenAPI (formerly Swagger) spec and thought, "Great… now I have to manually recreate every endpoint in Postman?" stop right there. You're not alone, and more importantly, you don't have to do that anymore.
Modern API tooling has evolved far beyond copy-pasting endpoints into a client. Today, you can import your Swagger or OpenAPI file once and automatically generate fully functional API requests, complete with example bodies, headers, authentication, and even validation rules. And the best part? It’s faster, more accurate, and dramatically less error-prone.
If you're a developer, tester, or product manager who works with APIs, mastering this workflow is a superpower that will save you countless hours and reduce errors.
Now, let's walk through the entire process, from understanding the spec to executing your first generated request.
Why Importing OpenAPI and Generating Requests Matters
First, let's clear up a common misconception: OpenAPI isn't just documentation. It's a machine-readable contract that defines every aspect of your API endpoints, parameters, request/response schemas, error codes, security schemes, and more.
When you treat it as a source of truth rather than a static output, you unlock superpowers:
- Auto-generated tests: No more writing boilerplate requests by hand.
- Realistic mocking: Spin up a mock server that behaves exactly like your real API.
- Always-accurate documentation: Docs update automatically when the spec changes.
- Faster frontend development: Frontend teams can start building before the backend is ready.
- Fewer integration bugs: Everyone works from the same contract.
But none of this happens if your OpenAPI file just sits in a repo gathering digital dust. You need a tool that understands OpenAPI deeply and translates it into actionable workflows.
That’s the magic of importing and request generation and it’s easier than you think.
Understanding Your Starting Point: The OpenAPI Specification
First, let's clarify some terms. OpenAPI is the open standard (formerly known as Swagger) for describing RESTful APIs. A Swagger/OpenAPI specification (or "spec") is a YAML or JSON file that conforms to this standard. It's a machine-readable contract that defines exactly how an API works.
A basic spec includes:
openapi: 3.0.0- The version of the OpenAPI specification.info- Metadata like the API's title, version, and description.servers- The base URL(s) for the API.paths- The available endpoints (like/usersor/products/{id}) and the HTTP methods (GET, POST, etc.) they support.components- Reusable schemas (data models for requests and responses) and security definitions.
Your journey begins when you receive a file named something like openapi.yaml, swagger.json, or api-spec.yml.
Step 1: Get Your OpenAPI Spec Ready
Before you import anything, make sure your OpenAPI file is valid and well-structured.
OpenAPI specs come in two formats:
- YAML (
.yamlor.yml) – human-readable, widely used - JSON (
.json) – machine-friendly, more verbose
Both are supported by modern tools like Apidog. But YAML is generally preferred for authoring because it’s cleaner and easier to diff in Git.
Pro Tips for a Healthy Spec:
- Use reusable components (
components/schemas,components/parameters) to avoid duplication. - Include example values for request bodies and responses—these become your auto-generated test data.
- Define security schemes clearly (e.g.,
Bearer,ApiKey,OAuth2). - Validate your spec using tools like Swagger Editor or
spectral.
Step 2: Choose the Right Tool to Import and Generate Requests
Not all API clients handle OpenAPI the same way. Some only read basic paths. Others fully interpret schemas, examples, and security.
Here’s what to look for in a tool:
- Supports OpenAPI 3.0+ (ideally 3.1)
- Preserves examples and uses them in generated requests
- Maps security schemes to authentication workflows
- Generates collections or folders organized by tags
- Allows bidirectional sync (update spec → update requests, and vice versa)
While tools like Postman and Insomnia offer OpenAPI import, Apidog stands out because it treats the spec as a living document, not a one-time import.
More on that soon. First, let's walk through the universal import process.
Step 3: Import Your OpenAPI File (The Universal Way)
Most modern API tools follow a similar flow:
- Open your API client (e.g., Apidog, Postman, etc.)
- Look for "Import" or "Create from OpenAPI"
- Upload your
.yamlor.jsonfile (or paste a URL if hosted) - Wait for the tool to parse and generate requests
But the devil’s in the details. Let’s compare how different tools handle this.
Postman (with caveats)
- Imports OpenAPI into a Collection
- Uses examples if provided
- Does not auto-apply authentication—you’ll need to configure it manually
- No live sync: if you update the spec, you must re-import (and risk losing custom edits)
Insomnia
- Imports into a Document
- Good support for examples and schemas
- Can link to a Git-hosted spec for semi-automated updates
- Still requires manual environment setup for auth
Apidog (the smooth way)
- One-click import from file, URL, or direct paste
- Auto-detects and configures authentication based on your
securitySchemes - Preserves all examples and populates request bodies/params
- Organizes endpoints by OpenAPI tags into folders
- Enables two-way sync: edit a request in Apidog, and it can update the underlying spec (optional)
Real-world win: In Apidog, if your OpenAPI defines a bearer token as security scheme, your generated requests will already have an authorization header field ready for your token, no extra setup.
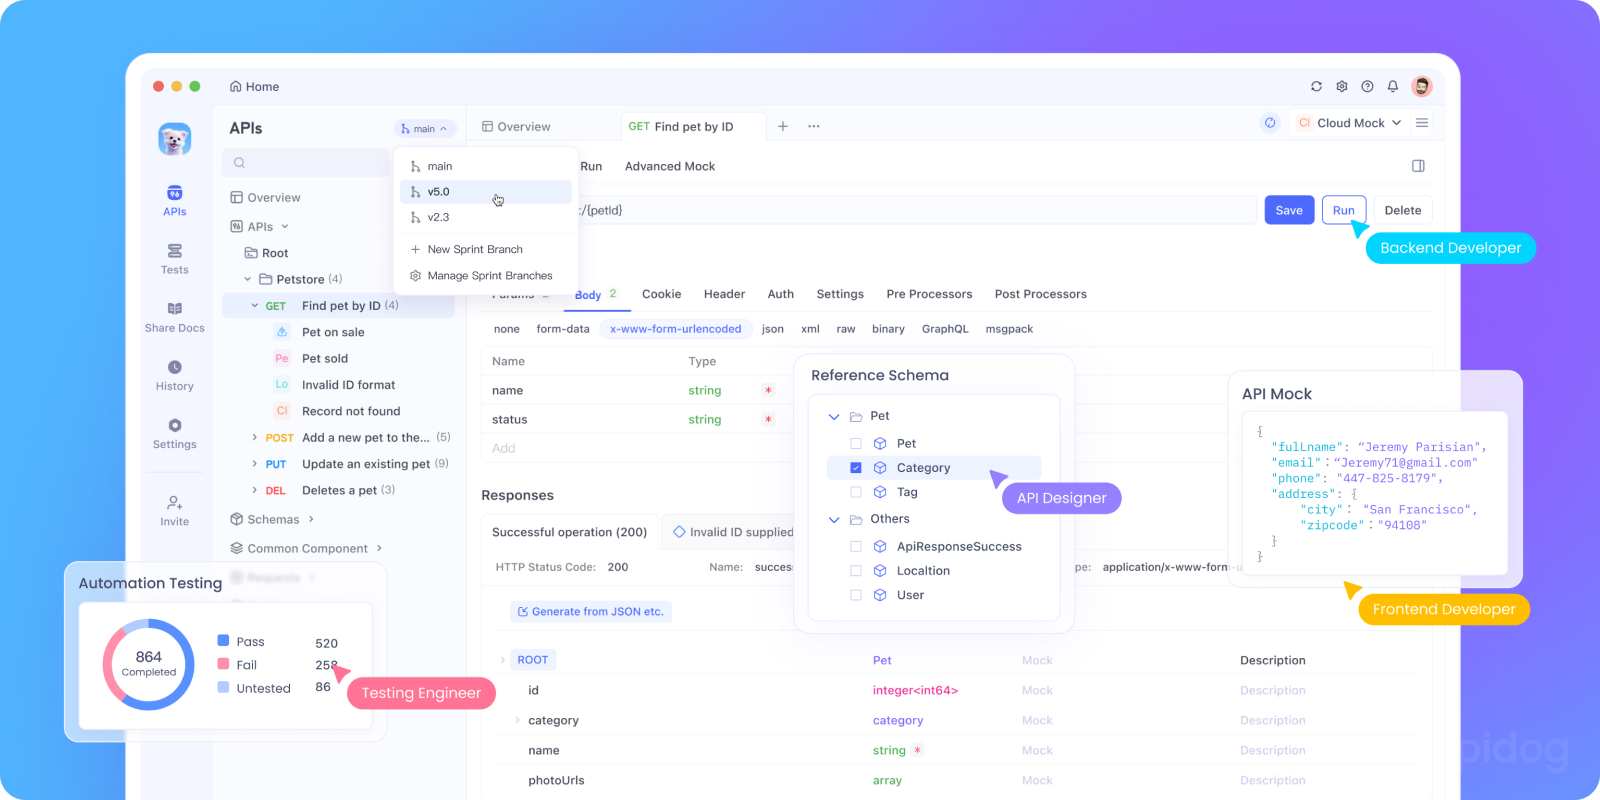
Step 4: Explore Your Auto-Generated Requests
Once imported, your tool should give you a collection of ready-to-send requests.
In Apidog, you’ll see:
- A project named after your API (
info.title) - Folders for each tag (e.g., “Users”, “Orders”)
- Each endpoint has a request with:
- Correct HTTP method (
GET,POST, etc.) - Full URL with path parameters pre-filled (e.g.,
/users/{{userId}}) - Query params as editable fields
- Request body pre-populated with example data from your spec
- Headers (including
Content-Type,Accept, and auth)
This isn’t just a skeleton it’s a fully functional testing suite.
Try it: Click “Send” on a POST /users request. If your spec included an example user payload, it’s already there. No typing. No guessing.
Step 5: Use Environments to Make Requests Dynamic (and Secure)
Hardcoding values like userId = 123 or api_key = "secret123" is a bad idea especially when sharing.
That’s where environments come in.
In Apidog:
- Go to Environments
- Create a new one (e.g., “Staging”)
- Define variables like:
base_url = <https://api.staging.example.com>auth_token = {{your_token_here}}
4. In your requests, replace hardcoded values with {{variable_name}}
Now, your request URL becomes:
{{base_url}}/users/{{userId}}
And your Authorization header:
Bearer {{auth_token}}
Benefits:
- No secrets in your collection
- Switch between dev/staging/prod with one click
- Share collections without exposing credentials
Apidog even lets you mask sensitive variables so they’re hidden in logs and shared views critical for team security.
Step 6: Generate a Mock Server (So Frontend Teams Don’t Wait)
One of the coolest things you can do with an OpenAPI spec? Spin up a mock API in seconds.
In Apidog:
- Open your imported project
- Click “Mock” in the sidebar
- Enable the mock server
- Start sending requests to the mock URL
The mock server:
- Returns example responses from your spec
- Validates request formats
- Simulates delays, errors, and status codes
- Updates automatically when you update the spec
This means your frontend team in another time zone can start building against realistic data today, not “when the backend is ready.”
Real impact: A mobile dev in Tokyo can build the user profile screen using mock data while the backend team in Berlin finishes the real implementation. Zero blockers.
Step 7: Keep Your Spec and Requests in Sync (Avoid Drift)
Here’s the silent killer of API workflows: drift.
Your OpenAPI says one thing. Your actual API (or your testing collection) does another. Chaos ensues.
To prevent this, you need sync not just import.
Apidog offers two-way synchronization:
- Spec → Requests: When the OpenAPI file updates, Apidog can merge changes into your existing collection (preserving your custom tests or comments).
- Requests → Spec: If you discover a missing field during testing, you can update the request in Apidog and push the change back to the spec.
Best Practice: Treat your OpenAPI spec as executable design. Every bug found in testing should either fix the code or update the spec never both independently.
Beyond Basics: Advanced Workflows and Best Practices
Handling Updates: Re-importing and Syncing
APIs evolve. When you get a new version of the spec file, you don't want to start from scratch. Advanced tools like Apidog offer solutions:
- Smart Merge: Re-import the updated spec. The tool can attempt to merge changes, updating existing requests while preserving your customizations (like saved examples or authentication settings).
- Comparison: Some tools can show a diff between the old and new spec, highlighting what endpoints were added, modified, or removed.
From Requests to Automated Tests
Your generated requests are the perfect foundation for an automated test suite. Once you've verified a request works, you can:
- Add Assertions: Tell the tool what to expect in the response (e.g., status code
200, a JSON schema match, a specific value in the body). - Create Test Scenarios: Chain requests together. For example:
POST /users(create) -> save the user ID from the response ->GET /users/{{userId}}(verify) ->DELETE /users/{{userId}}(cleanup). - Run in CI/CD: Export these tests as a collection and run them automatically in your deployment pipeline to ensure API integrations never break.
Generating More Than Just Requests
While generating requests is our focus, remember that the OpenAPI spec is a multi-purpose source. From it, you can also generate:
- Beautiful, Interactive Documentation: Tools like Swagger UI and Apidog's own docs feature can render the spec as a developer-friendly documentation portal.
- Mock Servers: Instantly create a fake API that returns realistic example responses. This allows frontend and backend teams to work in parallel.
- Client Code: Generate SDKs in Python, JavaScript, Java, etc., to use in your application.
Common Pitfalls (and How to Avoid Them)
Even with great tooling, teams stumble. Watch out for these traps:
Pitfall 1: Importing a Broken or Incomplete Spec
If your OpenAPI lacks examples or has invalid schemas, your generated requests will be useless.
Fix: Validate your spec first. Use spectral lint openapi.yaml or the Swagger Editor.
Pitfall 2: Not Using Environments
Hardcoded URLs or tokens leak when you share collections.
Fix: Always use {{base_url}} and {{auth_token}} with environment variables.
Pitfall 3: One-and-Done Import
You import once, then never update leading to drift.
Fix: Use tools like Apidog that support live spec linking or scheduled syncs.
Pitfall 4: Ignoring Security Schemes
Your spec defines OAuth2, but your tool doesn’t apply it.
Fix: Use a tool that interprets security schemes (like Apidog) and auto-configures auth.
Why Apidog Is the Best Choice for OpenAPI Workflows
Let’s be clear: many tools claim OpenAPI support. But few deliver a complete, collaborative, and secure workflow.
Apidog excels because it:
- Imports flawlessly: Handles complex schemas, examples, and security
- Generates smart requests: With real data, not placeholders
- Mocks instantly: One click to a realistic server
- Syncs bidirectionally: Avoid drift without manual work
- Collaborates securely: Role-based access, masked variables, audit logs
- Documents automatically: Publish beautiful, interactive docs from your spec
And this is huge it’s free to download and use, even for teams. No “Pro” paywall for core features like import, mock, or collaboration.
Ready to turn your OpenAPI spec into a living API workspace? Download Apidog for free and import your first spec today. You’ll wonder how you ever debugged APIs any other way.
Conclusion: Unlocking API Productivity
The ability to import a Swagger/OpenAPI specification and instantly generate working API requests transforms a daunting integration task into a streamlined, efficient process. It bridges the gap between abstract documentation and tangible, executable code.
This workflow embodies the modern "API-first" philosophy, where the contract is the foundation for all subsequent development and testing. By leveraging tools designed for this purpose especially comprehensive platforms like Apidog, you empower yourself and your team to work faster, more accurately, and with greater confidence.
So, the next time you receive an openapi.yaml file, don't open it in a text editor and start typing requests by hand. Import it. Generate your requests. And start building on a foundation of automation and precision.