
Meet Suna AI: The Open Source Generalist Agent Developers Can Run Anywhere
The next evolution of AI isn’t just smarter chatbots—it’s autonomous agents that translate natural language into real-world digital tasks. Suna AI stands out in this emerging field as a fully open-source, general-purpose AI agent. Built by Kortix AI and licensed under Apache 2.0, Suna AI acts as a digital assistant you can control, customize, and self-host for maximum privacy and flexibility.
For API developers, backend engineers, QA teams, and technical leads, Suna offers a unique combination: conversational interface, robust tool orchestration, and direct integration with APIs and automation workflows. Whether you want to automate web tasks, handle files, or connect with external systems, Suna bridges the gap between your instructions and digital action—all in your own environment.
💡 Looking for a way to generate beautiful API Documentation, streamline team collaboration, and optimize your API workflow? Apidog delivers a unified platform for API development, testing, and docs—replacing Postman at a more affordable price.
What Is Suna AI? Core Capabilities Explained
Suna AI functions as an extensible agent that can interpret your instructions and execute complex workflows. Its power comes from combining several developer-focused tools:
-
Browser Automation (Playwright):
Suna can launch a browser inside a secure container to navigate sites, log in, click, scrape, and extract structured data.
Example: Automate login and data extraction from internal dashboards. -
File Management:
Within its sandbox, Suna can create, read, edit, and organize files and directories.
Example: Generate project reports or process uploaded CSVs during test automation. -
Web Crawling & Enhanced Search:
Suna can crawl multiple pages and connect with external search APIs (e.g., Tavily) for deep research.
Example: Aggregate competitor data or technical documentation for analysis. -
Command-Line Execution:
All shell commands run isolated in a Docker container, letting Suna build, test, or deploy code securely.
Example: Trigger CI jobs or run custom Python scripts on demand. -
API Integration (RapidAPI & Direct):
Suna calls any RESTful API—useful for fetching data, triggering workflows, or integrating with SaaS.
Example: Pull data from LinkedIn, finance APIs, or custom microservices. -
Code Interpretation:
Suna can generate and execute Python code snippets on the fly for data processing and logic.
Example: Run quick data transformations or proof-of-concept algorithms.
How Suna Works:
When given a prompt, Suna intelligently sequences these tools. For instance, “Get recent posts from a website, summarize them, and save as CSV” triggers browsing, scraping, text summarization (with code), and file export—all hands-free.
Suna AI Architecture: Under the Hood
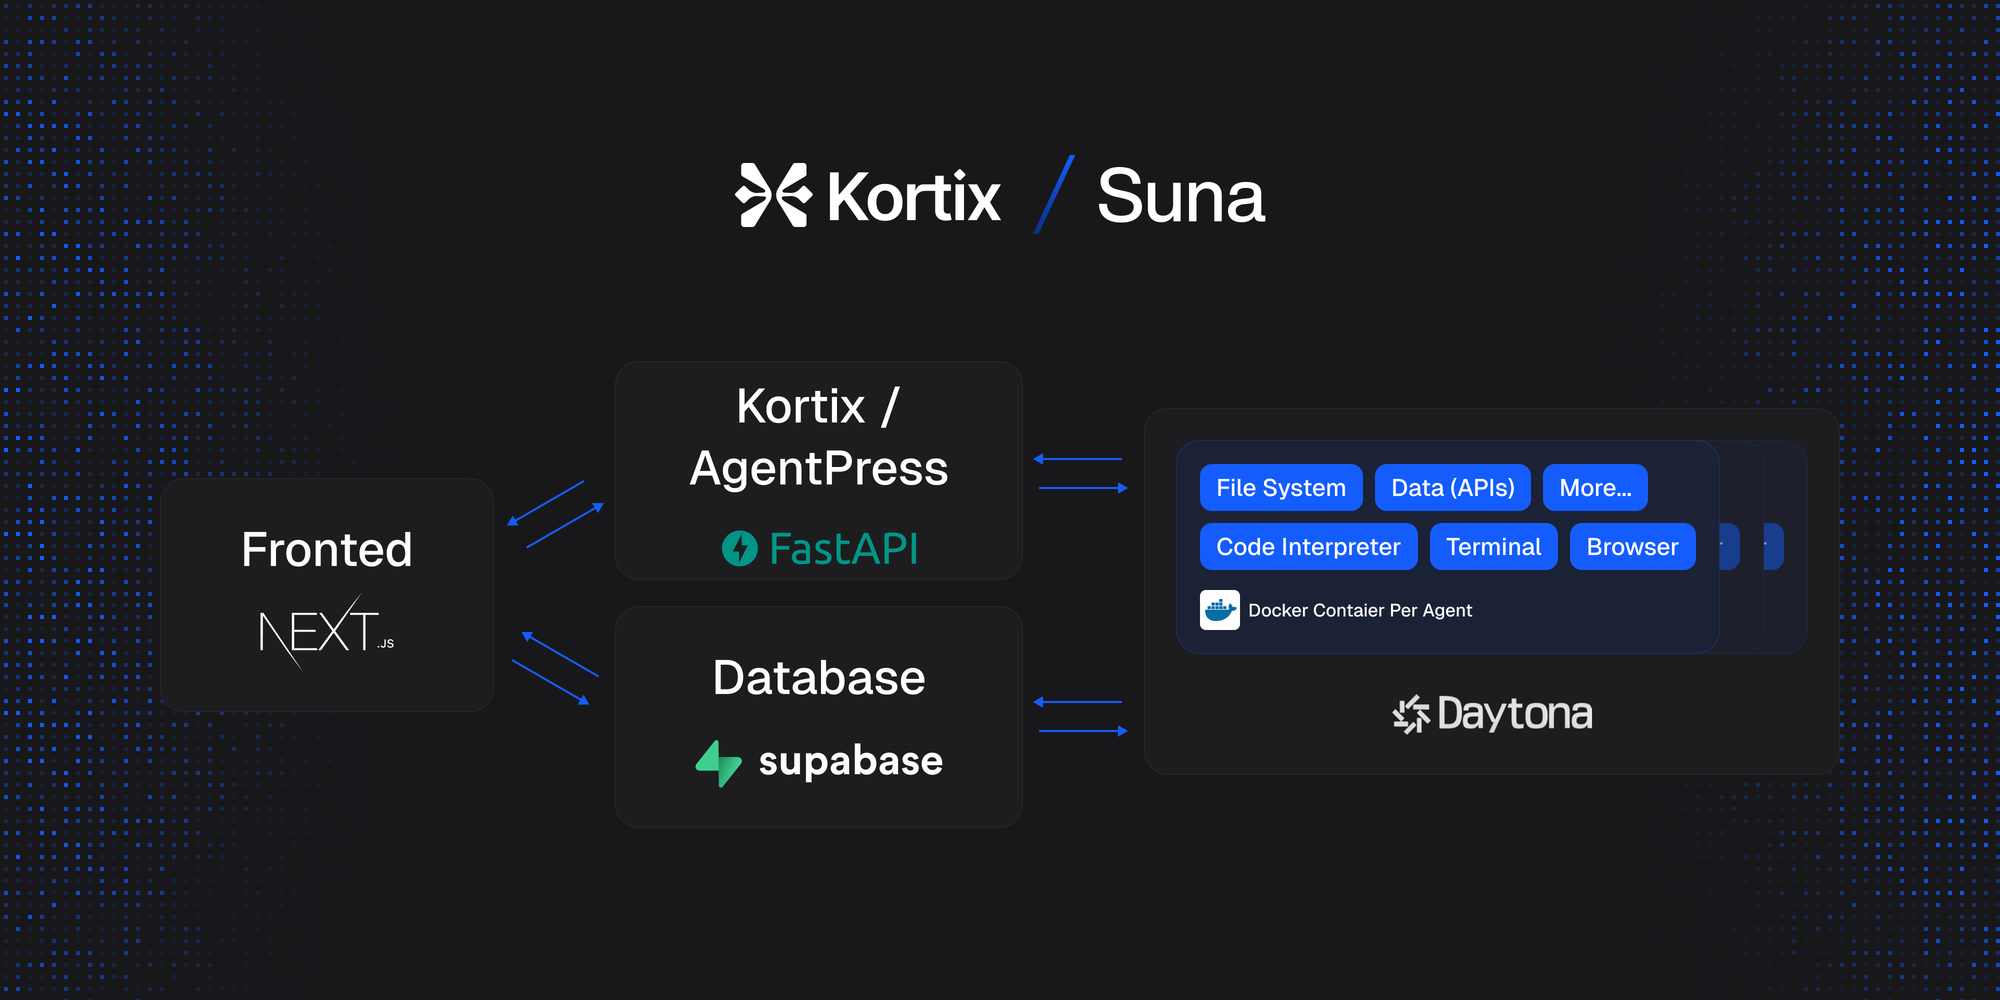
Understanding Suna’s modular architecture helps you deploy and extend it:
-
Backend API (Python/FastAPI):
Orchestrates user requests, tool usage, conversation state, and routes LLM calls (supports OpenAI, Anthropic via LiteLLM). -
Frontend (Next.js/React):
Developer-friendly chat UI for interacting with your agent, visualizing responses, and monitoring activity. -
Agent Docker Environment (Daytona):
Each task runs inside an isolated Docker container. This secures browser, CLI, and code execution, keeping your system safe. -
Supabase Database (PostgreSQL):
Stores user auth, chat history, files, and agent state—making multi-user management and audit trails easy.
All components communicate over APIs, supporting scalable, modular deployment—ideal for API-focused teams.
Step-by-Step: How to Set Up and Run Suna AI Locally
Want full control over your AI workflows? Here’s how to self-host Suna AI for secure, private, and customizable digital automation.

1. Gather Prerequisites
To run Suna, you’ll need:
-
Supabase Project:
- Sign up and create a project
- Copy Project URL, anon public key, and service_role secret key (Settings > API)
- Install Supabase CLI
-
Redis Database:
- Cloud (Recommended): Upstash offers a free tier
- Local: Install via Homebrew, apt, or Docker
- Record Host, Port, Password, SSL requirement
-
Daytona Account:
- Sign up at daytona.io
- Generate an API Key (Settings > API Keys)
- Add Suna’s Docker image (
adamcohenhillel/kortix-suna:0.0.20) with the correct entrypoint
-
LLM API Key:
-
(Optional) Tavily & RapidAPI Keys:
- For enhanced search or third-party integrations
2. Install & Configure Suna
GitHub - kortix-ai/suna: Suna - Open Source Generalist AI Agent
Clone the repository:
git clone https://github.com/kortix-ai/suna.git
cd suna
Configure Backend
-
Enter the backend directory:
cd backend cp .env.example .env -
Edit
.envwith your credentials:- URLs and keys for Supabase, Redis, Daytona
- Set only one LLM provider (OpenAI or Anthropic) and its model
- Add Tavily or RapidAPI keys if needed
-
Set up Supabase schema:
supabase login
supabase link --project-ref YOUR_PROJECT_REF_ID
supabase db push
Confirm 'basejump' schema is listed and exposed in Supabase dashboard.
Configure Frontend
- Enter frontend directory:
cd ../frontend cp .env.example .env.local - Edit
.env.localwith matching Supabase and backend URLs.
Install Dependencies
- Frontend (Node.js):
npm install - Backend (Python 3.11, virtual environment recommended):
pip install -r requirements.txt
3. Run Suna Locally
-
Backend:
Activate your virtualenv, then:python api.py -
Frontend:
npm run dev -
Access Suna:
Visit http://localhost:3000 in your browser.
Sign up, log in, and start instructing your agent.
Why Suna AI for Developer Teams?
Suna is more than a chatbot—it’s a programmable, extensible digital agent. For API-centric teams, this means:
- Automate repetitive web or file tasks using natural language.
- Integrate with internal APIs and tools to orchestrate complex workflows.
- Maintain privacy and control by running everything in your own environment.
- Open-source extensibility: tailor Suna’s tools and behaviors as needed.
If your team needs to document, test, and collaborate around APIs, platforms like Apidog can complement Suna by providing integrated API documentation and streamlined testing—maximizing productivity for modern developer workflows.
Conclusion
Suna AI transforms the way developers interact with digital systems, offering a self-hosted, open-source agent that automates tasks across browsing, files, APIs, and code. By following this guide, you can deploy Suna in your own infrastructure—unlocking new levels of automation, security, and control for your engineering team.
💡 See how Apidog can further streamline your API development and documentation process with beautiful docs and all-in-one team tools.


