
Have you ever wondered how real-time communication in applications works? You know, those instant notifications, live chats, and real-time updates? Well, it's all thanks to WebSockets. And when combined with Spring Boot, you have a powerful tool to create interactive web applications. Today, we’re diving deep into the world of Spring Boot WebSocket. By the end of this post, you’ll have a solid understanding of how to implement and utilize WebSockets in your Spring Boot applications. We’ll also touch upon integrating it with tools like Apidog to streamline your API management.
What is WebSocket?
WebSocket is a communication protocol that provides full-duplex communication channels over a single TCP connection. Unlike traditional HTTP requests, which are half-duplex, WebSocket allows for a persistent connection between the client and server. This means both can send and receive messages independently, making it ideal for real-time applications.

Why Use Spring Boot with WebSocket?
Spring Boot simplifies the development of stand-alone, production-grade Spring-based applications. It reduces the amount of boilerplate code and provides out-of-the-box support for WebSockets. Combining Spring Boot with WebSocket allows developers to create scalable, maintainable, and efficient real-time applications with minimal setup.

Getting Started with Spring Boot WebSocket
Let’s jump right into setting up a Spring Boot application with WebSocket support. We’ll start from scratch and build a simple chat application.
Step 1: Set Up Your Spring Boot Project
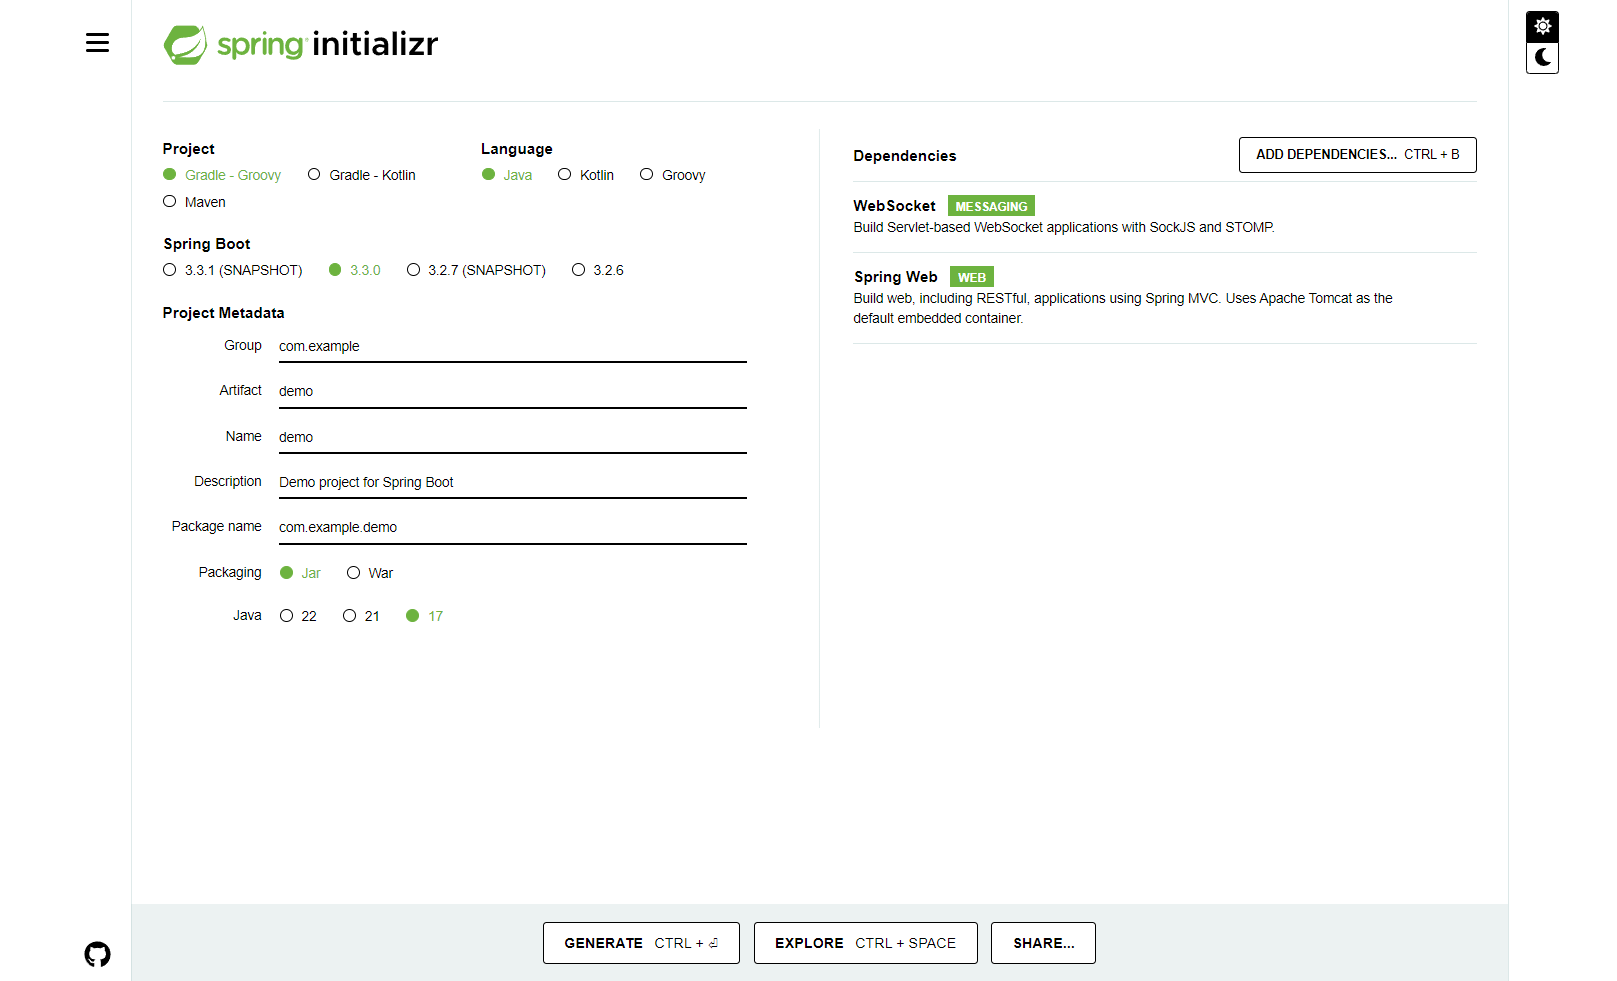
First, create a new Spring Boot project. You can use Spring Initializr for this. Select the following dependencies:
- Spring Web
- WebSocket
Generate the project and unzip the downloaded file. Open it in your favorite IDE.
Step 2: Configure WebSocket in Spring Boot
Now, we need to configure WebSocket in our Spring Boot application. Create a new configuration class:
import org.springframework.context.annotation.Configuration;
import org.springframework.web.socket.config.annotation.EnableWebSocketMessageBroker;
import org.springframework.web.socket.config.annotation.StompEndpointRegistry;
import org.springframework.web.socket.config.annotation.WebSocketMessageBrokerConfigurer;

@Configuration
@EnableWebSocketMessageBroker
public class WebSocketConfig implements WebSocketMessageBrokerConfigurer {

    @Override
    public void registerStompEndpoints(StompEndpointRegistry registry) {
        registry.addEndpoint("/chat").withSockJS();
    }

    @Override
    public void configureMessageBroker(MessageBrokerRegistry config) {
        config.enableSimpleBroker("/topic");
        config.setApplicationDestinationPrefixes("/app");
    }
}
In this configuration, we enable WebSocket message broker and define an endpoint /chat which clients will use to connect. The withSockJS() method allows for SockJS fallback options for browsers that don’t support WebSocket.
Step 3: Create a Message Model
Next, we need a model to represent our chat messages. Create a simple POJO:
public class ChatMessage {
    private String content;
    private String sender;

    // Getters and setters
}
Step 4: Create a Message Controller
We need a controller to handle incoming WebSocket messages. Create a new controller class:
import org.springframework.messaging.handler.annotation.MessageMapping;
import org.springframework.messaging.handler.annotation.SendTo;
import org.springframework.stereotype.Controller;

@Controller
public class ChatController {

    @MessageMapping("/sendMessage")
    @SendTo("/topic/messages")
    public ChatMessage sendMessage(ChatMessage chatMessage) {
        return chatMessage;
    }
}
In this controller, we map incoming messages sent to /app/sendMessage and broadcast them to all subscribers of /topic/messages.
Step 5: Create Frontend to Test WebSocket
To test our WebSocket setup, let’s create a simple HTML page. Place this file in src/main/resources/static directory and name it index.html:
<!DOCTYPE html>
<html>
<head>
    <title>Spring Boot WebSocket Chat</title>
    <script src="https://cdn.jsdelivr.net/npm/sockjs-client@1.5.0/dist/sockjs.min.js"></script>
    <script src="https://cdn.jsdelivr.net/npm/stompjs@2.3.3/lib/stomp.min.js"></script>
</head>
<body>
    <h1>Spring Boot WebSocket Chat</h1>
    <div>
        <input type="text" id="sender" placeholder="Your name">
        <input type="text" id="message" placeholder="Message">
        <button onclick="sendMessage()">Send</button>
    </div>
    <div id="messages"></div>

    <script>
        var stompClient = null;

        function connect() {
            var socket = new SockJS('/chat');
            stompClient = Stomp.over(socket);
            stompClient.connect({}, function (frame) {
                console.log('Connected: ' + frame);
                stompClient.subscribe('/topic/messages', function (chatMessage) {
                    showMessage(JSON.parse(chatMessage.body));
                });
            });
        }

        function sendMessage() {
            var sender = document.getElementById('sender').value;
            var message = document.getElementById('message').value;
            stompClient.send("/app/sendMessage", {}, JSON.stringify({'sender': sender, 'content': message}));
        }

        function showMessage(message) {
            var messages = document.getElementById('messages');
            var messageElement = document.createElement('div');
            messageElement.appendChild(document.createTextNode(message.sender + ": " + message.content));
            messages.appendChild(messageElement);
        }

        window.onload = connect;
    </script>
</body>
</html>
This simple HTML file includes a form to input messages and a div to display them. It uses SockJS and STOMP to handle WebSocket communication.
Step 6: Run the Application
Run your Spring Boot application and open http://localhost:8080 in your browser. Open the same URL in multiple tabs to see real-time chat in action.
When you need finer control than the managed server abstractions provide,the Java WebSocket client API gives you direct access to the protocol layer and is the right starting point for custom connection handling or non-Spring environments.
Debugging Springboot WebSockets with Apidog
Apidog is a fantastic tool for API documentation and testing. It simplifies the process of documenting and testing your Spring Boot WebSocket APIs. It provides a user-friendly interface for establishing WebSocket connections, sending and receiving messages, and documenting APIs.
Here’s how you can use Apidog to debug a WebSocket client:
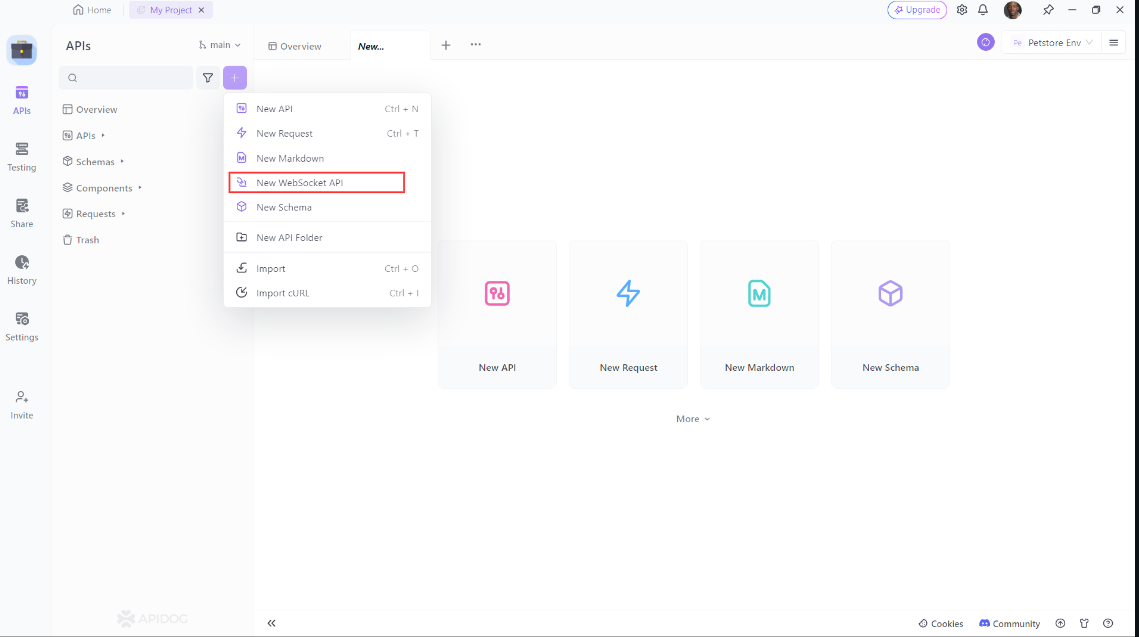
- Open Apidog: First, start the Apidog application and click on the "+" button on the left side, A new drop-down will be opened. From there choose "New WebSocket API":
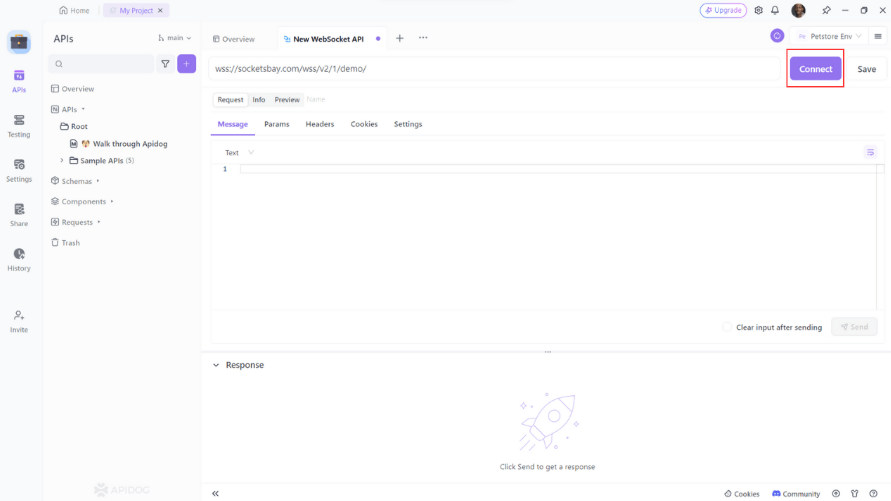
2. Establish a Connection: Start by entering the WebSocket API URL in Apidog’s address bar. You can then click the “Connect” button to initiate the handshake process and establish a connection. Apidog allows you to customize parameters such as Params, Headers, and Cookies during the handshake.
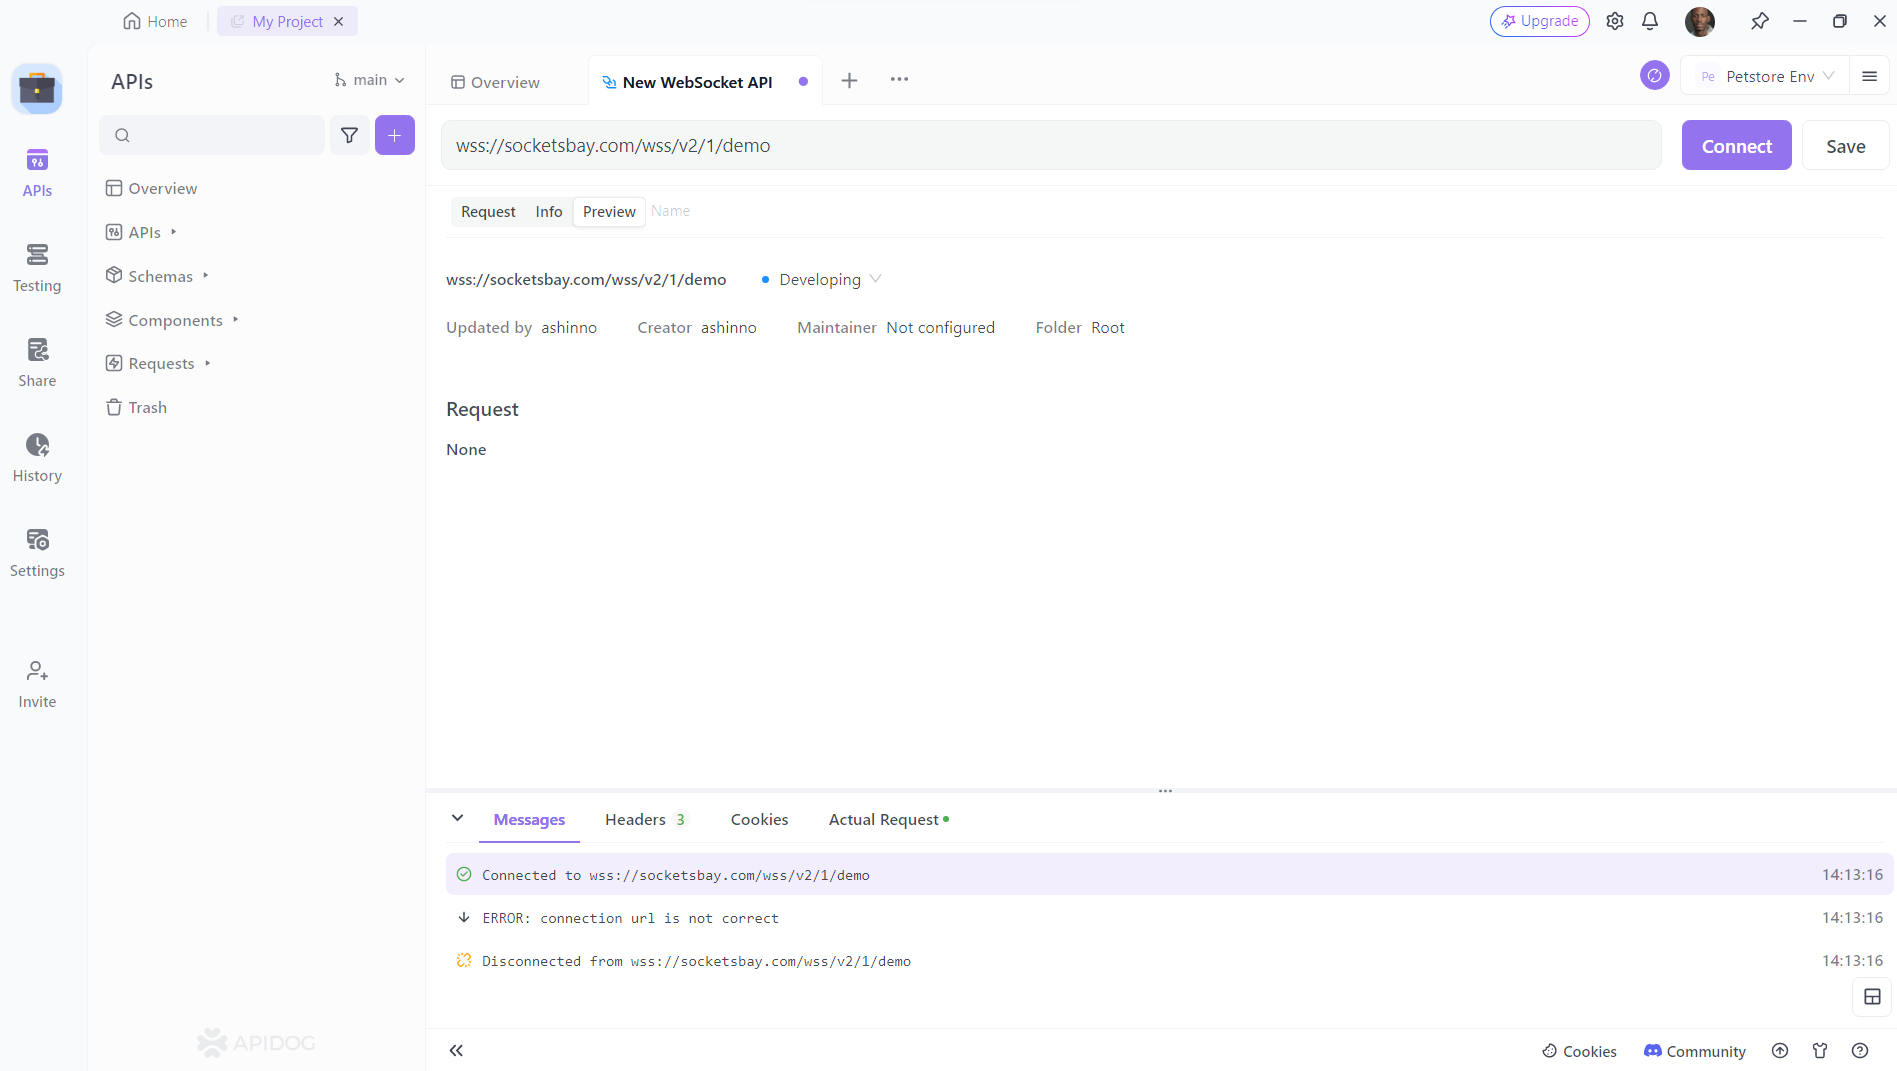
3. Send and Receive Messages: Once the connection is established, you can send messages under the "Message" tab. You can write text, JSON, XML, HTML, and other text format messages, as well as binary format messages using Base64 or Hexadecimal. Apidog's new timeline view shows the connection status, sent messages and received messages in chronological order. When you click on a message, you can easily view its details.

4. API Documentation: Apidog inherits its robust API documentation functionality for WebSocket APIs, allowing you to document your WebSocket interactions effectively.
Remember to check for common WebSocket issues such as connection problems, message format errors, and security concerns during your debugging process.
Conclusion
In this post, we’ve explored how to set up a real-time chat application using Spring Boot WebSocket. We started by configuring WebSocket in a Spring Boot project, created a simple chat application, and integrated it with Apidog for better API management. With WebSockets and Spring Boot, you can build efficient, real-time applications that provide a seamless user experience. By leveraging tools like Apidog, you can enhance your development workflow, ensuring your APIs are well-documented, tested, and monitored.
Real-time communication is a game-changer for modern web applications. Whether it's for live chat, notifications, or collaborative tools, mastering WebSocket with Spring Boot opens up a world of possibilities.


