Snowflake MCP Server provides a powerful bridge between AI assistants and your Snowflake databases, enabling natural language interactions with your data. This tool eliminates the need to write complex SQL queries manually by allowing AI models like Claude to directly access and query your Snowflake datasets through conversational language.
Setting up Snowflake MCP Server requires minimal configuration while delivering significant benefits for data analysis and API development. The server leverages the Model Context Protocol (MCP), functioning as a universal translator for AI-database communication. To get started with Snowflake MCP Server, you'll need:
- Python environment (with pip package manager)
- A Snowflake account with appropriate access credentials
- Claude Desktop (currently the primary supported LLM interface)
The installation process is straightforward:
Clone the repository:
git clone https://github.com/datawiz168/mcp-snowflake-service.gitInstall the required dependencies:
pip install -r requirements.txtOnce installed, you'll need to configure both the MCP client and your Snowflake connection. For the MCP client configuration, add the following to your claude_desktop_config.json file:
{
  "mcpServers": {
    "snowflake": {
      "command": "C:\\Users\\YourUsername\\anaconda3\\python.exe",
      "args": ["C:\\Path\\To\\mcp-snowflake\\server.py"]
    }
  }
}
Be sure to modify the paths according to your Python installation location and where you cloned the repository. For Snowflake configuration, create a .env file in the project root directory with your connection details:
SNOWFLAKE_USER=your_username
SNOWFLAKE_PASSWORD=your_password
SNOWFLAKE_ACCOUNT=NRB18479.US-WEST-2
SNOWFLAKE_DATABASE=your_database
SNOWFLAKE_WAREHOUSE=your_warehouse
The Snowflake MCP Server handles connection management automatically, including:
- Connection initialization when the first query is received
- Connection maintenance and handling timeouts
- Automatic reconnection if the connection is lost
- Proper connection cleanup when the server stops
This robust connection management ensures reliable access to your Snowflake data without manual intervention. The server starts automatically with Claude Desktop, requiring no manual startup for normal use. Once running, Claude can execute Snowflake queries directly, transforming how you interact with your database.
Snowflake MCP Server supports various capabilities that enhance database interactions:
- Executing SQL queries through natural language questions
- Accessing tables and views in your Snowflake database
- Exploring database schemas with clear labeling
- Analyzing data within safe limits
- Maintaining data security through read-only access
For API developers, this capability proves invaluable when designing data-driven APIs. By understanding your data structures and access patterns through natural language interactions, you can more effectively design APIs that reflect the underlying data relationships and common query patterns. This alignment between data structure and API design leads to more intuitive, efficient APIs that better serve your application needs.
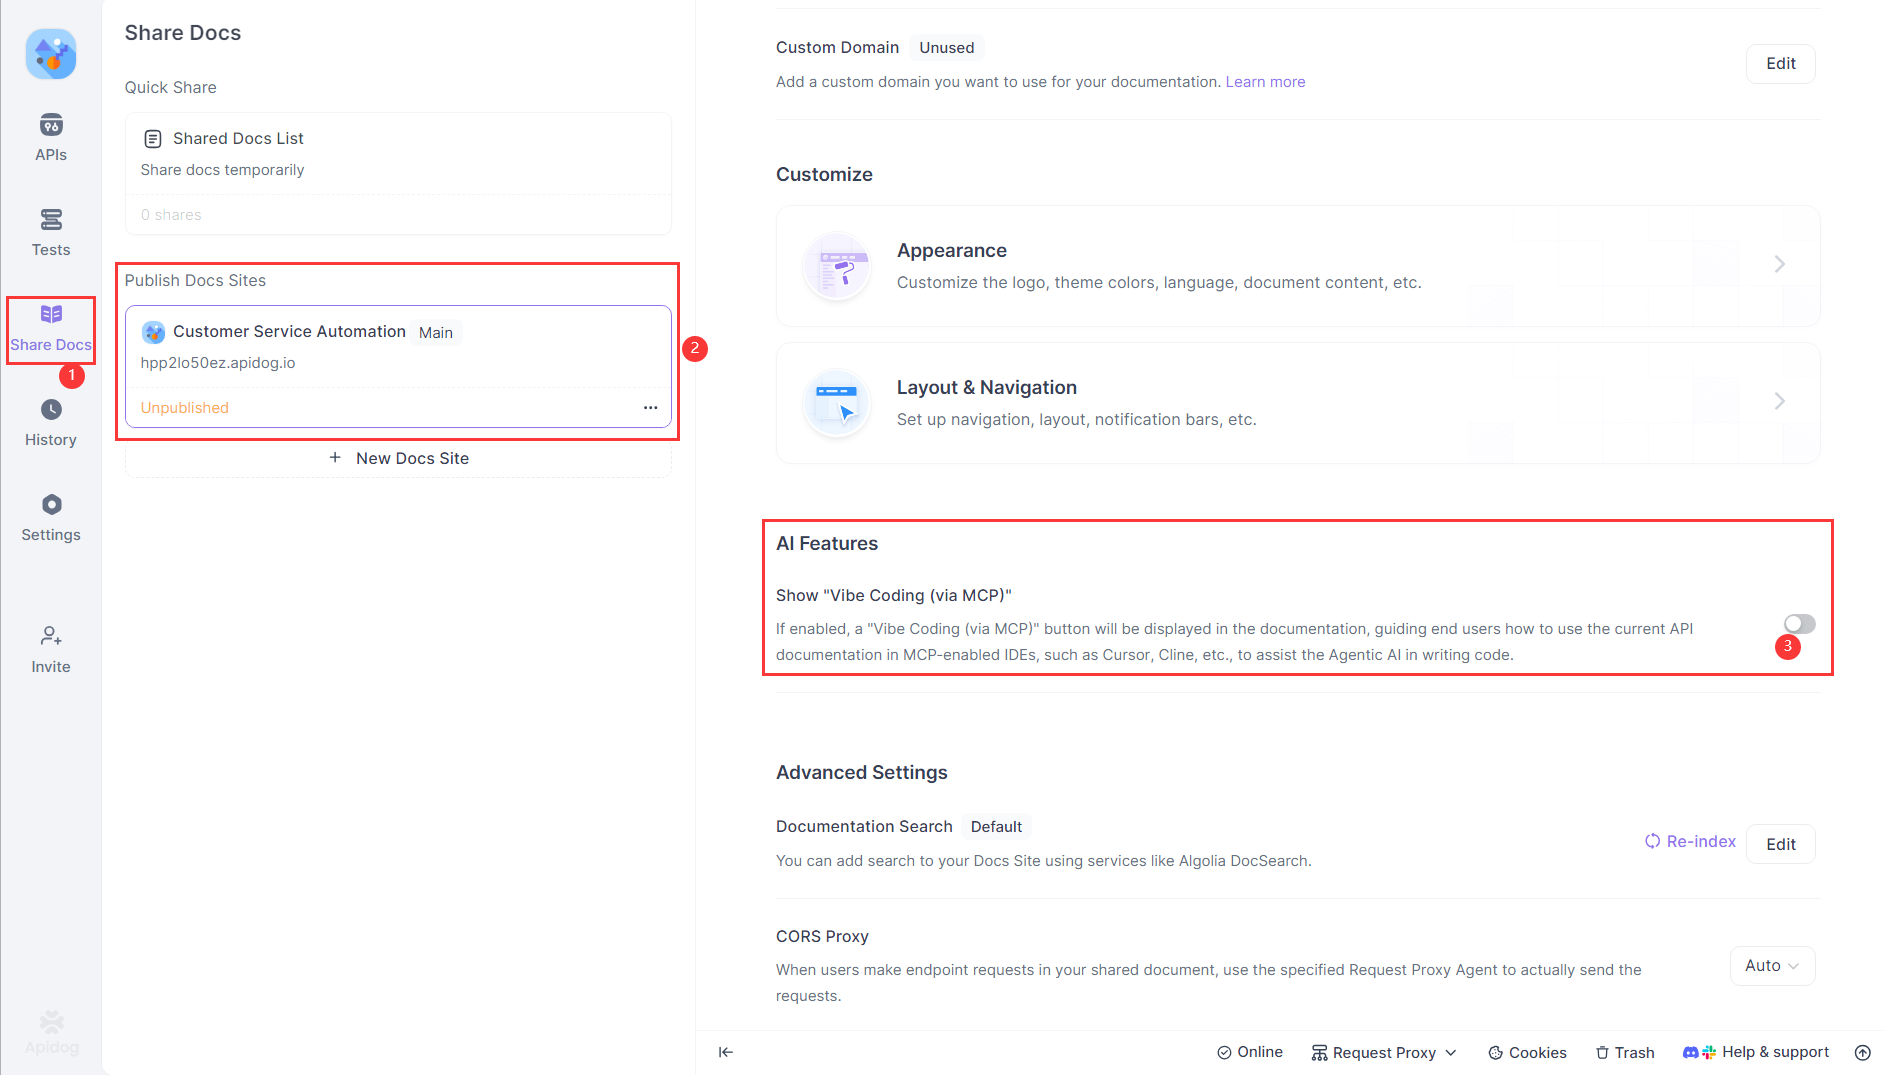
Enhancing API Development with Apidog MCP Server Integration
While Snowflake MCP Server focuses on database interactions, Apidog MCP Server takes a different approach by connecting your API specifications directly to AI-powered IDEs. This integration enables AI assistants to understand your API structure, accelerating development and improving code quality through context-aware assistance.
Apidog MCP Server allows developers to leverage AI assistants for generating or modifying code based on API specifications, searching through specification content, and performing various development tasks with a deep understanding of your API structure. This capability transforms how developers interact with their APIs, making development more efficient and reducing the learning curve for complex API structures.
The server works by reading and caching API specification data on your local machine, making it available to AI assistants through a standardized interface. Developers can then instruct the AI on specific tasks related to their API specifications, such as:
- Generate Code: "Use MCP to fetch the API specification and generate Java records for the 'Product' schema and related schemas"
- Update DTOs: "Based on the API specification, add the new fields to the 'Product' DTO"
- Add Comments: "Add comments for each field in the 'Product' class based on the API specification"
- Create MVC Code: "Generate all the MVC code related to the endpoint '/users' according to the API specification"
Setting up Apidog MCP Server requires Node.js (version 18 or higher) and an IDE that supports MCP, such as Cursor or VS Code with the Cline plugin. The server supports three different data sources:
This flexibility allows developers to choose the most appropriate data source for their specific needs, whether working within an Apidog project, consuming published API documentation, or working with standalone OpenAPI files.
Streamlining API Development with Apidog MCP Server Configuration
Apidog MCP Server significantly enhances development workflows by providing AI assistants with comprehensive knowledge of your API specifications. Setting up the server for different data sources follows similar patterns with slight variations depending on the source type.
Connecting Apidog Projects to AI
For teams working with API specifications within Apidog projects, the server can connect directly to your project using your API access token. This approach is ideal for accessing private API specifications and working collaboratively within a team.
To configure this connection:
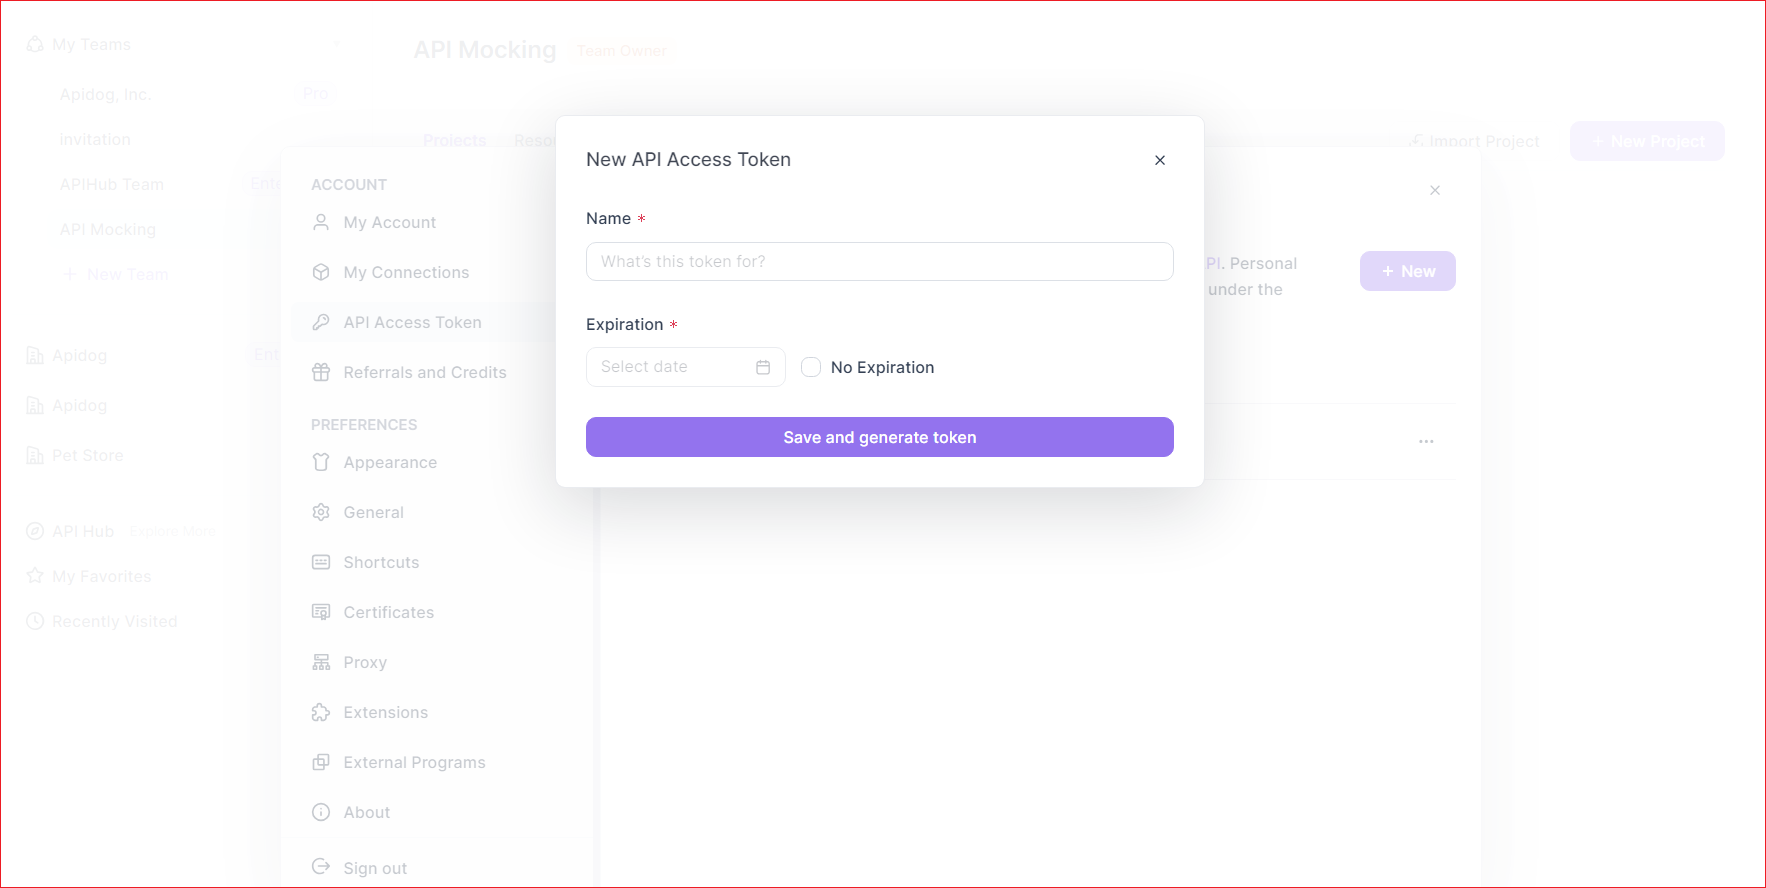
1. Generate an API Access Token from your Apidog account settings
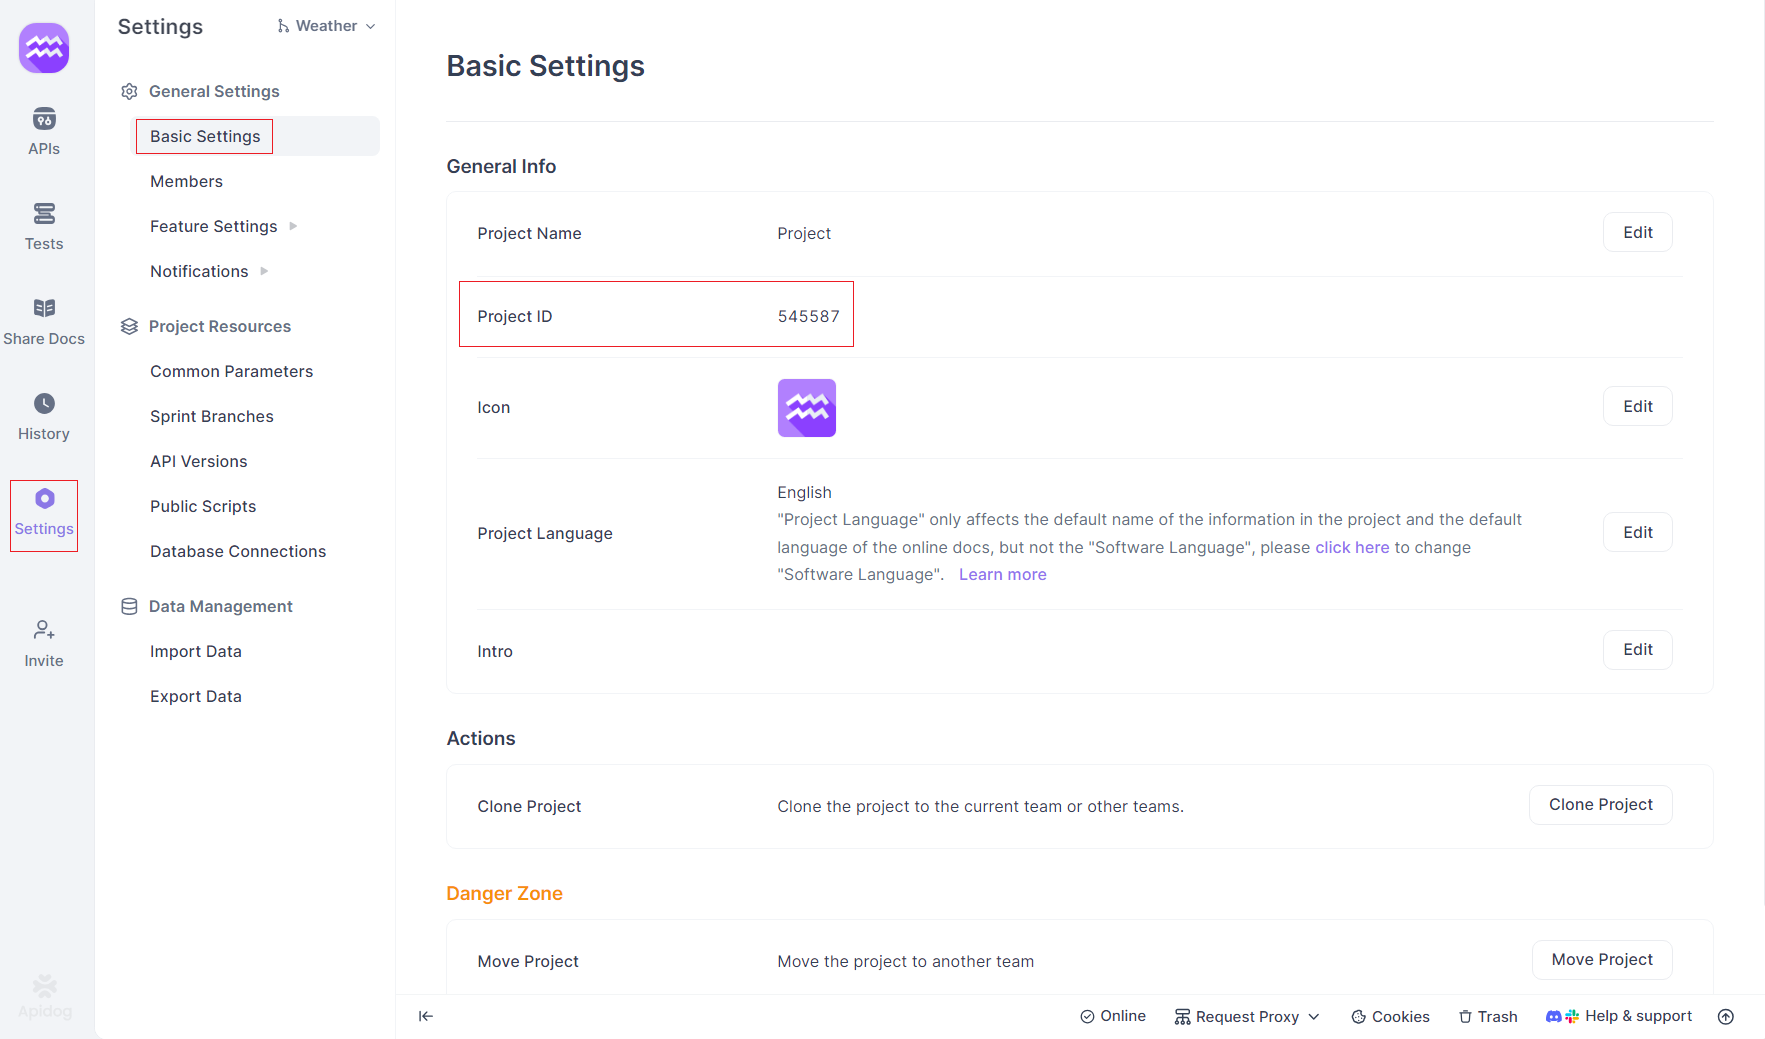
2. Get your Apidog Project ID from the project's basic settings
3. Configure your MCP-compatible IDE with the following settings:
{
  "mcpServers": {
    "API specification": {
      "command": "npx",
      "args": [
        "-y",
        "apidog-mcp-server@latest",
        "--project=<project-id>"
      ],
      "env": {
        "APIDOG_ACCESS_TOKEN": "<access-token>"
      }
    }
  }
}
This configuration enables your AI assistant to access and understand your API specifications, allowing for more intelligent code generation and assistance.
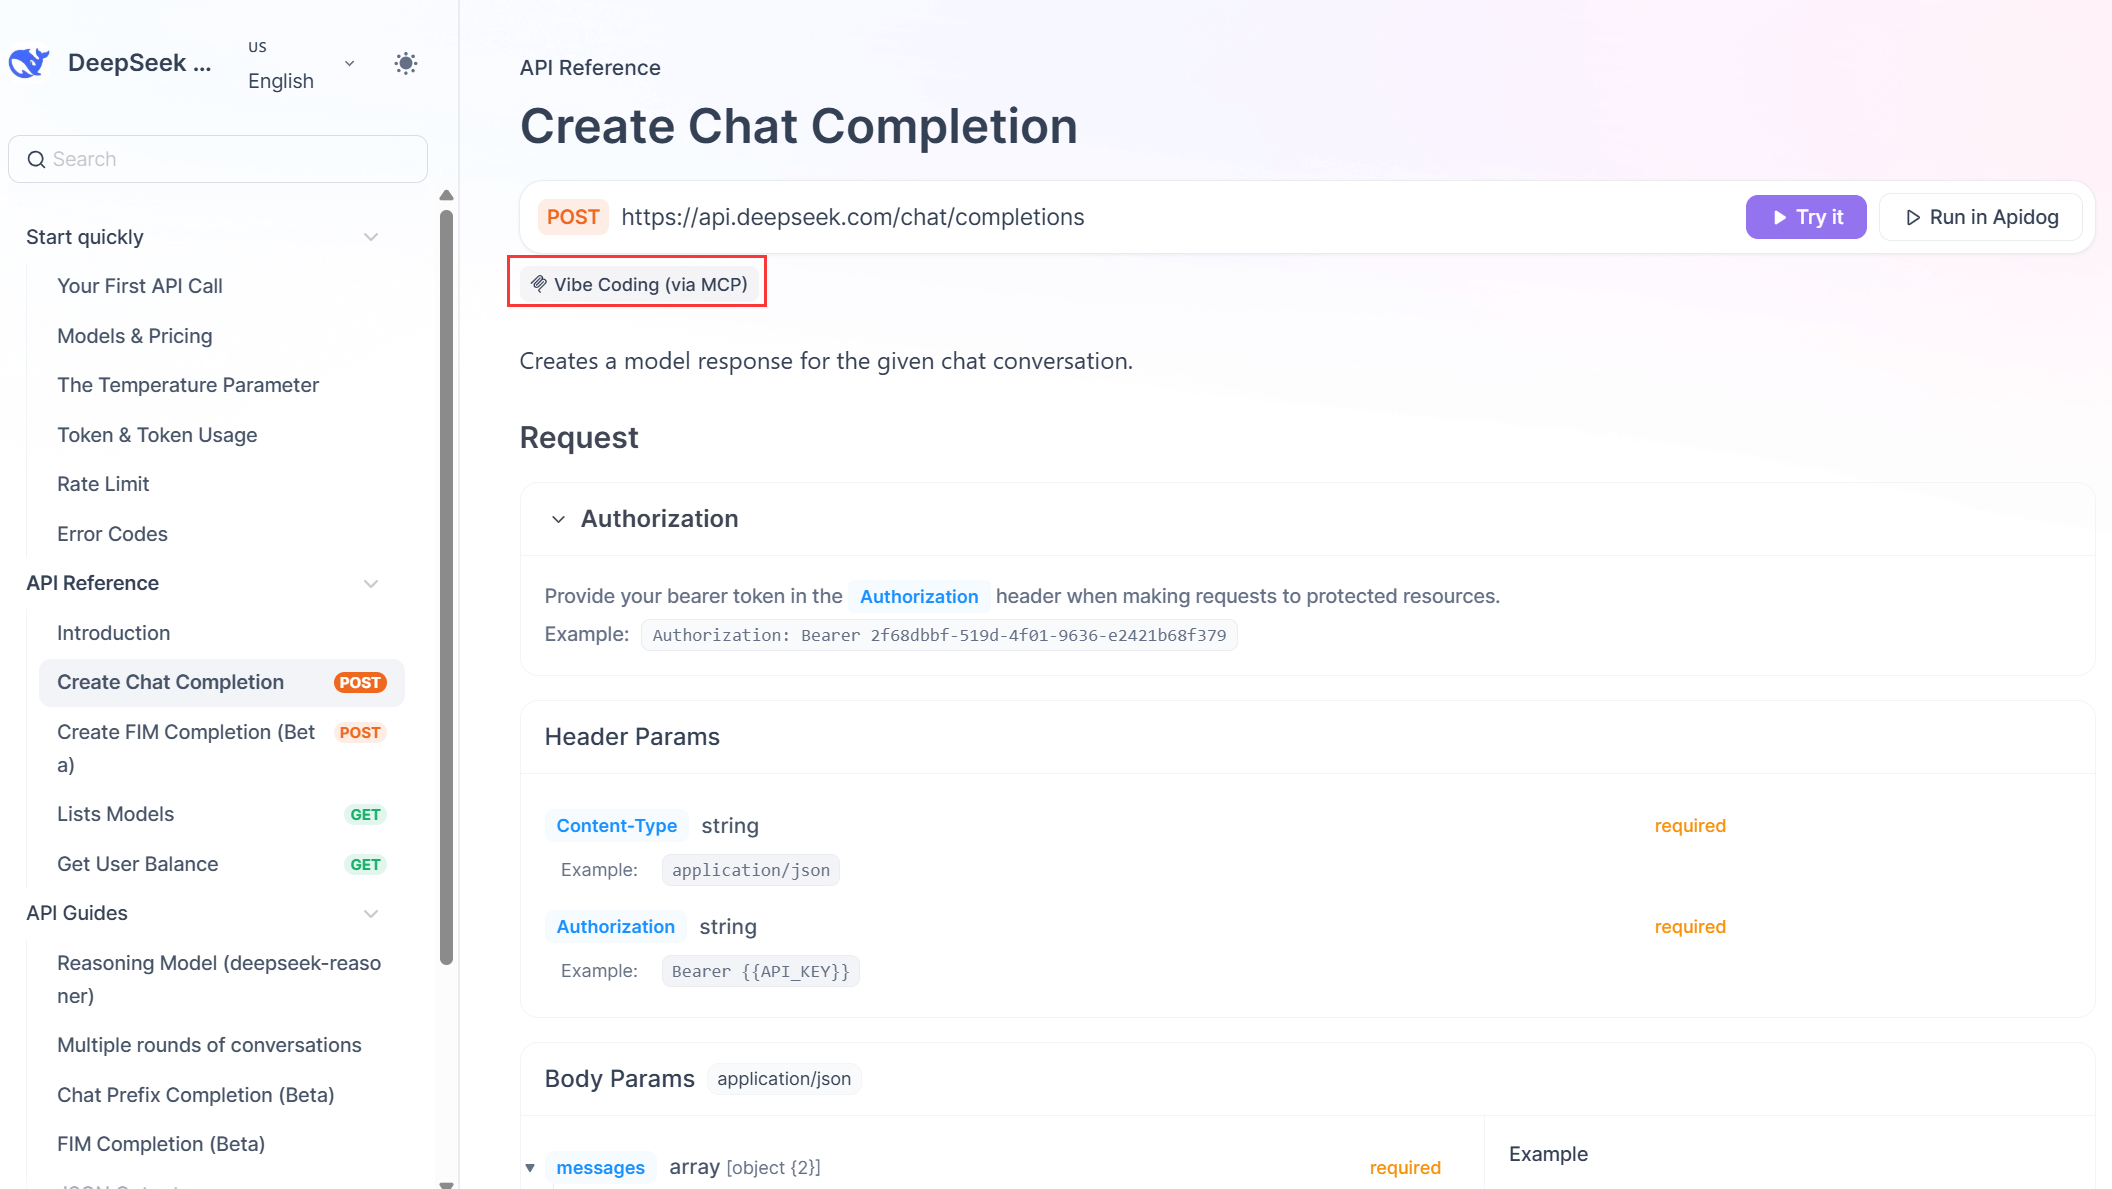
Connecting Published API Documentation to AI
For developers working with publicly available API documentation, Apidog MCP Server can connect to online documentation published through Apidog. This method doesn't require an API access token and is perfect for external developers consuming your APIs or for accessing public API documentation.
To enable this connection:
1. Enable the MCP Service in your Apidog project's documentation settings
2. Copy the MCP Configuration provided in the documentation interface
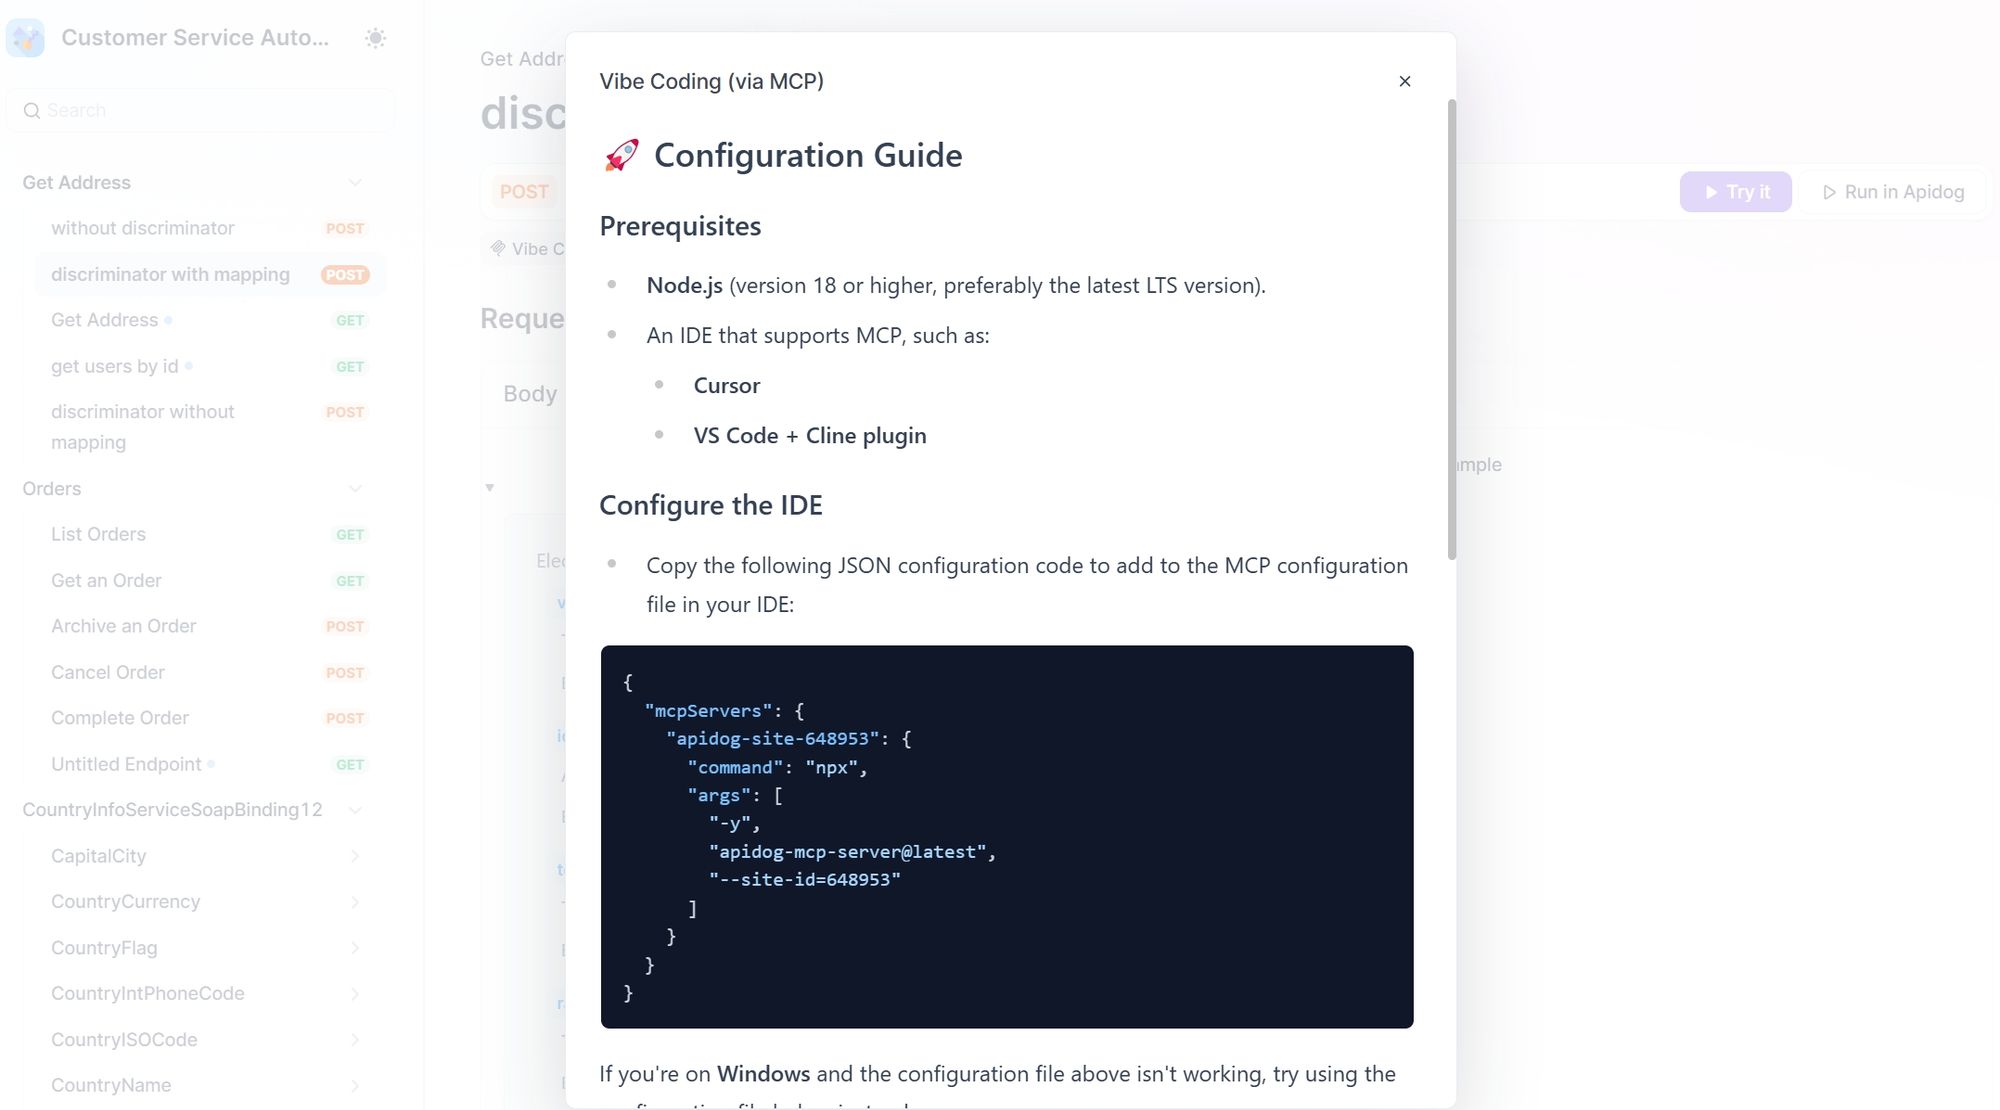
3. Add the configuration to your IDE's MCP settings:
{
  "mcpServers": {
    "apidog-site-123456": {
      "command": "npx",
      "args": [
        "-y",
        "apidog-mcp-server@latest",
        "--site-id=123456"
      ]
    }
  }
}
This approach makes your published API documentation directly accessible to AI assistants, enhancing the development experience for API consumers.
Connecting OpenAPI Files to AI
For developers working with standalone OpenAPI files, Apidog MCP Server provides direct integration with local or remote Swagger/OpenAPI files. This flexibility allows developers to use the server independently of Apidog projects or online documentation.
To configure this connection:
- Prepare your OpenAPI file (local or remote URL)
- Configure your IDE with the following settings:
{
  "mcpServers": {
    "API specification": {
      "command": "npx",
      "args": [
        "-y",
        "apidog-mcp-server@latest",
        "--oas=<oas-url-or-path>"
      ]
    }
  }
}
Replace <oas-url-or-path> with either a remote URL (e.g., https://petstore.swagger.io/v2/swagger.json) or a local file path (e.g., ~/data/petstore/swagger.json).
This configuration allows AI assistants to access and understand your OpenAPI specifications regardless of where they're stored, providing flexibility for various development scenarios.
Leveraging AI-Assisted API Development with Apidog MCP Server
Apidog MCP Server transforms API development by enabling AI assistants to directly access and understand your API specifications. This capability leads to more accurate code generation, improved development productivity, and enhanced code quality through context-aware assistance.
The integration between Apidog MCP Server and AI-powered IDEs creates a powerful development environment where the AI understands not just general programming concepts but also the specific structure and requirements of your API. This context-awareness enables the AI to generate code that adheres to your API's design, reducing inconsistencies and implementation errors.
For example, when generating client code for API consumption, the AI can accurately create models that match your API's schema definitions, implement proper parameter handling for endpoints, and include appropriate error handling based on the documented response codes. This precision eliminates the common disconnect between API specifications and client implementations, reducing bugs and integration issues.
Similarly, when developing server-side code, the AI can generate controllers, services, and data access layers that align perfectly with your API's defined endpoints, parameters, and response structures. This alignment ensures that your implementation matches your API specification, maintaining consistency throughout your codebase.
Apidog MCP Server also enhances documentation efforts by enabling the AI to generate detailed comments and documentation based on your API specifications. This capability ensures that your code documentation remains synchronized with your API definitions, improving maintainability and making it easier for new developers to understand your codebase.
The server's support for multiple data sources provides flexibility for various development scenarios:
- Teams developing APIs can connect to their Apidog projects for real-time access to evolving specifications
- API consumers can connect to published documentation to generate client code
- Developers working with existing OpenAPI files can leverage those specifications without additional tools
This flexibility makes Apidog MCP Server valuable across the entire API lifecycle, from initial design through implementation, testing, and consumption.
To verify your Apidog MCP Server configuration, you can ask the AI assistant to fetch information about your API specifications. For example, you might ask:
Please fetch API specification via MCP and tell me how many endpoints exist in the projectIf the connection is successful, the AI will respond with accurate information about your API, confirming that it has access to your specifications and can assist with development tasks.
Conclusion
The integration of MCP servers into development workflows represents a significant advancement in how developers interact with data and API specifications. Snowflake MCP Server enables natural language interactions with database systems, while Apidog MCP Server transforms API development by connecting specifications directly to AI assistants.
When combined with data-focused tools like Snowflake MCP Server, Apidog MCP Server creates a comprehensive development environment where AI assistants understand both your data structures and API specifications. This unified understanding enables more cohesive, efficient development workflows that produce higher-quality results.
As AI continues to evolve as a development partner, tools like Apidog MCP Server will become increasingly essential for modern development workflows. By bridging the gap between API specifications and AI assistants, Apidog MCP Server enables developers to leverage the full potential of AI in their development processes, creating more efficient workflows and higher-quality code. Whether you're designing new APIs, implementing existing specifications, or consuming third-party APIs, Apidog MCP Server provides the context and understanding necessary for AI assistants to provide truly valuable assistance.