The OAuth 2.0 Authorization Code Grant is a common authentication method used by many services, including GitHub, to allow third-party applications to access user data without sharing passwords. Implementing and debugging it in Apidog can be a valuable skill.
OAuth 2.0
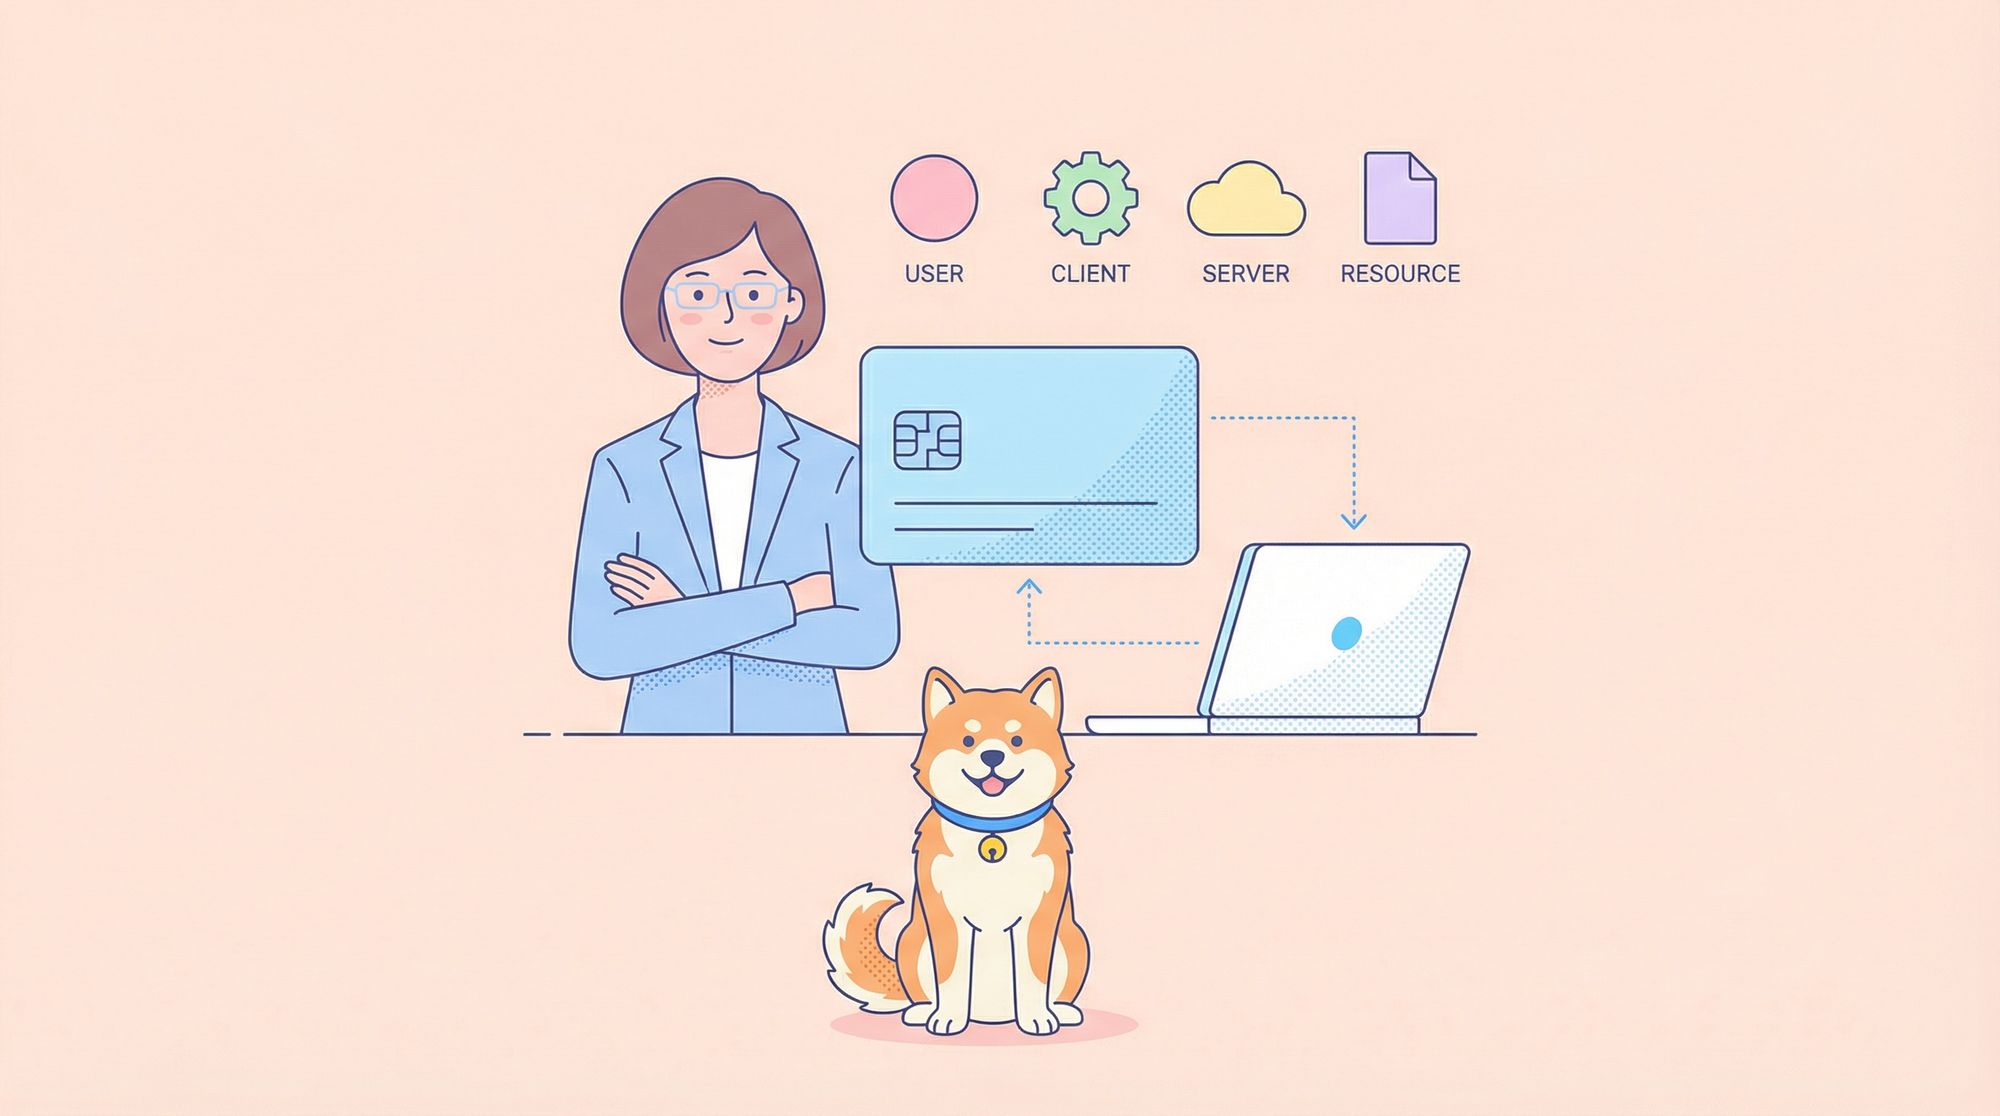
OAuth 2.0 is a widely used authorization protocol enabling third-party access to protected resources without requiring user credentials. It involves four key roles, which are Resource Owner, Client, Authorization Server, and Resource Server.
Common Authorization Flows
OAuth 2.0 protocol implements authorization through various authorization flows. Common authorization flows include:
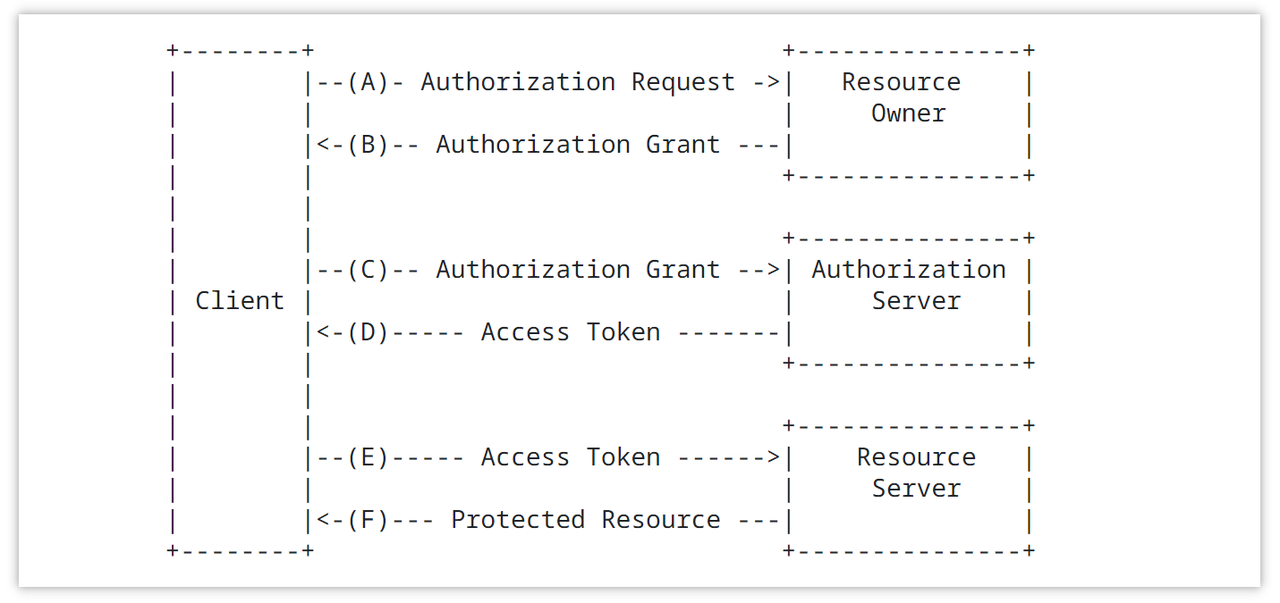
- Authorization Code Grant: The client redirects the user to the authorization server. After the user logs in and grants permission, the authorization server returns an authorization code to the client. The client then exchanges the authorization code along with its credentials for an access token.
- Authorization Code Grant with PKCE (Proof Key for Code Exchange): Similar to the standard authorization code flow, but the client enhances security by using PKCE (Proof Key for Code Exchange).
- Resource Owner Password Credentials Grant: The resource owner directly provides their username and password to the client. The client then uses these credentials to request an access token from the authorization server.
- Client Credentials Grant: The client directly requests an access token from the authorization server using its own credentials. This flow is suitable for cases where the client itself needs access to resources.
- Implicit Grant: Used to obtain an access token directly from the client in a browser-based application. This flow is typically used for web frontend applications.
How to Set up Github OAuth 2.0 (Client ID and Client Secret)
Step 1: Create the app and get the client ID and client secret
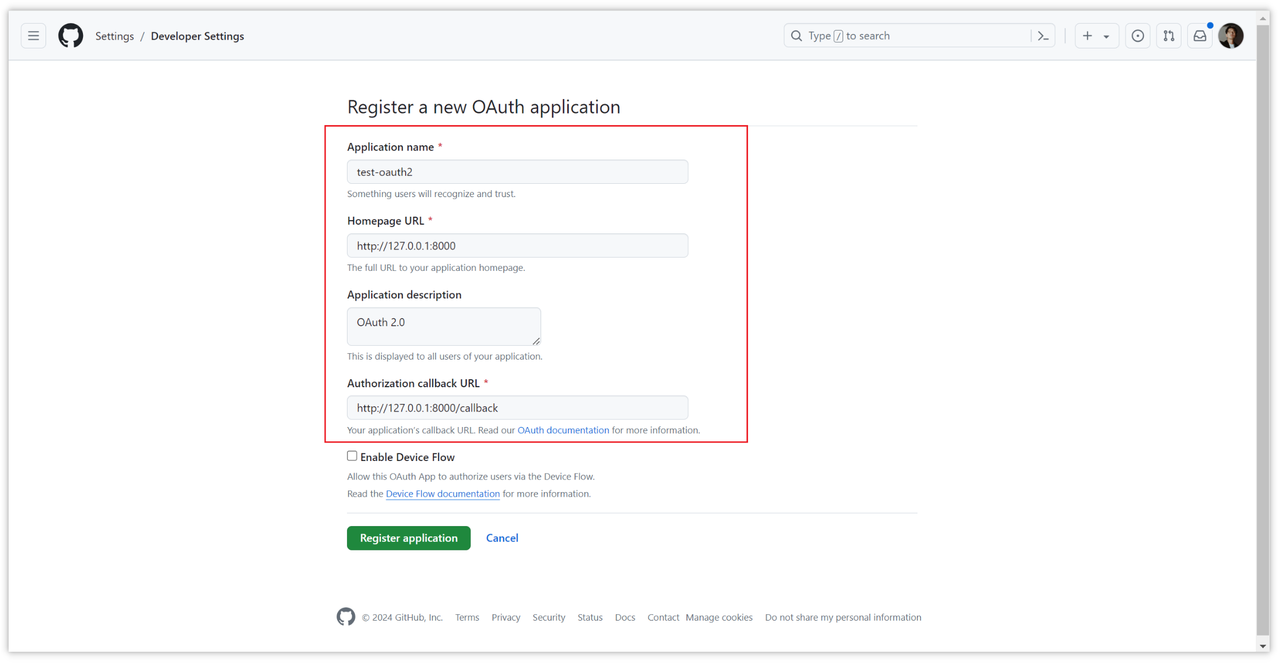
To get the client ID and client key, we first need to create an application. Click this link to create one in Github: https://github.com/settings/applications/new, and then fill in your "Homepage URL" here Domain name, if it is local debugging, you can fill in your local service, such as http://127.0.0.1:8000.
Fill in your callback address in "Authorization callback URL", which can be your domain name or your local callback address, such as http://127.0.0.1:8000/callback.
After filling in the relevant configuration, click "Register application" to create it.
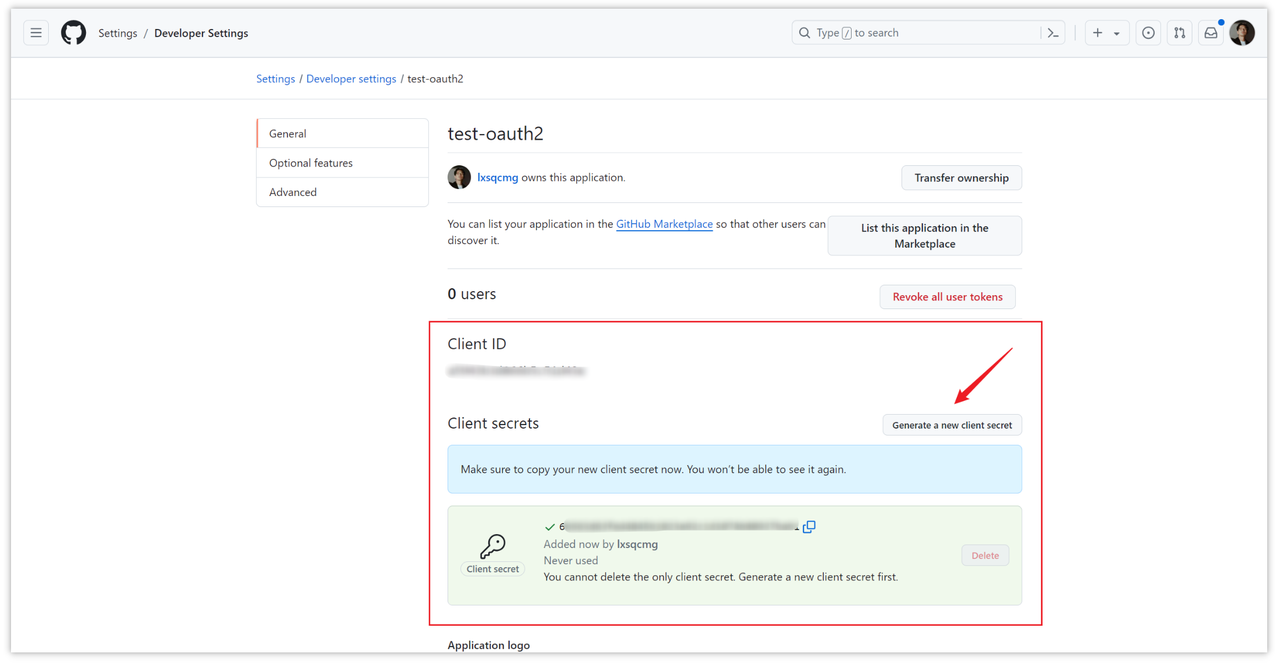
After the application is created, the client ID and client secret are generated. The client key needs to be generated separately. Click "Generate a new client secret" to generate a key.
Step 2: Get access token
When the first step above is ready, we can apply for an access token (Token). We will demonstrate this step through Apidog. Apidog is a very excellent API debugging and management tool.
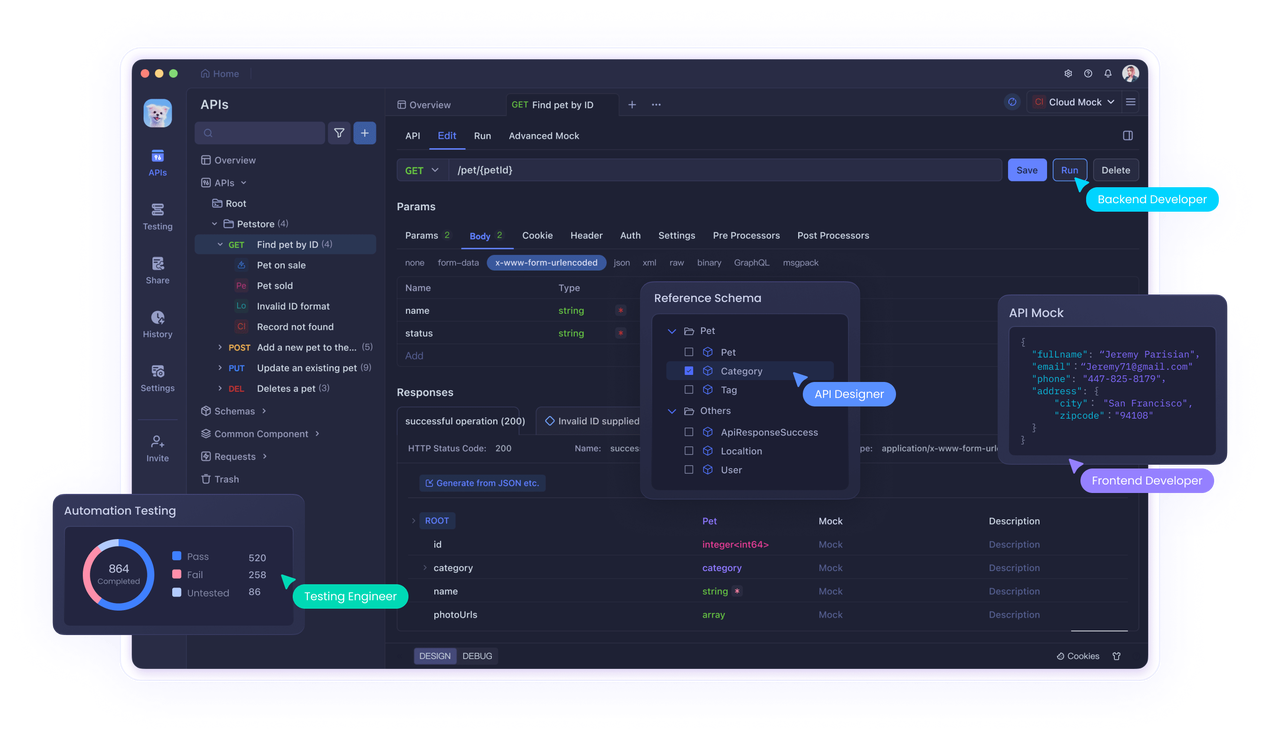
You can The Token access token can be obtained directly in Apidog. If you don’t have Apidog installed yet, go download one now!
- Create a new HTTP project in Apidog and open it, then create a new request in the project and select the [Modify Document -> Auth -> OAuth 2.0 -> option.
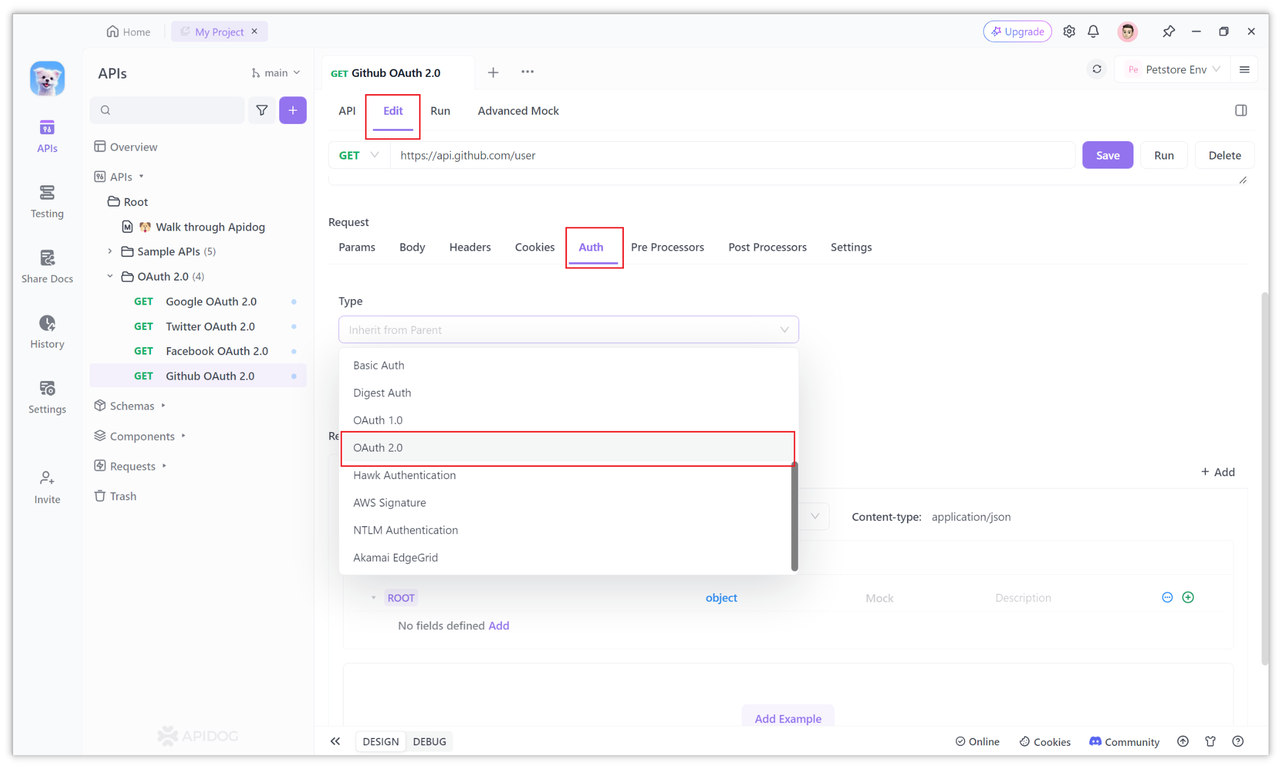
2. Configure client ID, client key and redirect address
The default authorization mode selected on the OAuth 2.0 page in Apifdog is Authorization Code (authorization code mode).
Because Github OAuth 2.0 also uses Authorization Code (authorization code mode), you do not need to switch here.
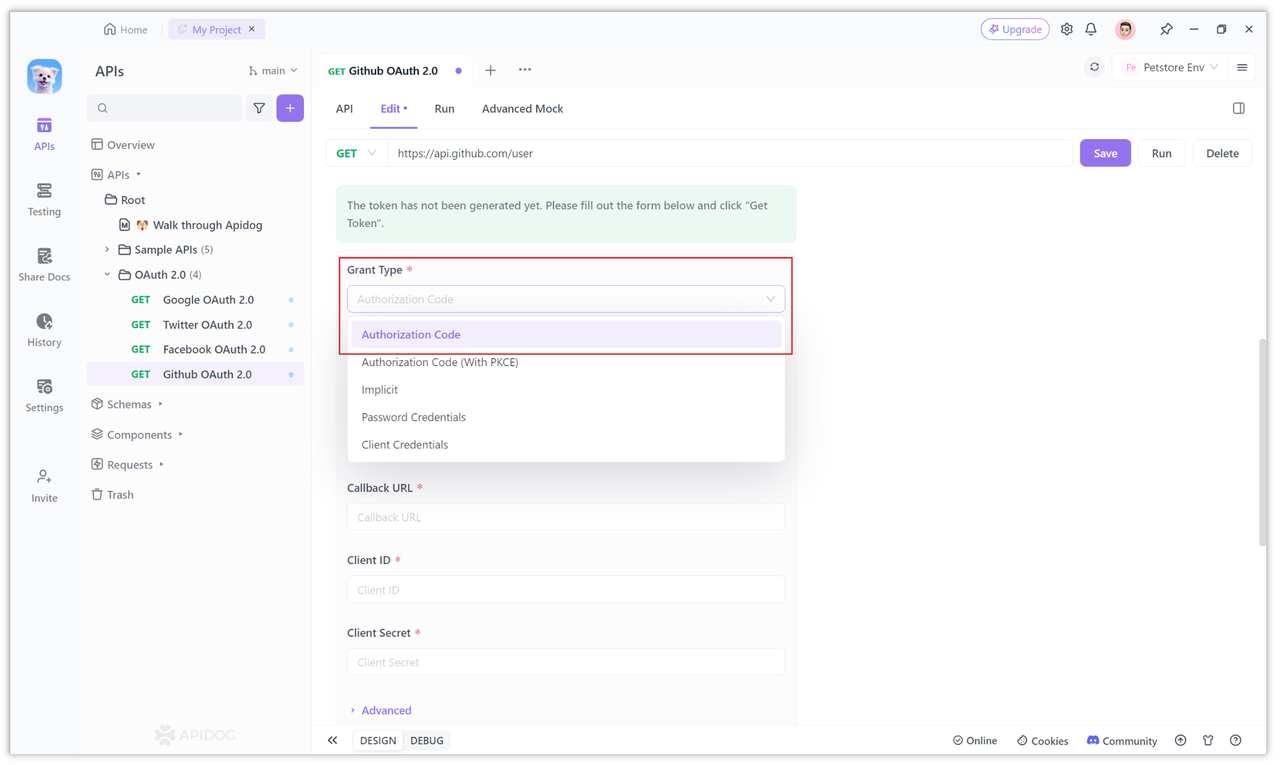
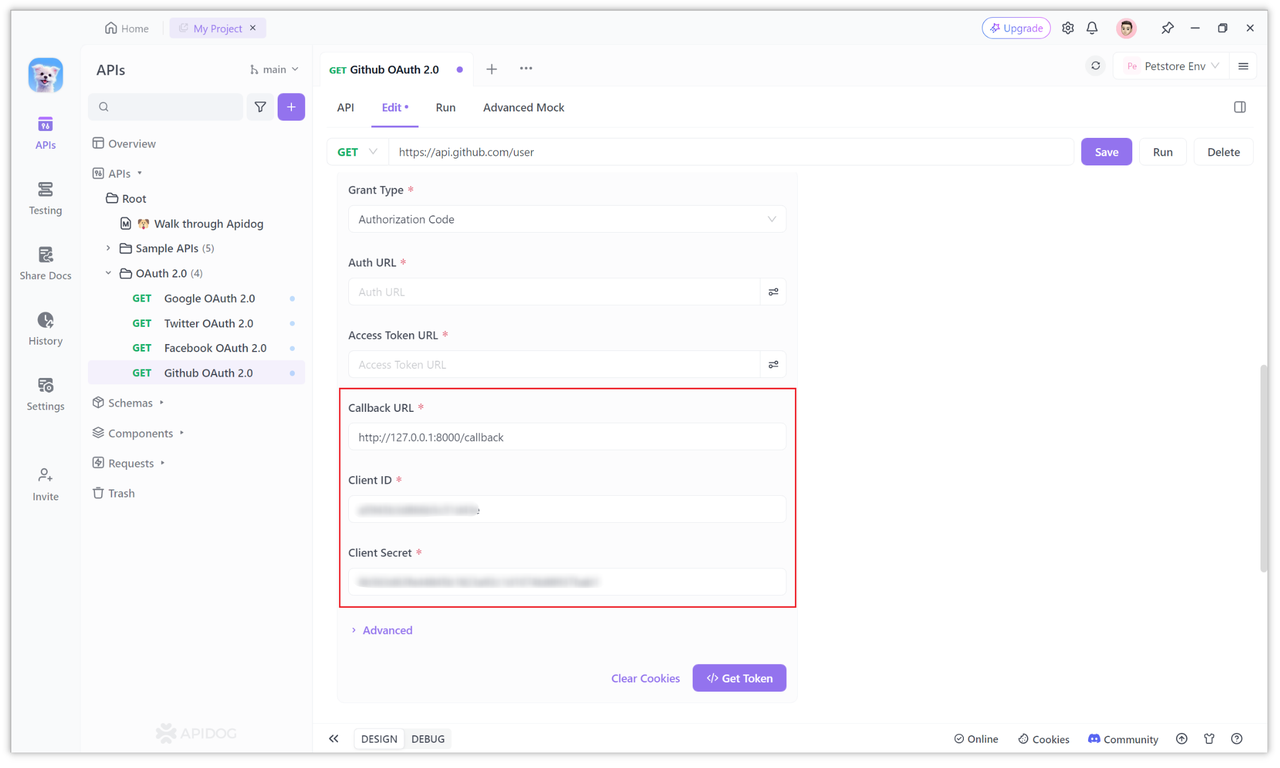
Then find the Client ID, Client Secret and Callback URL at the bottom of the page. The client ID (Client ID), client secret (Client Secret) and configured callback address (Callback URL) will be obtained from Github's OAuth 2.0 service.
Just fill it in. The specific parameters are the configurations in "Step 1" above.
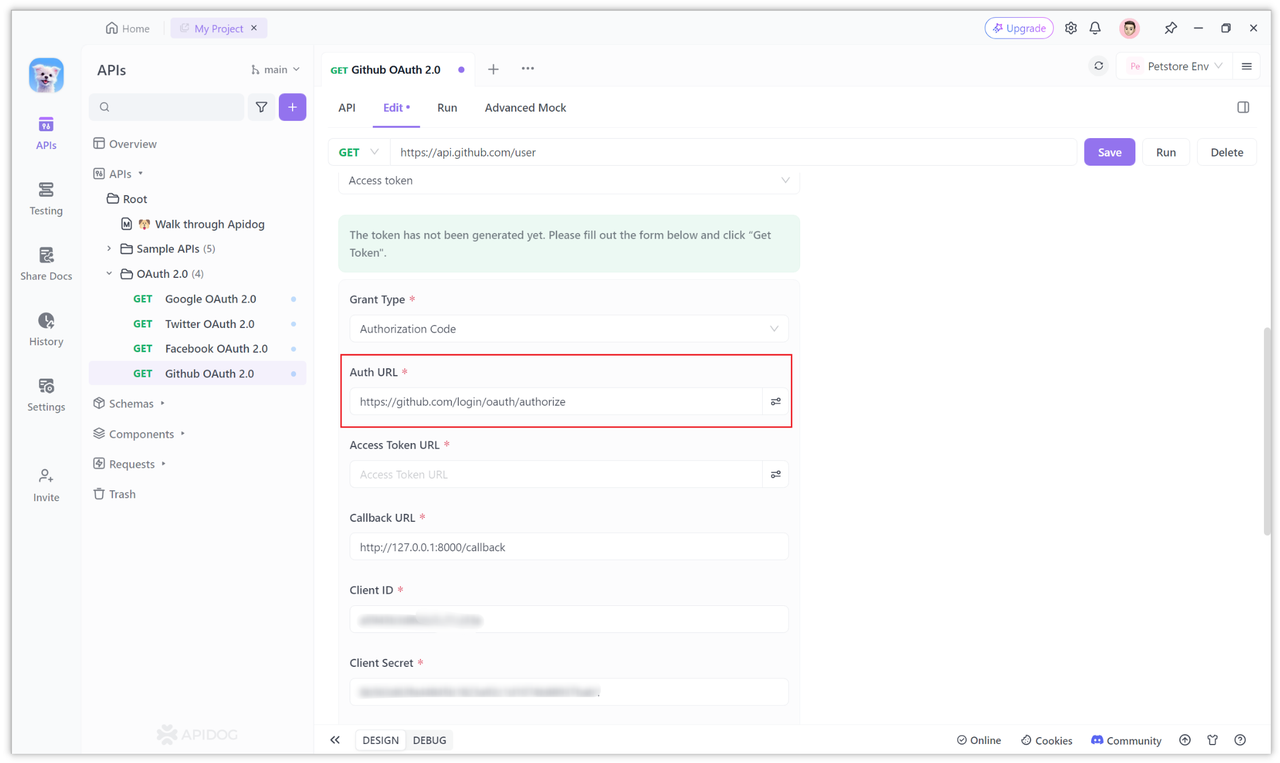
3. Configure the request address of the authorization code
According to the Github official documentation, when performing OAuth 2.0 authentication, the request address (Auth URL) of the authorization code is:
https://github.com/login/oauth/authorize
Just fill in the request address of this authorization code into the Auth URL. We can understand this address as the login authorization page.
This page will be opened when the login status is verified for the first time (it is a window on the client), and then you will be asked to fill in the request address. user name and password.
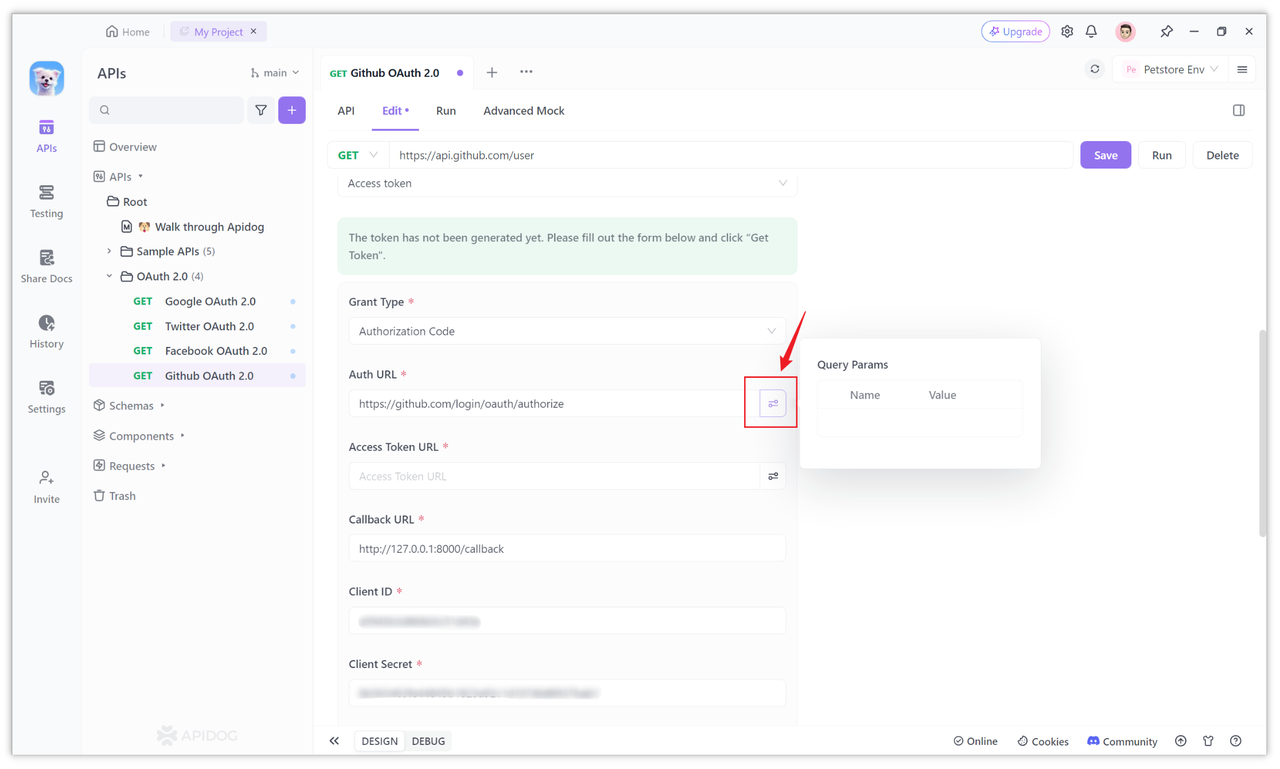
Generally, when manually constructing the login authorization page, some parameters need to be carried after the authorization address.
However, in Apidog, the parameters after the URL generally do not need to be carried, only the path in front of the question mark? is enough, because the others are required. The parameters have been configured separately in other options.
Of course, if you want to carry some Query parameters, you can also add them. Click the icon behind the input box to add:
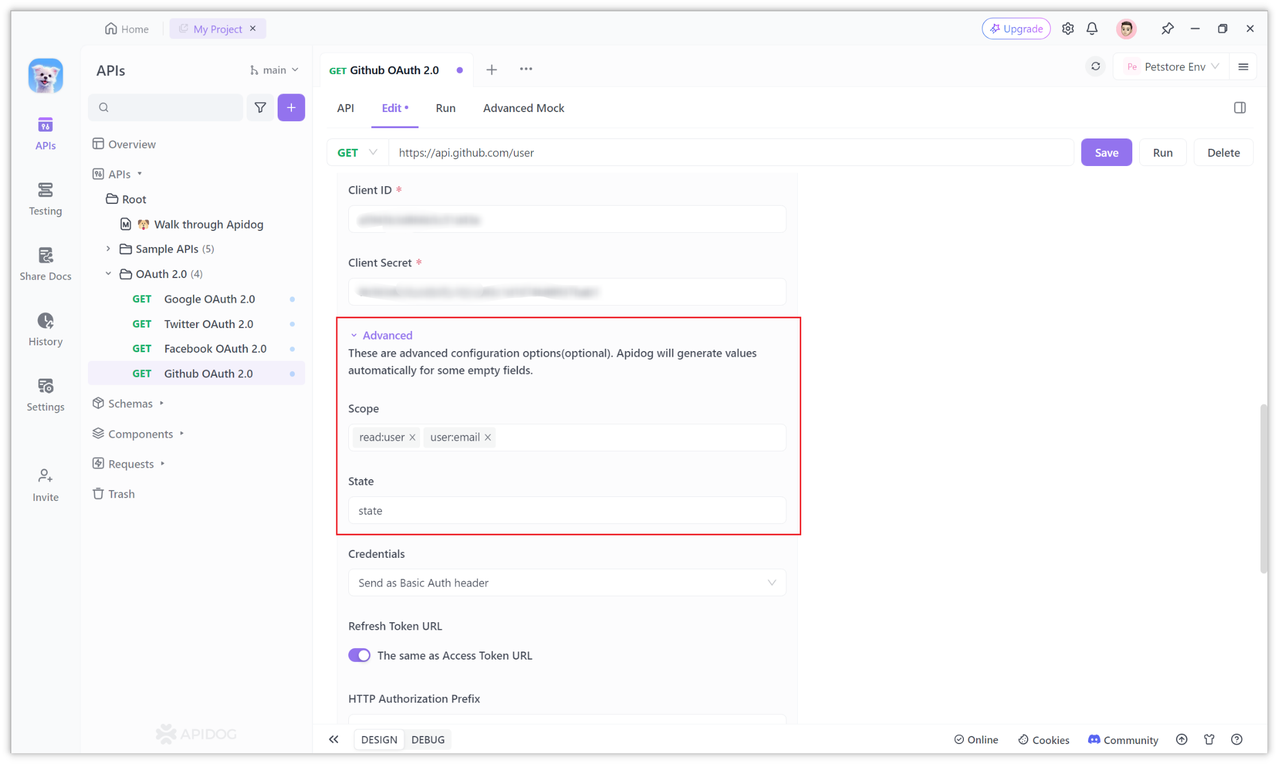
We can also expand the "More" option and fill in the parameter values that need to be filled in to the corresponding options. For example, in "Scope", you can fill in the required permissions, such as read:user, user:email, etc.
You can have more permissions for other You can visit the permissions module of the Github help documentation to view it. Fill in state in the "State" option. State is to prevent cross-site request forgery.
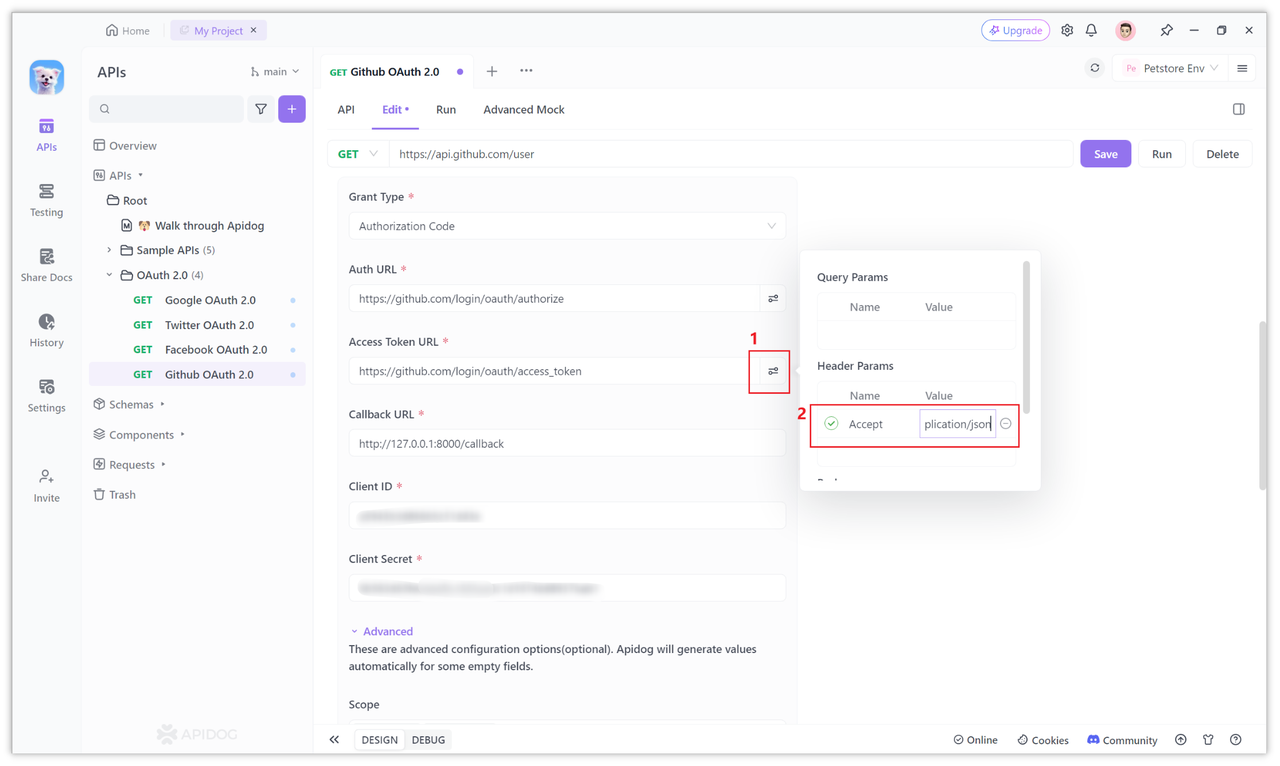
4. Configure the request address of the access token
According to the official Github documentation, to apply for an access token, the requested URL is:
https://github.com/login/oauth/access_token
Just fill in the above address into the Access Token URL input field of Apidog's OAuth 2.0 page.
5. Obtain the access token for the Github OAuth 2.0 service
After the above configuration items are set, you can click the "Get Token" button to obtain the access token.
After clicking, if this is the first time you log in, a window will pop up for you to authorize. Just fill in the username and password of your Github account.
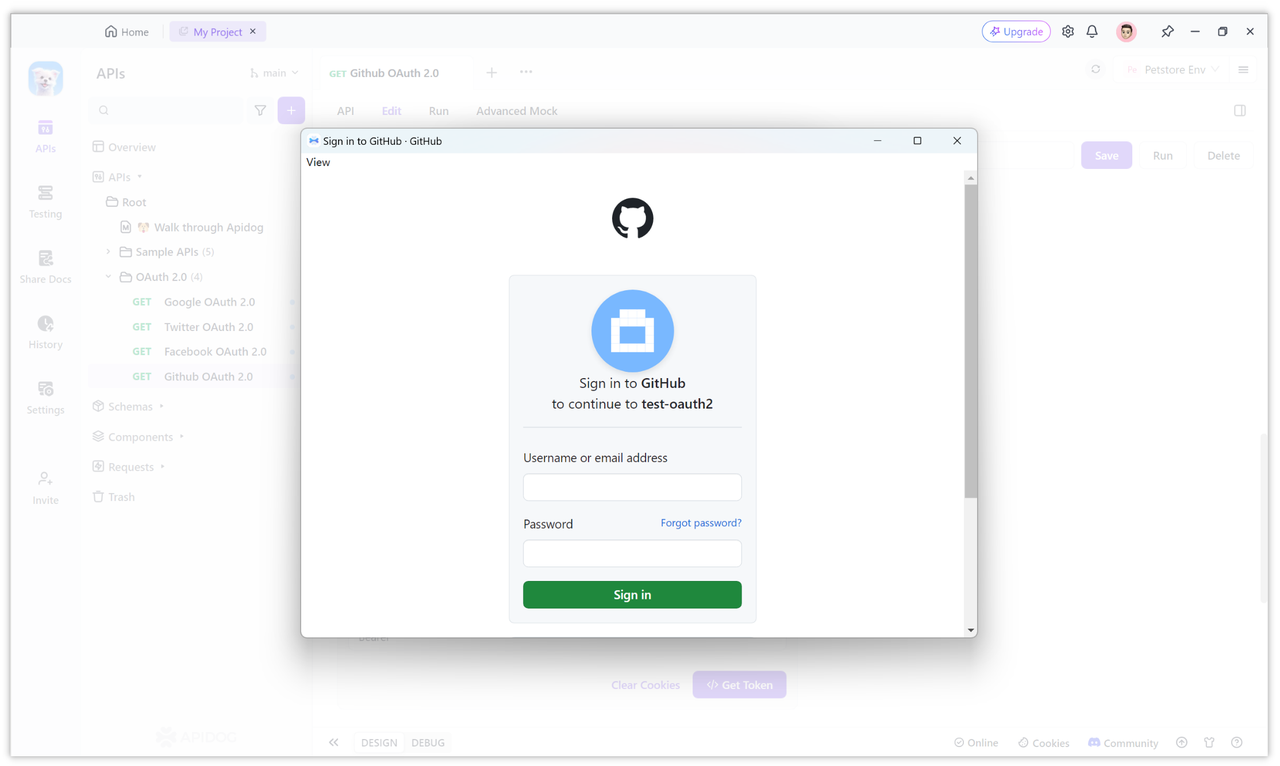
After filling in the username and password, you will be asked to confirm authorization or perform two-step verification. After verification, click Confirm.
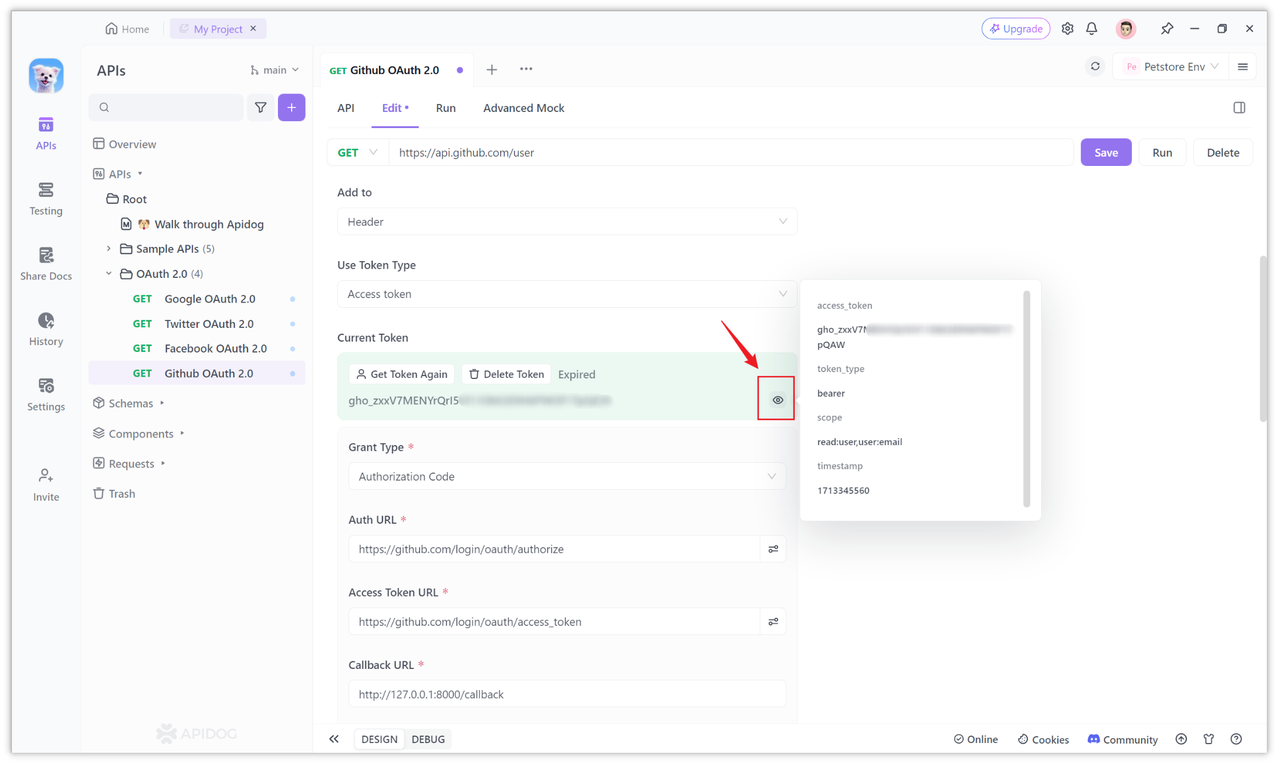
After the authorization is completed, the access token will be automatically obtained and displayed on the page. At the same time, other information returned by Github will also be parsed, as shown in the figure below. "Expired" is displayed here because Github did not return the expires_in attribute to us, so we cannot make a judgment. However, this Token is usable. Let's initiate a request below.
Step 3: Access open resources based on Token
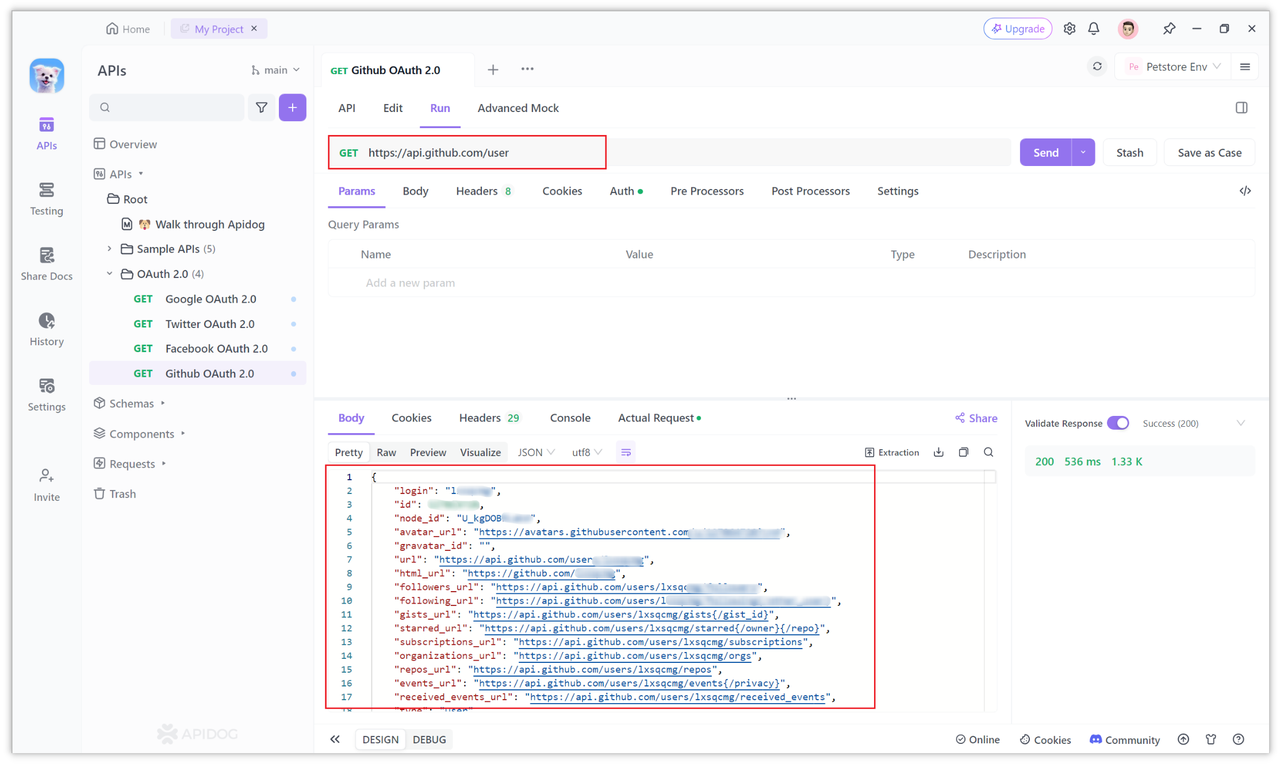
After you have the access token (Token), you can use this access token to call Github's open resources. You can view the specific open resources in the Github API.
For example, the following API obtains user information. If your interface does not return, you need to check whether you have permissions. As mentioned in Section 3 of "Step 2", just configure it in Scope.
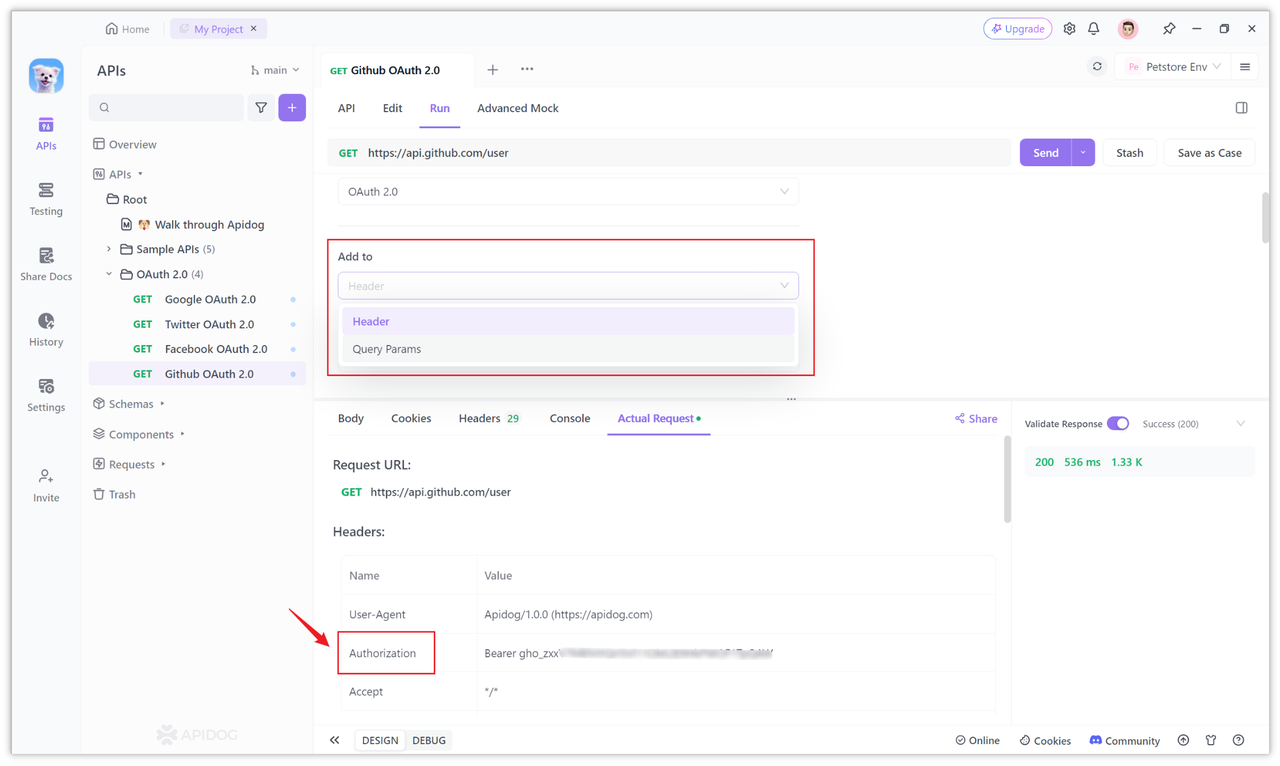
When sending a request, Apidog will automatically append the Token to the Authorization of the request header, add it to the Bearer, and send it out. If you want to carry the Token in the URL, you can also modify the "Add Location" of the Token in the configuration items of the page and select "Query Params".
Summary
OAuth 2.0 is an authorization framework that allows third-party applications to obtain access tokens without requiring the user to provide a username and password. The authorization process used by GitHub is the "authorization code authorization process", and its authorization process can be debugged and configured in Apidog.


