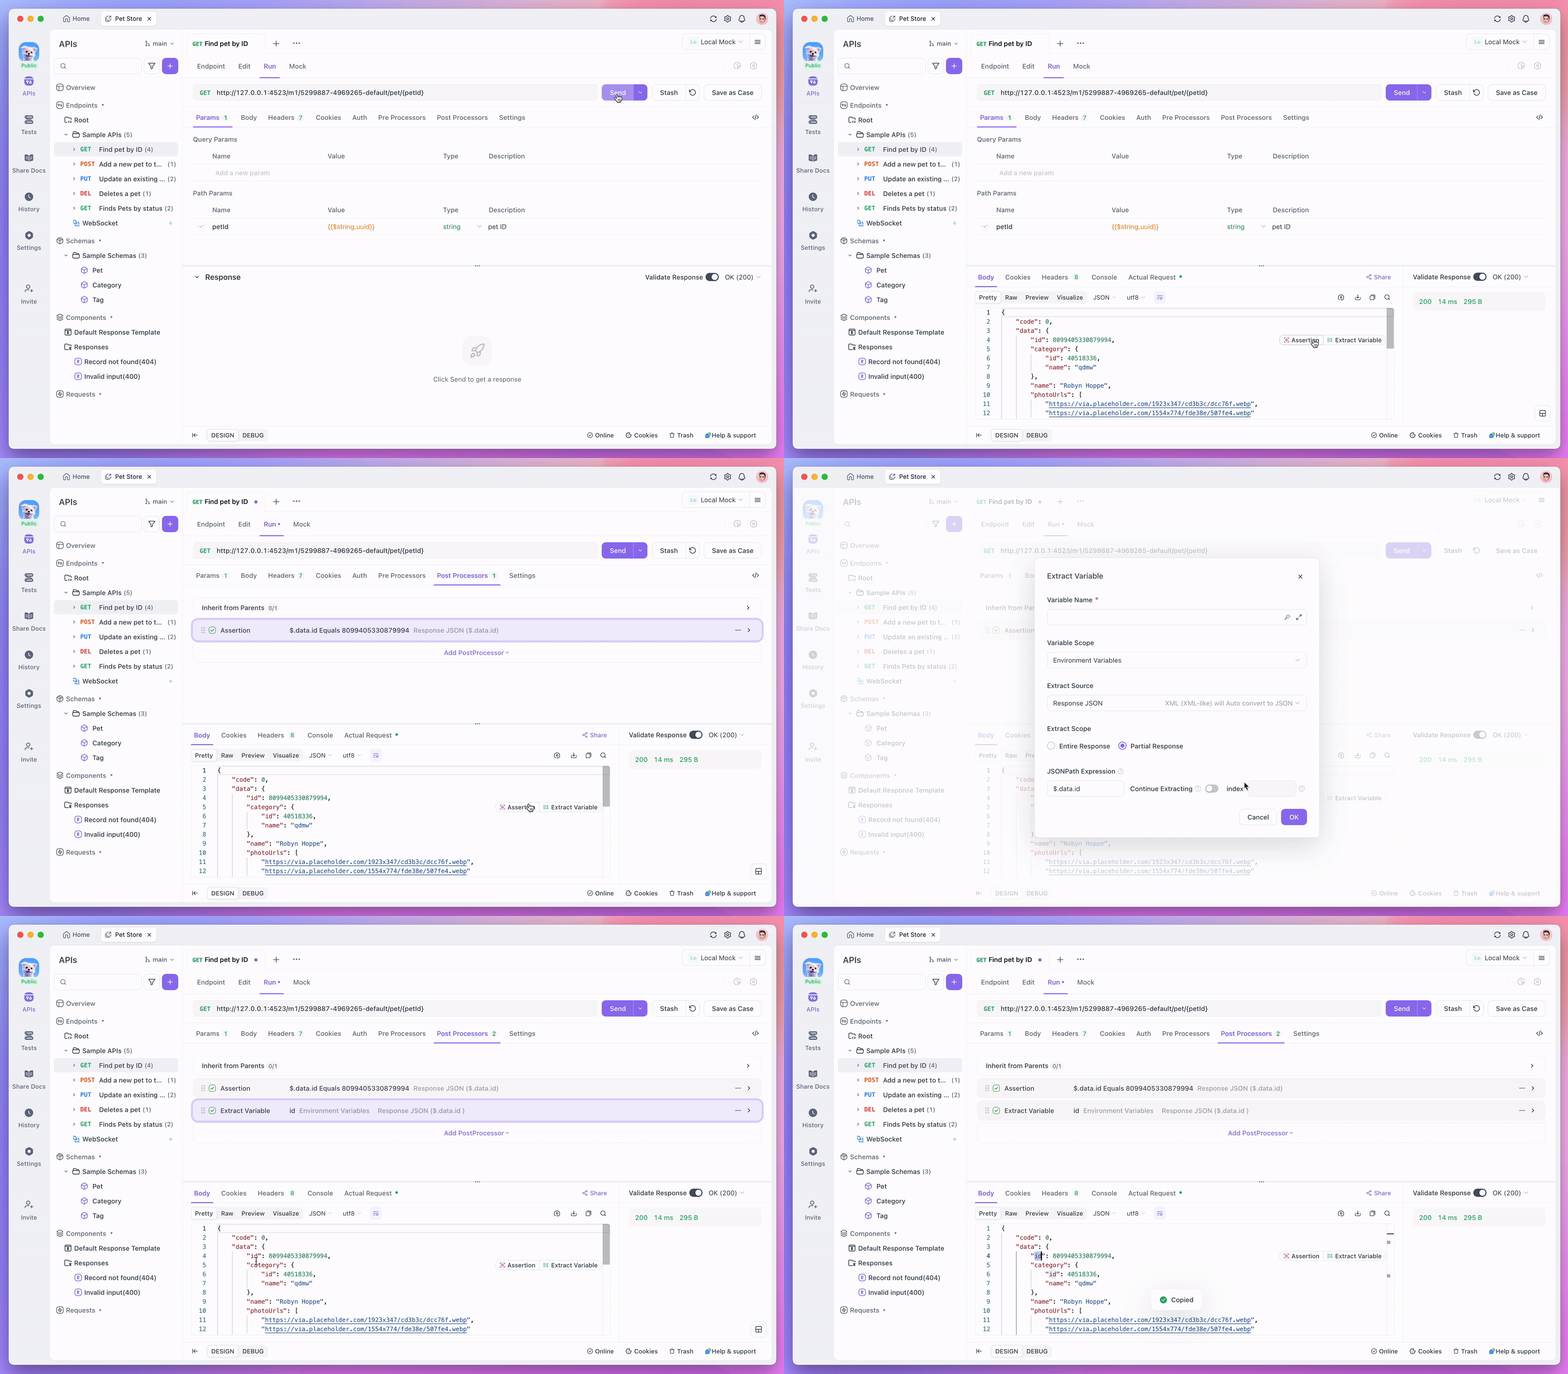
If you’re working with APIs, you know how important it is to ensure that the responses returned by the API are accurate and follow the expected format. Whether you're a developer, tester, or someone just getting into API testing, Apidog offers a powerful set of tools to streamline the process. In this guide, we’ll walk you through how to set assertions, extract variables, and copy the JSON path directly in the response area when an endpoint returns a JSON response. These capabilities in Apidog will help you test your APIs more effectively and automate much of your workflow.
Now, let’s get started!
What is Apidog and Why Should You Use It?
Before we jump into the specifics, let’s take a moment to understand what Apidog is and how it can help you with API testing. Apidog is a robust tool designed for API testing, and it allows users to work seamlessly with different API responses, manage complex workflows, and ensure their APIs work as expected.
Apidog simplifies the process of sending requests, receiving responses, and analyzing API behavior. You can use it to:
- Test APIs quickly and easily.
- Set up assertions and validations.
- Manage responses, particularly when they are returned in JSON format.
- Extract useful data from responses to reuse in other requests.
Now that you know what Apidog can do, let’s get into how to make the most of it, particularly when you're dealing with JSON responses from your API endpoints.
Step 1: Sending an API Request in Apidog
The first step in testing APIs with Apidog is sending a request. Apidog provides an easy-to-use interface to send both GET and POST requests, along with other HTTP methods.
- Open Apidog and create a new project or open an existing one.

2. Select the API request you want to send, such as a GET or POST request.

3. Enter the API endpoint URL you want to test.

4. Set any necessary headers, parameters, or body data (for POST requests).

Once you've set up the request, you can click the Send button to execute the API request. Apidog will show you the response in a structured format.
Step 2: Understanding JSON Responses in Apidog
When you send a request to an API endpoint, it often returns a JSON response. JSON (JavaScript Object Notation) is a lightweight data-interchange format that is easy for humans to read and write and easy for machines to parse and generate. Most modern APIs use JSON as their response format, so understanding how to handle it is crucial.
In Apidog, when a response is returned, you'll see it in the Response Area. The response area displays data returned by the API in a structured way. Here's an example of what a JSON response might look like:
{
  "status": "success",
  "data": {
    "user_id": 123,
    "name": "John Doe",
    "email": "johndoe@example.com"
  }
}
In this example, the JSON response has multiple fields, including a status field, a data object, and other properties like user_id, name, and email.
Understanding the structure of this response is key to setting assertions, extracting variables, and copying JSON paths in Apidog. Let's move on to how to make use of this structured data in your tests.

Step 3: Setting Assertions in Apidog
Assertions are essential for validating the behavior of your APIs. When you test an API, you want to ensure that the response returned is correct. Assertions help automate this validation by specifying expected values for different fields in the response.
How to Set Assertions in Apidog:
- Open the Response Area where your JSON response is displayed.

2. Click on the Assertions tab at the top of the response panel. You can now specify what field or value you want to assert.

Once you add your assertion, Apidog will automatically check if the response matches the condition you’ve set. This makes testing more efficient because you don’t have to manually check the response each time you run a test.
Step 4: Extracting Variables from JSON Responses
Often, you may want to reuse values from the API response in subsequent requests. Apidog makes it easy to extract variables from the JSON response and store them for later use.
How to Extract Variables in Apidog:
- Open the Response Area where the JSON response is displayed.

2. Select the Extract Variables button, which will automatically analyze the JSON response and present available fields to extract.

Step 5: Copying the JSON Path in Apidog
Another useful feature in Apidog is the ability to copy the JSON path of a particular field in the response. This comes in handy when you need to refer to a specific field in the JSON response multiple times.
How to Copy the JSON Path in Apidog:
- Open the Response Area with your JSON response. Hover over the field you want to copy the JSON path for, such as
data.user_id. Right click on the Copy JSON Path button that appears next to the field.

Now, the path is copied to your clipboard, and you can paste it wherever you need it (e.g., in assertions or variable extraction).
For instance, if you want to copy the JSON path for the user_id field, you would copy data.user_id. You can then use this copied path in assertions or in your next API request to pass this variable dynamically.
Conclusion
In this tutorial, we’ve explored how to set assertions, extract variables, and copy JSON paths when working with API responses in Apidog. These features allow you to test APIs efficiently, validate responses, and reuse data dynamically across multiple requests.
Now that you’re familiar with these powerful capabilities, go ahead and give them a try in Apidog. The more you use these features, the easier it will be to automate your API testing process and ensure your APIs are working as expected.
Don't forget to download Apidog for free if you haven’t yet. With Apidog, testing your APIs has never been easier!


