
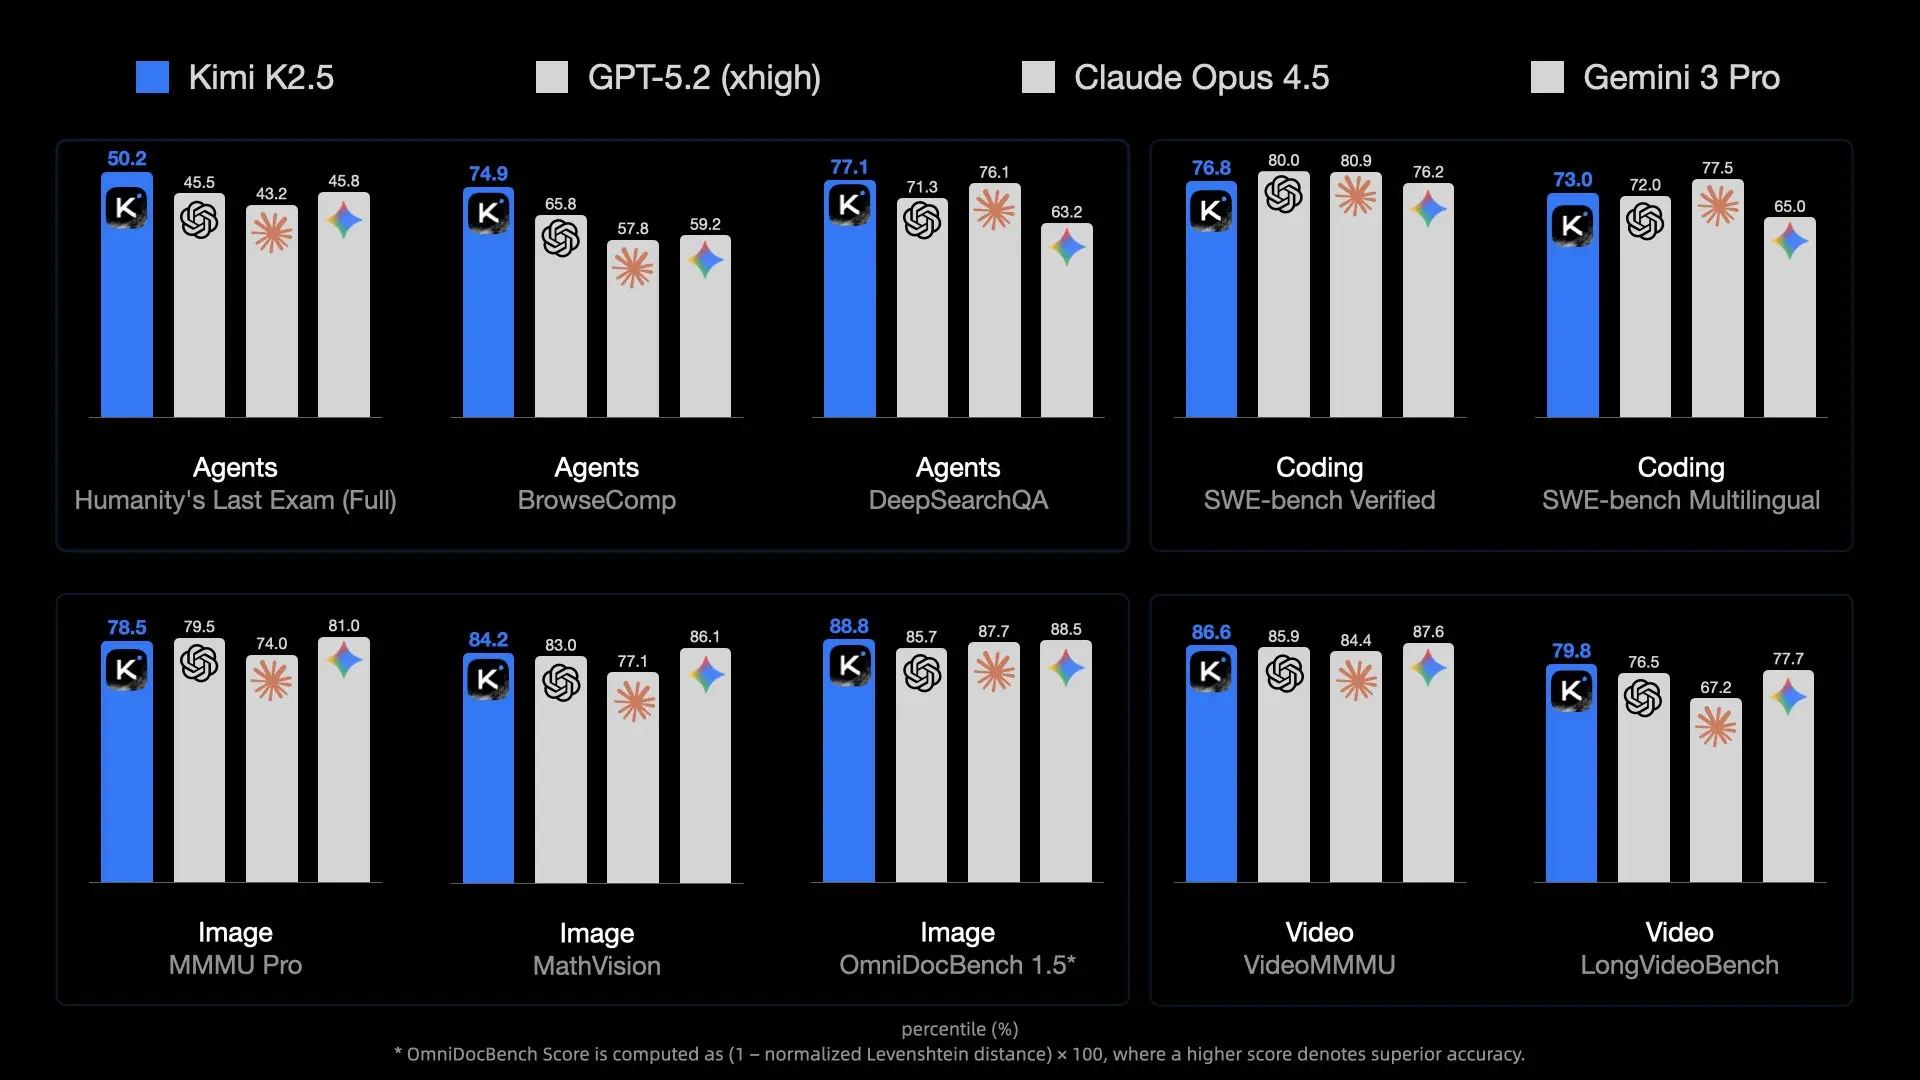
The release of Kimi K2.5 by Moonshot AI has set a new benchmark for open-source models. With 1 Trillion parameters and a Mixture-of-Experts (MoE) architecture, it rivals proprietary giants like GPT-4o. However, its sheer size makes it a beast to run.
For developers and researchers, running K2.5 locally offers unbeatable privacy, zero latency (network-wise), and cost savings on API tokens. But unlike smaller 7B or 70B models, you can't just load this onto a standard gaming laptop.
This guide explores how to leverage Unsloth's breakthrough quantization techniques to fit this massive model onto (somewhat) accessible hardware using llama.cpp, and how to integrate it into your development workflow with Apidog.
Why Kimi K2.5 is Hard to Run (The MoE Challenge)
Kimi K2.5 isn't just "big"; it's architecturally complex. It uses a Mixture-of-Experts (MoE) architecture with significantly more experts than typical open models like Mixtral 8x7B.
The Scale Problem
- Total Parameters: ~1 Trillion. In standard FP16 precision, this would require ~2 Terabytes of VRAM.
- Active Parameters: While inference only uses a subset of parameters per token (thanks to MoE), you still need to keep the entire model in memory to route tokens correctly.
- Memory Bandwidth: The real bottleneck isn't just capacity; it's speed. Moving 240GB of data through memory channels for every single token generation is a massive strain on consumer hardware.
This is why quantization (reducing the bits per weight) is non-negotiable. Without Unsloth's extreme 1.58-bit compression, running this would be strictly the domain of supercomputing clusters.
Hardware Requirements: Can You Run It?
The "1.58-bit" quantization is the magic that makes this possible, compressing the model size by ~60% without destroying intelligence.
Minimum Specifications (1.58-bit Quant)
- Disk Space: >240 GB (NVMe SSD strongly recommended)
- RAM + VRAM: >240 GB Combined
- Example 1: 2x RTX 3090 (48GB VRAM) + 256GB System RAM (Doable, slow)
- Example 2: Mac Studio M2 Ultra with 192GB RAM (Not enough, likely to crash or swap heavily)
- Example 3: Server with 512GB RAM (Works well on CPU)
- Compute: AVX2 supported CPU or NVIDIA GPUs
Recommended Specifications (Performance)
To get usable speeds (>10 tokens/s):
- VRAM: As much as possible. Offloading layers to GPU significantly boosts speed.
- System: 4x H100/H200 GPUs (Enterprise) OR a workstation with 512GB DDR5 RAM (Consumer/Prosumer).
Note: If you don't meet these specs, consider using the Kimi K2.5 API instead. It's cost-effective ($0.60/M tokens) and requires zero hardware maintenance.
The Solution: Unsloth Dynamic GGUF
Unsloth has released dynamic GGUF versions of Kimi K2.5. These files allow you to load the model into llama.cpp, which can intelligently split the workload between your CPU (RAM) and GPU (VRAM).
What is Dynamic Quantization?
Standard quantization applies the same compression to every layer. Unsloth's "Dynamic" approach is smarter:
- Critical Layers (Attention/Routing): Kept at higher precision (e.g., 4-bit or 6-bit) to maintain intelligence.
- Feed-Forward Layers: Compressed aggressively to 1.58-bit or 2-bit to save space.
This hybrid approach allows a 1T model to run in ~240GB while retaining reasoning capabilities that beat smaller 70B models running at full precision.
- 1.58-bit (UD-TQ1_0): ~240GB. The smallest viable version.
- 2-bit (UD-Q2_K_XL): ~375GB. Better reasoning, requires significantly more RAM.
- 4-bit (UD-Q4_K_XL): ~630GB. Near full-precision performance, enterprise hardware only.
Step-by-Step Installation Guide
We will use llama.cpp as it provides the most efficient inference engine for split CPU/GPU workloads.
Step 1: Install llama.cpp
You need to build llama.cpp from source to ensure you have the latest Kimi K2.5 support.
Mac/Linux:
# Install dependencies
sudo apt-get update && sudo apt-get install pciutils build-essential cmake curl libcurl4-openssl-dev -y

# Clone repository
git clone https://github.com/ggml-org/llama.cpp
cd llama.cpp

# Build with CUDA support (if you have NVIDIA GPUs)
cmake -B build -DBUILD_SHARED_LIBS=OFF -DGGML_CUDA=ON

# OR Build for CPU/Mac Metal (default)
# cmake -B build

# Compile
cmake --build build --config Release -j --clean-first --target llama-cli llama-server
Step 2: Download the Model
We'll download the Unsloth GGUF version. The 1.58-bit version is recommended for most "home lab" setups.
You can use the huggingface-cli or llama-cli directly.
Option A: Direct Download with llama-cli
# Create a directory for the model
mkdir -p models/kimi-k2.5

# Download and run (this will cache the model)
./build/bin/llama-cli \
    -hf unsloth/Kimi-K2.5-GGUF:UD-TQ1_0 \
    --model-url unsloth/Kimi-K2.5-GGUF \
    --print-token-count 0
Option B: Manual Download (Better for management)
pip install huggingface_hub

# Download specific quantization
huggingface-cli download unsloth/Kimi-K2.5-GGUF \
  --include "*UD-TQ1_0*" \
  --local-dir models/kimi-k2.5
Step 3: Run Inference
Now, let's fire up the model. We need to set specific sampling parameters recommended by Moonshot AI for optimal performance (temp 1.0, min-p 0.01).
./build/bin/llama-cli \
    -m models/kimi-k2.5/Kimi-K2.5-UD-TQ1_0-00001-of-00005.gguf \
    --temp 1.0 \
    --min-p 0.01 \
    --top-p 0.95 \
    --ctx-size 16384 \
    --threads 16 \
    --prompt "User: Write a Python script to scrape a website.\nAssistant:"
Key Parameters:
--fit on: Automatically offloads layers to GPU to fit available VRAM (crucial for hybrid setups).--ctx-size: K2.5 supports up to 256k, but 16k is safer for memory conservation.
Running as a Local API Server
To integrate Kimi K2.5 with your apps or Apidog, run it as an OpenAI-compatible server.
./build/bin/llama-server \
    -m models/kimi-k2.5/Kimi-K2.5-UD-TQ1_0-00001-of-00005.gguf \
    --port 8001 \
    --alias "kimi-k2.5-local" \
    --temp 1.0 \
    --min-p 0.01 \
    --ctx-size 16384 \
    --host 0.0.0.0
Your local API is now active at http://127.0.0.1:8001/v1.
Connecting Apidog to Your Local Kimi K2.5
Apidog is the perfect tool to test your local LLM. It allows you to visually construct requests, manage conversation history, and debug token usage without writing curl scripts.
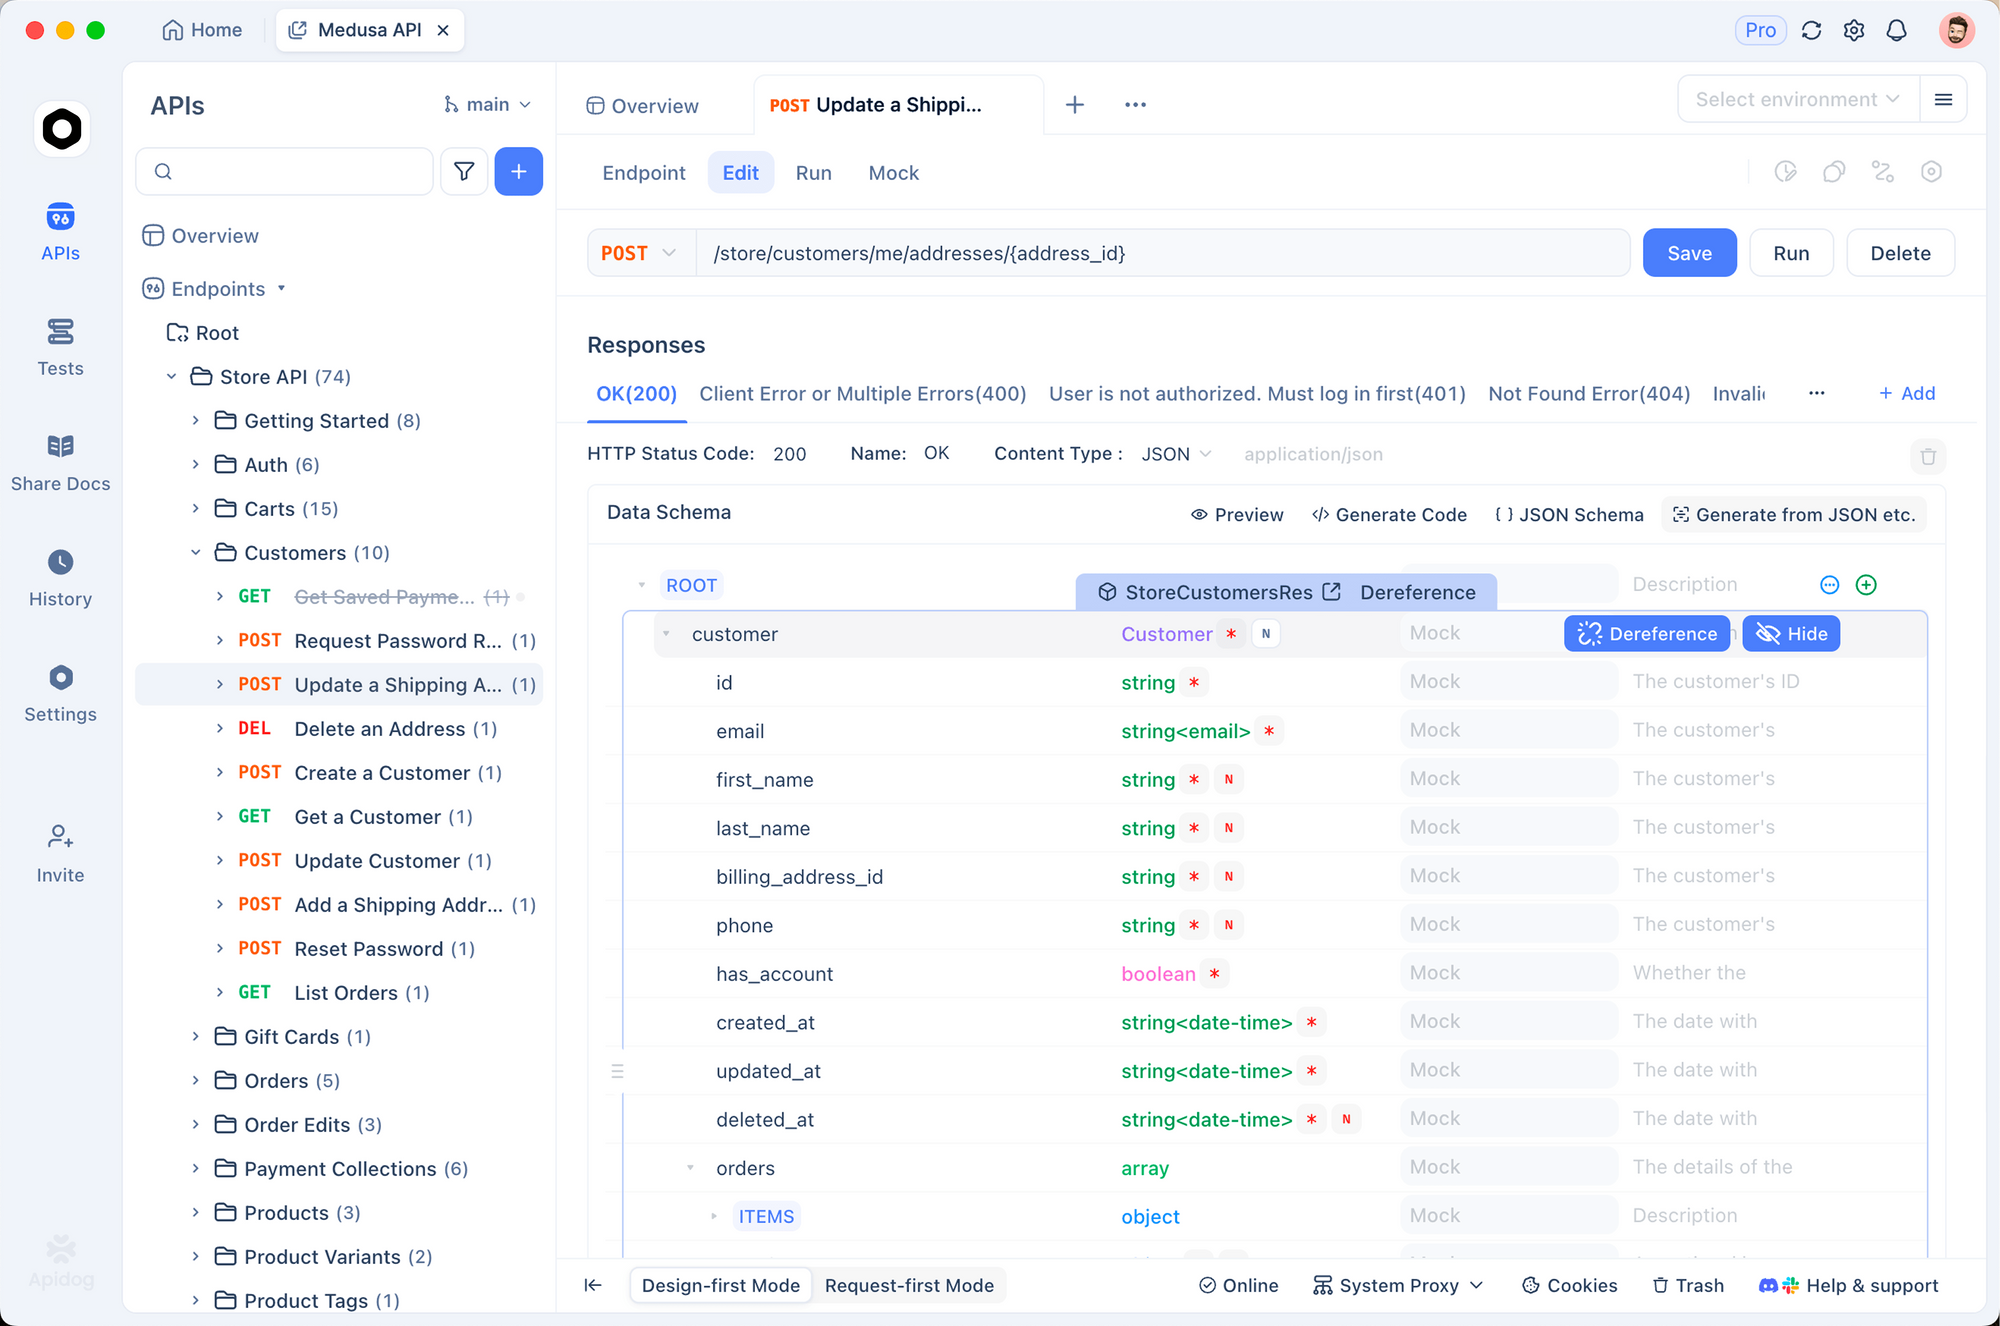
1. Create a New Request
Open Apidog and create a new HTTP project. Create a POST request to:http://127.0.0.1:8001/v1/chat/completions
2. Configure Headers
Add the following headers:
Content-Type:application/jsonAuthorization:Bearer not-needed(Local servers usually ignore the key, but it's good practice)
3. Set the Body
Use the OpenAI-compatible format:
{
  "model": "kimi-k2.5-local",
  "messages": [
    {
      "role": "system",
      "content": "You are Kimi, running locally."
    },
    {
      "role": "user",
      "content": "Explain Quantum Computing in one sentence."
    }
  ],
  "temperature": 1.0,
  "max_tokens": 1024
}
4. Send and Verify
Click Send. You should see the response stream in.
Why use Apidog?
- Latency Tracking: See exactly how long the local model takes to respond (Time to First Token).
- History Management: Apidog keeps your chat sessions, so you can test multi-turn conversation capabilities of the local model easily.
- Code Generation: Once your prompt works, click "Generate Code" in Apidog to get the Python/JS snippet to use this local server in your app.
Detailed Troubleshooting & Performance Tuning
Running a 1T model pushes consumer hardware to its breaking point. Here are advanced tips to keep it stable.
"Model loading failed: out of memory"
This is the most common error.
- Reduce Context: Lower
--ctx-sizeto 4096 or 8192. - Close Apps: Shut down Chrome, VS Code, and Docker. You need every byte of RAM.
- Use Disk Offloading (Last resort):
llama.cppcan map model parts to disk, but inference will drop to <1 token/s.
"Garbage Output" or Repetitive Text
Kimi K2.5 is sensitive to sampling. Ensure you are using:
Temperature: 1.0 (Surprisingly high, but recommended for this model)Min-P: 0.01 (Helps cut off low-prob tokens)Top-P: 0.95
Slow Generation Speed
If you are getting 0.5 tokens/s, you are likely bottlenecked by system RAM bandwidth or CPU speed.
- Optimization: Ensure
--threadsmatches your physical CPU cores (not logical threads). - GPU Offload: Even offloading 10 layers to a small GPU can improve prompt processing time significantly.
- NUMA Support: If you are on a dual-socket server, enable NUMA awareness in
llama.cppbuild flags to optimize memory access.
Dealing with Crashes
If the model loads but crashes during generation:
- Check Swap: Ensure you have a massive swap file enabled (100GB+). Even if you have 256GB RAM, transient spikes can kill the process.
- Disable KV Cache Offload: Keep the KV cache on CPU if VRAM is tight (
--no-kv-offload).
Ready to build?
Whether you manage to run Kimi K2.5 locally or decide to stick with the API, Apidog provides the unified platform to test, document, and monitor your AI integrations. Download Apidog for free and start experimenting today.


