
Perplexity AI has gained significant popularity for its conversational AI capabilities, particularly its strength in providing up-to-date, source-cited answers by integrating real-time web search into its responses. For developers and businesses looking to leverage these powerful models within their own applications, Perplexity offers an Application Programming Interface (API).
The Perplexity AI API allows programmatic access to Perplexity's large language models (LLMs), including their online models (like sonar-small-online and sonar-medium-online) which can browse the web to answer queries, and their offline chat models (like sonar-small-chat and sonar-medium-chat).
This tutorial explores two primary pathways for interacting with the Perplexity AI API ecosystem:
- Direct Access using an Official Perplexity API Key: This is the standard method provided by Perplexity. While there might be a very limited free trial or introductory credits, sustained or high-volume usage generally requires a Perplexity Pro subscription or specific enterprise arrangements to obtain and utilize an API key with sufficient credits.
- Indirect Access via Third-Party Services (OpenRouter): Platforms like OpenRouter act as aggregators, providing access to various LLMs, including Perplexity's models, through their own API infrastructure. This can be an alternative way to use Perplexity models, potentially without needing a direct Perplexity Pro subscription, though you will still incur costs through the third-party provider.
We will also clarify the situation regarding Groq, another popular inference platform, and its relationship (or lack thereof) with Perplexity's proprietary models.
Accessing the Official Perplexity AI API with a Pro Account
This section details how to use the official API provided directly by Perplexity. This method typically offers the most direct access and potentially the latest features or models, but usually requires a paid Perplexity subscription (Pro) for meaningful usage beyond initial exploration.
Prerequisites:
- A Perplexity Account.
- A Perplexity Pro subscription (generally required for substantial API access and key generation).
- Basic understanding of REST APIs and how to make HTTP requests (using tools like
curlor programming languages like Python).
Step 1: Obtaining Your Official Perplexity AI API Key
- Log in to Perplexity: Go to the Perplexity website (
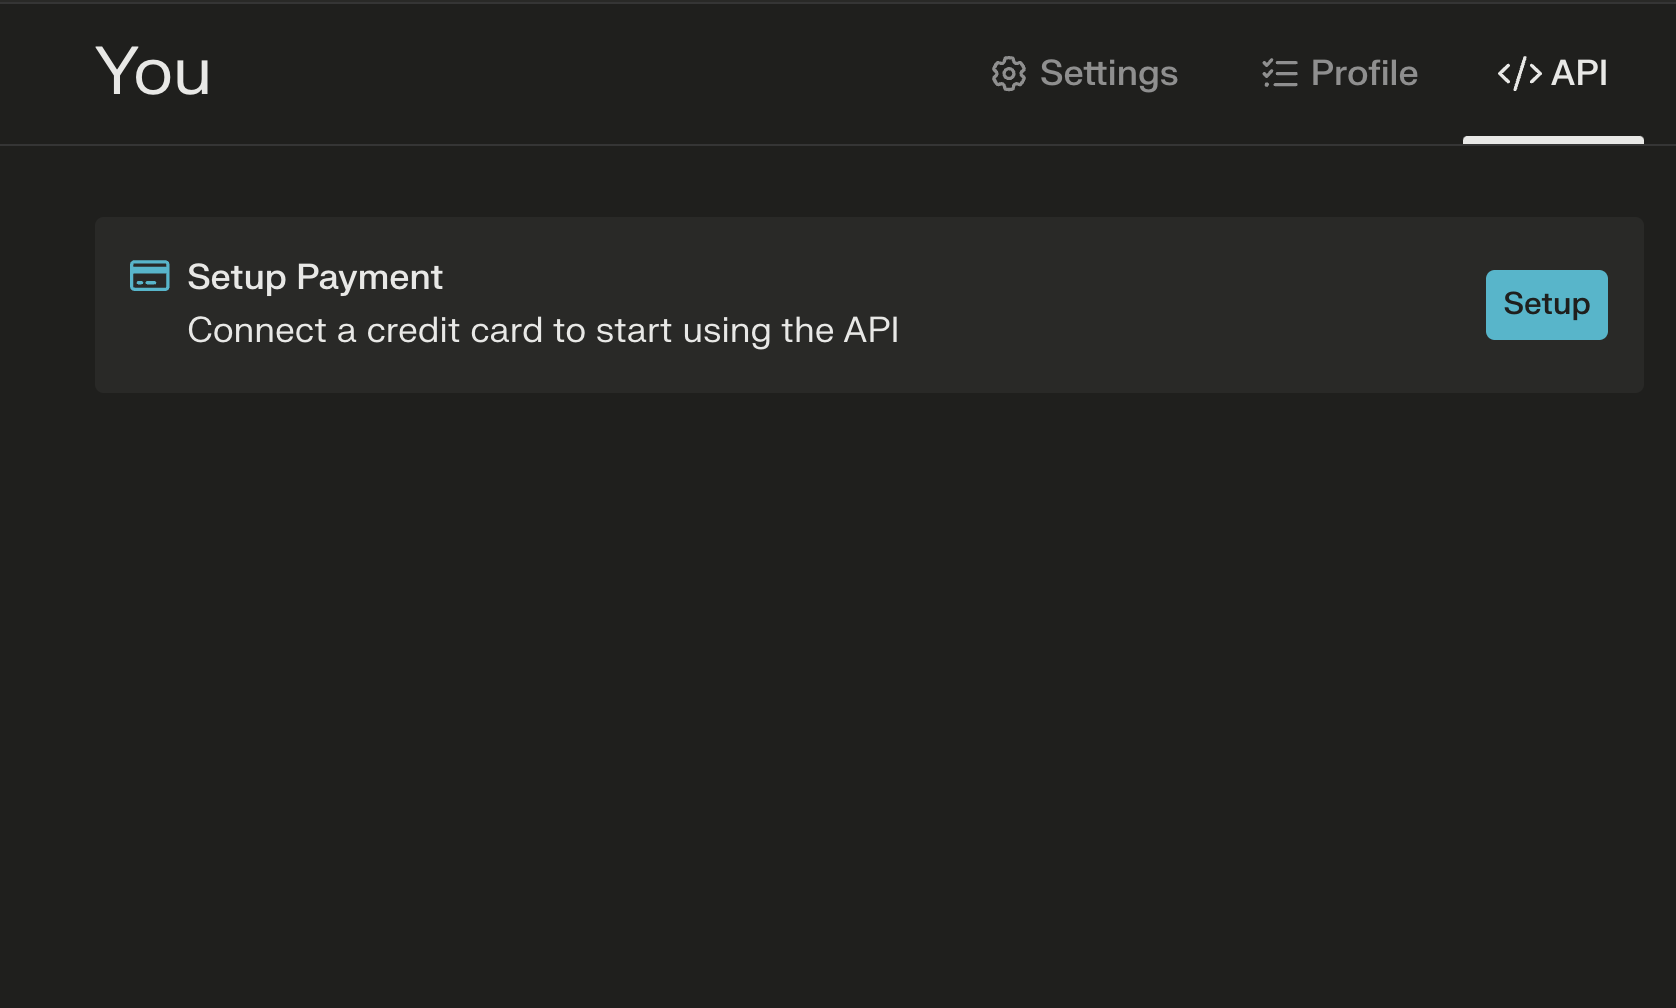
perplexity.ai) and log in to your account. Ensure it's upgraded to Pro if required for API key generation/usage. - Setup a Payment method: Look for account settings, profile options, or a dedicated 'API' section in your Perplexity dashboard. The exact location might change, but it's typically found under your account management area.
3. Generate API Key: Within the API settings, you should find an option to generate a new API key. Click this button.
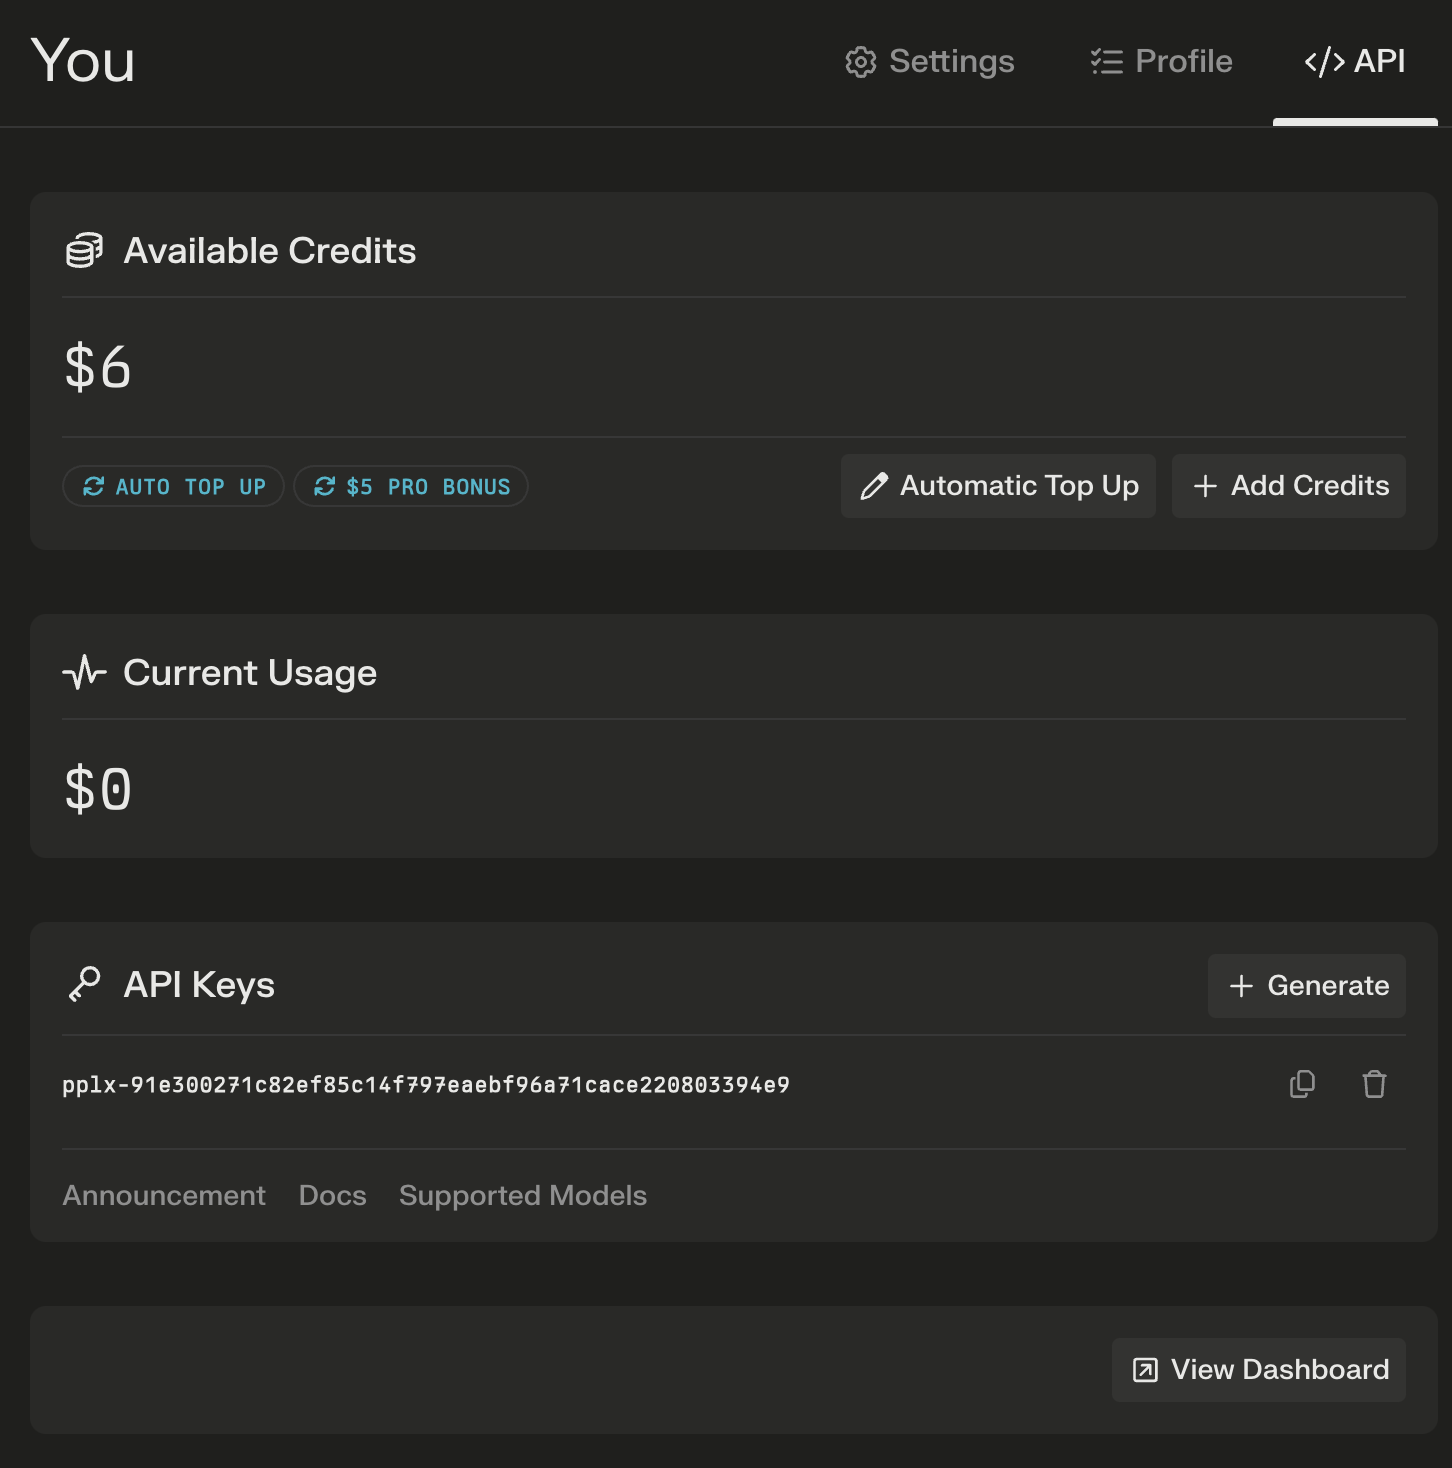
4. Copy and Secure Your Key: Perplexity will generate a unique alphanumeric string. This is your API key. Treat this key like a password. Do not share it publicly or commit it directly into your code repositories. Store it securely, for example, using environment variables or a secrets management system.
Step 2: Understanding the Perplexity AI API Endpoint
The primary endpoint for interacting with Perplexity's chat models via the API is:
https://api.perplexity.ai/chat/completions
This endpoint follows a structure similar to OpenAI's API, making it relatively familiar for developers who have worked with other LLM APIs.
Step 3: Choosing a Perplexity AI API Model
Perplexity offers several models through its API. You need to specify which model you want to use in your API request. Common models include:
Online Models (with web search):
sonar-small-onlinesonar-medium-online- (Previously
pplx-7b-online,pplx-70b-online- check current documentation for available models)
Chat Models (without web search):
sonar-small-chatsonar-medium-chat- (Previously
pplx-7b-chat,pplx-70b-chat- check current documentation) - Other specialized or older models might also be available. Always refer to the official Perplexity API documentation for the most up-to-date list of models and their capabilities.
Step 4: Making Your First Perplexity AI API Request
You can interact with the API using various tools or programming languages. Here are examples using curl (command-line tool) and Python (requests library).
Using curl:
curl -X POST <https://api.perplexity.ai/chat/completions> \\\\
     -H "Authorization: Bearer YOUR_PERPLEXITY_API_KEY" \\\\
     -H "Content-Type: application/json" \\\\
     -d '{
       "model": "sonar-medium-online",
       "messages": [
         {
           "role": "system",
           "content": "Be precise and concise."
         },
         {
           "role": "user",
           "content": "What are the main benefits of using the Perplexity AI API?"
         }
       ],
       "max_tokens": 500,
       "temperature": 0.7
     }'
Explanation:
curl -X POST ...: Makes an HTTP POST request to the specified endpoint.H "Authorization: Bearer YOUR_PERPLEXITY_API_KEY": This header provides your authentication credentials. ReplaceYOUR_PERPLEXITY_API_KEYwith the key you generated.H "Content-Type: application/json": Informs the server that the request body is in JSON format.d '{...}': Specifies the JSON payload (data) being sent."model": The specific Perplexity model to use (e.g.,sonar-medium-online)."messages": A list of message objects defining the conversation history."role": Can be"system"(sets the AI's behavior),"user"(your input), or"assistant"(previous AI responses)."content": The text of the message."max_tokens"(optional): Maximum number of tokens to generate in the response."temperature"(optional): Controls randomness (0 = deterministic, higher = more creative/random).
Using Python (requests library):
First, make sure you have the requests library installed: pip install requests
import requests
import json
import os

# Securely load your API key (e.g., from an environment variable)
api_key = os.environ.get("PERPLEXITY_API_KEY")
# Or uncomment and replace directly (less secure for production):
# api_key = "YOUR_PERPLEXITY_API_KEY"

if not api_key:
    print("Error: PERPLEXITY_API_KEY environment variable not set.")
else:
    url = "<https://api.perplexity.ai/chat/completions>"

    payload = {
        "model": "sonar-medium-online",
        "messages": [
            {
                "role": "system",
                "content": "Provide detailed explanations and cite sources."
            },
            {
                "role": "user",
                "content": "Explain the concept of Retrieval-Augmented Generation (RAG)."
            }
        ],
        "max_tokens": 800,
        "temperature": 0.5,
        # Add other parameters like 'frequency_penalty', 'presence_penalty' if needed
    }

    headers = {
        "Authorization": f"Bearer {api_key}",
        "Content-Type": "application/json"
    }

    try:
        response = requests.post(url, headers=headers, json=payload)
        response.raise_for_status() # Raise an exception for bad status codes (4xx or 5xx)

        response_data = response.json()
        print(json.dumps(response_data, indent=2))

        # Extract the assistant's reply
        if response_data.get("choices"):
             assistant_message = response_data["choices"][0]["message"]["content"]
             print("\\\\nAssistant's Response:\\\\n", assistant_message)

    except requests.exceptions.RequestException as e:
        print(f"An error occurred: {e}")
        if e.response is not None:
            print("Error details:", e.response.text)
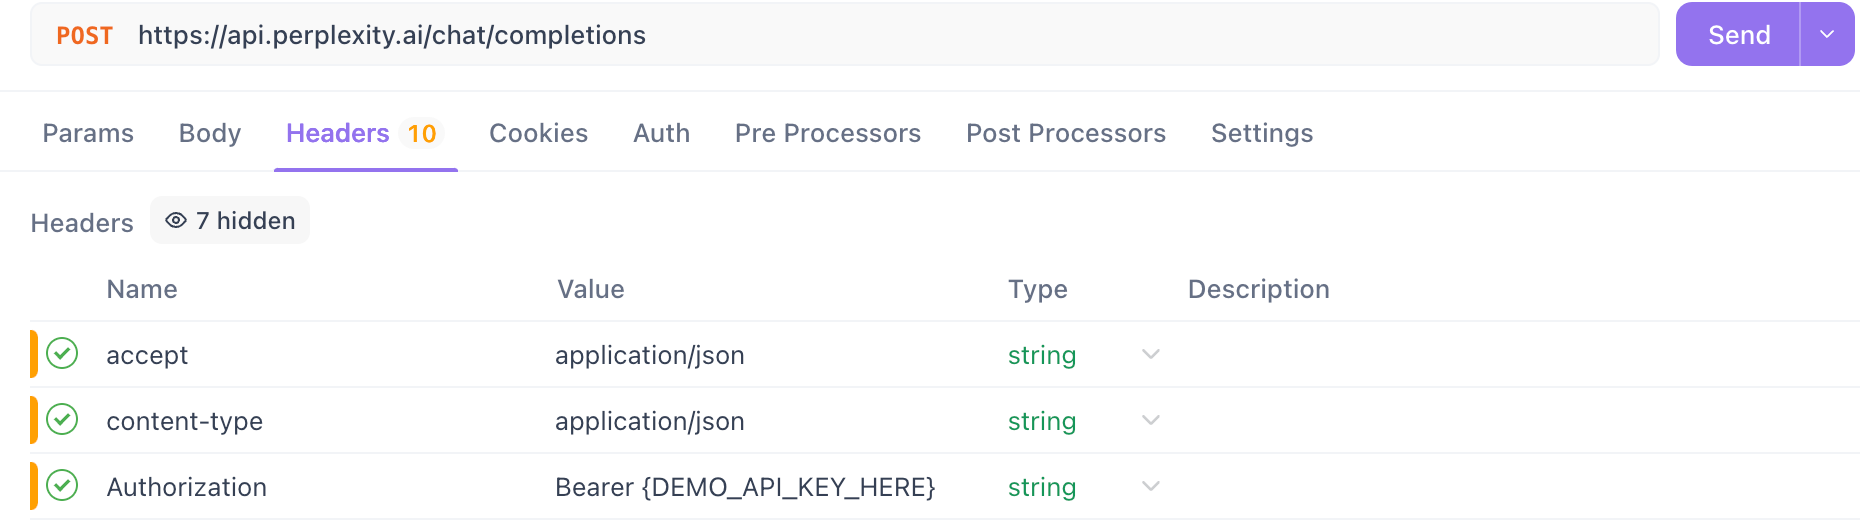
Step 5: Testing Your Perplexity AI API Key with APIdog

Before integrating the API key into your application, it's wise to test it to ensure it's working correctly. APIdog is a user-friendly tool for testing APIs. Here's how to use it to test your Perplexity key:
Download and Open APIdog: Launch the APIdog application or use the web version.
Create a New Request: Click the "+" button or similar option to create a new API request.

Set Method to POST: Change the HTTP method dropdown to POST.

Enter Endpoint URL: In the URL input field, paste the Perplexity chat completions endpoint: https://api.perplexity.ai/chat/completions
Configure Authorization:
- Go to the 'Authorization' tab below the URL bar.
- Select 'Bearer Token' from the type dropdown.
- In the 'Token' field, paste your Perplexity AI API key obtained in Step 1.
Set Content-Type Header:
- Go to the 'Headers' tab.
- Add a new header. Set the key to
Content-Typeand the value toapplication/json.
Construct Request Body:
- Go to the 'Body' tab.
- Select the 'raw' option and choose 'JSON' from the dropdown next to it.
- Paste the following JSON structure into the text area, replacing
"sonar-medium-online"with the model you want to test and adjusting the"content"if desired:
{
  "model": "sonar-medium-online",
  "messages": [
    {
      "role": "system",
      "content": "Be precise and factual."
    },
    {
      "role": "user",
      "content": "How many moons does Mars have?"
    }
  ]
}
Send the Request: Click the 'Send' button.
Check the Response: APIdog will display the response from the Perplexity API. Look for a 200 OK status code and a JSON response containing the AI's answer in the choices[0].message.content field. If you get an error (like a 401 Unauthorized or 403 Forbidden), double-check that your API key was pasted correctly in the Authorization tab and that your Perplexity account/key has the necessary permissions and credits.
Want an integrated, All-in-One platform for your Developer Team to work together with maximum productivity?
Apidog delivers all your demands, and replaces Postman at a much more affordable price!
Using Perplexity AI API Models Without a Direct Pro Account (with Openrouter)
If you don't have a Perplexity Pro subscription or prefer a different billing/access model, you can often use Perplexity's models through third-party API providers. OpenRouter is a popular example.
OpenRouter provides a unified API endpoint to access a wide variety of LLMs from different providers, including Perplexity. You pay OpenRouter based on your usage, and they handle the backend calls to the respective model providers.
You can check the available Perplexity AI API here:
Prerequisites:
- An OpenRouter Account (
openrouter.ai). - Funding added to your OpenRouter account or setting up billing.
- Basic understanding of REST APIs.
Step 1: Get Your OpenRouter API Key
- Sign Up/Log In: Go to
openrouter.aiand create an account or log in. - Navigate to Keys: Find the 'Keys' or 'API Keys' section in your account settings.
- Create Key: Generate a new API key.
- Copy and Secure: Copy the generated key and store it securely, just like the official Perplexity key.
Step 2: Identify Perplexity AI API Models on OpenRouter
OpenRouter uses its own naming convention, often prefixing the provider name. Perplexity models on OpenRouter might look like:
perplexity/sonar-small-chatperplexity/sonar-small-onlineperplexity/sonar-medium-chatperplexity/sonar-medium-online- (Check OpenRouter's /models page for the current list and exact names)
Step 3: Make API Request via OpenRouter Endpoint for Perplexity AI API Models
OpenRouter uses an OpenAI-compatible API endpoint:
https://openrouter.ai/api/v1/chat/completions
You structure your request similarly to the official Perplexity API or OpenAI API, but use your OpenRouter key and the OpenRouter model name.
Using curl:
curl -X POST <https://openrouter.ai/api/v1/chat/completions> \\\\
  -H "Authorization: Bearer YOUR_OPENROUTER_API_KEY" \\\\
  -H "Content-Type: application/json" \\\\
  -H "HTTP-Referer: YOUR_SITE_URL" \\\\ # Optional, but recommended by OpenRouter
  -H "X-Title: YOUR_APP_NAME" \\\\      # Optional, but recommended by OpenRouter
  -d '{
    "model": "perplexity/sonar-medium-online",
    "messages": [
      {"role": "user", "content": "How does OpenRouter provide access to the Perplexity AI API models?"}
    ]
  }'
Note: OpenRouter recommends adding HTTP-Referer and X-Title headers to identify your application. Replace YOUR_OPENROUTER_API_KEY, YOUR_SITE_URL, and YOUR_APP_NAME accordingly.
Step 4: Handle the OpenRouter Response for Perplexity AI API Models
The response structure from OpenRouter is generally identical to the OpenAI/Perplexity standard, including choices, message, content, and usage fields. The key difference is that the costs are calculated based on OpenRouter's pricing for the specific Perplexity model you used.
Benefits of using OpenRouter:
- Access Perplexity models without needing a direct Perplexity Pro subscription.
- Consolidated billing for multiple LLMs from different providers.
- Single API key and endpoint for various models.
Considerations:
- Pricing might differ from Perplexity's direct API costs.
- Potential for slightly higher latency due to the extra hop.
- Reliant on OpenRouter's platform availability and their integration with Perplexity.
Conclusion
This tutorial provides a detailed guide to accessing the powerful models behind Perplexity AI through various API methods. Remember to always consult the official documentation for Perplexity, OpenRouter for the most current model names, endpoints, pricing, and features. Secure your API keys and choose the access method that best suits your project requirements and budget.


